


 本文介绍了如何在小程序中实现深度链接,以连接到本机应用程序。内容来源于对原Medium文章的翻译,探讨了在React Native小程序中设置深度链接的方法,以提升用户体验。
小程序中 深度链接
In this post, I’ll quickly walk through how to add deep linking to a React Native app for both iOS and Android using React Navigation.
在本文中,我将快速讲解如何使用React Navigation为iOS和Android添加到React Native应用程序的深层链接。
Deep Linking is a technique in which a given URL or resource is used to open a specific page or screen on mobile. So, instead of just launching the app on mobile, a deep link can lead a user to a specific page within the app, providing a better experience. This specific page or screen may reside under a series of hierarchical pages, hence the term “deep” in deep linking.
深度链接是一种技术,其中给定的URL或资源用于在移动设备上打开特定的页面或屏幕。 因此,深层链接不仅可以在移动设备上启动应用程序,还可以将用户引导至应用程序内的特定页面,从而提供更好的体验。 该特定页面或屏幕可能位于一系列分层页面下,因此在深度链接中使用术语“深度”。
There are many cases where providing a url to transition a user to a specific point in your app on load makes a lot of sense.
在许多情况下,提供网址以将用户转移到负载中应用程序中的特定点很有意义。
For example, say you have a person’s profile, and you want to provide a link somewhere on the web or in another app, so that when the user clicks on a link, we not only open the app but also navigate to the exact point in the app that we want to go.
例如,假设您拥有一个人的个人资料,并且想要在Web上或其他应用程序中的某个位置提供链接,以便当用户单击链接时,我们不仅打开应用程序,还导航到其中的确切位置。我们想要去的应用程序。
This is what deep linking is, and this is what we will be walking through in this post.
这就是深层链接,这就是我们将在本文中介绍的内容。
Linking will provide for us an API that will allow us to listen for an incoming linked url, and then we can handle the url like
链接将为我们提供一个API,该API将使我们能够侦听传入的链接URL,然后我们可以像
componentDidMount() {
Linking.addEventListener('url', this.handleOpenURL);
}componentWillUnmount() {
  Linking.removeEventListener('url', this.handleOpenURL);
}handleOpenURL(event) {
  console.log(event.url);
  const route = e.url.replace(/.*?:\/\//g, '');
  // do something with the url, in our case navigate(route)
}
When a user in an external app or website clicks on one of our links, we will open in our new app and navigate to the intended url:
当外部应用程序或网站中的用户单击我们的链接之一时,我们将在新应用程序中打开并导航至所需的URL:
peopleapp://people/0
peopleapp://people/1
peopleapp://people/2
..etc
That will navigate to the people route, and then show a person based on the id.
这将导航到人员路线,然后根据id显示人员。
Let’s get started by creating a new React Native app and adding react-navigation
让我们开始创建一个新的React Native应用并添加react-navigation
react-native init PeopleAppOnce installed, cd into the new directory and install react-navigation using npm or yarn
安装完成后,cd进入新目录并使用npm或yarn安装react-navigation
npm i -s react-navigationor
要么
yarn add react-navigationNow that we have our app and some navigation, let’s create a router and two views: a home view and the people view.
现在我们有了我们的应用程序和一些导航,让我们创建一个路由器和两个视图:主视图和人员视图。
router.js
home.js
people.js
Now, let’s go into index.ios.js / index.android.js and import the router will will create next.
现在,让我们进入index.ios.js / index.android.js并导入将在下一步创建的路由器。
// index.ios.js or index.android.jsimport { AppRegistry } from 'react-native';import Router from './router';
AppRegistry.registerComponent('PeopleApp', () => Router);
Now, we’ll go ahead and create the router. In router.js
现在,我们将继续创建路由器。 在router.js
// router.jsimport React from 'react';
import {
  AppRegistry,
  Text,
} from 'react-native';import { StackNavigator } from 'react-navigation';import Home from './home';import People from './people';const Router = StackNavigator({
  Home: { screen: Home },
  People: { screen: People },
});export default Router;
Then, we’ll create the Home component. In home.js
然后,我们将创建Home组件。 在home.js
import React from 'react';
import { Platform, Text, Linking } from 'react-native';class Home extends React.Component {
  static navigationOptions = { // A
    title: 'Home',
  };componentDidMount() { // B
  if (Platform.OS === 'android') {
    Linking.getInitialURL().then(url => {
      this.navigate(url);
    });
  } else {
      Linking.addEventListener('url', this.handleOpenURL);
    }
  }
componentWillUnmount() { // C
    Linking.removeEventListener('url', this.handleOpenURL);
  }  handleOpenURL = (event) => { // Dthis.navigate(event.url);
  } navigate = (url) => { // E
    const { navigate } = this.props.navigation;
    const route = url.replace(/.*?:\/\//g, '');
    const id = route.match(/\/([^\/]+)\/?$/)[1];
    const routeName = route.split('/')[0];
    if (routeName === 'people') {
      navigate('People', { id, name: 'chris' })
    };
  }  render() {
    return <Text>Hello from Home!</Text>;
  }}export default Home;
A. We declare a title using static navigationOptions for react-navigation to show a title when we are on this route.
答:我们使用static navigationOptions声明标题以进行React导航,以显示我们在此路线上的标题。
B. If we are on Android, we immediately call the navigate method passing in the url. If we are on iOS, We add an event listener to call handleOpenUrl when an incoming link is detected.
B.如果我们使用的是Android ,则立即调用url传递的navigate方法。 如果我们在iOS上, handleOpenUrl当检测到传入链接时,我们将添加一个事件侦听器以调用handleOpenUrl 。
C. We delete the Linking listener on componentWillUnmount
C.我们删除componentWillUnmount上的链接侦听器
D. When handleOpenURL is called, we pass the event url to the navigate method.
D.当handleOpenURL被调用时,我们通过活动网址的navigate方法。
E. We first parse the url to get the id and route name. We then check to see if the route name is equal to people, and if so we navigate to the People component, passing the id as a prop.
E.我们首先解析网址以获取ID和路由名称。 然后,我们检查路线名称是否等于people ,如果是,则导航至People组件,并传递id作为道具。
Now we can go to people.js and create the component there that will be showing a person based on a route id. In people.js
现在,我们可以转到people.js并在其中创建组件,该组件将基于路线ID显示人员。 在people.js
import React from 'react';
import { Text, Image, View, StyleSheet } from 'react-native';const people = { // A  0: {
    name: 'Leela',
    image: 'http://vignette1.wikia.nocookie.net/en.futurama/images/d/d4/Turanga_Leela.png/revision/latest?cb=20150218013044',
  },  1: {
    name: 'Bender',
    image: 'https://vignette2.wikia.nocookie.net/en.futurama/images/4/43/Bender.png/revision/latest?cb=20150206072725',
  },  2: {
    name: 'Amy',
    image: 'https://i.ytimg.com/vi/4sCtTq7K3yI/hqdefault.jpg',
  },  3: {
    name: 'Fry',
    image: 'http://www.supergrove.com/wp-content/uploads/2017/03/fry-futurama-22-which-robot-from-quotfuturamaquot-are-you.jpg',
  }
}class People extends React.Component {
  static navigationOptions = {
    title: 'People',
  };  render() {
    const { id } = this.props.navigation.state.params; // B    if (!people[id])
       return
      <Text>Sorry, no data exists for this user</Text>return ( // C
      <View>
        <Text style={styles.text}>{people[id].name}</Text>
        <Image
          resizeMode="contain"
          style={styles.image}
          source={{ uri: people[id].image }}
        />
      </View>
    )
  }
}const styles = StyleSheet.create({
  text: {
    margin: 19,
    fontSize: 22,
  },
  image: {
    width: 400,
    height: 400,
  },
});export default People;
A. We create a hardcoded object with some information about a few people, including only their name and image with a corresponding id key.
答:我们创建一个硬编码对象,其中包含有关少数人的一些信息,其中仅包括他们的姓名和带有相应ID密钥的图像。
B. We destructure the id prop that we will be receiving. If no user exists for this id, we display a message.
B.我们破坏了我们将要收到的id道具。 如果没有用户使用此ID,我们将显示一条消息。
C. We use the id to reference the correct person, displaying their image and name.
C.我们使用id来引用正确的人,并显示其图像和姓名。
Ok, now that we have all of our basic code set up, we now need to configure both iOS and Android to enable deep linking.
好的,既然我们已经设置了所有基本代码,我们现在需要同时配置iOS和Android以启用深度链接。
配置iOS (Configuring iOS)
步骤1.将URL类型添加到info.plist (Step 1. Add URL type to info.plist)
Open
info.plistand at the top of the file, create a new property calledURL types打开
info.plist然后在文件顶部创建一个名为URL types的新属性。
2. Expand item 0 (zero) and choose URL Schemes.
2.展开项目0 (零),然后选择URL方案。
3. Give item 0 the name you would like your app to be linkable as. In our case, I chose peopleapp as the name.
3.为项目0您希望您的应用程序可链接为的名称。 在我们的情况下,我选择peopleapp作为名称。

----> peopleapp will be what we use to identify the app. Once this identifier is set up, we will be able to reference it outside of the application in web browsers and other apps, like so: peopleapp://someurl/someotherinfo/… <-----
----> peopleapp 将成为我们用来识别应用程序的工具。 设置此标识符后,我们将能够在Web浏览器和其他应用程序的应用程序外部引用它,例如 peopleapp://someurl/someotherinfo/… <-----
步骤2.将以下代码添加到AppDelegate.m (Step 2. Add the following code to AppDelegate.m)
Below last existing import add this import:
在最后一个现有导入下面,添加此导入:
#import <React/RCTLinkingManager.h>Directly below @implementation AppDelegate add this code:
在@implementation AppDelegate的正下方添加此代码:
- (BOOL)application:(UIApplication *)app openURL:(NSURL *)url options:(NSDictionary<UIApplicationOpenURLOptionsKey,id> *)options { return [RCTLinkingManager application:app openURL:url options:options]; }Now your final AppDelegate.m should look something like this linked Github gist.
现在,您的最终AppDelegate.m看起来应该像这样挂Github的依据。
Now we should be able to open up safari or chrome and pass in the following url:
现在,我们应该可以打开safari或chrome并传递以下网址:
peopleapp://people/0And the app should redirect on load to the correct route, showing the correct person’s info!
并且应用程序应在加载时重定向到正确的路线,并显示正确的人的信息!

配置Android (Configuring Android)
First, we need to open our Manifest file and add the app name we will want to be referencing, in our case peopleapp.
首先,我们需要打开Manifest文件并添加我们要引用的应用程序名称,在本例中为peopleapp 。
In android/app/src/main, open AndroidManifest.xml and add the following intent filter below the last intent filter already listed, within the <activity> tag:
在android/app/src/main ,打开AndroidManifest.xml并在<activity>标签内已列出的最后一个意图过滤器下面添加以下意图过滤器:
<intent-filter android:label="filter_react_native">
  <action android:name="android.intent.action.VIEW" />
  <category android:name="android.intent.category.DEFAULT" />
  <category android:name="android.intent.category.BROWSABLE" />
  <data android:scheme="peopleapp" android:host="people" /> // A
</intent-filter>
Here is an idea of how your AndroidManifext.xml should now look.
这是关于您的AndroidManifext.xml现在应如何显示的想法。
The <data> tag specifies the URL scheme which resolves to the activity in which the intent filter has been added. In this example the intent filter accepts URIs that begin with
peopleapp://people. To learn more about this configuration, check out this documentation.<data>标记指定URL方案,该方案解析为已添加了意图过滤器的活动。 在此示例中,意图过滤器接受以
peopleapp://people开头的URI 。 要了解有关此配置的更多信息,请查阅 此 文档。
That is all we need as far as configuration goes. To test this out, open Android Studio. Open Run -> Edit Configurations and change the launch options to URL, passing in the following url: peopleapp://people/1
就配置而言,这就是我们所需要的。 要对此进行测试,请打开Android Studio。 打开运行->编辑配置,然后将启动选项更改为URL ,并传递以下URL: peopleapp://people/1
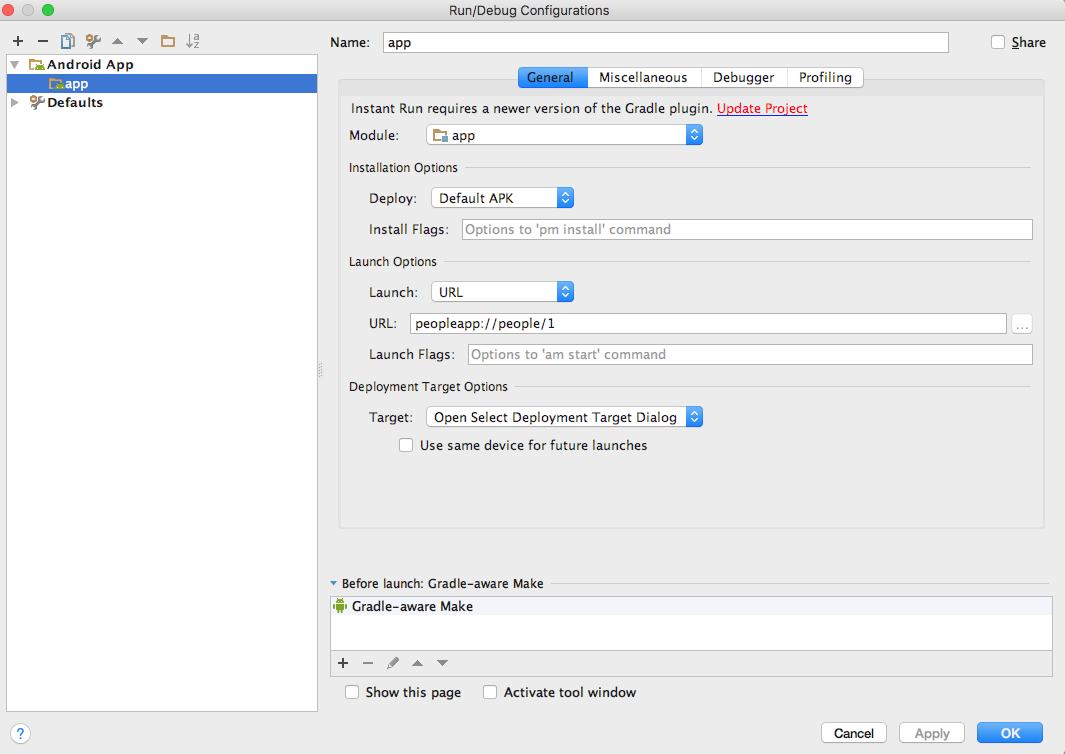
Now when we run the app, we should see Bender!
现在,当我们运行该应用程序时,我们应该看到Bender!
The final code for this example can be found here.
此示例的最终代码可以在此处找到。
翻译自: https://medium.com/@gilshaan/deep-linking-your-react-native-app-995c8e0f43d6
小程序中 深度链接


 1万+
1万+

 被折叠的 条评论
为什么被折叠?
被折叠的 条评论
为什么被折叠?
 到【灌水乐园】发言


