


欢迎 (Welcome)
In Part 1 of this series, we created a list in Android using some static movies data. But what if we want to populate a list using some web service like some news articles. Welcome to Part 2 of ‘Create a List in Android using RecyclerView’ series.
在本系列的第1部分中,我们使用一些静态电影数据在Android中创建了一个列表。 但是,如果我们想使用某些新闻之类的Web服务填充列表,该怎么办? 欢迎来到“使用RecyclerView在Android中创建列表”系列的第2部分。
In this article we will be creating a list in Android using RecyclerView, Retrofit and a Web Service. We have already discussed about RecyclerView in Part 1.
在本文中,我们将使用RecyclerView , Retrofit和Web Service在Android中创建列表。 我们已经在第1部分中讨论了RecyclerView。
According to Wikipedia, Web service is either a service offered by an electronic device to another electronic device or a server running on a computer device, listening for requests at a particular port over a network. In our case it is a server of NewsAPI. So basically we are going to use NewsAPI as our Web Service in this article.
根据Wikipedia所述 ,Web服务是由电子设备提供给另一电子设备的服务,或者是在计算机设备上运行的服务器的服务,它们通过网络在特定端口上侦听请求。 在我们的例子中,它是NewsAPI的服务器。 因此,基本上,我们将在本文中将NewsAPI用作我们的Web服务。
Retrofit is an REST client library for Java and Android which is used to create HTTP request and process HTTP response from a REST API (Web Service). It was developed by Square Inc. In this article we are going to request and receive JSON data from NewsAPI but do note that Retrofit can also be used to request and receive other type of data like SimpleXML and Jackson.
Retrofit是用于Java和Android的REST客户端库,用于创建HTTP请求和处理来自REST API(Web服务)的HTTP响应。 它是由Square Inc开发的。在本文中,我们将请求和接收NewsAPI的JSON数据,但请注意,Retrofit还可以用于请求和接收其他类型的数据,例如SimpleXML和Jackson。
Although, there are other HTTP Clients too, but Retrofit is the most popular among them. I have used Volley by Google and AsyncTask class from Android library to request APIs, but switched to Retrofit due to its seamless request and response experience. It focuses on the abstraction of HTTP request/response. Let’s jump right in.
尽管也有其他HTTP客户端,但是Retrofit是其中最流行的。 我曾使用Google Volley和Android库中的AsyncTask类来请求API,但由于其无缝的请求和响应体验,因此切换到Retrofit。 它着重于HTTP请求/响应的抽象。 让我们跳进去。
依存关系 (Dependencies)
Retrofit is not a part of Android legacy library, so we need to add a dependency for it too, just like we did for RecyclerView.
改造不是Android旧版库的一部分,因此我们也需要为其添加依赖项,就像对RecyclerView所做的那样。
implementation 'com.squareup.retrofit2:retrofit:2.1.0'
implementation 'com.squareup.retrofit2:converter-gson:2.1.0'
implementation 'com.squareup.okhttp3:logging-interceptor:3.4.1'implementation 'androidx.recyclerview:recyclerview:1.1.0'
You may notice that here only one dependency belongs to retrofit. So, what are the others?
您可能会注意到,这里只有一个依赖项属于改造。 那么,还有哪些呢?
Retrofit GSON is a converter library which uses Google GSON for serialization of strings to and from JSON type objects. Google GSON is itself a serialization/de-serialization library but Retrofit has overriden it to make it work with its network requests.
Retrofit GSON是一个转换器库,该库使用Google GSON在JSON类型对象之间进行字符串序列化。 Google GSON本身是一个序列化/反序列化库,但是Retrofit对其进行了覆盖,以使其能够处理其网络请求。
OkHTTP Logging Interceptor (sounds heavy), is a HTTP request logger. By this, I mean when we face trouble with request or response in Retrofit, this library comes handy. It logs all the information about every request/response you make using Retrofit, to Android Studio Logcat.
OkHTTP Logging Interceptor (听起来很沉重),是一个HTTP请求记录器。 借此,我的意思是当我们在Retrofit中遇到请求或响应的麻烦时,此库会派上用场。 它将与您使用Retrofit进行的每个请求/响应有关的所有信息记录到Android Studio Logcat。
After adding these dependencies, the dependency section of your app-level build.gradle should look like this:
添加这些依赖项之后,应用程序级build.gradle的依赖项部分应如下所示:
dependencies {
    implementation fileTree(dir: 'libs', include: ['*.jar'])    // AndroidX Support
    implementation 'androidx.appcompat:appcompat:1.1.0'
    implementation 'androidx.constraintlayout:constraintlayout:1.1.3'    // RecyclerView
    implementation 'androidx.recyclerview:recyclerview:1.1.0'    // Retrofit
    implementation 'com.squareup.retrofit2:retrofit:2.1.0'    // Retrofit Gson Converter
    implementation 'com.squareup.retrofit2:converter-gson:2.1.0'    // HttpLoggingInterceptor
    implementation 'com.squareup.okhttp3:logging-interceptor:3.4.1'    testImplementation 'junit:junit:4.12'
    androidTestImplementation 'androidx.test.ext:junit:1.1.1'
    androidTestImplementation 'androidx.test.espresso:espresso-core:3.2.0'
}
After synchronizing, you are ready to rock!
同步后,您就可以摇滚了!
We will try to work a little professionally here from now on. First of all, we will put our Java classes in contextual packages. We will be using Java
interfacefor some tasks in this article. And we will be using some industry level code conventions in this and upcoming articles. Feel free to ask questions about anything that strikes odd to you. I ensure you that using these code conventions will improve your code quality and workflow. Try to catch-up.从现在开始,我们将尝试在这里进行一些专业的工作。 首先,我们将Java类放入上下文包中。 在本文中,我们将使用Java
interface执行某些任务。 我们将在本文和后续文章中使用一些行业级别的代码约定。 随意问一些对您来说很奇怪的问题。 我确保您使用这些代码约定将改善您的代码质量和工作流程。 尝试追赶。
允许航行该船! (Permission to sail the ship!)
So, far we haven’t done anything that requires us to make changes in THE ANDROIDMANIFEST.XML. For now just know that whenever we have to access the resources of an Android device, we have to tell the OS that ‘we are going to need these resources in our application’. And how do we do that? By writing something in a file called AndroidManifest.xml. It defines the structure, metadata, components and requirements of our application.
因此,到目前为止,我们还没有做任何事情需要我们对ANDROIDMANIFEST.XML进行更改。 到目前为止,只要知道我们必须访问Android设备的资源,就必须告诉操作系统“我们将在我们的应用程序中需要这些资源”。 我们该怎么做? 通过在名为AndroidManifest.xml的文件中写入内容。 它定义了我们应用程序的结构,元数据,组件和要求。
So open AndroidManifest.xml and add internet permission line in it.
因此,打开AndroidManifest.xml并在其中添加互联网权限行。
<?xml version="1.0" encoding="utf-8"?>
<manifest xmlns:android="http://schemas.android.com/apk/res/android" package="com.prezrohit.recyclerviewexample">    <uses-permission android:name="android.permission.INTERNET" />    <application
        android:allowBackup="true"
        ...
        ...
简要了解Web服务 (A brief look at the Web Service)
As I said earlier that we will be using a Web Service in this article, so at this point you need to visit https://newsapi.org/ and set a free account.
如前所述,我们将在本文中使用Web服务,因此,此时您需要访问https://newsapi.org/并设置一个免费帐户。

After successfully setting up your account, go back to home.
成功设置帐户后,请返回首页。
Go to ‘Documentation’ in the title bar and there you will be able to see the different API endpoints you can hit using the API key provided. Try copying a link and pasting it in your browser (I’ll recommend Firefox Developer Edition for this). You’ll see something like this:
转到标题栏中的“文档”,您将能够看到使用提供的API密钥可以访问的不同API端点。 尝试复制链接并将其粘贴到浏览器中(我将为此推荐Firefox Developer Edition)。 您会看到以下内容:
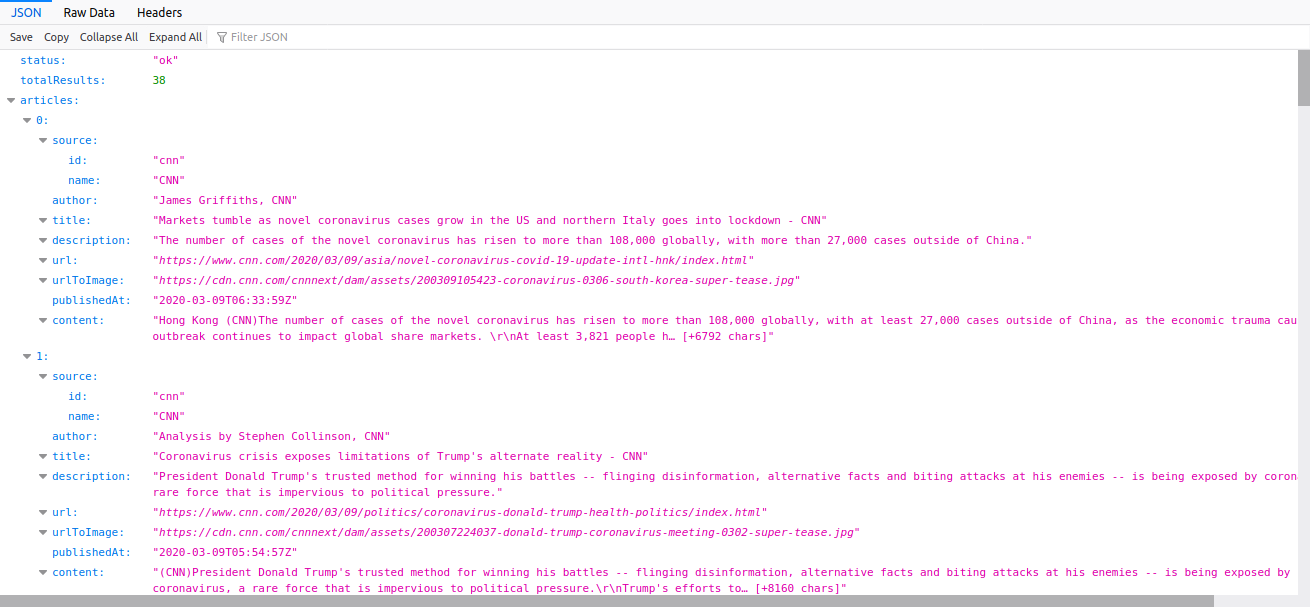
So, basically what we do is populate this raw data in some fancy looking Android layout. And this is just sufficient data to show Top Headlines from NewsAPI.
因此,基本上,我们要做的是将这些原始数据填充到看起来很漂亮的Android布局中。 这些数据足以显示NewsAPI的头条新闻。
Now, let’s set up our API Client which will be used here to load this data. Create a Java class named WebServiceClient.java and copy the following code in it:
现在,让我们设置API客户端,该客户端将在此处用于加载此数据。 创建一个名为WebServiceClient.java的Java类,并在其中复制以下代码:
import okhttp3.OkHttpClient;
import okhttp3.logging.HttpLoggingInterceptor;
import retrofit2.Retrofit;
import retrofit2.converter.gson.GsonConverterFactory;
public class WebServiceClient {
   static Retrofit getClient() {
      OkHttpClient client = new OkHttpClient.Builder().addInterceptor(new HttpLoggingInterceptor()
                  .setLevel(HttpLoggingInterceptor.Level.BODY)).build();
      return new Retrofit.Builder()
            .baseUrl("http://newsapi.org/v2/")
            .addConverterFactory(GsonConverterFactory.create())
            .client(client)
            .build();
   }
}
Here, we have created a static method getClient(), which returns a Retrofit object by creating it using base URL, GsonConverterFactory, OkHTTPClient and OkHTTPLoggingInterceptor.
在这里,我们创建了一个静态方法getClient() ,该方法通过使用基本URL, GsonConverterFactory , OkHTTPClient和OkHTTPLoggingInterceptor创建来返回Retrofit对象。
Now to capture response data, we need to create some DTOs (Data Transfer Objects which are just Java classes used to carry data from and to client and server). If you take a look at the Top Headlines response, you will notice that it contains three fields at the root level namely — status (a String), totalResults (an Integer but we can declare it as String since we are using GsonConverterFactory and it will do the conversion for us implicitly), articles (an Array of Article type). Further we see that Source field inside Article class is having some fields inside it too. So, we conclude that here we are going to use bottom-up approach. Let’s code it down.
现在要捕获响应数据,我们需要创建一些DTO(数据传输对象,这是用于将数据往返于客户端和服务器的Java类)。 如果查看“ Top Headlines”响应,您会注意到它在根级别包含三个字段,即— status (一个String ), totalResults (一个Integer但是由于我们使用的是GsonConverterFactory ,因此我们可以将其声明为String ,并且它将为我们进行隐式转换),文章( Article类型的Array )。 此外,我们看到Article类中的Source字段中也包含一些字段。 因此,我们得出结论,这里我们将使用自下而上的方法。 让我们写下来。
Source.java
Source.java
import com.google.gson.annotations.SerializedName;
public class Source {
   @SerializedName("id")
   private String id;
   @SerializedName("name")
   private String name;
   public String getId() {
      return id;
   }
   public String getName() {
      return name;
   }}
Article.java
Article.java
import com.google.gson.annotations.SerializedName;
public class Article {
   @SerializedName("source")
   private Source source;
   @SerializedName("author")
   private String author;
   @SerializedName("title")
   private String title;
   @SerializedName("description")
   private String description;
   @SerializedName("url")
   private String url;
   @SerializedName("urlToImage")
   private String urlToImage;
   @SerializedName("publishedAt")
   private String publishedAt;
   @SerializedName("content")
   private String content;
   public Source getSource() {
      return source;
   }
   public String getAuthor() {
      return author;
   }
   public String getTitle() {
      return title;
   }
   public String getDescription() {
      return description;
   }
   public String getUrl() {
      return url;
   }
   public String getUrlToImage() {
      return urlToImage;
   }
   public String getPublishedAt() {
      return publishedAt;
   }
   public String getContent() {
      return content;
   }
}
TopHeadlines.java
TopHeadlines.java
import com.google.gson.annotations.SerializedName;
import java.util.List;
public class TopHeadline {
   @SerializedName("status")
   private String status;
   @SerializedName("totalResults")
   private String totalResults;
   @SerializedName("articles")
   private List<Article> articleList;
   public String getStatus() {
      return status;
   }
   public String getTotalResults() {
      return totalResults;
   }
   public List<Article> getArticleList() {
      return articleList;
   }
}
Two things to notice here, first being @SerializedName() — it is used to pass a name to the converter factory to help in the serialization and de-serialization of JSON data into Java objects Meaning that after writing @SerializedName("status") the value of status key will be stored in the status field of TopHeadlines class object.
这里需要注意两件事,首先是@SerializedName() -它用于将名称传递给转换器工厂,以帮助将JSON数据序列化和反序列化到Java对象中,这意味着在编写@SerializedName("status")状态键的值将存储在TopHeadlines类对象的状态字段中。
Second thing to notice is that we don’t need to declare setter methods in our response DTOs since we are never going to set their values — they are receiver objects after all.
注意的第二件事是,我们不需要在响应DTO中声明setter方法,因为我们永远不会设置它们的值-它们毕竟是接收器对象。
To simplify this DTO creation process, you can use some online tools to get the class definitions of required DTOs by passing your response there. One such tool is jsonschema2pojo. Just copy the API response and paste into the placeholder at this website and click on preview. Done!
为了简化此DTO的创建过程,您可以使用一些在线工具,通过在其中传递您的响应来获取所需DTO的类定义。 jsonschema2pojo是这样一种工具。 只需复制API响应并粘贴到此网站上的占位符,然后单击预览即可。 做完了!
Now we are ready to define a web service interface named WebService.java. It contains API endpoint calling methods and determine what type of data we need to read from a certain endpoint.
现在,我们准备定义一个名为WebService.java的Web服务接口。 它包含API端点调用方法,并确定我们需要从特定端点读取什么类型的数据。
WebService.java
WebService.java
import com.cradle.recyclerviewexample.dto.TopHeadline;
import retrofit2.Call;
import retrofit2.http.GET;
import retrofit2.http.Query;
interface WebService {
   @GET("top-headlines")
   Call<TopHeadline> getTopHeadlines(@Query("country") String country, @Query("apiKey") String apiKey);
}
‘top-headlines’ is a GET endpoint — hence the @GET annotation and it takes two query parameters namely — country and apiKey. So, when we will call this endpoint we need to pass these two parameters or the API won’t hit or throw some error. This is the power of Java interface.
“顶头条新闻”是一个GET终点-因此@GET注释,它即有两个查询参数- country和apiKey 。 因此,当我们调用此端点时,我们需要传递这两个参数,否则API将不会发生任何错误。 这就是Java接口的功能。
We need to create a row item layout for the list, just like we did in the previous article in this series. A row layout file defines how the items are going to look in our list.
我们需要为列表创建一个行项布局,就像本系列的上一篇文章中一样 。 行布局文件定义了项目在列表中的外观。
For that we are gonna another AndroidX Support Library called
CardViewwhich just makes the view look like a card like who might have seen in some Google Apps.为此,我们将使用另一个名为
CardViewAndroidX支持库,它仅使视图看起来像一张卡片,就像在某些Google Apps中可能看到的一样。
Now open your app level build.gradle and add the following line to the dependency section and sync gradle.
现在打开您的应用程序级别build.gradle并将以下行添加到依赖项部分并同步gradle。
implementation "androidx.cardview:cardview:1.0.0"Now create a layout file and name it row_news.xml and copy the following code into it.
现在创建一个布局文件并将其命名为row_news.xml并将以下代码复制到其中。
<?xml version="1.0" encoding="utf-8"?><androidx.cardview.widget.CardView xmlns:android="http://schemas.android.com/apk/res/android"
    xmlns:app="http://schemas.android.com/apk/res-auto"
    android:layout_width="match_parent"
    android:layout_height="wrap_content"
    android:layout_margin="8dp"
    android:elevation="8dp"
    android:padding="10dp"
    app:cardBackgroundColor="#E5E5E5"
    app:cardCornerRadius="12dp">
    <LinearLayout
        android:layout_width="match_parent"
        android:layout_height="wrap_content"
        android:orientation="horizontal">
        <androidx.cardview.widget.CardView
            android:layout_width="wrap_content"
            android:layout_height="wrap_content"
            android:layout_margin="5dp"
            android:elevation="0dp"
            app:cardCornerRadius="12dp"
            android:layout_gravity="center">
            <ImageView
                android:id="@+id/img_thumbnail"
                android:layout_width="80dp"
                android:layout_height="80dp"
                android:scaleType="centerCrop"
                android:src="@drawable/ic_thumbnail" />
        </androidx.cardview.widget.CardView>
        <LinearLayout
            android:layout_width="match_parent"
            android:layout_height="wrap_content"
            android:layout_gravity="center"
            android:orientation="vertical">
            <TextView
                android:id="@+id/txt_title"
                android:layout_width="wrap_content"
                android:layout_height="wrap_content"
                android:layout_marginStart="5dp"
                android:layout_marginEnd="10dp"
                android:ellipsize="end"
                android:maxLines="2"
                android:padding="5dp"
                android:text="This is a sample news title which has no intent"
                android:textSize="18sp"
                android:textStyle="bold" />
            <LinearLayout
                android:layout_width="match_parent"
                android:layout_height="wrap_content">
                <TextView
                    android:id="@+id/txt_source_name"
                    android:layout_width="wrap_content"
                    android:layout_height="wrap_content"
                    android:layout_marginStart="5dp"
                    android:layout_weight="2"
                    android:padding="5dp"
                    android:text="Washington Post"
                    android:maxLines="1"
                    android:ellipsize="end"
                    android:textSize="15sp" />
                <TextView
                    android:id="@+id/txt_date"
                    android:layout_width="wrap_content"
                    android:layout_height="wrap_content"
                    android:layout_marginEnd="10dp"
                    android:layout_weight="2"
                    android:padding="5dp"
                    android:text="9 Mar 2020"
                    android:maxLines="1"
                    android:ellipsize="end"
                    android:textAlignment="viewEnd"
                    android:textSize="15sp" />
            </LinearLayout>
        </LinearLayout>
    </LinearLayout>
</androidx.cardview.widget.CardView>
行布局之后会发生什么? (What comes after row layout?)
VIEWHOLDER. It’s a Java class that helps us to interact with the row layout inside the Adapter, ring any bell? Nevermind, you’ll get the hang of it after a while.
VIEWHOLDER。 这是一个Java类,可帮助我们与Adapter的行布局进行交互,敲响钟声? 没关系,过一会儿您就会掌握它。
Please note that in this case, we are going to need to load a thumbnail for our news story which is basically an image. It is recommended to use a third party library like Picasso or Glide to load image from a URL in Android. So we are going to use Glide here. Open build.gradle, again, and paste the following line into the dependency section and then sync gradle.
请注意,在这种情况下,我们将需要为我们的新闻报道加载缩略图,基本上是图像。 建议使用第三方库(例如Picasso或Glide从Android中的URL加载图像。 因此,我们将在这里使用Glide 。 再次打开build.gradle ,然后build.gradle粘贴到dependency部分,然后同步gradle。
implementation 'com.github.bumptech.glide:glide:4.11.0'Now, create a new java class and name it NewsViewHolder.java and write the following code in it.
现在,创建一个新的Java类并将其命名为NewsViewHolder.java,并在其中编写以下代码。
import android.content.Context;
import android.view.View;
import android.widget.ImageView;
import android.widget.TextView;
import androidx.annotation.NonNull;
import androidx.recyclerview.widget.RecyclerView;
import com.bumptech.glide.Glide;
import com.bumptech.glide.request.RequestOptions;
import com.cradle.recyclerviewexample.R;
public class NewsViewHolder extends RecyclerView.ViewHolder {
   private TextView txtTitle;
   private TextView txtSourceName;
   private TextView txtDate;
   private ImageView imgThumbnail;
   public NewsViewHolder(@NonNull View itemView) {
      super(itemView);
      txtTitle = itemView.findViewById(R.id.txt_title);
      txtSourceName = itemView.findViewById(R.id.txt_source_name);
      txtDate = itemView.findViewById(R.id.txt_date);
      imgThumbnail = itemView.findViewById(R.id.img_thumbnail);
   }
   public void setTitle(String title) {
      this.txtTitle.setText(title);
   }
   public void setSourceName(String sourceName) {
      this.txtSourceName.setText(sourceName);
   }
   public void setDate(String date) {
      this.txtDate.setText(date);
   }
   public void setThumbnail(Context context, String url) {
      Glide.with(context)
            .load(url)
            .centerCrop()
            .placeholder(R.drawable.ic_thumbnail)
            .apply(new RequestOptions().override(100, 100))
            .into(this.imgThumbnail);
   }
}
You might notice the way image is being loaded here by Glide. It first takes a context instance, a URL of course, then we chose to center crop the image into our view, then there’s a placeholder until the image isn’t loaded, then we tell Glide to fit the image into the resolution of 100*100 before loading it into our ImageView and finally we load the image into our thumbnail image view.
您可能会注意到Glide在此处加载图像的方式。 它首先需要一个上下文实例,当然是一个URL,然后我们选择将图像裁剪到视图中心,然后有一个占位符,直到图像未加载,然后告诉Glide将图像调整为100 *的分辨率。 100,然后将其加载到ImageView ,最后将图像加载到缩略图视图中。
但是,谁来控制ViewHolder? (But, who controls the ViewHolder?)
Remember something called Adapter? Yeah, cool. That’s where we are. Now create a Adapter class named NewsAdapter.java and copy the following code into it.
还记得适配器吗? 是的,很酷。 那就是我们的位置。 现在创建一个名为NewsAdapter.java的适配器类,并将以下代码复制到其中。
import android.content.Context;
import android.view.LayoutInflater;
import android.view.View;
import android.view.ViewGroup;
import androidx.annotation.NonNull;
import androidx.recyclerview.widget.RecyclerView;
import com.cradle.recyclerviewexample.R;
import com.cradle.recyclerviewexample.dto.Article;
import com.cradle.recyclerviewexample.dto.TopHeadline;
import com.cradle.recyclerviewexample.ui.NewsViewHolder;
import java.util.List;
public class NewsAdapter extends RecyclerView.Adapter<NewsViewHolder> {
   private Context context;
   private List<Article> articleList;
   public NewsAdapter(Context context, List<Article> articleList) {
      this.context = context;
      this.articleList = articleList;
   }
   @NonNull
   @Override
   public NewsViewHolder onCreateViewHolder(@NonNull ViewGroup parent, int viewType) {
      View view = LayoutInflater.from(context).inflate(R.layout.row_news, parent, false);
      return new NewsViewHolder(view);
   }
   @Override
   public void onBindViewHolder(@NonNull NewsViewHolder holder, int position) {
      Article article = articleList.get(position);
      holder.setSourceName(article.getSource().getName());
      holder.setTitle(article.getTitle());
      holder.setDate(article.getPublishedAt());
      holder.setThumbnail(context, article.getUrlToImage());
   }
   @Override
   public int getItemCount() {
      return articleList == null ? 0 : articleList.size();
   }
}
We are almost done and are at the controller level right now. Meaning, we can now move to step where we will be populating the list. But before that we need to have a list. Don’t we? Navigate to activity_main.xml and create a RecyclerViewand a ProgressBarelement there.
我们差不多完成了,并且现在处于控制器级别。 这意味着,我们现在可以移至将要填充列表的步骤。 但在此之前,我们需要有一个清单。 不是吗 导航到activity_main.xml并在其中创建RecyclerView和ProgressBar元素。
<?xml version="1.0" encoding="utf-8"?><RelativeLayout xmlns:android="http://schemas.android.com/apk/res/android"
    xmlns:tools="http://schemas.android.com/tools"
    android:layout_width="match_parent"
    android:layout_height="match_parent"
    tools:context=".activity.MainActivity">
    <androidx.recyclerview.widget.RecyclerView
        android:id="@+id/rv_movies"
        android:layout_height="match_parent"
        android:layout_width="match_parent"
        tools:listitem="@layout/row_news"
        />
    <ProgressBar
        android:id="@+id/progress_bar"
        android:layout_width="100dp"
        android:layout_height="100dp"
        android:layout_centerInParent="true"
        />
</RelativeLayout>
We created a ProgressBar element in our view because it makes the UX better to show a progress bar when we are loading data from a remote source and we want the user to wait.
我们在视图中创建了ProgressBar元素,因为当从远程源加载数据并且希望用户等待时,它使UX更好地显示进度条。
Now, where do we get our data from? Remember, we talked something about HTTP request. But, how do we do that? Navigate to MainActivity.java.
现在,我们从哪里获取数据? 记住,我们讨论了有关HTTP请求的内容。 但是,我们该怎么做呢? 导航到MainActivity.java 。
First of all we need to set up views and list objects in our Activity class.
首先,我们需要在Activity类中设置视图并列出对象。
public class MainActivity extends AppCompatActivity {
   private static final String TAG = "MainActivity";
   private RecyclerView rvNews;
   private ProgressBar progressBar;
   private List<Article> articleList;
   private NewsAdapter newsAdapter;
   ...
   ...
   ...
}private void init() {
   articleList = new ArrayList<>();
   rvNews = findViewById(R.id.rv_movies);
   progressBar = findViewById(R.id.progress_bar);
}private void setRecyclerView() {
   rvNews.setLayoutManager(new LinearLayoutManager(this));
   rvNews.setAdapter(newsAdapter);
}
setRecyclerView() method sets the adapter and layout manager to the recycler view. We will use this method once the data is loaded from the web service. Now over to the final step.
setRecyclerView()方法将适配器和布局管理器设置为回收站视图。 从Web服务加载数据后,我们将使用此方法。 现在到最后一步。
private void getNews() {
   WebService webService = WebServiceClient.getClient().create(WebService.class);
   Call<TopHeadline> call = webService.getTopHeadlines("in", Helper.API_KEY);
   call.enqueue(new Callback<TopHeadline>() {
      @Override
      public void onResponse(Call<TopHeadline> call, Response<TopHeadline> response) {
         progressBar.setVisibility(View.GONE);
         Log.d(TAG, "onResponse: " + response.code());
         assert response.body() != null : "Response Body Empty";
         articleList = response.body().getArticleList();
         newsAdapter = new NewsAdapter(MainActivity.this, articleList);
         setRecyclerView();
      }
      @Override
      public void onFailure(Call<TopHeadline> call, Throwable t) {
         progressBar.setVisibility(View.GONE);
         Log.d(TAG, "onFailure: " + t.getLocalizedMessage());
      }
   });
}
We created a static getClient() method in WebServiceClient class. Here, we use that function to get a Retrofit object which is further used to create an instance of WebService class — which basically performs the API requests. Then we call the target method getTopHeadlines() passing the two required paramaters and then finally enqueue the task to be performed by Retrofit.
我们在WebServiceClient类中创建了一个静态getClient()方法。 在这里,我们使用该函数获取Retrofit对象,该对象进一步用于创建WebService类的实例—该实例基本上执行API请求。 然后,我们调用传递两个必需参数的目标方法getTopHeadlines() ,然后最终使要由Retrofit执行的任务入队。
This creates two ways for the flow of the program — onResponse() and onFailure(). As the name suggests, when the request is successful and we get a response from the server, the flow goes to onResponse() callback method otherwise in case of an error in getting a response, onFailure() is called. It is totally up to us what task we want to perform inside these callback method. We can setup big list here or change the view to an error message in case of an error or just print a simple message in the Logcat. But for this case we just used the Article and TopHeadlines classes’ getter methods to populate a list for our beloved recycler view. Then finally setup the recycler view by calling the setRecyclerView() method.
这为程序的流创建了两种方式onResponse()和onFailure() 。 顾名思义,当请求成功并且我们从服务器获得响应时,流程将转到onResponse()回调方法,否则,如果获取响应时出错,则会调用onFailure() 。 我们完全要在这些回调方法中执行什么任务。 我们可以在此处设置大列表,或者在出现错误时将视图更改为错误消息,或者仅在Logcat中打印一条简单消息。 但是对于这种情况,我们只使用了Article和TopHeadlines类的getter方法来填充我们心爱的回收者视图的列表。 然后,最后通过调用setRecyclerView()方法来设置回收器视图。
In case of an error we simply the error message to the Logcat and we’re done. But remember, at a professional level there’s a lot more to it. You cannot just leave it like this. You have got to notify the user what error occured in some user friendly way — for instance, change the UI or show a dialogue.
如果发生错误,我们只需向Logcat发送错误消息就可以了。 但是请记住,在专业层面上还有很多事情要做。 您不能只是这样离开它。 您必须以某种用户友好的方式通知用户发生了什么错误,例如,更改UI或显示对话框。
So all of it being said and done. We are at the happy position to wrap this up. I hope this article helps you in ways. Stay connected to the upcoming article in this series. Till then, keep writing good code!
因此,所有这些都说完了。 我们很高兴将其总结。 希望本文对您有所帮助。 与本系列的下一篇文章保持联系。 到那时,继续编写好的代码!
翻译自: https://medium.com/swlh/create-a-list-in-android-using-recyclerview-part-2-773e30ff84a5


 651
651


 被折叠的 条评论
为什么被折叠?
被折叠的 条评论
为什么被折叠?
 到【灌水乐园】发言


