


Flutter is taking the world by storm, and this comes as no surprise. It offers unmatched performance and robust multi-platform support. In this article, I will walk you through integrating GraphQL into Flutter apps, making queries, and performing mutations.
Flutter席卷全球,这不足为奇。 它提供了无与伦比的性能和强大的多平台支持。 在本文中,我将引导您完成将GraphQL集成到Flutter应用程序,进行查询和执行变异的过程。
什么是GraphQL? (What Is GraphQL?)
GraphQL is a query language developed by Facebook. It is supposed to replace REST as a mean of API communication. I will assume some basic knowledge of GraphQL for the REST (pun intended) of the article.
GraphQL是Facebook开发的一种查询语言。 应该取代REST作为API通信的一种方式。 我将假设本文具有REST(双关语意)的GraphQL的一些基本知识。
服务器设置 (Server Setup)
Developing a GraphQL API is out of scope for this article. Instead, we will use a pre-made one. Head out to the repo and clone it. I have forked this server from @haikyuu — many thanks to you.
开发GraphQL API超出了本文的范围。 相反,我们将使用预制的。 前往仓库并克隆它。 我已经从@haikyuu分叉了这台服务器-非常感谢您。
Once you have it cloned, open it in Terminal and run:
克隆后,在终端中将其打开并运行:
npm i npm startThis will install all dependencies and start the server. This server is a basic to-do app back end that lets you create, query, and modify tasks. It’s built using json-graphql-server; be sure to check it out.
这将安装所有依赖项并启动服务器。 该服务器是基本的待办事项应用程序后端,可让您创建,查询和修改任务。 它是使用json-graphql-server ; 一定要检查出来。
项目设置 (Project Setup)
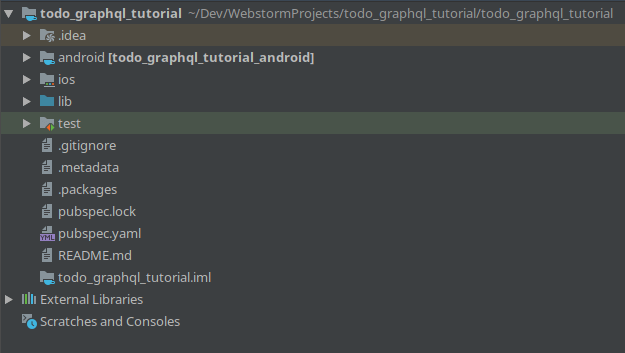
After we get the server up and running, let’s set up the Flutter project. After you have created the project, the directory structure should look like this:
在服务器启动并运行之后,让我们设置Flutter项目。 创建项目后,目录结构应如下所示:
If you try to run the app, this should happen in the emulator:
如果您尝试运行该应用程序,则应在模拟器中进行:
Congratulations, we are halfway there!
恭喜,我们已经到了一半!
添加GraphQL依赖项 (Add GraphQL Dependencies)
Before we start working with GraphQL in our Flutter app, we need to install some dependencies. Open the pubspec.yaml file and add this line in it (in the dependencies section:
在我们的Flutter应用中开始使用GraphQL之前,我们需要安装一些依赖项。 打开pubspec.yaml文件,并在其中添加以下行(在“ dependencies部分中:
graphql_flutter: ^3.0.0Now install the packages using this command:
现在使用以下命令安装软件包:
flutter pub getIn a few seconds, the dependencies should install.
几秒钟后,依赖项应已安装。
写一些查询 (Write Some Queries)
As you know, you talk to GraphQL APIs using queries. We are going to need three of them: a query to get a list of all tasks, a mutation to create new ones, and a mutation to complete an existing one. Create a file api.dart in /lib and put this code in it:
如您所知,您使用查询来与GraphQL API对话。 我们将需要其中三个:用于获取所有任务列表的查询,用于创建新任务的变异以及用于完成现有任务的变异。 在/lib创建文件api.dart并将以下代码放入其中:
import 'package:flutter/foundation.dart';
import 'package:graphql_flutter/graphql_flutter.dart';


ValueNotifier<GraphQLClient> client = ValueNotifier(
  GraphQLClient(
    cache: InMemoryCache(),
    link: HttpLink(uri: 'http://10.0.2.2:3000'),
  ),
);


final String getTasksQuery = """
query {
  allTodos {
    id,
    title,
    completed
  }
}
""";


final String createTaskMutation = """
mutation CreateTodo(\$id: ID!, \$title: String!) {
  createTodo(id: \$id, title: \$title, completed: false) {
    id
  }
}
""";


final String updateTaskMutation = """
mutation UpdateTodo(\$id: ID!, \$completed: Boolean!) {
  updateTodo(id: \$id, completed: \$completed) {
    id
  }
}
""";
Firstly, note the imports in lines 1–2. The first one is a core Flutter package that propagates updates down to components. The second one is the graphql_flutter package we installed earlier.
首先,请注意第1-2行中的导入。 第一个是Flutter核心软件包,可将更新向下传播到组件。 第二个是我们先前安装的graphql_flutter软件包。
On lines 4–9 we create a GraphQL client. It will be used to access our API. The link is using the address http://10.0.2.2:3000 because this is the IP of the host computer from inside of the emulator. If you are running the app on a physical device, you need to replace this address with the local IP address of your PC (or use something like ngrok).
在第4-9行,我们创建一个GraphQL client 。 它将用于访问我们的API。 该link使用的地址为http://10.0.2.2:3000因为这是仿真器内部的主机IP。 如果您在物理设备上运行该应用程序,则需要将此地址替换为PC的本地IP地址(或使用类似ngrok的地址 )。
Lastly, we have queries. The first one is pretty straightforward: Get all queries with fields id, title, and completed. createTaskMutation is a mutation to create tasks (obviously!) and it accepts two parameters: the id of the newly created task and its title. The back end we are using will not check for id uniqueness, due to its simplicity. The last query will update the completed field on a task with id.
最后,我们有疑问。 第一个非常简单:获取所有具有id , title和completed字段的查询。 createTaskMutation是创建任务的一种变体(很明显!),它接受两个参数:新创建的任务的id和其title 。 由于其简单性,我们正在使用的后端将不检查id唯一性。 最后一个查询将更新id为的任务的completed字段。
There were no changes to the UI yet, so the app should look the same.
用户界面尚未更改,因此该应用程序应外观相同。
设置用户界面 (Set Up the UI)
All we have left now is to bind it to the UI. I won’t explain the UI in depth, as you are expected to know the basics. Instead, I will focus on how it interacts with GraphQL. Firstly, replace all code in main.dart with this:
我们现在剩下的就是将其绑定到UI。 由于您应该了解基础知识,因此我不会深入解释UI。 相反,我将专注于它如何与GraphQL交互。 首先,用以下代码替换main.dart所有代码:
import 'package:flutter/material.dart';
import 'package:graphql_flutter/graphql_flutter.dart';
import 'package:todo_graphql_tutorial/api.dart';


void main() => runApp(TodoApp());


class TodoApp extends StatelessWidget {
  // This widget is the root of your application.
  @override
  Widget build(BuildContext context) {
    return GraphQLProvider(
        child: MaterialApp(
          title: 'TODO App With GraphQL',
          theme: ThemeData(
            primarySwatch: Colors.blue,
          ),
          home: ListPage(),
        ),
        client: client);
  }
}


class ListPage extends StatefulWidget {
  ListPage({Key key}) : super(key: key);


  @override
  _ListPageState createState() => _ListPageState();
}


class _ListPageState extends State<ListPage> {
  final newTaskController = TextEditingController();


  Future<String> onCreate(BuildContext context, id) async {
    return showDialog<String>(
      context: context,
      barrierDismissible: true,
      builder: (BuildContext context) {
        return Mutation(
            options: MutationOptions(
              documentNode: gql(createTaskMutation),
            ),
            builder: (RunMutation runMutation, QueryResult result) {
              return AlertDialog(
                title: Text('Enter a new task'),
                content: new Row(
                  children: <Widget>[
                    new Expanded(
                        child: new TextField(
                            autofocus: true,
                            decoration: new InputDecoration(
                                labelText: 'Task description',
                                hintText: 'Do stuff',
                                errorText: result.hasException
                                    ? result.exception.toString()
                                    : null),
                            controller: newTaskController))
                  ],
                ),
                actions: <Widget>[
                  FlatButton(
                    child: Text('Ok'),
                    onPressed: () {
                      runMutation({'title': newTaskController.text, 'id': id});
                      Navigator.of(context).pop();
                    },
                  ),
                ],
              );
            });
      },
    );
  }


  @override
  Widget build(BuildContext context) {
    return Query(
        options:
            QueryOptions(documentNode: gql(getTasksQuery), pollInterval: 1),
        builder: (QueryResult result,
            {VoidCallback refetch, FetchMore fetchMore}) {
          return Scaffold(
              appBar: AppBar(
                title: Text("TODO App With GraphQL"),
              ),
              body: Center(
                  child: result.hasException
                      ? Text(result.exception.toString())
                      : result.loading
                          ? CircularProgressIndicator()
                          : TaskList(list: result.data['allTodos'], onRefresh: refetch)),
              floatingActionButton: FloatingActionButton(
                onPressed: () => !result.hasException && !result.loading
                    ? this.onCreate(context, result.data['allTodos'].length)
                    : () {},
                tooltip: 'New Task',
                child: Icon(Icons.add),
              ));
        });
  }
}


class TaskList extends StatelessWidget {
  TaskList({@required this.list, @required this.onRefresh});


  final list;
  final onRefresh;


  @override
  Widget build(BuildContext context) {
    return Mutation(
      options: MutationOptions(documentNode: gql(updateTaskMutation)),
      builder: (RunMutation runMutation, QueryResult result) {
        return ListView.builder(
          itemCount: this.list.length,
          itemBuilder: (context, index) {
            final task = this.list[index];
            return CheckboxListTile(
                title: Text(task['title']),
                value: task['completed'],
                onChanged: (_) {
                  runMutation({'id': index + 1, 'completed': !task['completed']});
                  onRefresh();
                });
          },
        );
      },
    );
  }
}
The first thing you should notice is the GraphQLProvider on line 11. By wrapping the whole application in it, we provide the rest of the widgets with the GraphQL client. This means we can run queries and mutations from anywhere in the app.
您应该注意到的第一件事是第11行上的GraphQLProvider 。通过将整个应用程序包装在其中,我们为其他小部件提供了GraphQL客户端。 这意味着我们可以从应用程序中的任何位置运行查询和变异。
Now, examine the build function of the _ListPageState class in line 75. Here, we are using the Query widget to run the query and pass the results to its children. Query accepts an options argument of type QueryOptions, which sets up the query. The gql(getTasksQuery) will parse the query, and pollInterval: 1 means that this query will refresh every second (this is highly inefficient, but will do for now).
现在,在第75行中检查_ListPageState类的build函数。在这里,我们使用Query小部件来运行查询并将结果传递给它的子级。 Query接受QueryOptions类型的options参数,以设置查询。 gql(getTasksQuery)将解析查询,并且pollInterval: 1表示此查询将每秒刷新一次(效率极低,但现在会执行)。
Query will pass the QueryResult and the refetch and fetchMore functions to its builder callback. QueryResult has fields loading and hasException, which we use to determine what to render (lines 85-90). refetch will re-run the query if we call it, and we do, each time the user toggles a task (also highly inefficient). fetchMore is used when implementing pagination, but we will leave it for now.
Query将通过QueryResult和refetch和fetchMore功能,它的builder回调。 QueryResult具有loading字段和hasException ,我们使用它们来确定要呈现的内容(第85-90行)。 如果我们每次调用refetch都会重新运行查询,并且每次用户切换任务时也会这样做(效率非常低)。 在实现分页时使用了fetchMore ,但我们现在将其保留。
Now, look at the TaskList widget, specifically, its build function. It is wrapped with the Mutation class, which works pretty much like Query. The main difference is that Mutation does not automatically execute the mutation. It will pass RunMutation to its builder function that must be called to execute the mutation. You can see it in action on line 121. It accepts a map with arguments for the mutation ( id and completed, in this case). We then call onRefresh to re-run the query and get updated data.
现在,查看TaskList小部件,特别是其build功能。 它包装了Mutation类,其工作原理与Query非常相似。 主要区别在于, Mutation不会自动执行变异。 它将RunMutation传递给其生成builder函数,必须调用该生成builder函数才能执行该突变。 您可以在第121行上看到它的运行情况。它接受带有突变参数(在此例中为id和completed )的映射。 然后,我们调用onRefresh重新运行查询并获取更新的数据。
Lastly, the function onCreate on line 33 is responsible for showing a dialog to ask for the task title and for creating the task itself. The AlertDialog is wrapped in the now familiar Mutation, and line 63 calls the mutation itself. Now we are passing id and title; completed is false by default.
最后,第33行的onCreate函数负责显示一个对话框,询问任务标题并创建任务本身。 AlertDialog包装在现在熟悉的Mutation ,第63行调用了突变本身。 现在我们传递id和title ; 默认情况下, completed为false 。
This is how the app should look:
这是应用程序的外观:
If you got lost at any point, consult the Github repo.
如果您在任何时候迷路,请查阅Github仓库 。
结束语 (Closing notes)
Thank you for reading, I hope now you know how to use GraphQL in Flutter. In my coming articles, I will go into performance optimizations and real-time updating. Stay tuned!
感谢您的阅读,我希望您现在知道如何在Flutter中使用GraphQL。 在接下来的文章中,我将介绍性能优化和实时更新。 敬请关注!
资源资源 (Resources)
翻译自: https://medium.com/better-programming/how-to-use-graphql-in-flutter-7decd04a511f


 被折叠的 条评论
为什么被折叠?
被折叠的 条评论
为什么被折叠?
 到【灌水乐园】发言


