


mvp遇到的坑已经解决方法
In this article I am going to describe a modern approach to using the MVP pattern in an Android application. If you are familiar with MVP then still there might be some things here that might be useful.
在本文中,我将描述一种在Android应用程序中使用MVP模式的现代方法。 如果您熟悉MVP,那么这里可能仍然会有一些有用的东西。
A long time ago in a galaxy far away… We used the MVP pattern and it was a great way of separating UI interaction logic (or Presentation logic) though ever since ViewModel was introduced with the architecture components, for some, MVP became history with the MVVM pattern taking its place.
很久以前,在一个遥远的星系中……我们使用MVP模式,这是分离UI交互逻辑(或Presentation逻辑)的好方法,尽管自从将ViewModel与架构组件一起引入以来,对于某些人来说,MVP成为了历史MVVM模式取代了它。
关于ViewModels (About ViewModels)
The introduction of ViewModel was pretty much a game changer in the Android developer world. Finally a decent way to represent state for an activity that could survive orientation changes, conceptually locking it into either a Fragment or Activities lifespan.
ViewModel的引入几乎改变了Android开发人员的世界。 最后,这是一种代表状态的体面方式,该状态可以在方向变化中幸免于难,在概念上将其锁定为“片段”或“活动”寿命。
You may think by using a ViewModel you are doing MVVM however this is an incorrect assumption. If we take a look at the documentation for ViewModel we find
您可能会认为通过使用ViewModel您正在执行MVVM,但这是一个错误的假设。 如果我们看一下ViewModel的文档,我们会发现
The ViewModel class is designed to store and manage UI-related data in a lifecycle conscious way. The ViewModel class allows data to survive configuration changes such as screen rotations.Instead of seeing ViewModel as a component within the MVVM pattern, it might be best to see it exactly as a useful data storage mechanism for a screen.
与其将ViewModel视为MVVM模式中的一个组件,不如将它确切地视为一种有用的屏幕数据存储机制。
MVP的现代方法 (A modern approach to MVP)
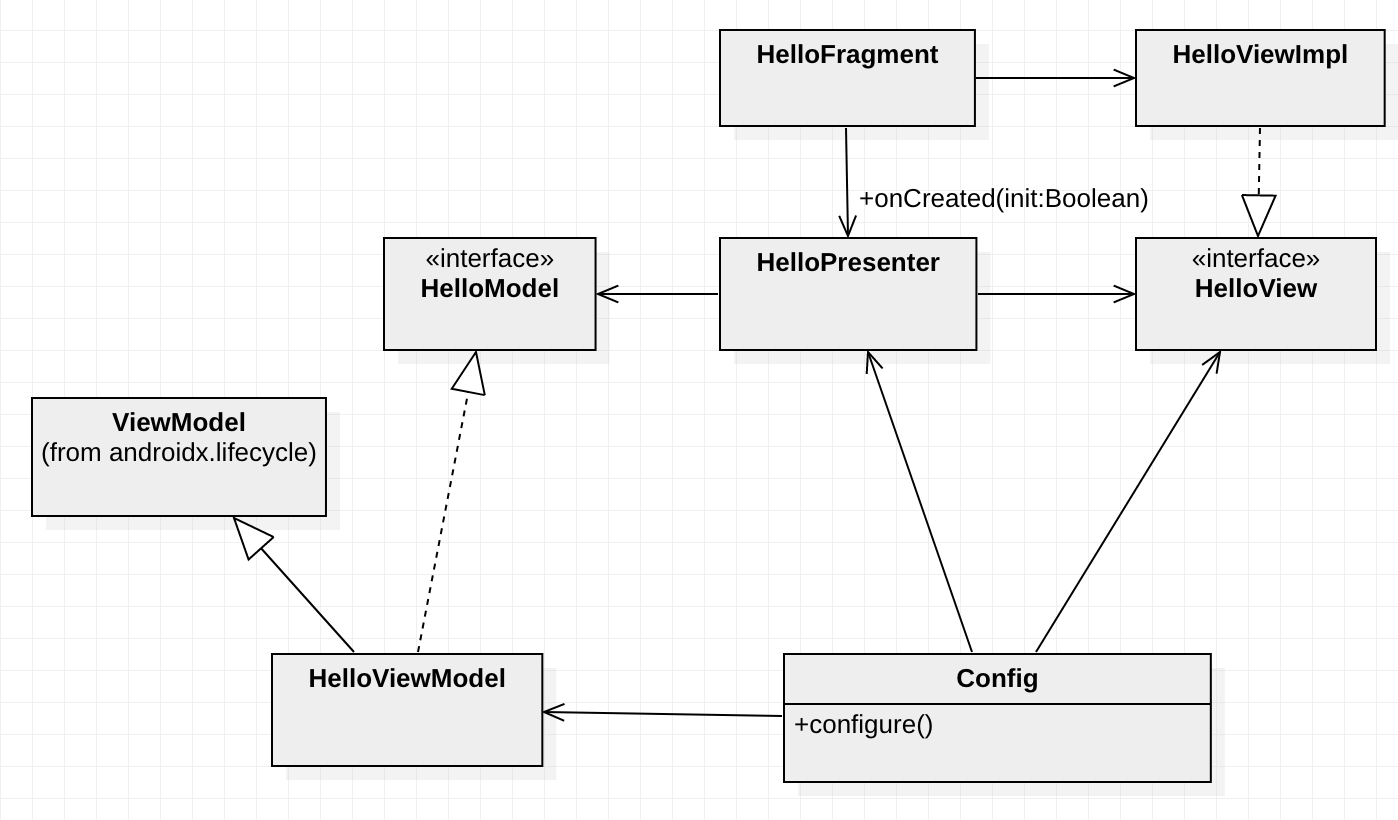
The design approach at the class level is shown in the diagram below.
下图显示了类级别的设计方法。
Looking at the diagram I want to highlight some of the important points in the design:-
查看该图,我想强调设计中的一些要点:
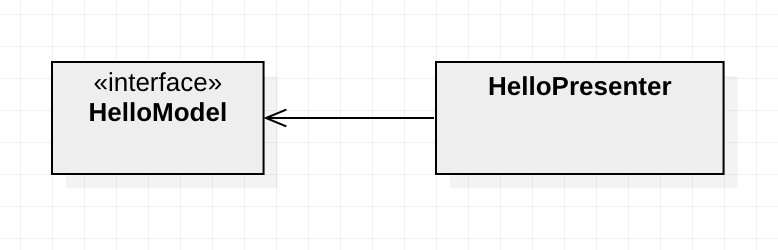
HelloPresenterhas a dependency onHelloModelandHelloViewwhich are both marked with<<interface>>denoting that these are both interfaces.HelloPresenter对HelloModel和HelloView有依赖性,它们都用<<interface>>标记,表示它们都是接口。The
HelloModelinterface is backed by an implementationHelloViewModelwhich in turn extendsViewModelfrom the Android architecture components.HelloModel接口由实现HelloViewModel支持,该实现又从Android体系结构组件扩展了ViewModel。HelloPresenterhas no idea how the interfaceHelloModelpersists data, it can expose all sorts of data via properties to the presenter including things parsed from intents or data that has been loaded (which I will get onto later by usingLiveData<T>behind the scenes as one usually would withViewModel.HelloPresenter不知道接口HelloModel如何持久化数据,它可以通过属性向演示者公开各种数据,包括从LiveData<T>解析的内容或已加载的数据(我将在LiveData<T>使用LiveData<T>进行介绍)就像通常使用ViewModel。Configis a separate function whose responsibility is to configure the routing of UI Actions (action flows) and Async Data callbacks (data flows) which I will get into later.Config是一个单独的功能,其职责是配置UI动作(动作流)和异步数据回调(数据流)的路由,我将在稍后进行介绍。
Looking back at the class diagram we see a class Config which is responsible for binding async data flows (via LiveData<T>) from the model to the presenter and UI action flows from the HelloView into the presenter.
回顾类图,我们看到一个类Config ,该类负责绑定从模型到演示者的异步数据流(通过LiveData<T> )和从HelloView到演示者的UI操作流。
The next diagram shows how the pattern is integrated into a Fragment.
下图显示了模式如何集成到片段中。
Looking at the diagram we introduce a HelloFragment that is responsible for creating a concrete implementation HelloViewImpl which will take care of interacting with the android views which HelloPresenter can only do through its interface HelloView.
看着图中我们引入HelloFragment ,负责创建的具体实现HelloViewImpl将采取与Android的意见互动的护理HelloPresenter只能通过它的接口做HelloView 。
Typically in the MVP that I have used the Fragment would implement the view interface itself, however it is best to delegate view interaction to its own class in this case HelloViewImpl to separate view lookups and bindings from an activity or fragment and keep them clean.
通常,在我使用Fragment的MVP中,视图接口本身会实现,但是最好将视图交互委托给它自己的类,在这种情况下, HelloViewImpl视图查找和绑定与活动或片段分开,并保持它们整洁。
为什么是抽象模型? (Why an abstract model?)
As mentioned previously, instead of allowing access to a ViewModel directly you should use an interface.
如前所述,应该使用接口来代替直接访问ViewModel 。
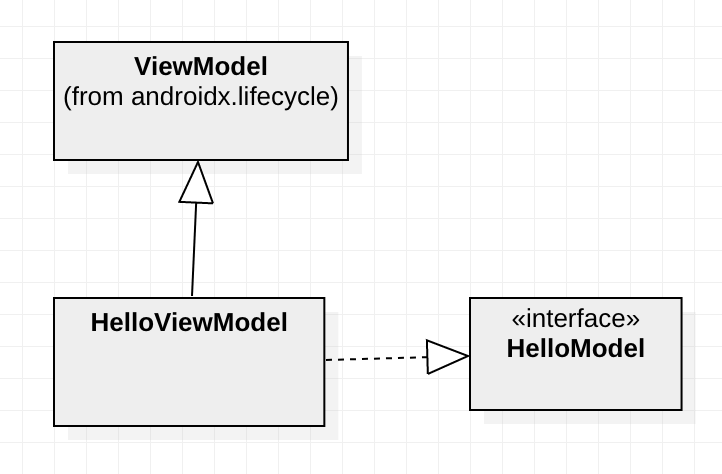
By using an interface we make sure anything (such as the presenter) interacting with our model makes no assumption on the technology employed to carry out the models responsibility. Which is to give access to data which is often contextual to the current screen.
通过使用接口,我们可以确保与模型交互的所有内容(例如演示者)都不会假设用于执行模型职责的技术。 通过它可以访问通常与当前屏幕相关的数据。
If later some fancier technology comes along to persist screen data, your refactoring becomes more trivial.
如果以后出现了一些更先进的技术来保留屏幕数据,那么重构将变得更加简单。
为什么要使用抽象视图? (Why use an abstract view?)
This goes without saying really in the MVP pattern instead of accessing the Android views directly we hide them behind an interface though instead of making the Fragment or Activity implement the view we delegate it to a class that specifically deals with a view hierarchy.
不用说真正地使用MVP模式,而不是直接访问Android视图,我们将它们隐藏在界面后,尽管不是使Fragment或Activity实现视图,而是将其委托给专门处理视图层次结构的类。
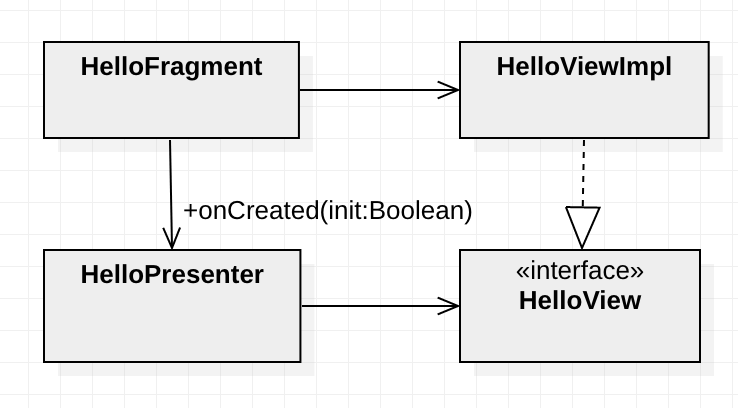
Looking at the diagram HelloViewImpl can be given a view hierarchy from HelloFragment (including passing itself if necessary). Now HelloViewImpl is responsible for doing view look ups, view binding, etc.
查看该图,可以从HelloFragment给HelloViewImpl一个视图层次结构(包括在必要时传递自身)。 现在, HelloViewImpl负责执行视图查找,视图绑定等。
HelloPresenter may only interact with the view via HelloView which is typical of MVP patterns.
HelloPresenter只能通过典型MVP模式的HelloView与视图进行交互。
实作 (Implementation)
So all this high-level design is insightful however there are some things missing from the design such as data & action flows.
因此,所有这些高级设计都是有见地的,但是设计中还缺少一些东西,例如数据和动作流。
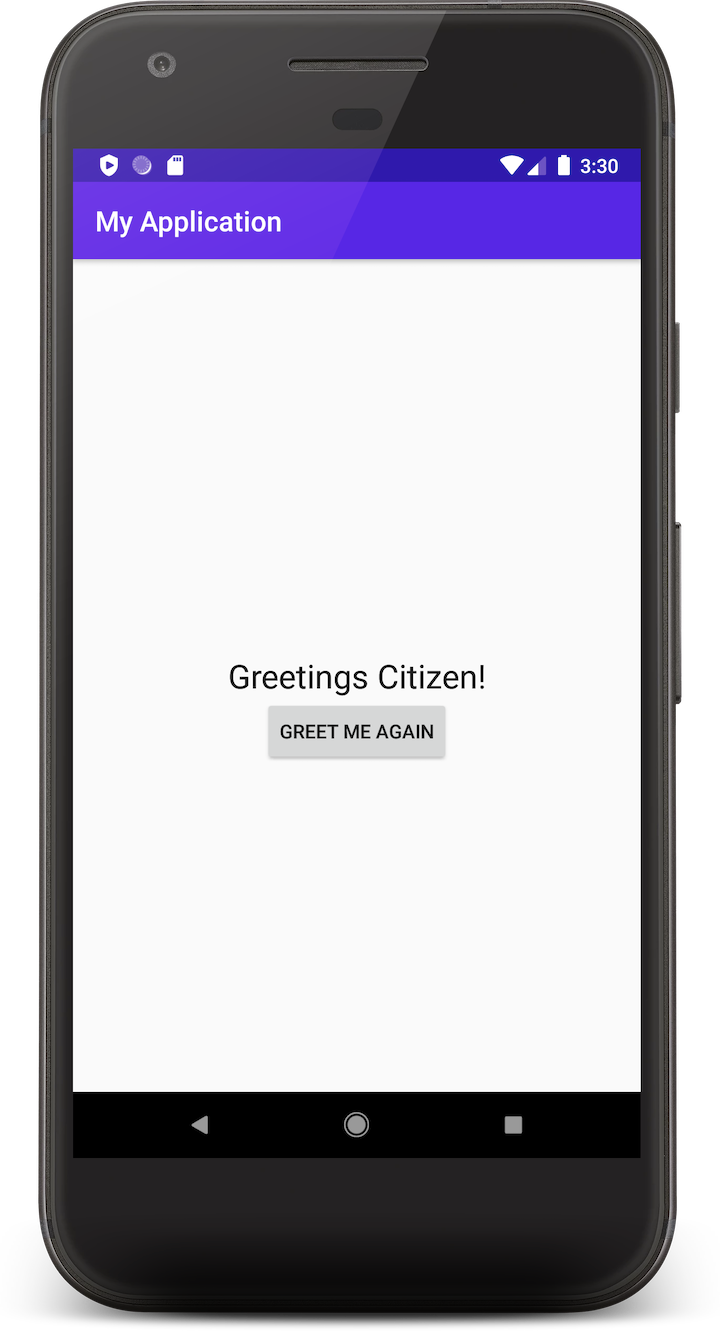
Like all good examples we will create a slightly modified “Hello World” that has a button, which when pushed will generate a new greeting message
像所有好的示例一样,我们将创建一个稍作修改的带有按钮的“ Hello World”,按下该按钮将生成新的问候消息
Let’s start out with the abstract stuff and deal with the implementation later, for that we need a View, a Model and a Presenter as follows.
让我们从抽象的东西开始,然后再处理实现,为此,我们需要如下所示的View,Model和Presenter。
interface HelloView {
    fun updateGreetingText(greetingText: String)
    fun onShowNewGreetingButtonPressed(onPressed: () -> Unit)
}
interface HelloModel {
fun loadGreeting()
}class HelloPresenter(val model: HelloModel, val view: HelloView) {
fun onCreated(init: Boolean) {
// If this is the first time we loaded,
// then load the first greeting
if (init) {
model.loadGreeting()
}
}
fun onGreetingLoaded(greeting: String) {
view.updateGreetingText(greeting)
}
fun onShowNewGreetingButtonPressed() {
model.loadGreeting()
}
}Looking at the code, in HelloPresenter we have some very simple functionality in onCreated(init: Boolean). Firstly we check init which tells us if this is the first time this screen was loaded (which we will see later how this works) and if it is the first time (init is true) then we ask the model to load a greeting by calling model.loadingGreeting().
查看代码,在HelloPresenter我们在onCreated(init: Boolean)具有一些非常简单的功能。 首先,我们检查init ,它告诉我们这是第一次加载此屏幕(稍后我们将看到它如何工作),如果是第一次(init为true),则要求模型通过调用来加载问候语model.loadingGreeting() 。
Next in the presenter we have another very simple function onGreetingLoaded(greeting: String)which will be called when the greeting has loaded (which we will see how this works later). When this function is called we make a call to view.updateGreetingText(greeting) with the loaded greeting text.
接下来,在演示者中,我们还有另一个非常简单的函数onGreetingLoaded(greeting: String) ,该函数将在问候语加载后调用(稍后我们将看到其工作原理)。 调用此函数时,我们使用加载的问候语文本调用view.updateGreetingText(greeting) 。
Finally we have a function onShowNewGreetingButtonPressed() which will be called when the user presses on a button (again this will become clear later when we find out how it is called). When the function is called we make a call to model.loadGreeting() which covers the functionality of loading a new greeting message.
最后,我们有一个函数onShowNewGreetingButtonPressed() ,当用户按下按钮时将调用该函数(同样,稍后我们将了解如何调用它,该函数将变得清晰)。 调用该函数时,我们将调用model.loadGreeting() ,它涵盖了加载新问候消息的功能。
HelloModel and HelloView are very simple interfaces, and we will see how they are implemented in the next sections.
HelloModel和HelloView是非常简单的接口,我们将在下一部分中了解如何实现它们。
具体的视图实现 (The concrete view implementation)
To satisfy our HelloView interface we need a concrete view, and to achieve this we create a class HelloViewImpl which implements the interface.
为了满足我们的HelloView接口,我们需要一个具体的视图,为实现此目的,我们创建了一个实现该接口的类HelloViewImpl 。
We can use a Fragment but in this case to keep our example simple we will use an Activity.
我们可以使用一个Fragment,但是在这种情况下,为了使示例简单,我们将使用Activity 。
class HelloViewImpl(activity: AppCompatActivity) : HelloView {
    private val greetingTextView: TextView = activity.findViewById(R.id.greeting_text)
    private val newGreetingButton: Button = activity.findViewById(R.id.new_greeting_button)


    override fun updateGreetingText(greetingText: String) {
        greetingTextView.text = greetingText
    }


    override fun onShowNewGreetingButtonPressed(onPressed: () -> Unit) =
        newGreetingButton.setOnClickListener { onPressed() }
}
In the code snippet above we have the HelloViewImpl which takes the activity as its first argument so it can perform relevant view lookups and actions on those views. It is a fairly simple app so we implement both the functions of HelloView to interact with the view accordingly. For onShowNewGreetingButtonPressed we take the lambda passed as onPressed and just call it when the greeting button is pushed, very simple.
在上面的代码片段中,我们有HelloViewImpl ,它将活动作为第一个参数,因此它可以对这些视图执行相关的视图查找和操作。 这是一个相当简单的应用程序,因此我们实现了HelloView两个功能,以便与视图进行相应的交互。 对于onShowNewGreetingButtonPressed我们将传递的lambda当作onPressed并在按下欢迎按钮时调用它,非常简单。
How we integrate this into the activity we will see later, let’s first take a look at the concrete model.
我们如何将其集成到稍后将看到的活动中,让我们首先看一下具体模型。
具体的模型实现 (The concrete model implementation)
On the other side, we need a concrete model, which we will use the awesome power of the architecture components ViewModel and its best buddy LiveData<T>.
另一方面,我们需要一个具体的模型,我们将使用架构组件ViewModel的强大功能及其最佳伙伴LiveData<T> 。
internal class HelloViewModel : ViewModel(), HelloModel {
    val greeting: MutableLiveData<String> = MutableLiveData()
    override fun loadGreeting() {
        greeting.value = greetings.random()
    }
}


private val greetings = listOf(
    "Hello", "Yo!", "Big up!", "Greetings!", "Hiya!"
Looking at the code HelloViewModel we have a live data which we will use to post new greetings to.
查看代码HelloViewModel我们有一个实时数据,我们将用它发布新的问候语。
We implement the HelloModel interface function loadGreeting() to select a random greeting from a list and post it on the greeting live data.
我们实现HelloModel接口函数loadGreeting() ,从列表中选择一个随机问候语,并将其发布在greeting实时数据上。
配置动作和数据流 (Configuring action and data flows)
Now we have a concrete model and a concrete view and our presentation logic, we can wire things together and create an activity which will make all of this finally work.
现在,我们有了一个具体的模型,一个具体的视图以及表示逻辑,我们可以将所有东西连接在一起,并创建一个活动,使所有这些最终起作用。
Taking a look at the diagram below we can visualise how communication will happen between the Presenter, View and Model.
看一下下面的图,我们可以可视化演示者,视图和模型之间的通信方式。
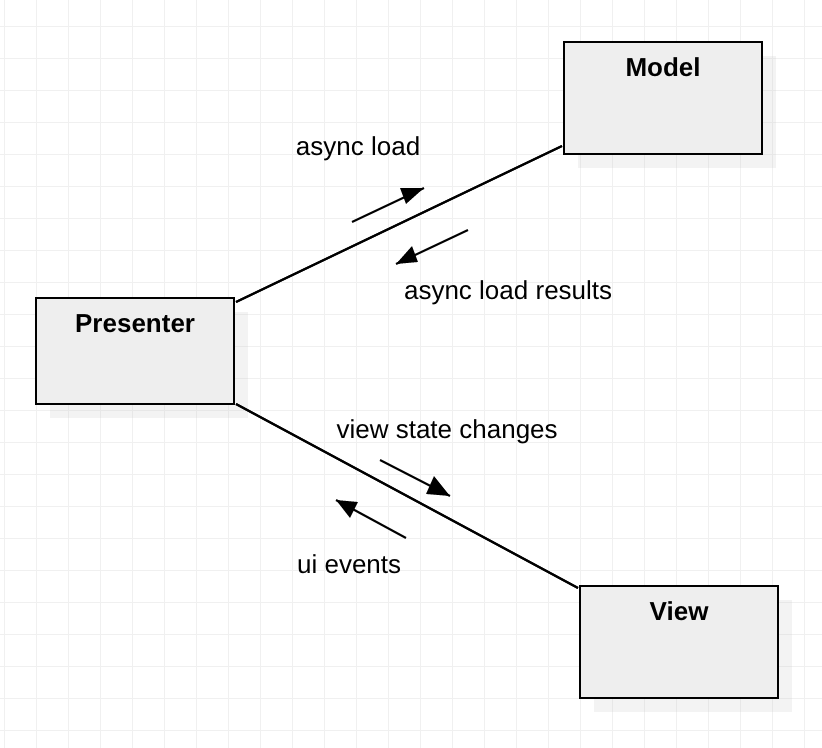
In the diagram we have two way communication between Presenter and Model and the Presenter and the view.
在图中,Presenter和Model之间以及Presenter和视图之间存在两种方式的通信。
To keep things nice and separate the responsibility of configuration is delegated to a simple extension functionHelloPresenter.configure(...) below.
为了使事情变得更好和分开,将配置的职责委托给下面的简单扩展函数HelloPresenter.configure(...) 。
fun HelloPresenter.configure(lifecycle: Lifecycle, vm: HelloViewModel, view: HelloView) {
    // action flows
    view.onShowNewGreetingButtonPressed(::onShowNewGreetingButtonPressed)


    // data flows
    vm.greeting.observe({ lifecycle }, ::onGreetingLoaded)
}
This function is best kept in a separate file and serves one purpose to connect the model data streams to the presenter (for this we need the concrete model) and for connecting UI event streams from the view.
最好将此功能保存在一个单独的文件中,并用于将模型数据流连接到演示者(为此,我们需要具体的模型)并从视图连接UI事件流。
融入活动 (Integrating into the activity)
Finally we can integrate into an activity and the following code snippet shows how this is done. We could use something like Dagger here though to keep things obvious and simple no DI will be used.
最后,我们可以将其集成到一个活动中,下面的代码片段显示了如何完成此操作。 我们可以在这里使用Dagger之类的东西,尽管这样可以使事情变得显而易见,并且简单的不使用DI。
class MainActivity : AppCompatActivity() {
    private lateinit var view: HelloView
    private lateinit var presenter: HelloPresenter
    private lateinit var model: HelloViewModel


    override fun onCreate(savedInstanceState: Bundle?) {
        super.onCreate(savedInstanceState)
        setContentView(R.layout.activity_main)


        model = of(this).get(HelloViewModel::class.java)
        view = HelloViewImpl(this)
        presenter = HelloPresenter(model, view)
        presenter.configure(lifecycle, model, view)
        presenter.onCreated(savedInstanceState == null)
    }
}
Following the example in onCreate we create our model (using ViewModelProviders.of) create our HelloViewImpl passing the activity to it so it can perform relevant lookups and bindings, create our presenter and call the configure(...) function on it effectively setting up the action & data flows and finally calling presenter.onCreated(savedInstanceState == null) kickstarting the presenter logic and letting it know that this is the first time this screen was created (leveraging saveInstanceState nullability).
按照onCreate的示例,我们使用ViewModelProviders.of创建模型(使用ViewModelProviders.of )创建将活动传递给它的HelloViewImpl ,以便它可以执行相关的查找和绑定,创建演示者并在其上调用configure(...)函数来有效地设置操作和数据流,最后调用presenter.onCreated(savedInstanceState == null)启动演示者逻辑,并告知这是该屏幕的首次创建(利用saveInstanceState为空)。
结论 (Conclusion)
And that is my modern approach to MVP using architecture components and following some basic rules of abstraction.
这是我使用体系结构组件并遵循一些基本抽象规则的现代MVP方法。
The full source code for the example is available here https://github.com/fluxtah/modern-mvp
示例的完整源代码可以在这里https://github.com/fluxtah/modern-mvp
Hope that helps anyone who finds some use in the MVP pattern and is looking for a modern approach to what might be out there already.
希望对任何在MVP模式中找到用处并正在寻找可以解决现有问题的现代方法的人有所帮助。
A thing to keep in mind is Jetpack Compose is around the corner so using a pattern like this (including MVVM) may become redundant as may some of the architecture components. That being said it is still a great pattern and using a model interface instead of directly integrating withViewModel could save you some trouble later if you wish to move away from architecture components later.
请记住,Jetpack Compose指日可待,因此像某些架构组件一样,使用这种模式(包括MVVM)可能变得多余。 话虽这么说,这仍然是一个很好的模式,如果您希望以后离开体系结构组件,那么使用模型接口而不是直接与ViewModel集成可以为您节省一些麻烦。
翻译自: https://medium.com/@fluxtah/mvp-is-dead-long-live-mvp-b9d3b0afa0a9
mvp遇到的坑已经解决方法


 4982
4982

 被折叠的 条评论
为什么被折叠?
被折叠的 条评论
为什么被折叠?
 到【灌水乐园】发言


