


redux状态管理机制
Flutter allows us to manage the state of the widgets individually. However, as the complexity of an app grows, and the need to allow different widgets to have access to the state of one another arises, there comes a need to store the state of the app in one commonplace. Redux fits this particular need perfectly. This post explains how Redux can be used with Flutter.
Flutter使我们可以分别管理小部件的状态。 但是,随着应用程序复杂性的提高,以及允许不同的小部件访问彼此状态的需求不断增加,需要将应用程序的状态存储在一个普通的地方。 Redux非常适合这种特殊需求。 这篇文章解释了Redux如何与Flutter一起使用。
The Redux pattern, which is popularly used with React, can be used in such circumstances. This allows us to have a single source of truth that is available throughout an app. But before we learn to use Redux with Flutter, understanding how Redux works helps.
Redux模式(通常与React一起使用)可以在这种情况下使用。 这使我们可以在整个应用程序中使用单一的事实来源。 但是在我们学习将Redux与Flutter结合使用之前,了解Redux的工作原理会有所帮助。
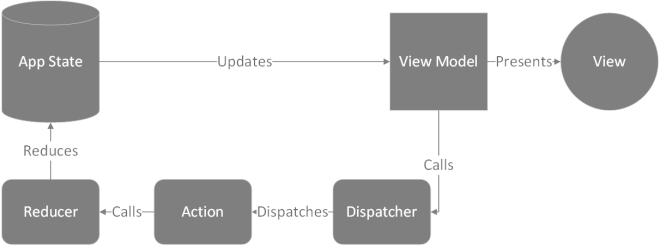
Redux架构 (The Redux Architecture)
Redux has four major components:
- The state 状态
- Actions 动作
- Dispatcher 调度员
- Reducer 减速器
The state is where the state (all the data) of an app gets stored. Redux libraries usually provide us with what are called providers to help us bind the state to our views. However, modifying the store is not straightforward (and it’s good) and this helps us have a unidirectional flow of data.
状态是存储应用程序状态(所有数据)的位置。 Redux库通常为我们提供所谓的提供程序,以帮助我们将状态绑定到我们的视图。 但是,修改存储并非易事(这很好),这有助于我们实现单向数据流。
To modify the store, the dispatcher (which is provided by Redux) has to fire an action. This action has a type and the data that we want to modify the store with. Once the action is fired, the reducer makes a copy of the store, updates the copy with the new data and returns the new state. Then, the view is updated with the new data.
要修改商店,调度程序(由Redux提供)必须触发一个动作。 此操作具有我们要用来修改存储的类型和数据。 触发操作后,Reducer会创建存储副本,并使用新数据更新副本并返回新状态。 然后,用新数据更新视图。
By incorporating this Redux pattern into a Flutter app, we can ensure that we have a common app state that can be mutated by firing actions. Even though I say the state is mutated, do note that a Redux store is immutable by design and every time an action is fired a new state is returned and the old one remains intact.
通过将此Redux模式整合到Flutter应用程序中,我们可以确保我们具有可以通过触发操作而改变的通用应用程序状态。 即使我说状态是突变的,也要注意Redux存储在设计上是不可变的,并且每次触发操作时都会返回一个新状态,而旧状态则保持不变。
安装Redux (Installing Redux)
There are two Flutter packages, redux and flutter_redux, that help us use Redux with Flutter, and they should be installed first. So, in the pubspec.yaml file, list these two packages under dependencies.
有两个Flutter软件包redux和flutter_redux ,可以帮助我们在Flutter中使用Redux,应该首先安装它们。 因此,在pubspec.yaml文件中,列出依赖关系下的这两个软件包。
dependencies: flutter: sdk: flutter flutter_redux: ^0.5.3 redux: ^3.0.0Now, you need to run flutter pub get in order to install these packages. Once done, we can start using Redux in our Flutter app. To demonstrate this, I am going to use the default demo app created by the flutter create command.
现在,您需要运行flutter pub get才能安装这些软件包。 完成后,我们可以在Flutter应用中开始使用Redux。 为了演示这一点,我将使用由flutter create命令创建的默认演示应用程序。
The default app has a counter that can be incremented by pressing on the floating action button. The counter is contained within the state of the MyHomePage widget. Let's try to move this into a Redux store and increment it by dispatching actions.
默认应用程序具有一个计数器,可以通过按浮动操作按钮来增加计数器。 计数器包含在MyHomePage小部件的状态内。 让我们尝试将其移动到Redux存储中,并通过分派操作来增加它。
建立模型 (Creating a Model)
Before creating the store, we need to create a model of the counter. To that end, create a dart file called model and create a class called Counter. This class will have a property called counter which will be storing, as the name implies, the counter. Create a constructor that would accept an integer as an argument and assign it to the counter property. This can be easily accomplished in Dart by passing the name of the property-to which we want to assign the passed argument-preceded by this. as a parameter. Now, we have a model for our counter.
在创建商店之前,我们需要创建计数器模型。 为此,创建一个名为model的dart文件,并创建一个名为Counter的类。 此类将具有一个称为counter的属性,顾名思义,它将存储counter。 创建一个接受整数作为参数的构造函数,并将其分配给counter属性。 在Dart中,可以通过传递属性的名称(在this.之前,我们要为其分配传递的参数)来轻松实现this. 作为参数。 现在,我们有一个柜台模型。
class Counter{ int counter; Counter(this.counter); }建立国家 (Creating a State)
Next, let’s create the state of our app. Create a Dart file called state and create a class called AppState. An instance of this class will be holding the state of our app. Now, we need to store the counter in the app's state. So, import the Counter model into the state file and create a property of the type Counter called counter. Then, create a constructor that would accept a Counter object as an argument and assign it to the counter property.
接下来,让我们创建应用程序的状态。 创建一个名为state的Dart文件,并创建一个名为AppState的类。 该类的一个实例将保存我们应用的状态。 现在,我们需要将计数器存储在应用程序的状态中。 因此,进口Counter模式进入状态文件并创建类型的属性Counter称为counter 。 然后,创建一个接受Counter对象作为参数的构造函数,并将其分配给counter属性。
To initialize the state of the app, it is advisable to create a named constructor that would set the value of the counter to zero.
要初始化应用程序的状态,建议创建一个命名构造函数,该构造函数会将counter的值设置为零。
import 'package:sample/model.dart'; class AppState { final Counter counter; AppState(this.counter); AppState.initial():counter=new Counter(0); }创建动作 (Creating an Action)
Now that we have created our AppState class, let's create an action to modify the state. Create a new file called action.dart and create a new class called IncrementAction. This action will carry the data that would be used by the reducer to modify the state with. Since we want to increment the counter, we need a counter property in this class. So, create an integer property called counter and initialize it using the constructor.
现在,我们已经创建了AppState类,让我们创建一个操作来修改状态。 创建一个名为action.dart的新文件,并创建一个名为IncrementAction的新类。 该操作将携带减速器用来修改状态的数据。 由于我们要增加计数器,因此在此类中需要一个counter属性。 因此,创建一个名为counter的整数属性,并使用构造函数对其进行初始化。
class IncrementAction{ final int count; IncrementAction(this.count); }创建一个减速器 (Creating a Reducer)
Next, we need to create a reducer that would return the updated state. Therefore, create a new file called reducer.dart and create a function that would return an instance of our AppState class. This function accepts the state object and an object of the fired action as arguments. When an action is fired, Redux calls this reducer function and passes the current state of the app and an instance of the action that was fired as the arguments.
接下来,我们需要创建一个将返回更新状态的化简器。 因此,创建一个名为reducer.dart的新文件,并创建一个将返回AppState类实例的AppState 。 此函数接受状态对象和触发操作的对象作为参数。 触发操作后,Redux会调用此reducer函数,并传递应用程序的当前状态以及作为参数触发的操作实例。
We can modify the passed state object with the data in the action object, create a new instance of the AppState with the modified state object, and return it. But this reducer function will be called every time an action is fired. Different actions carry different data and are supposed to modify the state in different ways. So, how do we perform different functions based on the action fired? Since every action is an instance of an action class, we can check for the data type of the action object and then, decide on the subsequent course of actions.
我们可以使用操作对象中的数据来修改传递的状态对象,使用修改后的状态对象创建AppState的新实例,然后将其返回。 但是,每次执行动作时都会调用此reducer函数。 不同的动作携带不同的数据,并且应该以不同的方式修改状态。 那么,我们如何根据触发的动作执行不同的功能? 由于每个动作都是动作类的实例,因此我们可以检查动作对象的数据类型,然后决定后续的动作过程。
We can check the type of a variable in Dart by using the is syntax. So, we can write a conditional statement to see if an action is of a certain type and perform the necessary actions.
我们可以使用is语法检查Dart中变量的类型。 因此,我们可以编写条件语句来查看某个动作是否为某种类型并执行必要的动作。
AppState appStateReducer (AppState state, dynamic action){ if(action is IncrementAction){ return new AppState(new Counter(action.count)); } return state; }As shown above, we can write a reducer function that checks if the action fired is an instance of our action class IncrementAction, and return a new AppState instance initialized with the updated counter object.
如上所示,我们可以编写一个reducer函数,以检查触发的动作是否是我们的动作类IncrementAction的实例,并返回一个使用更新的counter对象初始化的新AppState实例。
视图模型 (The View Model)
Now, we have created an action, an app state, and a reducer. All that is left to do is to create a button click event that would fire this action. But before we do this, we need to create a view model.
现在,我们创建了一个动作,一个应用程序状态和一个reducer。 剩下要做的就是创建一个按钮单击事件,它将触发此操作。 但是在执行此操作之前,我们需要创建一个视图模型。
The view model is not all that complex. It acts as a presentation layer between the state of our app and the user interface of an app. Now, the way we want to store our data in the state of our app may not necessarily be the way we want to display it. For instance, we may store the first name and the last name of a user in separate variables in the state. But when displaying the name of a user, we might want to display both the first name and the last name together. We can use the view model to do such cosmetic changes to our data. In other words, we use the view model to help both the state and the UI interact with one another. It simply acts as a filter.
视图模型并不那么复杂。 它充当我们应用程序状态与应用程序用户界面之间的表示层。 现在,我们想要在应用程序状态下存储数据的方式不一定是我们想要显示数据的方式。 例如,我们可以在状态中的不同变量中存储用户的名字和姓氏。 但是,在显示用户名时,我们可能希望同时显示名字和姓氏。 我们可以使用视图模型对我们的数据进行这种修饰性的更改。 换句话说,我们使用视图模型来帮助状态和UI相互交互。 它只是充当过滤器。
创建视图模型 (Creating a View Model)
Let’s go ahead and create a new file called viewModel.dart and create a class called ViewModel. Now, we want our UI to do two things: to display the counter value and fire our IncrementAction action. So, our view model should include a variable to store the counter value and a method to fire the action.
让我们继续创建一个名为viewModel.dart的新文件,并创建一个名为ViewModel的类。 现在,我们希望用户界面做两件事:显示计数器值并触发我们的IncrementAction操作。 因此,我们的视图模型应包含一个存储计数器值的变量和一个触发操作的方法。
So, let’s create an integer called counter and a method called onIncrement. Let's also create a constructor that would initialize these two.
因此,让我们创建一个称为counter的整数和一个名为onIncrement的方法。 我们还创建一个构造器,以初始化这两个构造器。
Next, we need to create a factory constructor that would return an instance of the ViewModel class. The factory constructor ensures if an instance of the ViewModel class already exists, then that instance is returned instead of creating and returning a new instance of it.
接下来,我们需要创建一个工厂构造函数,该构造函数将返回ViewModel类的实例。 工厂构造函数确保ViewModel类的实例是否已存在,然后返回该实例,而不是创建并返回该实例的新实例。
This constructor should accept a store object as an argument. Then, we shall instantiate the ViewModel class and return it. But before we do that, we need to get the value of the counter and implement a function to fire the IncrementAction action.
此构造函数应接受一个存储对象作为参数。 然后,我们将实例化ViewModel类并返回它。 但是在执行此操作之前,我们需要获取计数器的值并实现触发IncrementAction操作的函数。
We can get the counter value from the store object that is passed as an argument. The state of the app is stored in the attribute called state. So, we can access the counter value by using store.state.counter.counter. The state has a counter property of type Counter which has an integer attribute called counter.
我们可以从存储对象中获取作为参数传递的计数器值。 应用程序的状态存储在称为状态的属性中。 因此,我们可以使用store.state.counter.counter访问计数器值。 该状态具有类型为Counter的counter属性,该属性具有一个称为counter的整数属性。
Then create a method to dispatch the action. The dispatch method is attached to the store object and can be accessed via store.dispatch(). To dispatch an action, we need to create an object of the action class and pass it as an argument into the dispatch method. As you may remember, this action class also carries the necessary data. In our case, we have a property in our action class called counter which will carry the updated value of the counter.
然后创建一个方法来分派动作。 调度方法附加到store对象,可以通过store.dispatch()进行访问。 要分派动作,我们需要创建动作类的对象,并将其作为参数传递给分派方法。 您可能还记得,该动作类还包含必要的数据。 在我们的例子中,我们在操作类中有一个称为counter的属性,该属性将携带counter的更新值。
从我们的视图模型中增加计数器 (Incrementing the counter from within our view model)
So, we can change the counter value by instantiating our action class with the new counter value. Since we are trying to increment our counter value, we can get the existing value of the counter from the store, increment it by one, and pass it as an argument into our action class constructor. We can pass the returned object into the dispatch method.
因此,我们可以通过使用新的计数器值实例化操作类来更改计数器值。 由于我们正在尝试增加计数器的值,因此我们可以从存储中获取计数器的现有值,将其递增1,然后将其作为参数传递给我们的动作类构造函数。 我们可以将返回的对象传递给dispatch方法。
You will have to import the redux package, and the actions and the state file.
您将必须导入redux包,操作和状态文件。
import 'package:redux/redux.dart'; import 'package:sample/actions.dart'; import 'package:sample/state.dart'; class ViewModel{ int count; final Function () onIncrement; ViewModel(this.count,this.onIncrement); factory ViewModel.create(Store<AppState> store){ _onIncrement(){ print("Incrementing"); print(store.state.counter.counter.toString()); store.dispatch(new IncrementAction(store.state.counter.counter+1)); } return ViewModel(store.state.counter.counter,_onIncrement); } }创建一个Store对象并将其传递到Flutter Widget树下 (Creating a Store object and passing it down the Flutter Widget tree)
We are almost done. Now, we need to create a store object and pass it down our widget tree. Then we can access our store in our widgets using a store connector.
我们快完成了。 现在,我们需要创建一个存储对象,并将其传递到小部件树中。 然后,我们可以使用商店连接器在小部件中访问商店。
First, let’s create a store object. We can do that by instantiating the store class provided by the redux package. When creating the store object, we need to specify the type of the state property (the class of our state object) as a generic type parameter. And then, pass the reducer function, and the initial state as arguments. We can get the initial state by calling the initial constructor of our state class.
首先,让我们创建一个store对象。 我们可以通过实例化redux包提供的store类来实现。 在创建存储对象时,我们需要将状态属性的类型(状态对象的类)指定为通用类型参数。 然后,传递reducer函数,并将初始状态作为参数。 我们可以通过调用状态类的初始构造函数来获取初始状态。
Now that we have a store object, we need to pass it down the widget tree. The flutter redux package provides us with a StoreProvider that would pass our store object down the widget tree. All that we need to do is to wrap our root widget with the StoreProvider. Mention MaterialApp as the child and assign our store object to the store parameter.
现在我们有了一个存储对象,我们需要将其传递到小部件树中。 flutter的redux包为我们提供了一个StoreProvider ,该StoreProvider将我们的商店对象传递到小部件树下。 我们需要做的就是用StoreProvider包装我们的根小部件。 提及MaterialApp作为子项,并将我们的store对象分配给store参数。
class MyApp extends StatelessWidget { // This widget is the root of your application. @override Widget build(BuildContext context) { final Store<AppState> store = new Store<AppState>(appStateReducer, initialState: AppState.initial()); return StoreProvider<AppState>( store: store, child: MaterialApp( title: 'Flutter Demo', theme: ThemeData( // This is the theme of your application. // // Try running your application with "flutter run". You'll see the // application has a blue toolbar. Then, without quitting the app, try // changing the primarySwatch below to Colors.green and then invoke // "hot reload" (press "r" in the console where you ran "flutter run", // or simply save your changes to "hot reload" in a Flutter IDE). // Notice that the counter didn't reset back to zero; the application // is not restarted. primarySwatch: Colors.blue, ), home: MyHomePage(title: 'Flutter Demo Home Page'), )); } }从Flutter小部件访问Redux存储 (Accessing the Redux store from the Flutter Widgets)
Now, we can access the store object anywhere in our app using the StoreConnector. First, let's display the counter value.
现在,我们可以使用StoreConnector在应用程序中的任何位置访问商店对象。 首先,让我们显示计数器值。
In the _MyHomePageState widget, let's assign the StoreConnector widget to the body parameter. Specify the AppState class and ViewModel class as the generic parameters. This StoreConnector widget has two properties: connector and builder. The connector accepts a function that accepts a store object as an argument and returns a view model object. We can create a ViewModel object by using the factory constructor. The builder parameter accepts a function that takes in a BuildContext object and a ViewModel object as arguments and returns a widget.
在_MyHomePageState小部件中,让我们将StoreConnector小部件分配给body参数。 将AppState类和ViewModel类指定为通用参数。 此StoreConnector小部件具有两个属性: connector和builder 。 connector接受一个函数,该函数接受一个存储对象作为参数并返回一个视图模型对象。 我们可以使用工厂构造函数创建一个ViewModel对象。 builder参数接受接受BuildContext对象和ViewModel对象作为参数并返回小部件的函数。
We can use the viewModel argument to display the counter value. Remember, the viewModel object has a property called counter that stores the counter value. We can display the counter values using viewModel.counter.toString().
我们可以使用viewModel参数来显示计数器值。 请记住, viewModel对象具有一个称为counter的属性,用于存储计数器值。 我们可以使用viewModel.counter.toString()显示计数器值。
To dispatch an action, we can use viewModel.onIncrement() method. Assign it to the onPressed parameter of the floating action button.
要调度动作,我们可以使用viewModel.onIncrement()方法。 将其分配给浮动操作按钮的onPressed参数。
class _MyHomePageState extends State<MyHomePage> { int _counter = 0; void _incrementCounter() { setState(() { _counter++; }); } @override Widget build(BuildContext context) { return Scaffold( appBar: AppBar( title: Text(widget.title), ), body: StoreConnector<AppState, ViewModel>( converter: (Store<AppState> store) => ViewModel.create(store), builder: (BuildContext context, ViewModel viewModel) => Center( mainAxisAlignment: MainAxisAlignment.center, children: <Widget>[ Text( 'You have pushed the button this many times:', ), Text( viewModel.count.toString(), style: Theme.of(context).textTheme.display1, ), ], ), )), floatingActionButton: StoreConnector<AppState, ViewModel>( converter:(Store<AppState> store)=>ViewModel.create(store), builder:(BuildContext context, ViewModel viewModel)=> FloatingActionButton( onPressed: ()=>viewModel.onIncrement(), tooltip: 'Increment', child: Icon(Icons.add), ), // This trailing comma makes auto-formatting nicer for build methods. )); } }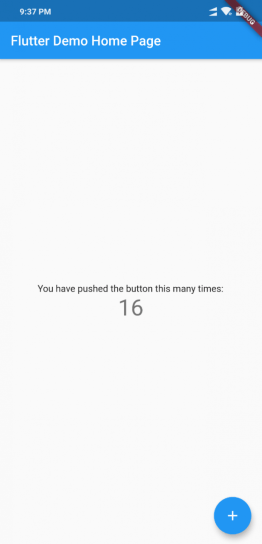
When you click on the floating action button, it calls the onIncrement method of the viewModel object. This method increments the counter value by one and passes it into the IncrementAction class constructor. This calls the reducer and passes the state and the created object of the IncrementAction class as the arguments. The reducer then takes the new counter value from the action object and creates a Counter object with the new counter value. This object is then passed into the AppState constructor to create a new state object which is returned by the reducer function. As the new state object is returned, the viewModel 's counter property gets updated and the view is updated with the new counter value.
当您单击浮动操作按钮时,它将调用viewModel对象的onIncrement方法。 此方法将计数器值加1,然后将其传递到IncrementAction类构造函数中。 这将调用reducer并将IncrementAction类的状态和创建的对象作为参数传递。 然后,Reducer从操作对象中获取新的计数器值,并使用新的计数器值创建一个Counter对象。 然后将此对象传递到AppState构造函数中,以创建一个新的状态对象,该对象由reducer函数返回。 返回新的状态对象后, viewModel的counter属性将更新,并且视图将使用新的计数器值进行更新。
There it is! We have connected our state built using Redux to the view of our Futter app. Now, we have a single source of truth and don’t need to worry about passing data among components.
在那里! 我们已将使用Redux构建的状态连接到Futter应用程序的视图。 现在,我们有了一个单一的事实来源,无需担心在组件之间传递数据。
The full source code can be found here: https://github.com/thivi/FlutterReduxSample
完整的源代码可以在这里找到: https : //github.com/thivi/FlutterReduxSample
Originally published at https://www.thearmchaircritic.org on September 30, 2019.
最初于 2019年9月30日 发布在 https://www.thearmchaircritic.org 。
翻译自: https://levelup.gitconnected.com/managing-state-in-flutter-using-redux-7eeb686c108c
redux状态管理机制


 780
780

 被折叠的 条评论
为什么被折叠?
被折叠的 条评论
为什么被折叠?
 到【灌水乐园】发言


