


As someone who is an Amateur Radio Operator, Student Pilot, and tech addict during the Pandemic SIP I decided to build a performant ADS-B feeder.
作为在大流行SIP期间是业余无线电操作员,学生飞行员和技术爱好者的人,我决定建造一款性能卓越的ADS-B馈线。
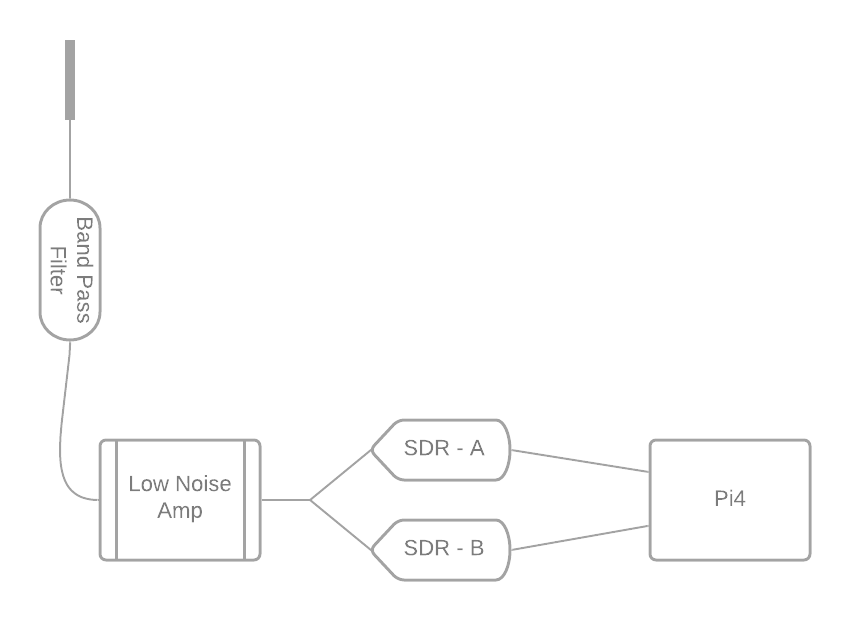
Before we begin there is some added hardware this will require. I will share a sample list of what you would want to purchase, however there are many options and you don’t have to buy exactly what I suggest. There are also better versions of almost all these components. You can decide what fits your needs the best.
在我们开始之前,这需要一些额外的硬件。 我将分享您要购买的商品的示例清单,但是有很多选择,您不必完全购买我的建议。 几乎所有这些组件都有更好的版本。 您可以决定最适合自己的需求。
If I can also explain why to feed the same sites I feed:
如果我还能解释为什么要提供与我提供的网站相同的网站:
ADSBExchange — This is the best of them all. No paid blocking, API access if you feed, and they are a very helpful bunch on their Discord server.
ADSBExchange-这是其中最好的。 如果您进行订阅,则无需付费阻止,访问API,并且它们在Discord服务器上非常有用。
FlightAware — While they do make money off your feeding data they do give Enterprise access for free. Additionally Pilots that use the ForeFlight aviation app (myself included) get Internet based ADS-B traffic on our tables from FlightAware. This helps improve the safety in the skies.
FlightAware-尽管他们确实从您的供餐数据中获利,但确实为企业免费提供访问权限。 此外,使用ForeFlight航空应用程序(包括我自己)的飞行员会从FlightAware的桌子上获得基于Internet的ADS-B流量。 这有助于提高天空的安全性。
FlightRadar24 — I like this site as it’s quite international. They do also make money off your data but at the same time give their Business account for free. Their mobile apps have useful features for pilots and frequent travelers as well.
FlightRadar24-我喜欢这个网站,因为它非常国际化。 他们的确也从您的数据中获利,但同时免费提供其企业帐户。 他们的移动应用程序还为飞行员和常旅客提供有用的功能。
RadarBox — I just like their website and UI. I figure they are one of the smaller sites with a cool app and app idea which includes trying to pipe in ATC audio which is live presently but needs more coverage.
RadarBox-我喜欢他们的网站和用户界面。 我认为它们是规模较小的网站之一,其应用程序和应用程序构思很酷,包括尝试引入ATC音频,该音频当前正在直播,但需要更大的覆盖范围。
Raspberry Pi 4–4GB RAM (kit, $99.99)
Raspberry Pi 4–4GB RAM (套件,99.99美元)
AirSpy Mini — 1090MHz SDR (preferred, $99)
AirSpy Mini — 1090MHz SDR (建议零售价99美元)
RTL-SDR Compat — Many — Options (Preferred for 978, cheaper 1090 option $24–$30)
Low Noise Amplifier — LNA ($29.95)
低噪声放大器— LNA (29.95美元)
High Endurance MicroSD 32GB ($10.99)
高耐用性MicroSD 32GB (10.99美元)
Coax w/SMA Y Cable ($7.49 - needed to for 978MHz and 1090MHz)
带SMA Y电缆的同轴电缆(7.49美元-978MHz和1090MHz所需)
SMA Barrel Adapters ($5.59 — depending on what you buy you will likely need at least one)
SMA枪管适配器(5.59美元-根据购买的产品,您可能至少需要一个)
External Antenna ($59.95 — so many options here. If you have a short run this coax is fine, but if it gets longer you’d want better coax and N-Connectors)
外部天线(59.95美元-这里有很多选择。如果短期运行,此同轴电缆很好,但是如果更长,则需要更好的同轴电缆和N型连接器)
ADS-B Band Pass Filter ($14.94)
ADS-B带通滤波器($ 14.94)
Once you have the hardware, you will want to set it up in the below configuration:
有了硬件后,您将需要在以下配置中进行设置:
Burning the image to a SD Card
将图像刻录到SD卡
The awesome people over at adsbexchange.com make a raspberry pi image that anyone can use with a lot of the basics already setup. Alternatively, you can use a generic raspberry pi image and setup everything from scratch. The later is how I had initially built my feeder.
adsbexchange.com上的杰出人士制作了一个树莓派图像,任何人都可以使用已经建立的许多基础知识。 另外,您可以使用通用的树莓派映像并从头开始设置所有内容。 稍后是我最初构建馈线的方式。
You can find the image download at this link: https://adsbexchange.com/myip/downloads/adsbx_buster.1.0.zip?v=latest. As of today (16.June.2020) the current version is 1.0.3. Once downloaded unzip the file and you will have an .img file. Note that this image works well if using RTL based SDR’s but needs work if using an AirSpy. Additionally it has a graphana dashboard that has some nice data but will slightly reduce the lifespan of your SD card.
您可以在以下链接中找到图像下载: https : //adsbexchange.com/myip/downloads/adsbx_buster.1.0.zip?v=latest 。 截至今天(2020年6月16日),当前版本为1.0.3。 下载后,解压缩该文件,您将获得一个.img文件。 请注意,如果使用基于RTL的SDR,此图像效果很好,但如果使用AirSpy,则需要工作。 此外,它还有一个graphana仪表板,其中包含一些不错的数据,但会略微缩短SD卡的使用寿命。
Next you will want to download balenaEtcher which can be found here: https://www.balena.io/etcher/
接下来,您将要下载balenaEtcher,可以在这里找到: https ://www.balena.io/etcher/
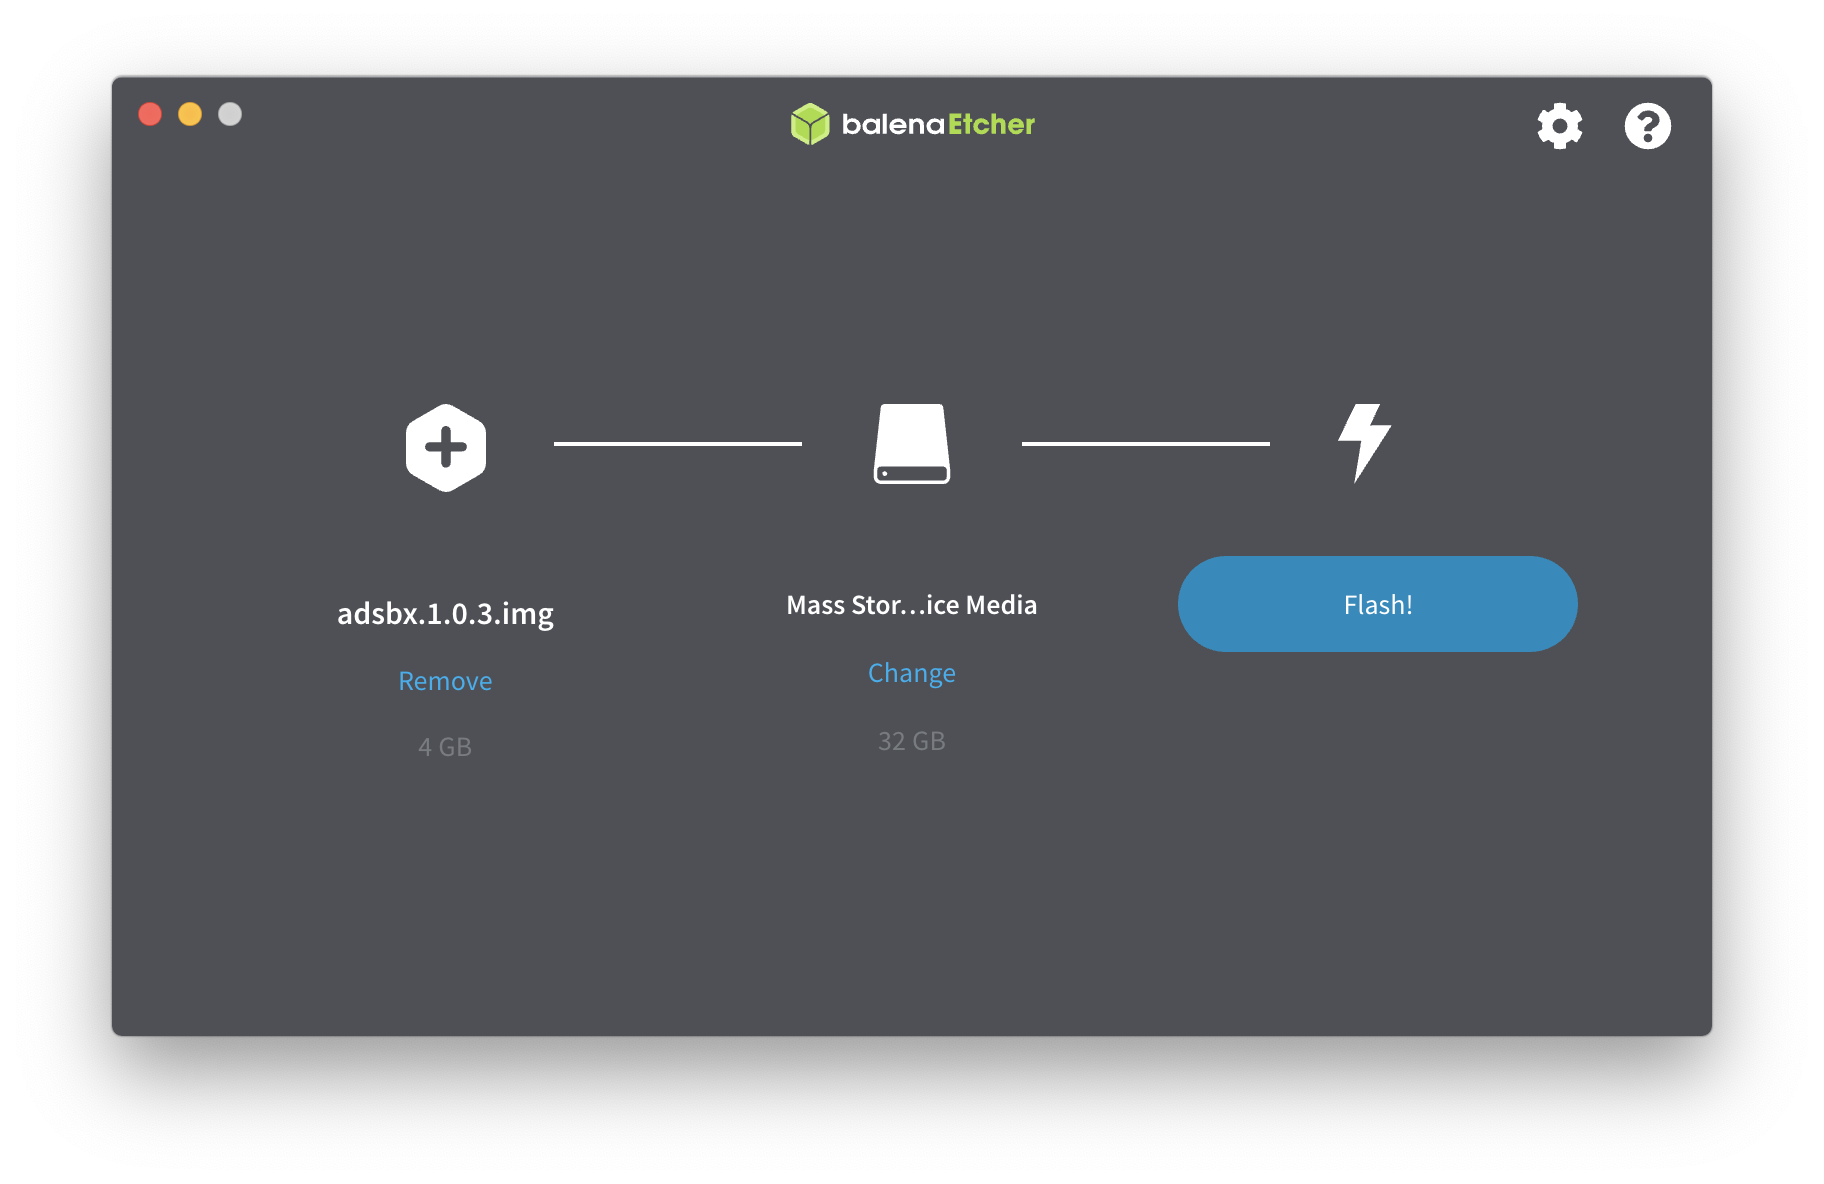
Once installed and running it’s this simple to burn the image:
安装并运行后,刻录映像非常简单:
Flash from file, select the .imgIt should automatically detect your connected SD cardThen click flash!
从文件闪存中选择.img,它将自动检测您连接的SD卡,然后单击闪存!
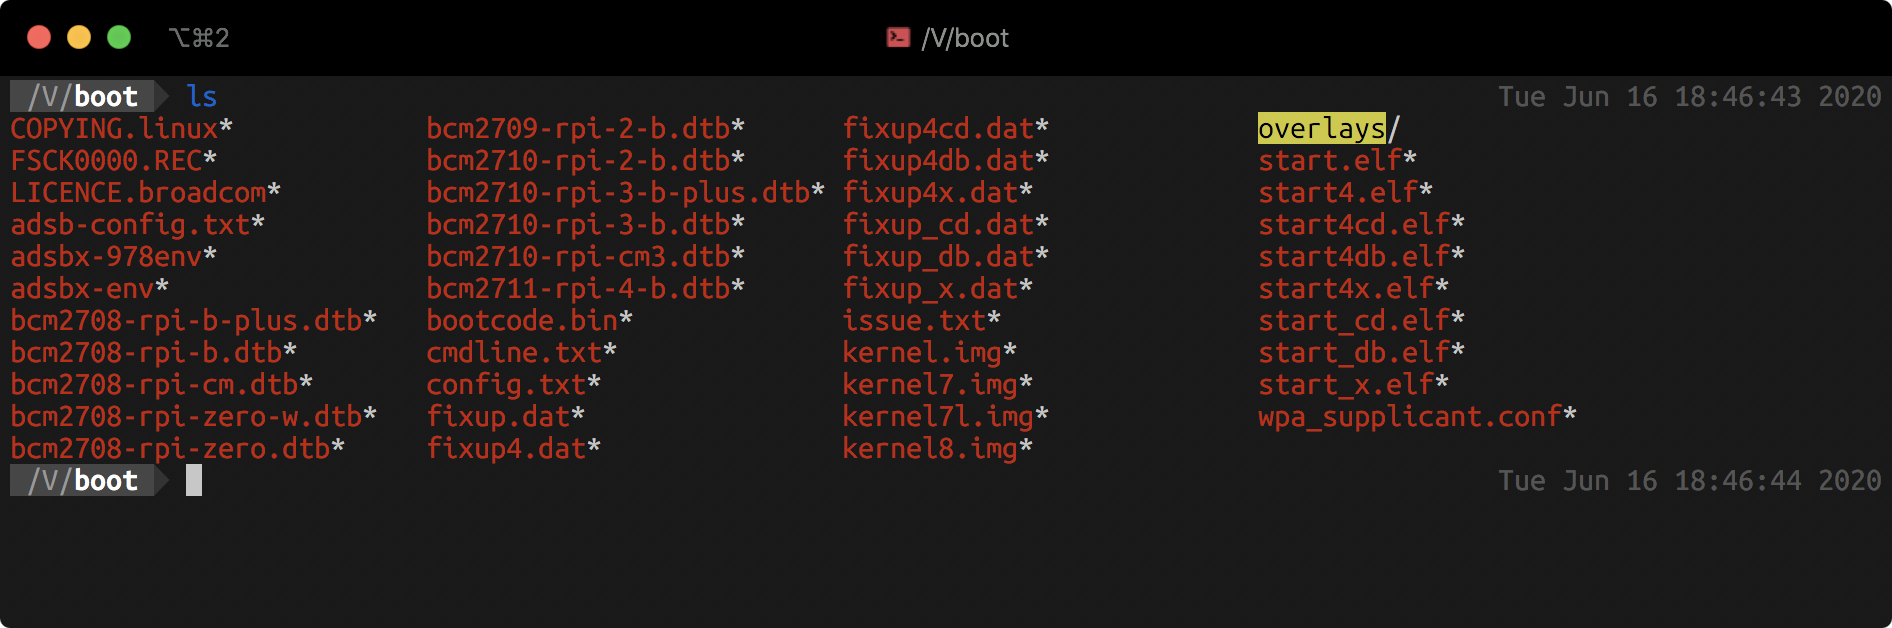
Once the flashing is complete you will need to remount the SD card on your computer. This should show the /boot partition once mounted. NOTE: If you are using the Raspian Lite aka Raspberry Pi OS — Lite install you can skip the below two steps. However, if you wish to build a wpa_supplicant.conf it will help save time later.
闪烁完成后,您将需要在计算机上重新安装SD卡。 一旦挂载,这应该显示/ boot分区。 注意:如果您正在使用Raspian Lite aka Raspberry Pi OS-Lite安装,则可以跳过以下两个步骤。 但是,如果您希望构建wpa_supplicant.conf,则将有助于节省时间。
You will want to edit both the adsb-config.txt file and wpa_supplicant.conf if using the ADSBExchange Image. If not, skip these for now.
如果使用ADSBExchange映像,则需要同时编辑adsb-config.txt文件和wpa_supplicant.conf。 如果不是,请暂时跳过这些内容。
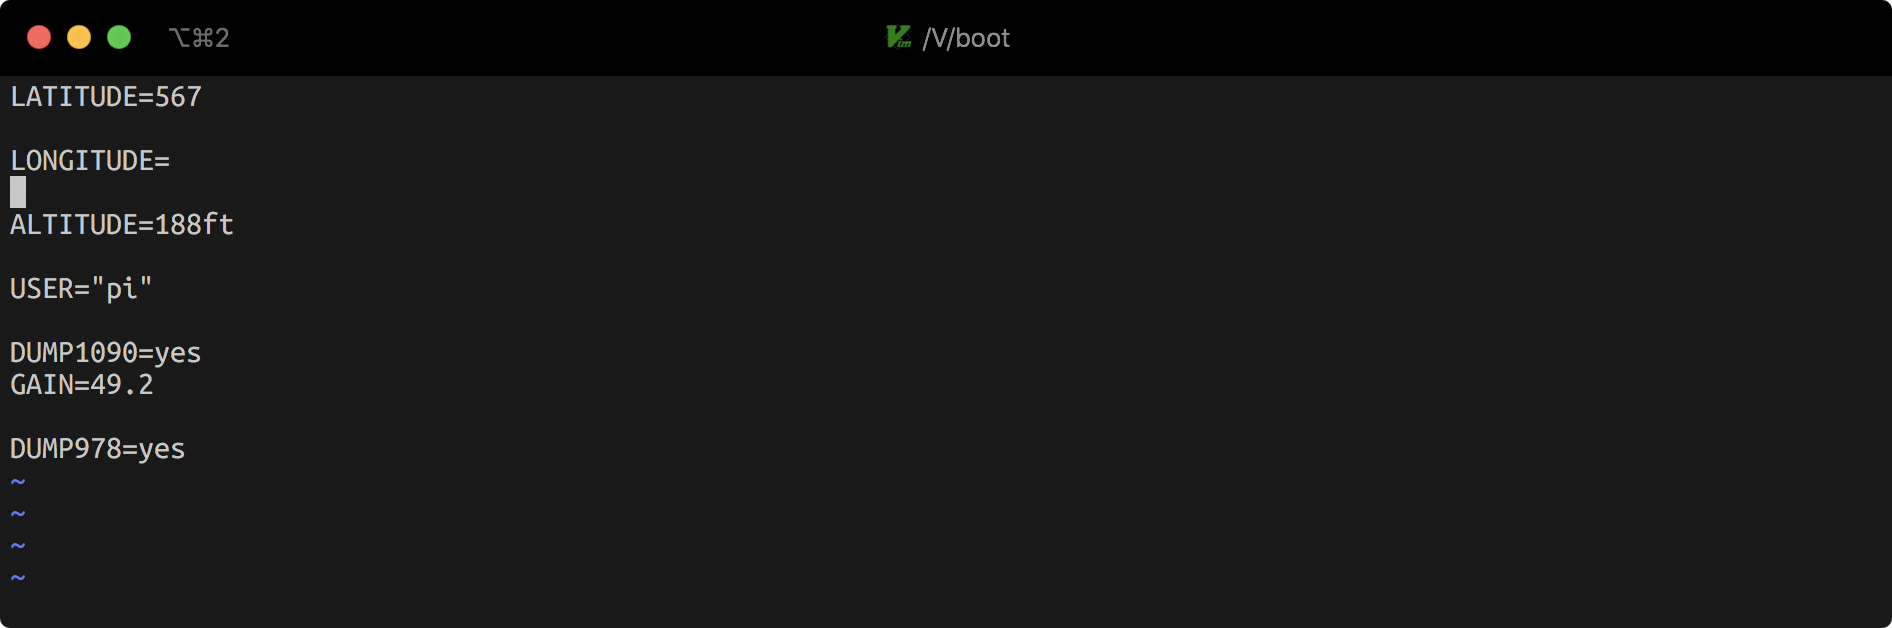
In the adsb-config.txt file you will want to make a few edits. First is setting your latitude and longitude. Delete whatever values are in there and replace with the coordinates of your ANTENNA. If you need to determine what they are this is a handy resource: https://www.freemaptools.com/elevation-finder.htm. Additionally, set the altitude of your antenna, your local username, and if you plan to also capture ADS-B on the 978Mhz then change DUMP978 from no to yes.
您将要在adsb-config.txt文件中进行一些编辑。 首先是设置纬度和经度。 删除其中的任何值,并替换为您的天线的坐标。 如果您需要确定它们是什么,这是一个方便的资源: https : //www.freemaptools.com/elevation-finder.htm 。 另外,设置天线的高度,本地用户名,如果您还打算在978Mhz上捕获ADS-B,则将DUMP978从no更改为yes 。
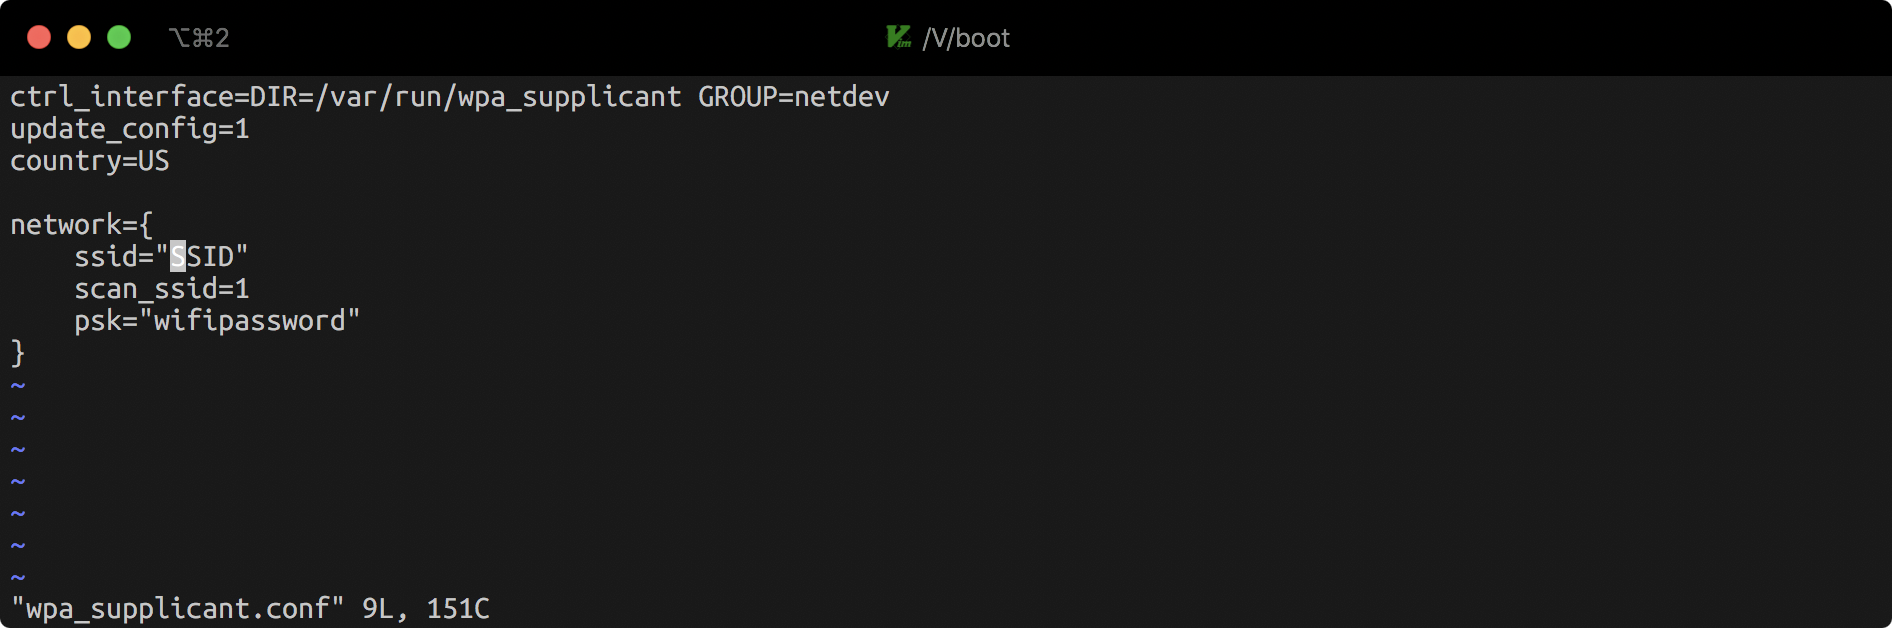
In the wpa_supplicant.conf file you need to set your SSID and psk. The SSID needs to be in quotes and it will be the full name of your WiFi network. The PSK option will be your WiFi password. Ensure this also has quotes around it and save the file.
在wpa_supplicant.conf文件中,您需要设置SSID和psk。 SSID必须用引号引起来,它将是您的WiFi网络的全名。 PSK选项将是您的WiFi密码。 确保它周围也有引号并保存文件。
At this point you’re ready to boot the Raspberry Pi. Unmount the SD card from your computer and install it into your Raspberry Pi. If you plan to use AirSpy I highly suggest a Pi4 Model B with 4GB of RAM.
至此,您已经准备好启动Raspberry Pi。 从计算机上卸载SD卡,然后将其安装到Raspberry Pi中。 如果您打算使用AirSpy,我强烈建议您使用具有4GB RAM的Pi4 ModelB。
Once the Pi has booted you will want to run through the raspi-config utility. In here you will need to check a few things. Ensure you have enabled ssh access, set a new password, configured your WiFi if you did not before and plan to use it, as well as set the time zone and adjust your locale as necessary. There are plenty of resources on the internet you can search for if you need help with any of this. Additionally before you begin I suggest you also install an NTP client… I prefer chrony. This is a random guide I found that will set you on the right path for this step.
Pi启动后,您将要运行raspi-config实用程序。 在这里,您需要检查一些内容。 确保您已启用ssh访问,设置新密码,配置WiFi(如果尚未使用过)并计划使用它,以及设置时区并根据需要调整语言环境。 如果您需要任何帮助,可以在Internet上搜索大量资源。 另外,在开始之前,我建议您还安装一个NTP客户端……我更喜欢chrony 。 这是我发现的随机指南,它将为您设置正确的路径。
Also install some useful tools:
还安装一些有用的工具:
sudo apt install chrony mtr git wget curl vim
须藤apt install chrony mtr git wget curl vim
Now you are ready for the main event! Setting up your Raspberry Pi to be an ADS-B feeder!
现在您已准备好参加主要活动! 将您的Raspberry Pi设置为ADS-B送纸器!
I like to break this down in terms of the order in which the various pieces of software work together. As I use an AirSpy I also use readsb vs the standard dump1090 setup, this will also assume you have an Airspy…
我喜欢按照各个软件一起工作的顺序来分解。 当我使用AirSpy时,我也使用readsb与标准的dump1090设置,这也将假定您有Airspy…
First we will install Readsb via the automated method:
首先,我们将通过自动化方法安装Readsb:
sudo bash -c "$(wget -q -O - https://raw.githubusercontent.com/wiedehopf/adsb-scripts/master/readsb-install.sh)"On your Pi next you will want to clone this repo from github as it will install the AirSpy software and configure readsb:https://github.com/wiedehopf/airspy-conf.git
接下来在您的Pi上,您将要从github克隆此存储库,因为它将安装AirSpy软件并配置readsb: https : //github.com/wiedehopf/airspy-conf.git
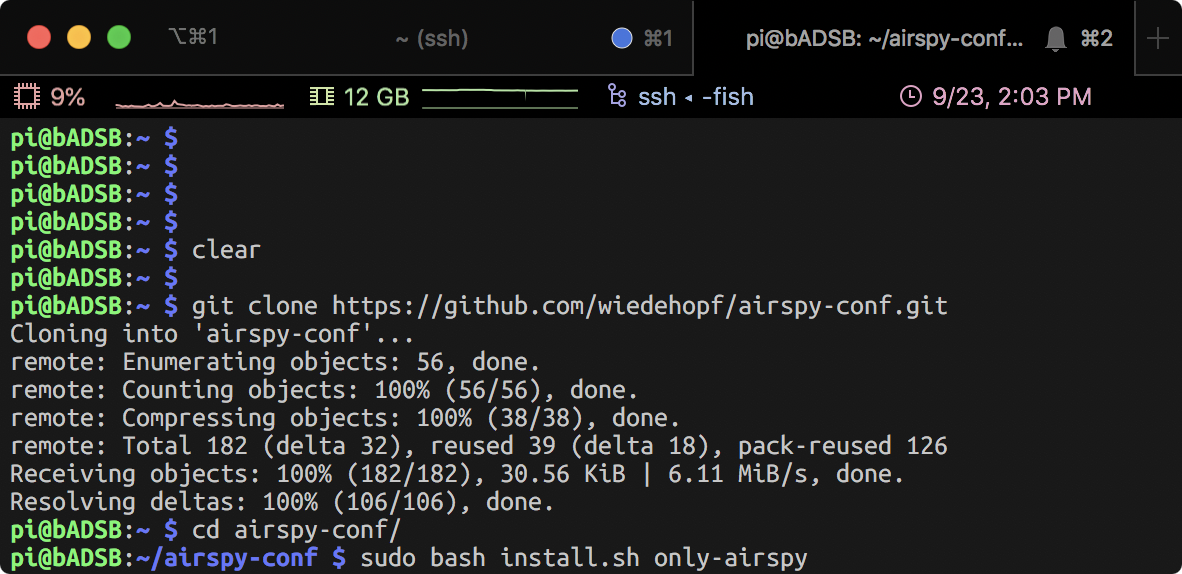
The command to run the installer after cloning is:
克隆后运行安装程序的命令是:
sudo bash ./airspy-conf/install.sh only-airspy
须藤bash ./airspy-conf/install.sh only-airspy
Last you need to set your latitude and longitude:
最后,您需要设置纬度和经度:
sudo readsb-set-location la.titude lon.gitudeNow we should have readsb and airspy installed and next we will want to install the tar1090 GUI so we can see our traffic on a map. To install this GUI it’ also quote simple:
现在我们应该已经安装了readsb和airspy,接下来我们将要安装tar1090 GUI,以便我们可以在地图上查看流量。 要安装此GUI,还引用了简单的命令:
sudo bash -c "$(wget -nv -O - https://raw.githubusercontent.com/wiedehopf/tar1090/master/install.sh)"Once that installation is complete you can (optionally) edit the configuration file to customize tar1090 to your liking. Note in here you can define different range rings:
安装完成后,您可以(可选)编辑配置文件以根据需要自定义tar1090。 请注意,您可以在此处定义不同的范围环:
sudo nano /usr/local/share/tar1090/html/config.jsIf you wish to get an overlay on your map for your anticipated coverage area based upon your antenna installation location you can use this website: http://www.heywhatsthat.com/. Once there select ‘New Panorama’ and input either your address or LAT/LONG as well as altitude of antenna. Give it a name and submit it. Within a few minutes it will provide you a link with a string of text. Save that string and replace the XXXX’s in this command with that string:
如果您希望根据天线的安装位置在地图上覆盖预期的覆盖区域,则可以使用以下网站: http : //www.heywhatsthat.com/ 。 到达后,选择“新全景图”,然后输入您的地址或LAT / LONG以及天线的高度。 给它起个名字并提交。 几分钟后,它将为您提供带有文本字符串的链接。 保存该字符串,并使用该字符串替换此命令中的XXXX:
sudo wget -O /usr/local/share/tar1090/html/upintheair.json "http://www.heywhatsthat.com/api/upintheair.json?id=XXXXXXXX&refraction=0.25&alts=12192"Now, when you visit http://127.0.0.1/tar1090 you will have a coverage plot on your graph!
现在,当您访问http://127.0.0.1/tar1090时,您的图形上将显示一个覆盖图!
You should now have a working ADS-B receiver that plots on a map where nearby aircraft are located, good work! Now, lets make this data useful to a variety of sites. One benefit to feeding numerous sites is that you get their Enterprise/Business (top tier) plan at no monthly cost. Additionally, I highly suggest everyone also feeds ADSBExchange as they do not charge for access or permit people to pay to hide flights.
现在,您应该拥有可以正常工作的ADS-B接收器,可以在附近飞机所在的地图上进行绘图,很好! 现在,让这些数据对各种站点有用。 满足众多站点需求的好处之一是,您可以免费获得其企业/业务(顶层)计划。 此外,我强烈建议每个人也向ADSBExchange喂食,因为他们不收取访问费用或允许人们付费以隐藏航班。
Let’s start by feeding ADSBExchange first!
让我们首先添加ADSBExchange!
curl -o /tmp/feed.sh https://raw.githubusercontent.com/adsbxchange/adsb-exchange/master/install.shsudo bash /tmp/feed.shIf you wish to feed more sites you can follow these steps…
如果您希望养活更多站点,则可以按照以下步骤操作…
For FlightAware see this link.
对于FlightAware,请参阅此链接。
The brief excerpt: wget https://flightaware.com/adsb/piaware/files/packages/pool/piaware/p/piaware-support/piaware-repository_3.8.1_all.debsudo dpkg -i piaware-repository_3.8.1_all.debsudo apt-get updatesudo apt-get install piawaresudo piaware-config allow-auto-updates yessudo piaware-config allow-manual-updates yessudo apt-get install dump978-fasudo reboot
简短摘录: wget https://flightaware.com/adsb/piaware/files/packages/pool/piaware/p/piaware-support/piaware-repository_3.8.1_all.deb sudo dpkg -i piaware-repository_3.8.1_all.debsudo apt-get updatesudo apt-get install piawaresudo piaware-config allow-auto-updates yessudo piaware-config allow-manual-updates yessudo apt-get install dump978-fasudo reboot
Then edit the config…
然后编辑配置…
sudo vi /etc/piaware.confallow-mlat yesmlat-results yesuat-receiver-type sdr
须藤vi /etc/piaware.confallow-mlat yesmlat-results yesuat-receiver-type sdr
To setup FlightRadar24 you can start with think link.
要设置FlightRadar24,您可以从思考链接开始。
The brief excerpt:sudo bash -c "$(wget -O - https://repo-feed.flightradar24.com/install_fr24_rpi.sh)"
简短的摘录: sudo bash -c "$(wget -O - https://repo-feed.flightradar24.com/install_fr24_rpi.sh)"
Then follow the steps as it asks questions. Once the wizard is done you need to edit the config…
然后按照其提出的步骤进行操作。 向导完成后,您需要编辑配置…
sudo vi /etc/fr24feed.ini
须藤vi /etc/fr24feed.ini
Change these lines to this:receiver=”beast-tcp”^Mhost=”127.0.0.1:30005"^M
将这些行更改为:receiver =” beast-tcp” ^ Mhost =“ 127.0.0.1:30005” ^ M
If you also wish to feed RadarBox visit this link. You can stick with their defaults which is already beast TCP to port 30005.
如果您还希望添加RadarBox,请访问此链接。 您可以保留其默认值,该默认值已是野兽TCP到端口30005的值。
The brief excerpt:sudo bash -c "$(wget -O - http://apt.rb24.com/inst_rbfeeder.sh)"sudo apt-get install mlat-client -y Then edit your configuration and ensure these are set to active:[mlat]autostart_mlat=truemlat_cmd=/usr/bin/python3.5 /usr/bin/mlat-client
简短摘录: sudo bash -c "$(wget -O - http://apt.rb24.com/inst_rbfeeder.sh)"sudo apt-get install mlat-client -y然后编辑您的配置并确保将它们设置为活动:[mlat] autostart_mlat = truemlat_cmd = / usr / bin / python3.5 / usr / bin / mlat-client
[dump978]dump978_enabled=true
[dump978] dump978_enabled = true
Last, restart the client:sudo systemctl restart rbfeeder
最后,重新启动客户端: sudo systemctl restart rbfeeder
There are other sites you can feed but I think you should have the hang of how to set that up by now. Good luck, have fun and thanks for contributing!
您还可以提供其他站点,但我认为您现在应该掌握如何设置它的窍门。 祝你好运,玩得开心,感谢您的贡献!
Be sure to share your Raspberry Pi projects with the community as well!
确保与社区共享您的Raspberry Pi项目!
翻译自: https://medium.com/@bbianchi/custom-ads-b-raspberry-pi-feeding-7f2f2a1e4251


 1141
1141


 被折叠的 条评论
为什么被折叠?
被折叠的 条评论
为什么被折叠?
 到【灌水乐园】发言


