


 本文详细介绍了如何在PyTorch中构建、加载和保存卷积神经网络(CNN)。通过实例展示了深度学习框架PyTorch在处理CNN模型时的灵活性和实用性。
pytorch卷积神经网络
This article is aimed at people who want to learn or review how to build a basic Convolutional Neural Network in Keras. The dataset in which this article is based is the Fashion-Mnist dataset.
本文针对想要学习或复习如何在Keras中构建基本卷积神经网络的人们。 本文所基于的数据集是Fashion-Mnist数据集。
Along with this article, we will explain how:
与本文一起,我们将解释如何:
- To build a basic CNN in Pytorch. 在Pytorch中建立基本的CNN。
- To run the neural networks. 运行神经网络。
- To save and load checkpoints. 保存和加载检查点。
数据集描述 (Dataset description)
Fashion-MNIST is a dataset of Zalando’s article images — consisting of a training set of 60,000 examples and a test set of 10,000 examples. Each example is a 28x28 grayscale image, associated with a label from 10 classes. We intend Fashion-MNIST to serve as a direct drop-in replacement for the original MNIST dataset for benchmarking machine learning algorithms. It shares the same image size and structure of training and testing splits.
时尚MNIST是Zalando的文章图像的数据集- C 0 60000个例的训练集和测试集10000个例子nsisting。 每个示例都是一个28x28灰度图像,与来自10个类别的标签相关联。 我们打算将Fashion-MNIST用作直接替代MNIST原始数据集的基准机器学习算法。 它具有相同的图像大小以及训练和测试分割的结构。
num_classes = 10
target_names = ['top', 'trouser', 'pullover', 'dress', 'coat', 'sandal', 'shirt', 'sneaker', 'bag', 'boot']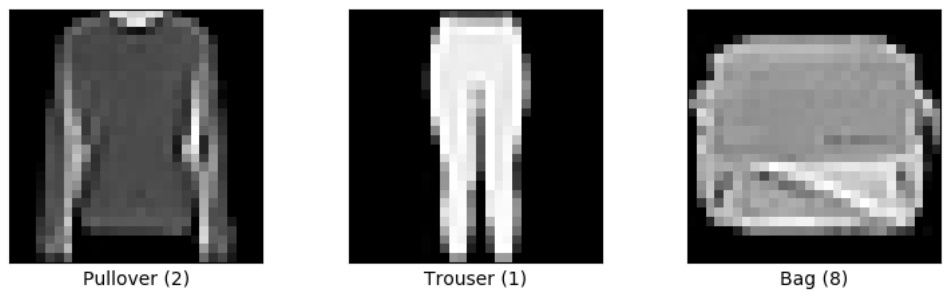
加载数据(Loading the data)
In order to run the code displayed below, it is necessary to download the following files. Once downloaded the data, you can load it using the following code.
为了运行下面显示的代码,必须下载以下文件。 下载数据后,您可以使用以下代码加载数据。
def read_idx(filename):
    with gzip.open(filename, 'rb') as f:
        zero, data_type, dims = struct.unpack('>HBB', f.read(4))
        shape = tuple(struct.unpack('>I', f.read(4))[0] for d in range(dims))
        return np.fromstring(f.read(), dtype=np.uint8).reshape(shape)

train_x = read_idx('./fashion-mnist/data/fashion/train-images-idx3-ubyte.gz')
train_y = read_idx('./fashion-mnist/data/fashion/train-labels-idx1-ubyte.gz')
test_x = read_idx('./fashion-mnist/data/fashion/t10k-images-idx3-ubyte.gz')
test_y = read_idx('./fashion-mnist/data/fashion/t10k-labels-idx1-ubyte.gz')数据标准化(Data normalization)
Then, we rescale the images from 0–255 to 0–1 by dividing the data by 255.
然后,通过将数据除以255,我们将图像从0-255缩放到0-1。
train_x = train_x/255
test_x = test_x/255前处理(Pre-processing)
Before loading the data inside the neural network, it is necessary to reshape the images to the correct format that Keras requires. When using a 2D convolution as the first layer in a model, the default shape is (batch_size, channels, height, width); (no_data, 3, 128, 128) for 128x128 RGB pictures.
在将数据加载到神经网络内部之前,有必要将图像重塑为Keras所需的正确格式。 当使用2D卷积作为模型的第一层时,默认形状为(batch_size,channels,height,width); ( no_data,3,128,128 )用于128x128 RGB图片。
The images of our dataset are grayscale images, in which the value of each pixel is a single sample representing only an amount of light. Therefore, the shape of the training data has to be (no_data, 1, 28, 28).
我们的数据集的图像是灰度图像,其中每个像素的值是仅代表一定量光的单个样本。 因此,训练数据的形状必须为( no_data,1,28,28 )。
input_shape = (1, 28, 28)


x_train = train_x.reshape(train_x.shape[0], *input_shape)
x_test = test_x.reshape(test_x.shape[0], *input_shape)


x_train = torch.stack([torch.from_numpy(np.array(i)) for i in x_train])
x_test = torch.stack([torch.from_numpy(np.array(i)) for i in x_test])
y_train = torch.stack([torch.from_numpy(np.array(i)) for i in train_y])
y_test = torch.stack([torch.from_numpy(np.array(i)) for i in test_y])


train_set = torch.utils.data.TensorDataset(x_train, y_train)
trainset, valset = torch.utils.data.random_split(train_set, [round(len(train_set)*0.75), round(len(train_set)*0.25)])
testset = torch.utils.data.TensorDataset(x_test, y_test)


train_loader = torch.utils.data.DataLoader(trainset, batch_size=batch_size, shuffle=True, num_workers=0)
val_loader = torch.utils.data.DataLoader(valset, batch_size=batch_size, shuffle=True, num_workers=0)
test_loader = torch.utils.data.DataLoader(testset, batch_size=batch_size, shuffle=False, num_workers=0)建立神经网络(Building the neural network)
For this article, I built a neural network using two 2D convolutions layers and then two fully connected layers. When declaring the 2D convolutional layers, it is possible/necessary to indicate some parameters. Also, remember to recheck the input_shape. Most errors come from not declaring it right.
对于本文,我使用两个2D卷积层以及两个完全连接的层构建了一个神经网络。 声明2D卷积层时,有可能/有必要指出一些参数。 另外,请记住要重新检查input_shape。 大多数错误来自未正确声明。
Arguments:
参数:
in_channels — Number of channels in the input image
in_channels —输入图像中的通道数
out_channels — Number of channels produced by the convolution
out_channels —卷积产生的通道数
kernel_size — Size of the convolving kernel
kernel_size —卷积内核的大小
import torch
import torch.nn as nn
import torch.nn.functional as F


class pytorch_cnn(nn.Module):
    def __init__(self, num_classes):
        super().__init__()
        self.c1 = nn.Conv2d(1, 32, 3)
        self.p1 = nn.MaxPool2d(2, 2)
        self.c2 = nn.Conv2d(32, 64, 3)
        self.d2 = nn.Dropout(0.2)
        self.l3 = nn.Linear(7744, 32)
        self.l4 = nn.Linear(32, num_classes)


    def forward(self, x):
        x = self.p1(F.relu(self.c1(x)))
        x = self.d2(F.relu(self.c2(x)))
        x = x.view(x.size(0), -1)
        x = F.relu(self.l3(x))
        x = self.l4(x)
        return x

model = pytorch_cnn(num_classes=10)
This is the architecture of the built neural network.
这是内置神经网络的体系结构。

训练神经网络 (Training the neural network)
For training the neural network, you can run the following code. Apart from training and evaluating the validation set, it will also save logs that can be afterward loaded into Tensorboard.
为了训练神经网络,您可以运行以下代码。 除了训练和评估验证集外,它还将保存日志,然后可以将其加载到Tensorboard中。
Besides, this code will save (1) the weights of the model for each epoch, and (2) the weights of the model with maximum accuracy.
此外,此代码还将节省(1)每个时期的模型权重,以及(2)以最大精度保存的模型权重。
Saving the best model is interesting because the last epoch is not always that one that performed best (e.g., the model is overfitting).
保存最佳模型很有趣,因为最后一个时期并不总是表现最好的那个时期(例如,模型过度拟合)。
def train(model, train_loader, val_loader, no_epochs):
    errs = []
    accs = []
    loss_func = nn.CrossEntropyLoss()
    optimizer = optim.Adam(model.parameters(), lr=1e-3)

    # Train
    model.train()
    for i, (images, labels) in enumerate(train_loader):
        # Run the forward pass
        outputs = model.forward(images.float())
        labels = torch.tensor(labels, dtype=torch.long)
        loss = loss_func(outputs, labels)
        errs.append(loss.cpu().detach().item())


        # Backprop and perform Adam optimisation
        optimizer.zero_grad()
        loss.backward()
        optimizer.step()


        # Track the accuracy
        total = labels.size(0)
        _, predicted = torch.max(outputs.data, 1)
        correct = (predicted == labels).sum().item()
        accs.append(correct / total)


        if (i + 1) % len(train_loader) == 0:
            print('Epoch [{}/{}], Step [{}/{}], Loss: {:.4f}, Accuracy: {:.2f}%'
                  .format(epoch + 1, no_epochs, i + 1, len(train_loader), loss.item(),
                          (correct / total) * 100))
            writer.add_scalar('Train/Loss', np.mean(errs), epoch)
            writer.add_scalar('Train/Acc', np.mean(accs), epoch)

    # Save the model
    torch.save({'epoch': epoch,
                'model_state_dict': model.state_dict(),
                'optimizer_state_dict': optimizer.state_dict(),
                'loss': loss,
               }, 'models/pytorch_' + str(datetime_now)+'/conv_net_model_'+ str(epoch)+'_'+str(np.mean(accs))+'.ckpt')


    return model, accs, errs


def validate(model, val_loader, epoch, no_epochs):
    errs = []
    accs = []
    loss_func = nn.CrossEntropyLoss()


    model.eval()
    for i, (images, labels) in enumerate(val_loader):
        # Run the forward pass
        outputs = model.forward(images.float())
        labels = torch.tensor(labels, dtype=torch.long)
        loss = loss_func(outputs, labels)
        errs.append(loss.cpu().detach().item())


        # Track the accuracy
        total = labels.size(0)
        _, predicted = torch.max(outputs.data, 1)
        correct = (predicted == labels).sum().item()
        accs.append(correct / total)

        if (i + 1) % len(val_loader) == 0:
            print('Epoch [{}/{}], Step [{}/{}], Accuracy: {:.2f}%\n'
                  .format(epoch + 1, no_epochs, i + 1, len(val_loader), (correct / total) * 100))
            niter = epoch*len(val_loader)+i
            writer.add_scalar('Validation/Loss', np.mean(errs), epoch)
            writer.add_scalar('Validation/Acc', np.mean(accs), epoch)

    return accs, errs

# Train the model
tr_err = []
tr_acc = []
ts_err = []
ts_acc = []


datetime_now = datetime.datetime.now()
datetime_now = datetime_now.strftime("%Y_%m_%d_%H_%M_%S")
print(datetime_now)
os.mkdir('models/pytorch_' + str(datetime_now))


batch_size = 512
no_epochs = 15


for epoch in range(no_epochs):  # loop over the dataset multiple times


    model, accs, errs = train(model, train_loader, epoch, no_epochs)


    tr_err.append(np.mean(errs))
    tr_acc.append(np.mean(accs))


    accs, errs = validate(model, val_loader, epoch, no_epochs)


    ts_err.append(np.mean(errs))
    ts_acc.append(np.mean(accs))


    history_values = []
    history_values.append(tr_err)
    history_values.append(tr_acc)
    history_values.append(ts_err)
    history_values.append(ts_acc)


print('Finished Training')加载并重新运行模型(Loading and re-running the model)
Since we saved the models in the step before, now it is possible to load it and keep training the neural network.
由于我们在之前的步骤中保存了模型,因此现在可以加载模型并继续训练神经网络。
The code to load the model is the following.
下面是加载模型的代码。
def load_checkpoint(path):


    model = pytorch_cnn(num_classes).to('cpu')

    # Print model's state_dict
    print("Model's state_dict:")
    for param_tensor in model.state_dict():
        print(param_tensor, "\t", model.state_dict()[param_tensor].size())

    optimizer = optim.Adam(model.parameters(), lr=1e-3)
    checkpoint = torch.load(path)
    model.load_state_dict(checkpoint['model_state_dict'])
    optimizer.load_state_dict(checkpoint['optimizer_state_dict'])
    epoch = checkpoint['epoch']
    loss = checkpoint['loss']


    return model, optimizer, epoch, loss


model, optimizer, epoch, loss = load_checkpoint(path='models/pytorch_2020_09_13_16_19_26/conv_net_model_14_0.9199650960675837.ckpt')绘制结果(Plotting the results)
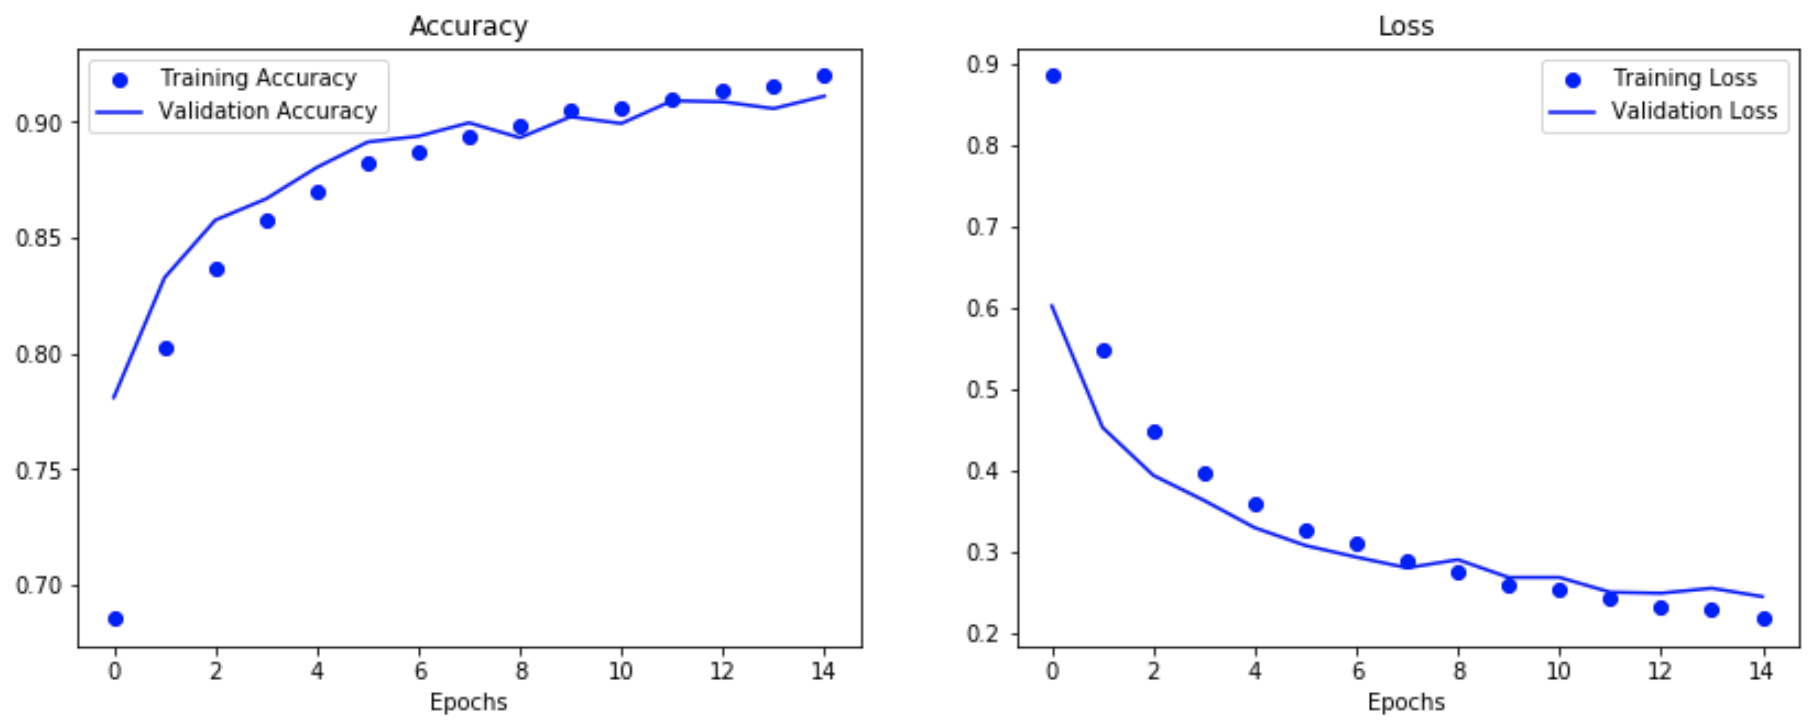
The results of the first training are displayed in the following figures.
下图显示了第一次训练的结果。
pytorch卷积神经网络


 9623
9623

 被折叠的 条评论
为什么被折叠?
被折叠的 条评论
为什么被折叠?
 到【灌水乐园】发言


