


Have you started using your touch bar and thought “why the hell do I need this in my computer”? Well, now we found some use for it! The touch bar was released in 2016, and since then users and developers have been trying to innovate on its use. Today, we will go through a simple and fast way to allow SpriteKit applications to be used on our dear touch bar.
您是否开始使用触摸栏并想过“为什么在我的计算机上需要它”? 好吧,现在我们发现了它的一些用途! 触摸栏于2016年发布,此后,用户和开发人员一直在尝试对其使用进行创新。 今天,我们将通过一种简单而快速的方法,使SpriteKit应用程序可以在我们亲爱的触摸条上使用。
Note: For this tutorial, you will need Xcode version 8.1 or later and macOS 10.12.2 or later.
注意: 对于本教程,您将需要Xcode版本8.1或更高版本以及macOS 10.12.2或更高版本。
First of all, we have to pay attention to the type of project we are creating: a touch bar only exists on MacBooks, therefore we should create a macOS project in order to facilitate our work.
首先,我们必须注意正在创建的项目的类型:触摸栏仅存在于MacBooks上,因此我们应该创建一个macOS项目以方便我们的工作。

Having it created, we are able to start coding. If your MacBook doesn’t have a physical touch bar, you can use the Xcode simulator clicking on Window > Touch Bar > Show Touch Bar.
创建完成后,我们就可以开始编码了。 如果您的MacBook没有物理触摸栏,则可以使用Xcode模拟器,单击“ 窗口”>“触摸栏”>“显示触摸栏” 。

我如何支持触控栏? (How can I support the Touch Bar?)
When we want to use elements provided by the system and its functions, like Table Views and Text Fields, we adopt their delegate protocols. Well, for the touch bar it wouldn’t be different, right? In this application, we are going to implement two protocols: NSTouchBarProvider and NSTouchBarDelegate.
当我们要使用系统及其功能提供的元素时,例如“表视图”和“文本字段”,我们采用它们的委托协议。 好吧,对于触摸条来说,不会有什么不同,对吧? 在此应用程序中,我们将实现两个协议: NSTouchBarProvider和NSTouchBarDelegate 。
In this project specifically, we are doing it at our AppDelegate, but this is not a rule. Go to AppDelegate.swift and add the following at the end of the file:
具体来说,在此项目中,我们正在AppDelegate进行此操作,但这不是规则。 转到AppDelegate.swift并在文件末尾添加以下内容:
extension AppDelegate: NSTouchBarDelegate, NSTouchBarProvider {var touchBar: NSTouchBar? {let bar = NSTouchBar()
        bar.delegate = selfbar.defaultItemIdentifiers = [.touchBarView]return bar
    }
}
Here you will be declaring touchBar, which is required for the protocol NSTouchBarProvider, responsible for your view to instantiate a touch bar. Notice that here you also:
在这里,您将声明touchBar ,它是协议NSTouchBarProvider所必需的,它负责您的视图以实例化触摸条。 请注意,在这里您还:
Created a touchBar.
创建了一个touchBar 。
- Set the delegate. 设置代表。
- Set the default item identifiers, that tells what will be displayed on the touch bar. 设置默认项目标识符,该标识符指示将在触摸栏上显示的内容。
Nevertheless, we still didn’t create a proper default item identifier. In the same file, add this to the code:
不过,我们仍然没有创建适当的默认商品标识符。 在同一文件中,将其添加到代码中:
extension NSTouchBarItem.Identifier {static let touchBarView = NSTouchBarItem.Identifier(“com.spriteKit.touchBar”)}The string used to declare the identifier can be anything, just remind not to create two identifiers with the same string.
用于声明标识符的字符串可以是任何东西,只是要提醒不要用相同的字符串创建两个标识符。
If you compile and run now, you will see that the touch bar is still empty, and that’s because we haven’t instantiated anything in there, and that is what we are going to do now.
如果现在编译并运行,您将看到触摸栏仍然为空,这是因为我们没有实例化其中的任何内容,而这就是我们现在要做的。

Create a variable called touchBarView of the type TouchBarView inside your AppDelegate.
在AppDelegate内创建一个类型为TouchBarView的名为touchBarView的变量。
Inside the NSTouchBarDelegate and NSTouchBarProvider extension, below the NSTouchBar variable, write the following:
在NSTouchBarDelegate和NSTouchBarProvider扩展内的NSTouchBar变量下面,编写以下代码:
func touchBar(_ touchBar: NSTouchBar, makeItemForIdentifier identifier: NSTouchBarItem.Identifier) -> NSTouchBarItem? {switch identifier {case NSTouchBarItem.Identifier.touchBarView:let item = NSCustomTouchBarItem(identifier: .touchBarView)if touchBarView == nil {
           touchBarView = TouchBarView()
        }item.viewController = touchBarViewreturn itemdefault: return nil  }
}
Here we will be creating touch bar items according to their identifiers, and we use a switch to act differently with each one of them. To do that, we instantiate a NSCustomTouchBarItem and add the elements we want it to show. Since our goal is to use a SpriteKit scene, we will want it first to present a View Controller.
在这里,我们将根据其标识符创建触摸条项目,并使用开关对它们中的每一个进行不同的操作。 为此,我们实例化一个NSCustomTouchBarItem并添加我们希望其显示的元素。 由于我们的目标是使用SpriteKit场景,因此我们首先希望它呈现一个View Controller 。
将视图控制器添加到触摸栏 (Adding a View Controller to the Touch Bar)
While adding the previous code, you noticed that we don’t have the “TouchBarView” class, so let’s add it! Create a new Swift File and add the following:
在添加之前的代码时,您注意到我们没有“ TouchBarView”类,因此让我们添加它吧! 创建一个新的Swift文件并添加以下内容:
import Cocoaimport Foundationimport SpriteKitclass TouchBarView: NSViewController {override func viewDidLoad() {super.viewDidLoad()
    }override func loadView() {
    }override func viewDidAppear() {super.viewDidAppear()
    }
}
This is a basic view controller with its basic methods, and that is what is being presented by the touch bar now. If we want to have a SpriteKit scene on it, we should first create a SKView variable with the size of the touch bar, so add this inside the class:
这是具有基本方法的基本视图控制器,这就是触摸条现在正在提供的内容。 如果要在其上放置SpriteKit场景,则应首先创建一个SKView变量 和触摸条的大小一样,因此在类中添加以下内容:
private lazy var gameView: SKView = {let view = SKView(frame: self.view.bounds)
    view.autoresizingMask = [.width, .height]return view
}()
Now we have a SKView, let’s use it! Add the following code inside loadView() method to add the SKView to our existent view:
现在我们有了SKView,让我们使用它! 在loadView()方法内添加以下代码,以将SKView添加到我们现有的视图中:
view = NSView()
view.addSubview(gameView)
If you run the project now, you will see we have good news! Now the touch bar seems to be white, and that happens because it is showing now our SKView :)
如果您现在运行该项目,您将看到我们有个好消息! 现在,触摸栏似乎是白色的,这是因为它现在显示了我们的SKView :)

Let’s now present a SKScene there, therefore we will be able to add whatever we want to our touch bar. In order to do that, add the following to our viewDidAppear():
现在让我们在这里展示一个SKScene ,因此我们将能够在触摸栏中添加任何我们想要的东西。 为此,请将以下内容添加到我们的viewDidAppear()中:
override func viewDidAppear() {super.viewDidAppear()if gameView.scene == nil {let scene = SKScene(fileNamed: "StartScene") as? StartScene
        scene!.scaleMode = .aspectFillgameView.presentScene(scene)
    }
}
We still don’t have the class StartScene, and that’s what we are going to do now.
我们仍然没有StartScene类,这就是我们现在要做的。
连接到SKScene (Connecting to the SKScene)
We are almost there! Now, we have to create the SKScene that we are going to present.
我们就快到了! 现在,我们必须创建将要展示的SKScene。
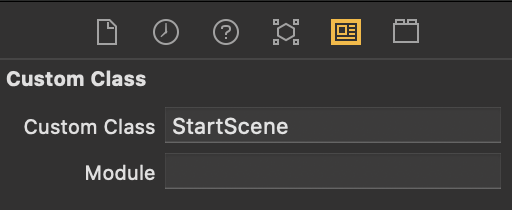
Go to you scene file (.sks) and adjust the width to 690 and the height to 30.
转到您的场景文件(.sks),并将宽度调整为690并将高度调整为30 。

And one more thing with the scene file! Write StartScene in the Custom Class field. Doing that, we will have defined the size of the scene and the class that it will display.
场景文件还有另外一件事! 在“自定义类”字段中编写StartScene 。 这样做,我们将定义场景的大小及其将显示的类。
Finally, we got to the final step! Now we should create the class we defined as custom on our .sks file, so let’s do it. Create a new Swift File and add the following code:
最后,我们进入了最后一步! 现在,我们应该在.sks文件中创建定义为自定义的类,让我们开始吧。 创建一个新的Swift文件并添加以下代码:
import Foundationimport SpriteKitclass StartScene: SKScene {override func didMove(to view: SKView) {let backgroundNode = SKSpriteNode(color: NSColor(red: 95/255, green: 75/255, blue: 139/255, alpha: 1.0), size: view.bounds.size)let labelNode = SKLabelNode(text: “Congratulations! ;]”)
        labelNode.position = CGPoint(x: 0, y: -5)
        labelNode.fontSize = 16
        labelNode.fontColor = NSColor(red: 230/255, green: 154/255, blue: 141/255, alpha: 1.0)addChild(backgroundNode)
        addChild(labelNode)
    }
}
This will instantiate our SKScene and add two nodes to demonstrate that we can use it in our touch bar just like we use on other devices. If you compile and run the project, it should now look like this.
这将实例化我们的SKScene并添加两个节点,以证明我们可以像在其他设备上使用的那样在触摸栏中使用它。 如果编译并运行该项目,则它现在应如下所示。

Our initial objective was to connect the touch bar with a SpriteKit application, so we won’t go any further on the implementation. However, if you want to adventure yourself, here is a simple example of what is possible to do, available to download here:
我们的最初目标是将触控栏与SpriteKit应用程序连接,因此我们将不对其进行进一步介绍。 但是,如果您想冒险,这里有一个简单的示例,可以在这里下载:
If you want to check the game code, click here:
如果要检查游戏代码,请单击此处:
然后去哪儿? (Where to go from here?)
In this tutorial, you learned the following:
在本教程中,您学习了以下内容:
- How to setup your app to support theTouch Bar. 如何设置您的应用程序以支持TouchBar。
- How to connect the Touch Bar with a custom View Controller. 如何将触控栏与自定义View Controller连接。
- How to connect your custom View Controller to a SKScene. 如何将自定义View Controller连接到SKScene。
If you want to go further on the app, you can implement features on your SKScene to understand better how the touch bar screen works and its limitations. Besides, I challenge you to make an interactive app using the touch bar and a Mac application.
如果您想进一步了解该应用程序,可以在SKScene上实现功能,以更好地了解触摸屏的工作方式及其局限性。 此外,我要求您使用触摸栏和Mac应用程序制作一个交互式应用程序。
翻译自: https://medium.com/academy-poa/connecting-a-spritekit-application-with-the-touchbar-86f057aa5117


 2341
2341

 被折叠的 条评论
为什么被折叠?
被折叠的 条评论
为什么被折叠?
 到【灌水乐园】发言


