


 本文介绍了如何创建适用于各种设备的iOS通用框架,包括详细步骤和资源链接。
ios 通用框架
模块化iOS (Modular iOS)
Compiling iOS frameworks for distribution is not a straightforward task. Out of the box Apple offers no option for distributing compiled frameworks. Through Xcode user interface the option to archive a framework is disabled.
编译用于分发的iOS框架并不是一项简单的任务。 Apple开箱即用,没有提供分发已编译框架的选项。 通过Xcode用户界面,用于存档框架的选项被禁用。

What about when you run Product > Build option?
当您运行产品 > 构建选项时,该怎么办?
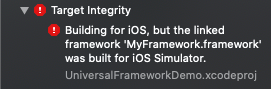
Xcode builds the framework but only for either devices or simulators. But not both.
Xcode构建框架,但仅适用于设备或模拟器。 但不是两个。
So how can you build an iOS framework that is compatible for both devices and simulators?
那么,如何构建一个既适用于设备又适用于模拟器的iOS框架?
In this post we learn how to build iOS frameworks that work for both simulators and devices. These are known as universal iOS frameworks.
在本文中,我们将学习如何构建适用于模拟器和设备的iOS框架。 这些被称为通用iOS框架。
I assume you are familiar with the basics of Swift. Additionally you must also be familiar with the basics of iOS frameworks.
我假设您熟悉Swift的基础知识。 此外,您还必须熟悉iOS框架的基础 。
Let’s dive in!
让我们潜入吧!
I have used Swift 5.2 and Xcode 11.4.1 for this post.
我已经为这篇文章使用了Swift 5.2和Xcode 11.4.1。
如何构建通用的iOS框架 (How to build universal iOS frameworks)
In this post we’ll cover the steps to build universal iOS frameworks. We’ll be starting off from a project that already contains a framework. We’ll then build a universal iOS framework. Finally learn how to consume a universal framework.
在本文中,我们将介绍构建通用iOS框架的步骤。 我们将从一个已经包含框架的项目开始。 然后,我们将构建一个通用的iOS框架。 最后,学习如何使用通用框架。
The steps we’ll take to in this post are:
在本文中,我们将采取的步骤是:
- Retrieve starter pack 检索入门包
- Building a universal iOS framework 构建通用的iOS框架
- Consuming the framework 消耗框架
1.检索入门包 (1. Retrieve starter pack)
Let’s start by downloading the starter Xcode project. Open terminal and execute the following commands:
让我们从下载入门Xcode项目开始。 打开终端并执行以下命令:
cd $HOME
curl https://github.com/anuragajwani/ios-universal-framework/archive/starter.zip -o ios_framework.zip -L -s
unzip -q ios_framework.zip
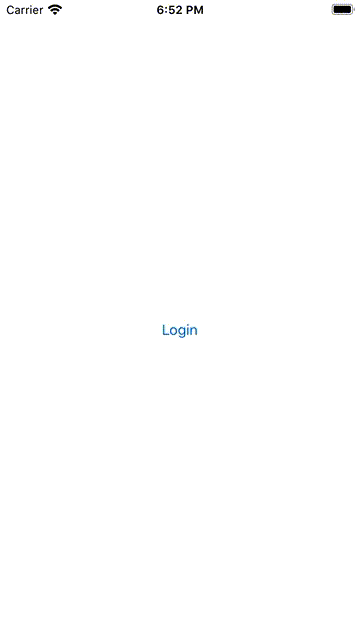
cd ios-universal-framework-starter/MyFrameworkThe starter pack contains a framework project and an app project. The framework contains a single Login screen. The app currently display a Login button that doesn’t do anything. In the last step we’ll present the Login screen from the universal iOS framework when the user taps the login button.
入门包包含一个框架项目和一个应用程序项目。 该框架包含一个“登录”屏幕。 该应用程序当前显示“登录”按钮,该按钮不执行任何操作。 在最后一步中,当用户点击登录按钮时,我们将显示来自通用iOS框架的“登录”屏幕。
2.构建通用的iOS框架 (2. Building a universal iOS framework)
Next we’ll build a universal framework from the framework project. We’ll be using the command line exclusively to do so.
接下来,我们将从框架项目构建通用框架。 我们将仅使用命令行来这样做。
First let’s create a directory where we’ll output the frameworks. We’ll be building a framework that works for simulators, a framework for devices and finally we’ll merge these two into one universal framework. Execute the following command:
首先,让我们创建一个目录,在其中输出框架。 我们将构建一个适用于模拟器的框架,一个适用于设备的框架,最后将这两个框架合并为一个通用框架。 执行以下命令:
mkdir buildNext we’ll build the framework for devices. Run the following command:
接下来,我们将构建设备框架。 运行以下命令:
xcodebuild clean build \
  -project MyFramework.xcodeproj \
  -scheme MyFramework \
  -configuration Release \
  -sdk iphoneos \
  -derivedDataPath derived_data \
  BUILD_LIBRARY_FOR_DISTRIBUTION=YES
The above command will output a devices compatible framework under derived_data/Build/Products/Release-iphoneos/ within the project. The command is similar to when we build the framework through the Xcode user interface with the device destination set to Generic iOS Device.
上面的命令将在项目内的derived_data/Build/Products/Release-iphoneos/下输出设备兼容的框架。 该命令类似于我们通过Xcode用户界面构建框架并将设备目标设置为Generic iOS Device 。

Note BUILD_LIBRARY_FOR_DISTRIBUTION=YES argument. This sets the Build Libraries for Distribution to Yes. You can also set through the Xcode UI.
注意 BUILD_LIBRARY_FOR_DISTRIBUTION=YES参数。 这会将“分发的构建库”设置为“是”。 您也可以通过Xcode UI进行设置。

Built frameworks already contain a public interface in a serialised binary format. This format is subject to change in newer Swift versions. This means that future versions of Swift might not be able to read the public serialised binary format interface. Setting BUILD_LIBRARY_FOR_DISTRIBUTION to YES tells Xcode to generate a non-binary format of the frameworks public interface. This public interface is compatible with newer versions of Swift.
构建的框架已经包含序列化二进制格式的公共接口。 此格式可能会在较新的Swift版本中更改。 这意味着Swift的未来版本可能无法读取公共序列化二进制格式的接口。 将BUILD_LIBRARY_FOR_DISTRIBUTION设置为YES告诉Xcode生成框架公共接口的非二进制格式。 此公共接口与较新版本的Swift兼容。
Let’s copy the framework into our output build folder. Execute the following commands:
让我们将框架复制到我们的输出build文件夹中。 执行以下命令:
mkdir build/devices
cp -r derived_data/Build/Products/Release-iphoneos/MyFramework.framework build/devices
Next we want to add simulator support to our build to make it a universal framework. Let’s build the framework for simulators. Execute the following command:
接下来,我们要向构建中添加模拟器支持,以使其成为通用框架。 让我们为模拟器构建框架。 执行以下命令:
xcodebuild clean build \
  -project MyFramework.xcodeproj \
  -scheme MyFramework \
  -configuration Release \
  -sdk iphonesimulator \
  -derivedDataPath derived_data \
  BUILD_LIBRARY_FOR_DISTRIBUTION=YES
The command above will output an iOS framework compatible with simulator s in derived_data/Build/Products/Release-iphonesimulator/.
上面的命令将在derived_data/Build/Products/Release-iphonesimulator/输出与模拟器兼容的iOS框架。
Next let’s copy the simulator framework into our build folder. Execute the following commands:
接下来,将模拟器框架复制到我们的build文件夹中。 执行以下命令:
mkdir build/simulator
cp -r
Next we’ll create a universal framework. For this we’ll use the devices framework as our starting point. Execute the following commands:
接下来,我们将创建一个通用框架。 为此,我们将使用设备框架作为起点。 执行以下命令:
mkdir build/universal
cp -r build/devices/MyFramework.framework build/universal/
Next we’ll extract the the simulator and devices binaries from the executables within the frameworks and merge into a single executable with both binaries. Execute the following command:
接下来,我们将从框架内的可执行文件中提取模拟器和设备的二进制文件,然后将两个二进制文件合并为一个可执行文件。 执行以下命令:
lipo -create \
  build/simulator/MyFramework.framework/MyFramework \
  build/devices/MyFramework.framework/MyFramework \
  -output build/universal/MyFramework.framework/MyFramework
To make universal framework work we’ll also need the public interfaces for the binaries to be included in the framework. These are located under the directory .swiftmodule. As we based off the framework from device compatible framework devices interfaces are included. Let’s copy in the public interfaces for simulators. Execute the following command:
为了使通用框架正常工作,我们还需要将二进制文件包含在框架中的公共接口。 它们位于目录.swiftmodule 。 由于我们基于与设备兼容的框架的框架,因此包含了设备接口。 让我们在模拟器的公共接口中进行复制。 执行以下命令:
cp -r \
build/simulator/MyFramework.framework/Modules/MyFramework.swiftmodule/* \
build/universal/MyFramework.framework/Modules/MyFramework.swiftmodule/
And that’s it! Our framework is now ready to be consumed by devices and simulators!
就是这样! 现在,我们的框架已准备就绪,可供设备和模拟器使用!
3.消耗框架 (3. Consuming the framework)
For the final step we’ll learn how to consume the universal iOS framework and see it build and run for both iOS devices and iOS simulators. We’ll do that through the app included in the starter pack.
对于最后一步,我们将学习如何使用通用的iOS框架,并了解如何为iOS设备和iOS模拟器构建并运行它。 我们将通过入门包中包含的应用来完成此操作。
Let’s open the app project included in Xcode. The app project is included within the starter pack. Execute the following commands:
让我们打开Xcode中包含的应用程序项目。 该应用程序项目包含在入门包中。 执行以下命令:
open -a Xcode ~/ios-universal-framework-starter/UniversalFrameworkDemo/UniversalFrameworkDemo.xcodeprojNext we’ll link the framework from universal build folder into UniversalFrameworkDemo app. Let’s open project navigator. From menu select View > Navigators > Show Project Navigator.
接下来,我们将框架从通用构建文件夹链接到UniversalFrameworkDemo应用程序。 打开项目导航器。 从菜单中选择视图 > 导航器 > 显示项目导航器 。

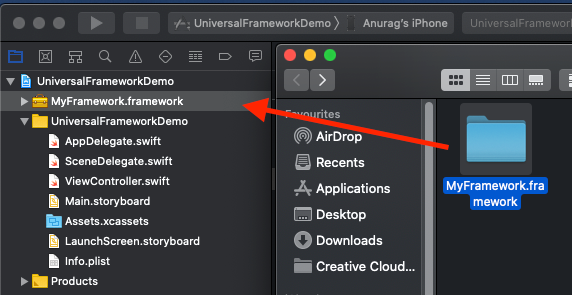
Next let’s drag and drop the generated framework into the UniversalFrameworkDemo app project. Let’s open finder showing the generated framework. Execute the following command:
接下来,让我们将生成的框架拖放到UniversalFrameworkDemo应用程序项目中。 让我们打开finder来显示生成的框架。 执行以下命令:
open -a Finder ~/ios-universal-framework-starter/MyFramework/build/universalNext drag and drop MyFramework.framework into the project navigator in UniversalFrameworkDemo app.
接下来将MyFramework.framework拖放到项目导航器中 在UniversalFrameworkDemo应用程序中。
When prompted “Choose options for adding these files:” check Copy items if needed and check UniversalFrameworkDemo target. Click Finish.
出现提示“ 选择添加这些文件的选项: ”时, 如果需要 ,请选中“ 复制项目”,然后选中“ UniversalFrameworkDemo”目标。 单击完成。

One last thing before the framework is successfully linked is to make sure that framework gets embedded into the app when the app gets built. On the project navigator select UniversalFrameworkDemo project settings (the one with the blue icon), then select the UniversalFrameworkDemo app target. Next select the General tab and finally scroll down to the “Frameworks, Libraries, and Embedded” Content section.
成功链接框架之前的最后一件事是确保在构建应用程序时将框架嵌入到应用程序中。 在项目导航器上,选择UniversalFrameworkDemo项目设置(带有蓝色图标的项目设置),然后选择UniversalFrameworkDemo应用程序目标。 接下来,选择“ General选项卡,最后向下滚动至“ 框架,库和嵌入式 ” 内容部分。

Make sure the “Embed” is set to “Embed and Sign”.
确保将“ 嵌入 ”设置为“ 嵌入并签名 ”。

Next let’s present MyFramework’s LoginViewController when the user taps the Login button on UniversalFrameworkDemo app. Open ViewController.swift. Add the following line under import UIKit:
接下来,当用户点击UniversalFrameworkDemo应用程序上的Login按钮时,展示MyFramework的LoginViewController。 打开ViewController.swift 。 在import UIKit下添加以下行:
import MyFrameworkThen within loginButtonTapped present the LoginViewController from MyFramework:
然后在loginButtonTapped显示来自MyFramework的LoginViewController :
let loginViewController = LoginViewController()self.present(loginViewController, animated: true, completion: nil)Finally select any device or simulator and the click Product > Run. You should now see the app running and presenting the login screen when login button is tapped regardless of the app being ran on simulator or device.
最后,选择任何设备或模拟器,然后单击产品 > 运行 。 现在,无论在模拟器或设备上运行的应用程序是什么,只要轻按“登录”按钮,您都应该看到该应用程序正在运行并显示登录屏幕。
摘要 (Summary)
In this post we learnt:
在这篇文章中,我们学习了:
- how to build universal iOS frameworks 如何建立通用的iOS框架
- how to consume universal iOS frameworks 如何使用通用的iOS框架
最后的笔记 (Final notes)
You can find the full source code in the link below:
您可以在下面的链接中找到完整的源代码:
So you know how to create, maintain and compile iOS frameworks that are easily consumeable by iOS app projects. But how do you distribute these?
因此,您知道如何创建,维护和编译可被iOS应用程序项目轻松使用的iOS框架。 但是您如何分配这些?
As you release newer versions of your framework integrators will need to remove the old version, download the new version and link the new version. They will need to know when a version is out too.
发布新版本的框架时,集成商需要删除旧版本,下载新版本并链接新版本。 他们也需要知道何时发布版本。
But worry not! There are great tools that manage framework integration where integrators can easily upgrade a version of your framework with the latest bugfix or minor version as desired by them. The two most popular tools are Cocoapods and Carthage.
但是不用担心! 有许多很棒的工具可以管理框架集成,集成商可以根据需要轻松地使用最新的错误修正或次要版本来升级框架的版本。 两种最受欢迎的工具是Cocoapods和Carthage。
In a previous post I covered how to distribute compiled iOS frameworks through Cocoapods. You can learn more by clicking the link below:
在上一篇文章中,我介绍了如何通过Cocoapods分发已编译的iOS框架。 您可以通过点击以下链接了解更多信息:
Stay tuned for more on iOS development! Follow me on Twitter or Medium.
翻译自: https://medium.com/@anuragajwani/how-to-build-universal-ios-frameworks-74b6b07bf31d
ios 通用框架


 375
375

 被折叠的 条评论
为什么被折叠?
被折叠的 条评论
为什么被折叠?
 到【灌水乐园】发言


