


构建 快速迭代
If you like something and want to show it to others you need a like view. If you want to do it beautifully, you need a like view with an explosive animation!
如果您喜欢某些东西并想向他人展示,则需要一个类似的视图。 如果您想做得精美,则需要具有爆炸性动画的相似视图!
First, let’s take a look at the animation.
首先,让我们看一下动画。
If you don’t want to read full article, you can find a source code in my GitHub repository.
如果您不想阅读全文,则可以在我的GitHub存储库中找到源代码。
To understand what the animation is, let’s take a look at the animation in slow motion.
要了解什么是动画,让我们看一下慢动作的动画。

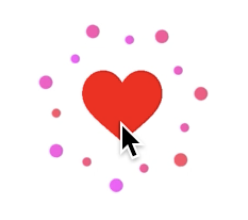
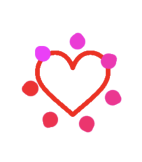
As you can see, it consists of four elements:
如您所见,它包含四个元素:
- The heart (empty at the beginning and full at the end of the animation) 心(动画开始时为空,动画结束时为空)
- A red circle that grows. 成长的红色圆圈。
- A white circle that grows into the red circle. 变成红色圆圈的白色圆圈。
- Fireworks. 烟花。
The animation has several steps:
动画有几个步骤:
- Fade out the heart. 淡化心脏。
- Grow a red circle. 成长一个红色圆圈。
- Grow a white circle. 成长一个白色的圆圈。
- Fade in the heart view. 在心脏视图中渐隐。
- Blow up fireworks. 炸烟花。
To create these elements and achieve this animation we’ll use Core Animation.
为了创建这些元素并实现此动画,我们将使用Core Animation。
You need to know what CALayer, CAShapeLayer, CAReplicatorLayer, CABasicAnimation, CAKeyframeAnimation and CAAnimationGroup are. I won’t be explaining these layers and animations. If you want to know more, read some articles and documentation, and come back to this article when you’re done.
您需要知道CALayer , CAShapeLayer , CAReplicatorLayer , CABasicAnimation , CAKeyframeAnimation和CAAnimationGroup是什么。 我不会解释这些图层和动画。 如果您想了解更多信息,请阅读一些文章和文档,并在完成后返回本文。
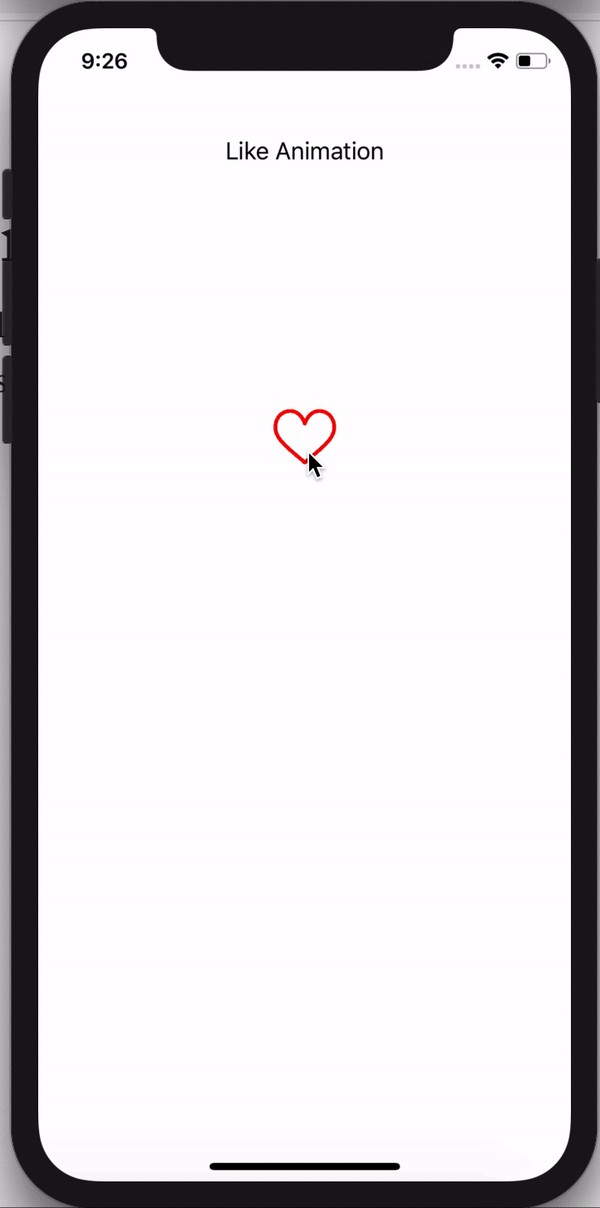
Now, let’s create our layers. First, we need to create a full and empty like (heart) icon . To create these likes, we need to add icons to our assets.
现在,让我们创建图层。 首先,我们需要创建一个完整的空白图标(心形)。 要创建这些赞,我们需要向资产添加图标。
After that we can create the like layer.
之后,我们可以创建like层。
private lazy var likeLayer: CALayer = CALayer()


  private func changeLikeState(isFilled: Bool) {
    let maskLayer = CALayer()
    maskLayer.frame = bounds
    maskLayer.contents = UIImage(named: isFilled ? "like.fill" : "like")?.cgImage
    likeLayer.frame = bounds
    likeLayer.mask = maskLayer
    likeLayer.backgroundColor = UIColor.red.cgColor
  }
As you can see, we write the changeLikeState(isFilled:) method. This either adds a filled like or not to the layer depending on the isFilled parameter. Note that we use mask property, so we can change the icon color.
如您所见,我们编写了changeLikeState(isFilled:)方法。 根据isFilled参数,这会为图层添加或不填充。 请注意,我们使用mask属性 ,因此我们可以 更改图标颜色。
Let’s move on. Now, we’ll create circles.
让我们继续。 现在,我们将创建圈子。
private lazy var redCircleLayer: CAShapeLayer = {
    createCircleLayer(with: .red)
  }()

  private lazy var whiteCircleLayer: CAShapeLayer = {
    createCircleLayer(with: .white)
  }()


  private func createCircleLayer(with color: UIColor) -> CAShapeLayer {
    let layer = CAShapeLayer()
    layer.path = UIBezierPath(roundedRect: self.bounds,
                              cornerRadius: self.bounds.height / 2).cgPath
    layer.frame = self.bounds
    layer.fillColor = color.cgColor
    self.layer.addSublayer(layer)
    return layer
  }
At first, we write the createCircleLayer(with:) method. This creates CAShapeLayer and a circle using UIBezierPath, which is added to the path property of the layer. In the end, we use this method to create the redCircleLayer and whiteCircleLayer.
首先,我们编写createCircleLayer(with:) 方法。 这将使用UIBezierPath创建CAShapeLayer和一个圆,该圆将添加到图层的path属性中。 最后,我们使用此方法创建redCircleLayer 和 whiteCircleLayer 。
We’ve done the simplest part. Now, we need to create the firework. Let’s take a look at that.
我们已经完成了最简单的部分。 现在,我们需要创建烟花。 让我们来看看。
The fireworks consist of large and small circles. To create a circle, let’s write a method createDotLayer(radius:). This method has a radius parameter that defines the size of a circle.
烟花由大小圆圈组成。 为了创建一个圆,让我们编写一个方法createDotLayer(radius:) 。 此方法具有定义圆形大小的radius参数。
private func createDotLayer(radius: CGFloat) -> CALayer {
    let layer = CALayer()
    layer.frame = CGRect(x: 0, y: 0, width: radius * 2, height: radius * 2)
    layer.backgroundColor = UIColor.red.cgColor
    layer.cornerRadius = radius
    layer.backgroundColor = UIColor(red: 1, green: 0, blue: 1, alpha: 1).cgColor
    return layer
  }
Next, we need to create an array of circles. This array consists of two circles: small and big. Then we’ll multiply them using CAReplicatorLayer.
接下来,我们需要创建一个圆形数组。 该数组由两个圆圈组成:小圆圈和大圆圈。 然后,我们将使用CAReplicatorLayer将它们CAReplicatorLayer 。
private lazy var movableDotShapeLayers: [CALayer] = {
    [createDotLayer(radius: firstDotsRadius),
     createDotLayer(radius: secondDotsRadius)]
  }()
So, the movableDotShapeLayers property contains two circles: small and big. Next, we need to create the CAReplicatorLayer. To do this we write the createDotsLayer method.
因此, movableDotShapeLayers 属性包含两个圆圈:大和小。 接下来,我们需要创建CAReplicatorLayer 。 为此,我们编写了createDotsLayer方法。
private func createDotsLayer(itemLayer: CALayer) -> CAReplicatorLayer {
    let layer = CAReplicatorLayer()
    layer.frame = bounds
    layer.addSublayer(itemLayer)
    layer.instanceCount = dotsCount
    let angle = CGFloat.pi * 2 / CGFloat(dotsCount)
    layer.instanceTransform = CATransform3DMakeRotation(angle, 0, 0, 1)
    let offset = -1 / Float(dotsCount)
    layer.instanceBlueOffset = offset
    return layer
  }
So, we’ve created the CAReplicatorLayer and add the small and big circles as a sub-layer. Next, we use the instanceCount property to determine how many circles there will be in the layer. We calculate the distance between them and store that in an angle variable. To stretch the circles we use the instanceTransform property of the layer. To give the circles different colors, we use the instanceBlueOffset property. There are two more properties that we can use, instanceRedOffset and instanceGreenOffset, but I only use instanceBlueOffset.
因此,我们创建了CAReplicatorLayer并将小圆圈和大圆圈添加为子层。 接下来,我们使用instanceCount属性来确定图层中将有多少个圆。 我们计算它们之间的距离并将其存储在angle变量中。 为了拉伸圆,我们使用了图层的instanceTransform属性。 为了给圆提供不同的颜色,我们使用instanceBlueOffset属性。 我们可以使用另外两个属性instanceRedOffset 和 instanceGreenOffset ,但我只使用instanceBlueOffset 。
Let’s look at what we have.
让我们看看我们有什么。
Now our circles are under each other (the small circles are under the large ones). Let’s fix that. To do this we add transform for the CAReplicatorLayer. It’s pretty easy.
现在我们的圈子在彼此之下(小圈子在大圈子之下)。 让我们修复它。 为此,我们为CAReplicatorLayer添加了转换。 很简单
private lazy var movableDotReplicatorLayers: [CALayer] = {
    movableDotShapeLayers
      .enumerated()
      .map({ (index, dotLayer) -> CALayer in
        let layer = createDotsLayer(itemLayer: dotLayer)
        layer.transform = CATransform3DMakeRotation(CGFloat.pi * 2 + CGFloat(index * dotsDistanceCoefficient), 0, 0, 1)
        return layer
      })
  }()
The result will look like this.
结果将如下所示。

At the start, our circles must be hidden. So, add isHidden = true for the CAReplicatorLayers and move on.
首先,我们的圈子必须隐藏。 因此,添加isHidden = true 为了 CAReplicatorLayers 继续前进。
At this moment, we’ve created all the layers. All we need to do is add tap gestures and some animations.
此时,我们已经创建了所有图层。 我们需要做的就是添加点击手势和一些动画。
// MARK: - Gestures
  private lazy var tapGesture: UITapGestureRecognizer = {
    let tap = UITapGestureRecognizer(target: self, action: #selector(didTapLikeView))
    tap.numberOfTapsRequired = 1
    tap.numberOfTouchesRequired = 1
    return tap
  }()

  // MARK: - Actions
  @objc private func didTapLikeView() {
    if !isFilled {
      // Start animation
    } else {
      // Stop animation
    }
    isFilled.toggle()
  }
If the like view is filled we stop the animation and if not we start the animation. Pretty simple, isn’t it?
如果填充了like视图,我们将停止动画,否则,我们将开始动画。 很简单,不是吗?
To stop animations let’s write a method, stopAnimations().
要停止动画,让我们编写一个方法stopAnimations() 。
private func stopAnimations() {
    likeLayer.removeAllAnimations()
    redCircleLayer.removeAllAnimations()
    whiteCircleLayer.removeAllAnimations()
    movableDotShapeLayers.forEach({ $0.removeAllAnimations() })
    likeLayer.isHidden = false
    redCircleLayer.isHidden = true
    whiteCircleLayer.isHidden = true
    movableDotReplicatorLayers.forEach({ $0.isHidden = true })
  }
So, to stop animations all we need to do is remove all the animations from all the layers that can be animated. We also hide unnecessary layers (the red and white circles and fireworks).
因此,要停止动画,我们需要做的就是从可以动画化的所有层中删除所有动画。 我们还隐藏了不必要的图层(红色和白色圆圈和烟花)。
Let’s move on to the first step of the animation. Our first animation fades out the like view. To achieve this effect we animate the opacity of the layer from 1 to 0.
让我们继续进行动画的第一步。 我们的第一个动画淡化了类似视图。 为了实现此效果,我们将图层的不透明度从1设置为0。
private func fadeOutLikeView() {
    let anim = CABasicAnimation(keyPath: "opacity")
    anim.delegate = self
    anim.fromValue = 1
    anim.toValue = 0
    anim.duration = duration
    anim.fillMode = .both
    anim.setValue(AnimationKeys.fadeOutLike,
                  forKey: AnimationKeys.animationName.rawValue)
    likeLayer.add(anim, forKey: nil)
  }
Note that we set a new value and use the delegate property. We do this to understand when the animation is stopped. We need it to re-start at the next step of the animation.
请注意,我们设置了一个新值并使用了委托属性。 我们这样做是为了了解动画何时停止。 我们需要它重新开始动画的下一步。
Let’s get ahead of ourselves and take a look at the animation call sequence.
让我们超越自己,看看动画调用序列。
func animationDidStart(_ anim: CAAnimation) {
    typealias Keys = AnimationKeys
    guard let key = anim.value(forKey: Keys.animationName.rawValue) as? Keys else {
      return
    }
    switch key {
    case .fadeInLike:
      likeLayer.isHidden = false
    case .redCircleFadeIn:
      redCircleLayer.isHidden = false
    case .whiteCircleFadeIn:
      whiteCircleLayer.isHidden = false
    case .moveFireworks:
      movableDotReplicatorLayers.forEach({ layer in
        layer.isHidden = false
      })
    default:
      break
    }
  }

  func animationDidStop(_ anim: CAAnimation, finished flag: Bool) {
    typealias Keys = AnimationKeys
    guard let key = anim.value(forKey: Keys.animationName.rawValue) as? Keys else {
      return
    }
    guard flag else { return }
    switch key {
    case .fadeOutLike:
      likeLayer.isHidden = true
      fadeInRedCircle()
    case .redCircleFadeIn:
      fadeInWhiteCircle()
    case .whiteCircleFadeIn:
      redCircleLayer.isHidden = true
      whiteCircleLayer.isHidden = true
      fadeInLikeView()
    case .fadeInLike:
      makeFireworks()
    case .moveFireworks:
      movableDotReplicatorLayers.forEach({ layer in
        layer.isHidden = true
      })
      movableDotShapeLayers.forEach({ layer in
        layer.removeAllAnimations()
      })
    default:
      break
    }
}animationDidStart(_:) — is a delegate method that is called before starting the animation. We use this delegate method to make the necessary layer visible.
animationDidStart( _ :) —是在开始动画之前调用的委托方法。 我们使用此委托方法使必要的图层可见。
animationDidStop(_:, finished:) — is a delegate method that’s called after the animation finishes. We use this delegate method to start the next step of our explosive animation and to hide unnecessary layers.
animationDidStop( _ :, finished:) —是在动画结束后调用的委托方法。 我们使用此委托方法开始爆炸性动画的下一步,并隐藏不必要的图层。
As we can see, the sequence of animations is:
如我们所见,动画序列为:
- Fade out like view 像视图一样淡出
- Fade in red circle 淡入红色圆圈
- Fade in white circle 淡入白色圆圈
- Fade in like view 像视图一样淡入
- Make fireworks 制作烟花
Our last task is to implement these methods. We’ve already implemented the fadeOutLikeView() method. Let’s implement the fadeInRedCircle() method.
我们的最后一个任务是实现这些方法。 我们已经实现了fadeOutLikeView() 方法。 让我们实现fadeInRedCircle ()方法。
private func fadeInRedCircle() {
    let anim = CABasicAnimation(keyPath: "transform.scale")
    anim.delegate = self
    anim.fromValue = 0
    anim.toValue = 1
    anim.duration = duration
    anim.fillMode = .both
    anim.setValue(AnimationKeys.redCircleFadeIn,
                  forKey: AnimationKeys.animationName.rawValue)
    redCircleLayer.add(anim, forKey: nil)
  }
Making the red circle appear is very simple — we just increase the scale of the circle from 0 to 1. The same goes for the white circle and like view.
使红色圆圈看起来非常简单-我们只需将圆圈的比例从0增加到1。白色圆圈和类似视图也是如此。
private func fadeInWhiteCircle() {
    let anim = CABasicAnimation(keyPath: "transform.scale")
    anim.delegate = self
    anim.fromValue = 0
    anim.toValue = 1
    anim.duration = duration
    anim.fillMode = .both
    anim.setValue(AnimationKeys.whiteCircleFadeIn,
                  forKey: AnimationKeys.animationName.rawValue)
    whiteCircleLayer.add(anim, forKey: nil)
  }

  private func fadeInLikeView() {
    let anim = CABasicAnimation(keyPath: "transform.scale")
    anim.delegate = self
    anim.fromValue = 0
    anim.toValue = 1
    anim.duration = duration
    anim.fillMode = .both
    anim.setValue(AnimationKeys.fadeInLike,
                  forKey: AnimationKeys.animationName.rawValue)
    likeLayer.add(anim, forKey: nil)
  }
We’ve done the simplest part. Let’s implement the last animation.
我们已经完成了最简单的部分。 让我们实现最后一个动画。
private func makeFireworks() {
    movableDotShapeLayers
      .enumerated()
      .forEach({ (index, dotLayer) in
        let opacityAnim = CABasicAnimation(keyPath: "opacity")
        opacityAnim.toValue = 0.0

        let positionAnim = CABasicAnimation(keyPath: "position")
        let currentPosition = dotLayer.position
        let offset = CGFloat(dotsPositionCoefficient * (index + 1))
        let nextPosition = CGPoint(x: currentPosition.x - offset,
                                    y: currentPosition.y - offset)
        positionAnim.toValue = NSValue(cgPoint: nextPosition)

        let scaleAnim = CABasicAnimation(keyPath: "transform.scale")
        scaleAnim.fromValue = 1.0
        scaleAnim.toValue = 0.0

        let anim = CAAnimationGroup()
        anim.delegate = self
        anim.animations = [opacityAnim, positionAnim, scaleAnim]
        anim.duration = duration
        anim.speed = 0.2
        anim.fillMode = .both
        anim.setValue(AnimationKeys.moveFireworks,
                      forKey: AnimationKeys.animationName.rawValue)
        anim.isRemovedOnCompletion = false

        dotLayer.add(anim, forKey: nil)
      })
  }
This consists of three steps:
这包括三个步骤:
- Changing opacity from 1 to 0. 将不透明度从1更改为0。
- Changing the scale from 1 to 0. 将比例从1更改为0。
- Changing position from the current position. 从当前位置更改位置。
Opacity and scale animations look the same as before. To implement the position animation we calculate the offset and define nextPosition. Then we combine these animations using the CAAnimationGroup.
不透明度和缩放动画看起来与以前相同。 为了实现位置动画,我们计算偏移量并定义nextPosition 。 然后,我们使用CAAnimationGroup组合这些动画。
Note that animations are applied to the small and large circles but not to the replicator layer.
请注意,动画将应用于大和小圆圈,但不会应用于复制器层。
That’s all for today. We’ve implemented a beautiful animation that you can use in your projects. You can find the full code in this repository.
今天就这些。 我们已经实现了漂亮的动画,您可以在项目中使用它。 您可以在此存储库中找到完整的代码。
Thanks for reading! 😉
谢谢阅读! 😉
翻译自: https://medium.com/better-programming/lets-build-a-fun-like-animation-in-swift-34fab05f6afb
构建 快速迭代


 496
496

 被折叠的 条评论
为什么被折叠?
被折叠的 条评论
为什么被折叠?
 到【灌水乐园】发言


