


flutter ios测试
This article was originally posted on Codemagic blog.
本文最初发布在Codemagic博客上 。
In this article we will learn how to add Flutter to your new or existing Native iOS project and how to test it on Codemagic CI/CD using codemagic.yaml file.
在本文中,我们将学习如何将Flutter添加到新的或现有的Native iOS项目中,以及如何使用codemagic.yaml文件在Codemagic CI / CD上对其进行测试。
Let’s start by building a native iOS app.
让我们开始构建一个本地iOS应用程序。

应用概述 (App Overview)
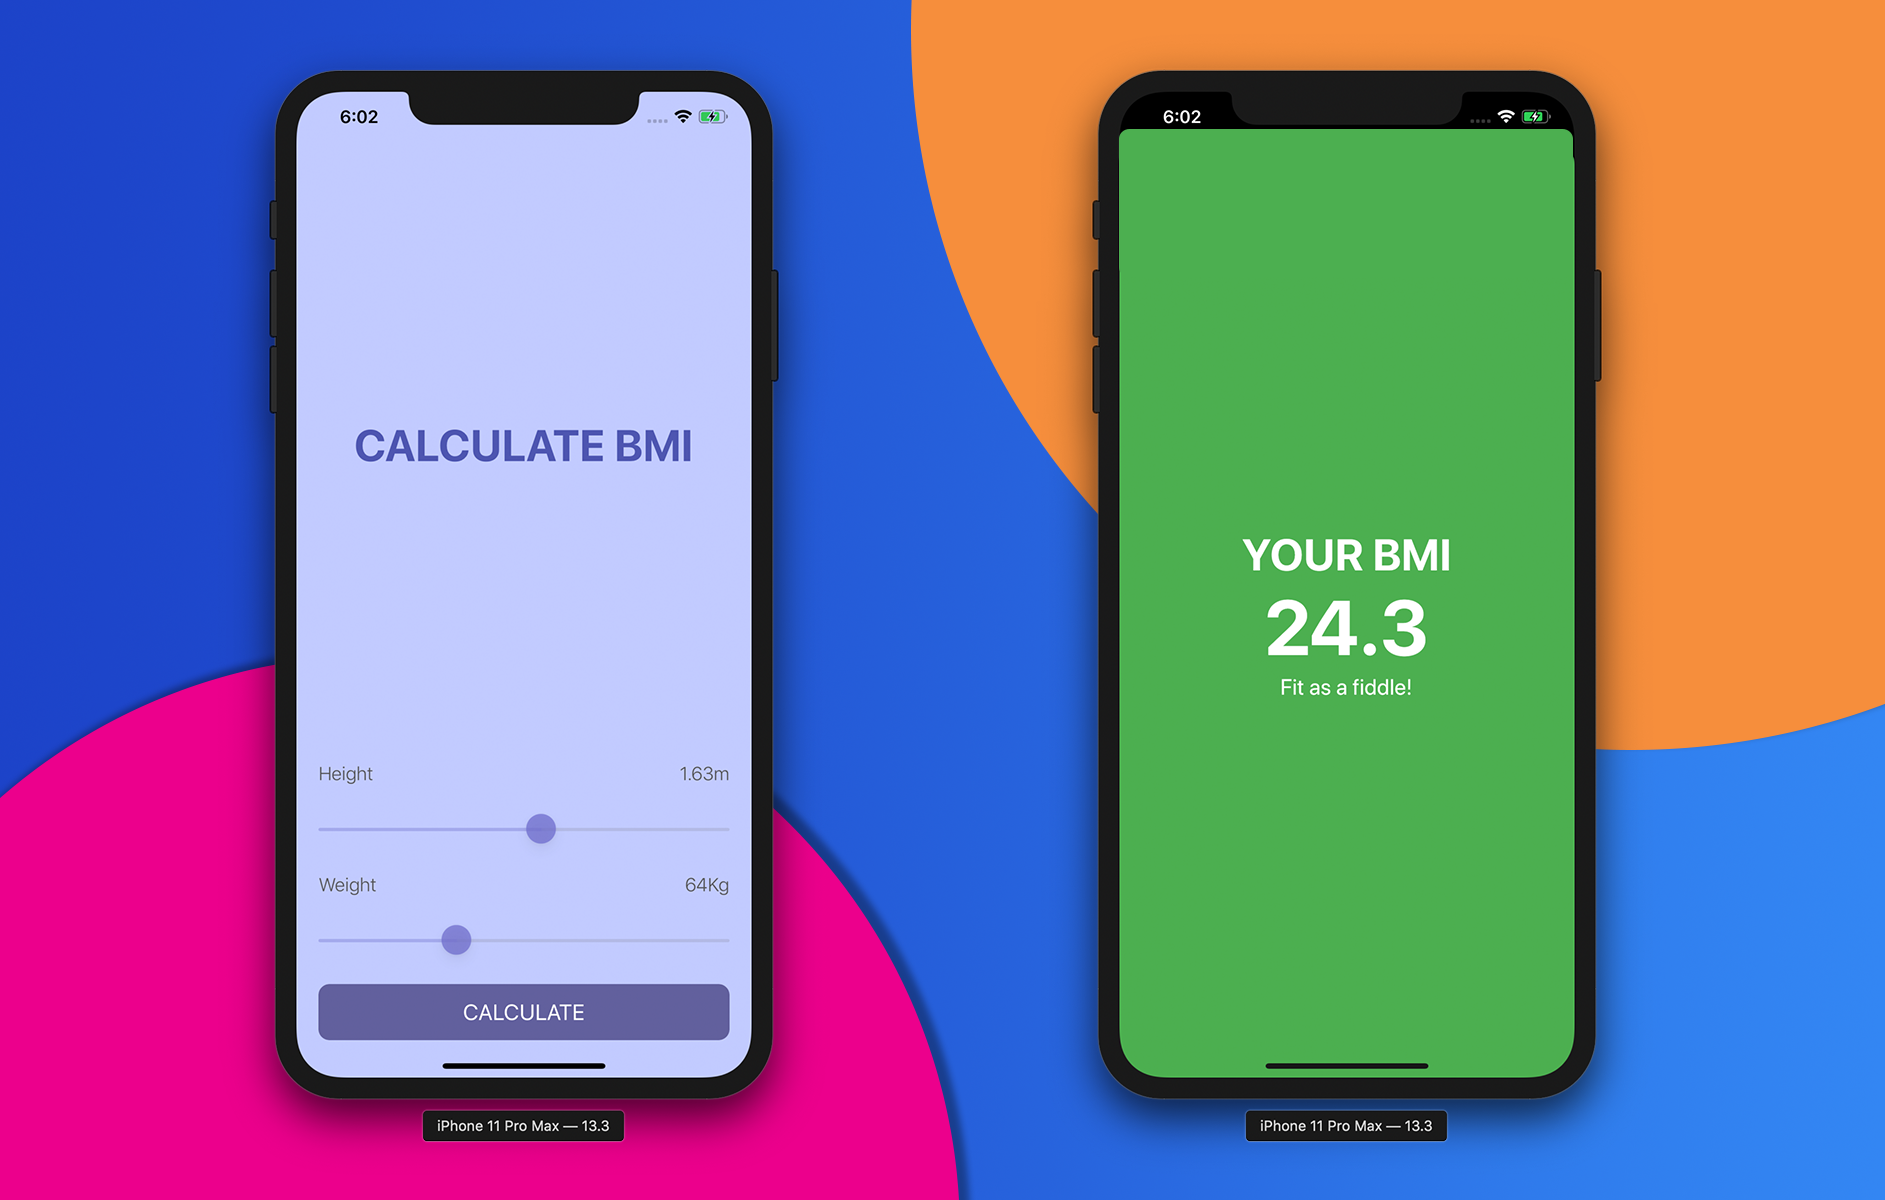
The app that we will be looking at is a simple BMI Calculator app.
我们将要查看的应用程序是一个简单的BMI计算器应用程序。
It will have two screens:
它将有两个屏幕:
1. BMI Calculation Screen (using Native iOS)
1. BMI计算屏幕(使用本机iOS )
2. BMI Result Screen (using Flutter Module)
2. BMI结果屏幕(使用Flutter模块 )
创建本机iOS应用 (Creating the Native iOS app)
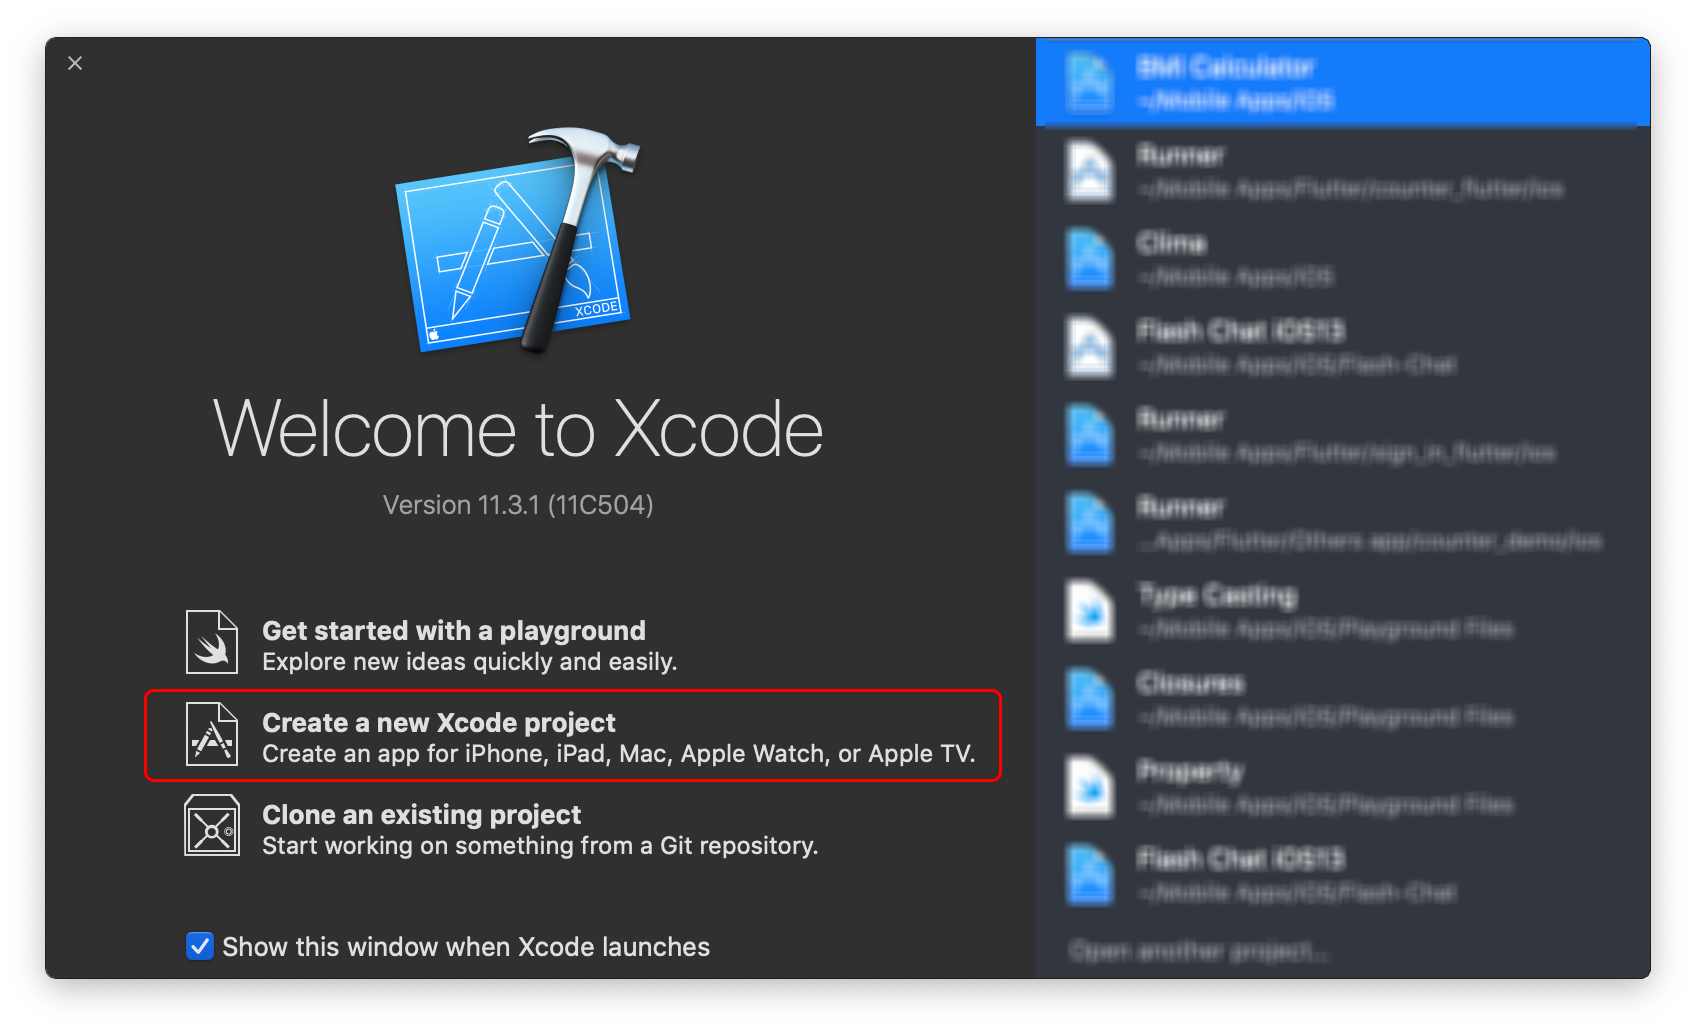
1. Start Xcode on your system.
1.在系统上启动Xcode 。
2. Click on Create a new Xcode project.
2.单击创建一个新的Xcode项目 。
3. Go to the iOS tab and select Single View App. Click Next.
3.转到iOS选项卡,然后选择Single View App 。 单击下一步 。

4. Enter the Product Name, select Team, and fill in the other details. Then click Next.
4.输入产品名称 ,选择团队 ,然后填写其他详细信息。 然后单击“ 下一步” 。

This will create an empty iOS project with all the required files.
这将创建一个包含所有必需文件的空iOS项目。
在iOS应用上工作 (Working on the iOS app)
First of all, we have to complete the UI of the app. So, go to the file Main.storyboard and complete the UI design.
首先,我们必须完成应用程序的用户界面。 因此,转到文件Main.storyboard并完成UI设计。
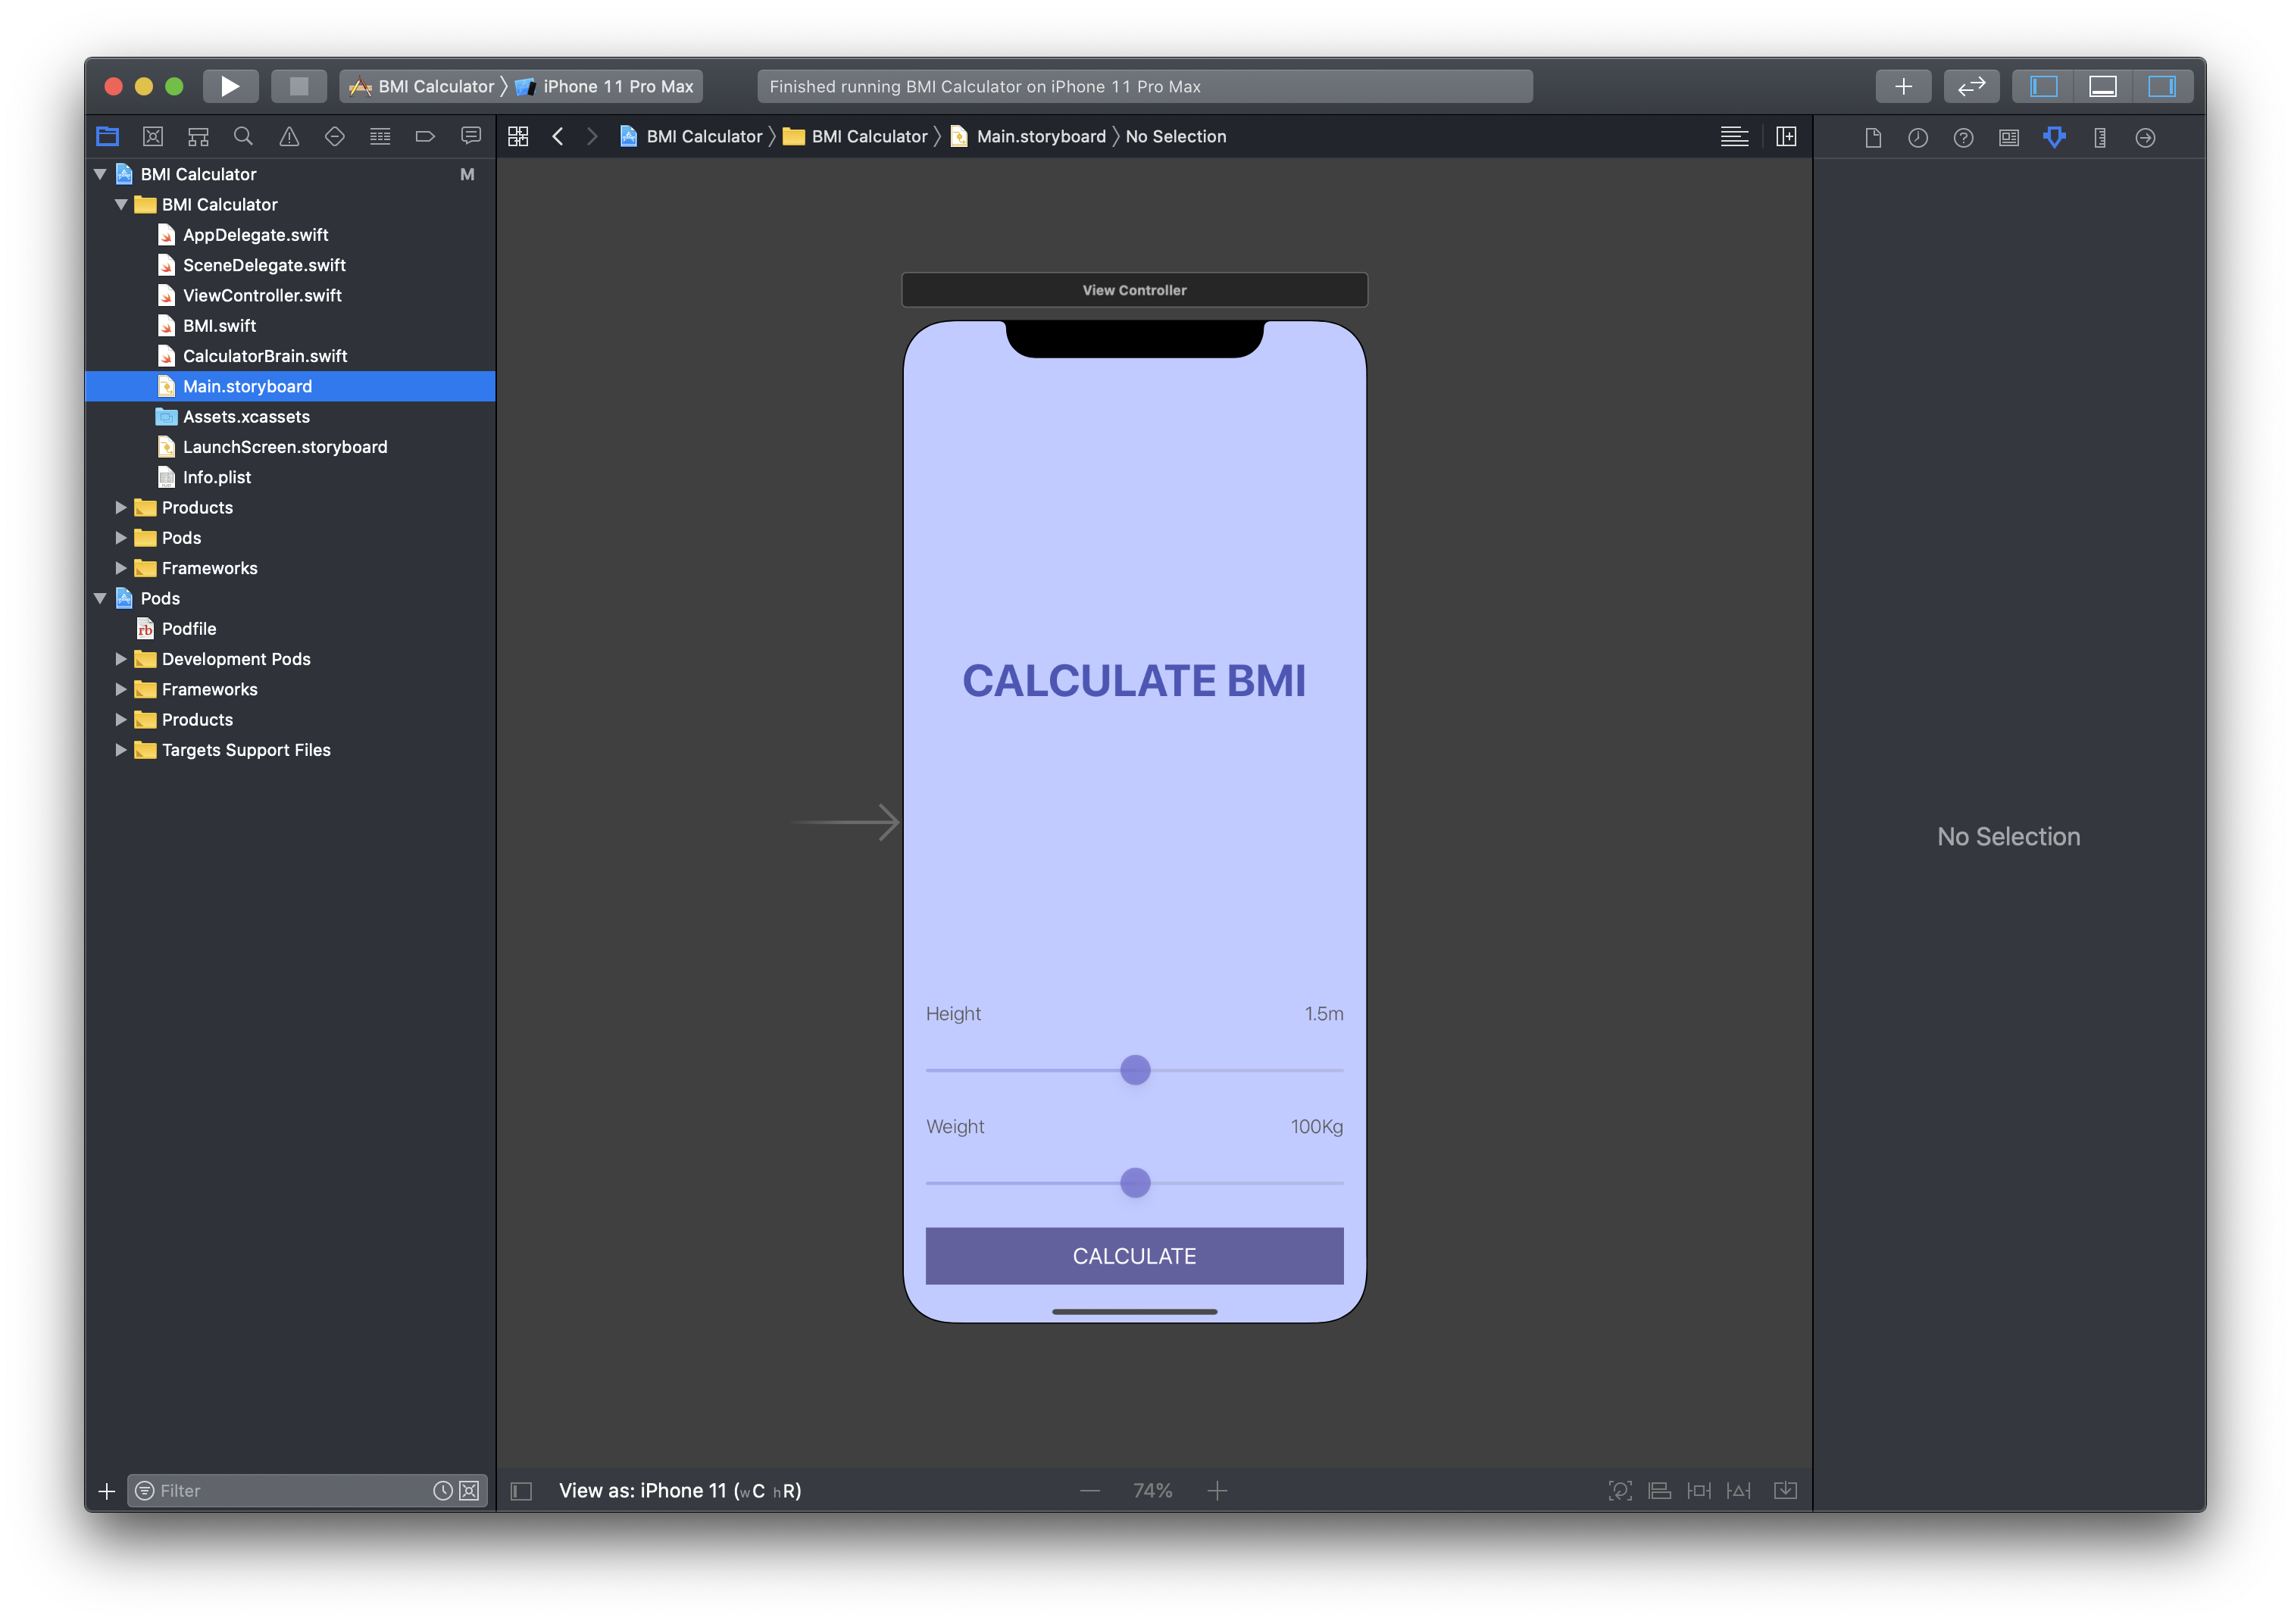
This will contain only one screen with some basic components. Link the UI components to the ViewController.swift file.
这将仅包含一个具有一些基本组件的屏幕。 将UI组件链接到ViewController.swift文件。
// ViewController.swiftimport UIKitclass ViewController: UIViewController {
    // Reference to the UI components
    @IBOutlet weak var heightLabel: UILabel!
    @IBOutlet weak var weightLabel: UILabel!
    @IBOutlet weak var heightSlider: UISlider!
    @IBOutlet weak var weightSlider: UISlider!
    override func viewDidLoad() {
        super.viewDidLoad()
    }    @IBAction func heightSliderChanged(_ sender: UISlider) {
        // Perform some action when height slider position
        // is changed.
    }
    @IBAction func weightSliderChanged(_ sender: UISlider) {
        // Perform some action when weight slider position
        // is changed.
    }
    @IBAction func calculatePressed(_ sender: UIButton) {
        // Perform some action when calculate button
        // is pressed.
    }}
Now, we will be creating two new files to keep the project organized:
现在,我们将创建两个新文件来保持项目的井井有条:
BMI.swift(This file will contain a BMI struct for structuring important BMI information)BMI.swift(此文件将包含用于构造重要BMI信息的BMI结构 )CalculatorBrain.swift(This file will be responsible for retrieving data and calculating the BMI of a person)CalculatorBrain.swift(此文件将负责检索数据并计算一个人的BMI)
// BMI.swiftimport UIKitstruct BMI {
    let value: Float
    let advice: String
    let color: String
}// CalculatorBrain.swiftimport UIKitstruct CalculatorBrain {
    var bmi: BMI?
    func getBMIValue() -> String {
        let bmiTo1DecimalPlace = String(format: "%.1f", bmi?.value ?? 0.0)
        return bmiTo1DecimalPlace
    }
    func getAdvice() -> String {
        return bmi?.advice ?? "No advice"
    }
    func getColor() -> String {
        return bmi?.color ?? "white"
    }
    mutating func calculateBMI(_ weight: Float, _ height: Float) {
        let bmiValue = weight / pow(height, 2)
        if bmiValue < 18.5 {
            bmi = BMI(value: bmiValue, advice: "Eat more pies!", color: "blue")
        } else if bmiValue < 24.9 {
            bmi = BMI(value: bmiValue, advice: "Fit as a fiddle!", color: "green")
        } else {
            bmi = BMI(value: bmiValue, advice: "Eat less pies!", color: "pink")
        }
    }
}
Complete implementing the methods of ViewController.swift file.
完成实现ViewController.swift文件的方法。
// ViewController.swift
// (with methods implemented)import UIKitclass ViewController: UIViewController {
    var calculatorBrain = CalculatorBrain()
    @IBOutlet weak var heightLabel: UILabel!
    @IBOutlet weak var weightLabel: UILabel!
    @IBOutlet weak var heightSlider: UISlider!
    @IBOutlet weak var weightSlider: UISlider!
    override func viewDidLoad() {
        super.viewDidLoad()
    }    @IBAction func heightSliderChanged(_ sender: UISlider) {
        heightLabel.text = String(format: "%.2fm", sender.value)
    }
    @IBAction func weightSliderChanged(_ sender: UISlider) {
        weightLabel.text = String(format: "%.0fKg", sender.value)
    }
    @IBAction func calculatePressed(_ sender: UIButton) {
        let height = heightSlider.value
        let weight = weightSlider.value
        calculatorBrain.calculateBMI(weight, height)
        let bmiValue = calculatorBrain.getBMIValue()
        let bmiAdvice = calculatorBrain.getAdvice()
        let bmiColor = calculatorBrain.getColor()
        print(bmiValue)
        print(bmiAdvice)
        print(bmiColor)
    }}
If you run the app now, you will be able to see the calculated BMI value, advice and color value in the Xcode Console.
如果现在运行该应用程序,则可以在Xcode Console中查看计算出的BMI值,建议和颜色值。
We will be sending these parameters to the BMI Result Screen (created using Flutter modules) through Platform Channel.
我们将通过平台通道将这些参数发送到BMI结果屏幕 (使用Flutter模块创建)。
创建Flutter模块 (Creating Flutter Module)
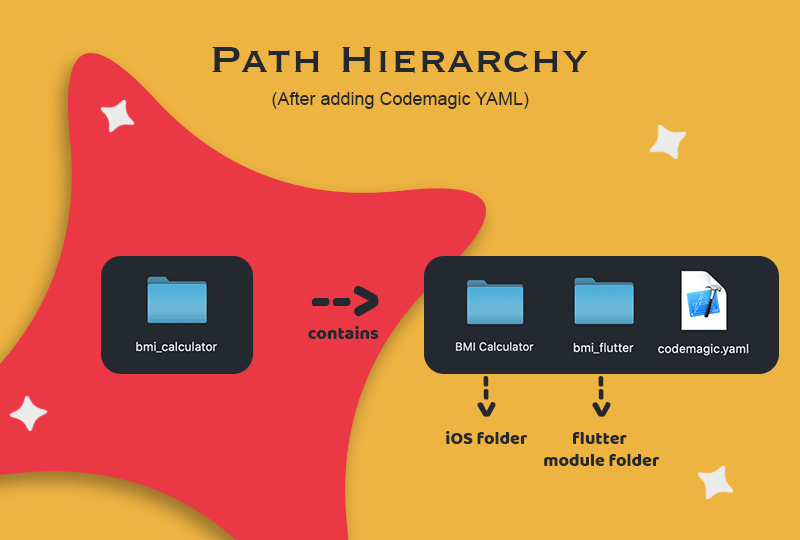
You should keep both the iOS project folder and the Flutter module folder in a root folder for easy accessibility.
您应该将iOS项目文件夹和Flutter模块文件夹都放在根文件夹中,以方便访问。
The project directory structure followed by me for this app is as below:
我为此应用程序遵循的项目目录结构如下:

Run this command from the root directory to create the Flutter module:
从根目录运行以下命令以创建Flutter模块:
flutter create --template module <module_name>Or, you can also run this similar command:
或者,您也可以运行以下类似命令:
flutter create -t module <module_name>Replace the text in angle brackets with proper information.
用适当的信息替换尖括号中的文本。

--org <organization_id>is an optional parameter by which you can specify the organization id for this module. By default it is set to com.example.
--org <organization_id>是一个可选参数,您可以通过该参数指定 此模块 的 组织ID 。 默认情况下,它设置为 com.example 。
Open the Flutter module folder using any code editor. You will find that it contains the demo Flutter Counter app.
使用任何代码编辑器打开Flutter模块文件夹。 您会发现它包含演示Flutter Counter应用程序。
Run the Flutter module on physical iOS device or Simulator to test if it is working properly.
在物理iOS设备或模拟器上运行Flutter模块以测试其是否正常运行。
Now, let’s move on to integrating the Flutter module to the native iOS project.
现在,让我们继续将Flutter模块集成到本地iOS项目中。
将Flutter模块集成到本机iOS (Integrating Flutter module to native iOS)
The easiest option to integrate Flutter module to native iOS is using CocoaPods.
将Flutter模块集成到本机iOS的最简单选择是使用CocoaPods 。
There are two other options for integrating Flutter module to a native iOS app, you can find them here.
还有另外两个将Flutter模块集成到本地iOS应用程序的选项,您可以在 此处 找到它们 。
If you do not have CocoaPods installed on your system, you can find the installation guide here.
如果您 的系统上 未安装 CocoaPods ,则可以在 此处 找到安装指南 。
Now, we have to create a Podfile.
现在,我们必须创建一个Podfile 。
If you already have a Podfile created in your iOS project, then you can skip the first step.
如果您已经在iOS项目中创建了Podfile ,则可以跳过第一步。
1. Run this command from the iOS project directory:
1.从iOS项目目录运行以下命令:
pod initAfter creating the Podfile the whole project structure should be like this:
创建Podfile之后 ,整个项目结构应如下所示:
bmi_calculator/
 ├── bmi_flutter/
 │   └── .ios/
 │       └── Flutter/
 │         └── podhelper.rb
 └── BMI Calculator/
     └── Podfile
2. Now, open the Podfile using Xcode.
2.现在,使用Xcode打开Podfile。
3. Add the following code to your Podfile:
3.将以下代码添加到您的Podfile中 :
flutter_application_path = '../my_flutter'
load File.join(flutter_application_path, '.ios', 'Flutter', 'podhelper.rb')
Replace
my_flutterwith the name of your Flutter module folder.将
my_flutter替换 为Flutter模块文件夹的名称。
4. For each Podfile target that needs to embed Flutter, you have to add this line:
4.对于需要嵌入Flutter的每个Podfile目标 ,您必须添加以下行:
install_all_flutter_pods(flutter_application_path).5. Save and close the Podfile as well the Xcode.
5.保存并关闭Podfile以及Xcode 。
6. Finally, run the following command to install the Pods:
6.最后,运行以下命令来安装Pods :
pod install7. Reopen the project using the file with .xcworkspace extension.
7.使用扩展名为.xcworkspace的文件重新打开项目。
If you open the file with
.xcodeprojectextension, then you will get a lot of errors as the Podfile cannot be used with it.如果打开 扩展名为
.xcodeproject的文件 ,则将出现很多错误,因为Podfile无法与其一起使用。You can refer to the Flutter Official Docs for more information.
您可以参考 Flutter官方文档 以获取更多信息。
将Flutter屏幕添加到iOS应用 (Adding a Flutter screen to the iOS app)
FlutterViewController is used to display a Flutter screen inside the native iOS app. But for using this, we will also need to create a FlutterEngine.
FlutterViewController用于在本机iOS应用程序内部显示Flutter屏幕。 但是要使用此功能,我们还需要创建FlutterEngine 。
The proper place to create a FlutterEngine is inside the AppDelegate.swift file.
创建FlutterEngine的正确位置是AppDelegate.swift文件中。
Replace the whole content of this file with the following code:
用以下代码替换此文件的全部内容:
// AppDelegate.swiftimport UIKit
import Flutter
import FlutterPluginRegistrant@UIApplicationMain
class AppDelegate: FlutterAppDelegate {
    var flutterEngine : FlutterEngine?;
    override func application(_ application: UIApplication, didFinishLaunchingWithOptions launchOptions: [UIApplication.LaunchOptionsKey: Any]?) -> Bool {
        self.flutterEngine = FlutterEngine(name: "io.flutter", project: nil);
        self.flutterEngine?.run(withEntrypoint: nil);
        GeneratedPluginRegistrant.register(with: self.flutterEngine!);
        return super.application(application, didFinishLaunchingWithOptions: launchOptions);
    }}
Now, we can just add the following lines to the ViewController.swift file in order to display the flutter screen:
现在,我们可以将以ViewController.swift添加到ViewController.swift文件中,以显示抖动屏幕:
// ViewController.swift// ...
import Flutterclass ViewController: UIViewController {
    // ...
    @IBAction func calculatePressed(_ sender: UIButton) {        // ...        let flutterEngine = ((UIApplication.shared.delegate as? AppDelegate)?.flutterEngine)!;
        let flutterViewController = FlutterViewController(engine: flutterEngine, nibName: nil, bundle: nil);
        self.present(flutterViewController, animated: true, completion: nil)    }}
If you run your app now, you should be able to view the Flutter Demo Counter app screen by tapping on the CALCULATE button.
如果立即运行应用程序,则应该可以通过点击“ 计算”按钮来查看Flutter Demo Counter应用程序屏幕。
You can refer to the Flutter Official Docs for more information.
您可以参考 Flutter官方文档 以获取更多信息。
完成Flutter UI (Completing the Flutter UI)
The UI for the BMI Result Screen will be really simple, with just a few Text widgets.
BMI结果屏幕的用户界面将非常简单,只有几个文本小部件。
Code for the BMI Result Screen UI:
BMI结果屏幕UI的代码:
// main.dartimport 'dart:convert';import 'package:flutter/material.dart';
import 'package:flutter/services.dart';void main() => runApp(MyApp());class MyApp extends StatelessWidget {
  @override
  Widget build(BuildContext context) {
    return MaterialApp(
      title: 'BMI Calculator Module',
      theme: ThemeData(
        primarySwatch: Colors.blue,
      ),
      home: MyHomePage(),
      debugShowCheckedModeBanner: false,
    );
  }
}class MyHomePage extends StatefulWidget {
  @override
  _MyHomePageState createState() => _MyHomePageState();
}class _MyHomePageState extends State<MyHomePage> {  Future<void> _receiveFromHost(MethodCall call) async {
    // To be implemented.    // Will be used for retrieving data passed from
    // the native iOS app.
  }  @override
  Widget build(BuildContext context) {
    return Scaffold(
      body: Container(
        color: Colors.blue,
        child: Center(
          child: Column(
            mainAxisSize: MainAxisSize.max,
            mainAxisAlignment: MainAxisAlignment.center,
            crossAxisAlignment: CrossAxisAlignment.center,
            children: <Widget>[
              Text(
                'YOUR BMI',
                style: TextStyle(
                    color: Colors.white,
                    fontSize: 40,
                    fontWeight: FontWeight.bold),
              ),
              Text(
                '23.7',
                style: TextStyle(
                    color: Colors.white,
                    fontSize: 70,
                    fontWeight: FontWeight.bold),
              ),
              Text(
                'Fit as a fiddle!',
                style: TextStyle(
                  color: Colors.white,
                  fontSize: 20,
                ),
              ),
            ],
          ),
        ),
      ),
    );
  }
}
使用平台频道 (Using Platform Channel)
We will be using Platform Channel to pass data from the native iOS app to the Flutter module.
我们将使用平台通道将数据从本地iOS应用传递到Flutter模块。
设置Flutter模块(接收数据) (Setting up the Flutter Module (receiving data))
1. First of all, we have to create a channel with some name, inside the class _MyHomePageState.
1.首先,我们必须在_MyHomePageState类中创建一个具有某些名称的通道。
// main.dartstatic const platform = const MethodChannel('com.souvikbiswas.bmi/data');2. Implement the method _receiveFromHost(), which will retrieve the data passed from the native part and get the data to display inside the Flutter module.
2.实现方法_receiveFromHost() ,该方法将检索从本机部分传递的数据并获取要显示在Flutter模块内部的数据。
// main.dartFuture<void> _receiveFromHost(MethodCall call) async {
   var jData;
   try {
     print(call.method);
     if (call.method == "fromHostToClient") {
       final String data = call.arguments;
       print(call.arguments);
       jData = await jsonDecode(data);
     }
   } on PlatformException catch (error) {
     print(error);
   }
   setState(() {
     jData1 = jData;
     if (jData['color'] == 'blue') {
       color = Colors.blue;
     } else if (jData['color'] == 'green') {
       color = Colors.green;
     } else {
       color = Colors.pink;
     }
   });
 }
3. Initialize the platform in the _MyHomePageState() constructor and set the _receiveFromHost() method as Method Call Handler.
3.在_MyHomePageState()构造函数中初始化平台,并将_MyHomePageState() _receiveFromHost()方法设置为Method Call Handler 。
// main.dart_MyHomePageState() {
     platform.setMethodCallHandler(_receiveFromHost);
}
4. Update the build method to show the data retrieved using the platform channel:
4.更新构建方法以显示使用平台通道检索到的数据:
// main.dart @override
  Widget build(BuildContext context) {
    return Scaffold(
      body: Container(
        color: color, // Updated
        child: Center(
          child: Column(
            // ...
            children: <Widget>[
              Text(
                'YOUR BMI',
                // ...
              ),
              Text(
                jData1['value'], // Updated
                // ...
              ),
              Text(
                jData1['advice'], // Updated
                // ...
              ),
            ],
          ),
        ),
      ),
    );
  }
}
设置iOS应用(发送数据) (Setting up the iOS app (sending data))
1. Creating a channel for communicating with the Flutter module
1.创建用于与Flutter模块通信的通道
// Define inside calculatePressed() methodlet bmiDataChannel = FlutterMethodChannel(name: "com.souvikbiswas.bmi/data", binaryMessenger: flutterViewController.binaryMessenger)2. Sending data using the channel
2.使用通道发送数据
// Define inside calculatePressed() method let bmiDataChannel = FlutterMethodChannel(name: "com.souvikbiswas.bmi/data", binaryMessenger: flutterViewController.binaryMessenger)
 let jsonObject: NSMutableDictionary = NSMutableDictionary() jsonObject.setValue(bmiValue, forKey: "value")
 jsonObject.setValue(bmiAdvice, forKey: "advice")
 jsonObject.setValue(bmiColor, forKey: "color")
 var convertedString: String? = nil
 do {
     let data1 =  try JSONSerialization.data(withJSONObject: jsonObject, options: JSONSerialization.WritingOptions.prettyPrinted)
     convertedString = String(data: data1, encoding: String.Encoding.utf8)
 } catch let myJSONError {
     print(myJSONError)
 }
 bmiDataChannel.invokeMethod("fromHostToClient", arguments: convertedString)
使用热加载和热重启 (Using Hot Reload & Hot Restart)
You might be missing the Hot Reload and Hot Restart feature of Flutter. Though you are running an instance of Flutter within the native iOS app, still you will be able to use these Flutter features.
您可能缺少Flutter的热重加载和热重启动功能。 尽管您正在本机iOS应用程序中运行Flutter的实例,但仍然可以使用这些Flutter功能。
To use Hot Reload and Hot Restart, follow these steps:
要使用热重载和热重启动,请按照下列步骤操作:
1. Run the following command from the Flutter project directory:
1.从Flutter项目目录中运行以下命令:
flutter attach2. Immediately, go to Xcode and run the app on device by clicking on the Run button present at the top-left corner.
2.立即转到Xcode,并通过单击左上角的“运行”按钮在设备上运行该应用程序。
3. If you take a look at the Terminal, you will notice that the connection is successful and you can now use Hot reload & Hot restart for the Flutter module running inside a native iOS app.
3.如果您查看Terminal ,您会注意到连接成功,并且现在可以对本机iOS应用程序中运行的Flutter模块使用Hot reload和Hot restart 。
在Codemagic上构建(使用YAML) (Building on Codemagic (using YAML))
For building a native iOS app with Flutter module, we have to use codemagic.yaml file. Codemagic has recently announced YAML support for building and testing iOS apps.
为了使用Flutter模块构建本机iOS应用,我们必须使用codemagic.yaml文件。 Codemagic最近宣布了YAML支持,用于构建和测试iOS应用。
I will be showing how you can define a correct pipeline for building and testing a native iOS app with a Flutter module.
我将展示如何使用Flutter模块定义正确的管道来构建和测试本机iOS应用程序。
下载YAML文件 (Downloading the YAML file)
1. First of all, push the code to online VCS.
1.首先,将代码推送到在线VCS上 。
Add the contents of the root folder to VCS (including both the native iOS folder and the Flutter module folder)
将根文件夹的内容添加到VCS(包括本机iOS文件夹和Flutter模块文件夹)
2. Go to Codemagic UI and Login.
2.转到Codemagic UI并登录 。
3. In the Applications dashboard, search for your project and go to its Settings.
3.在“ 应用程序”仪表板中,搜索您的项目,然后转到其“设置” 。

4. Then, on the right side bar under Configuration as code, click Download configuration. This generates a codemagic.yaml file with some default configurations.
4.然后,在配置为代码下的右侧栏上,单击下载配置 。 这将生成具有某些默认配置的codemagic.yaml文件。
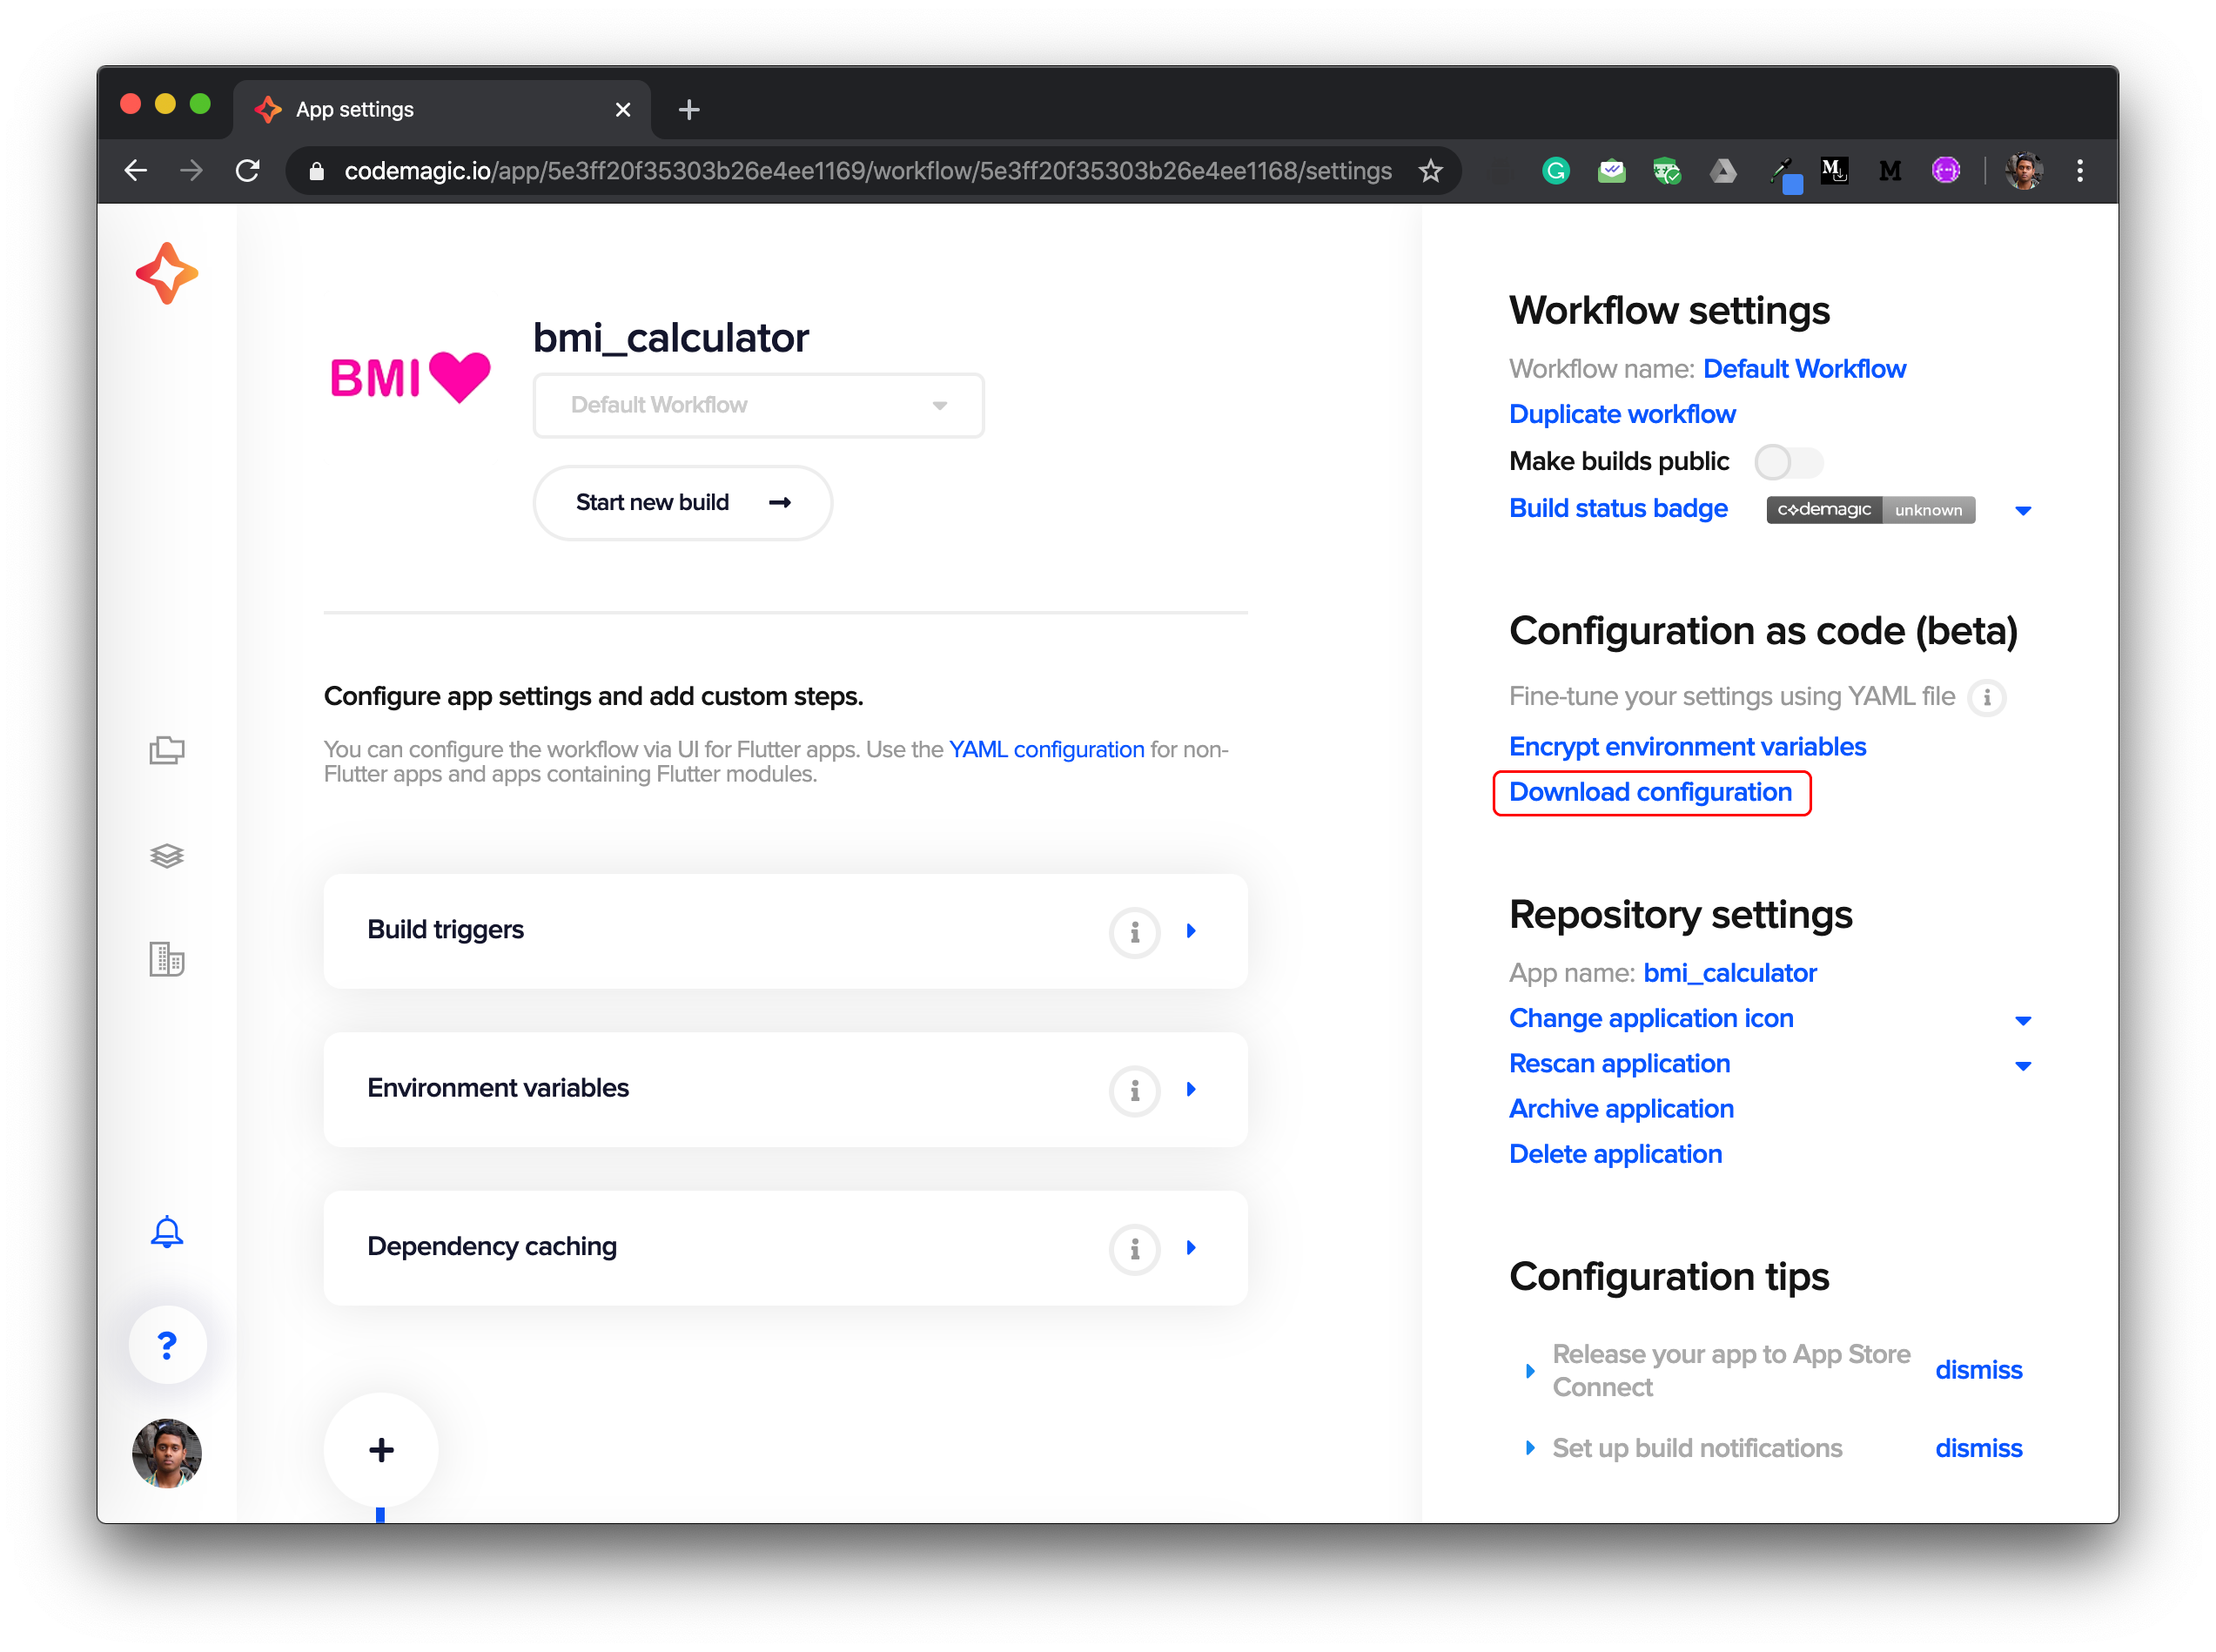
5. After downloading the file, open it in a code editor.
5.下载文件后,在代码编辑器中将其打开 。
The codemagic.yaml file will contain a pipeline for building and testing a default Flutter app. But in order to use this for native iOS app with Flutter modules, we need to make some modifications to it.
codemagic.yaml文件将包含用于构建和测试默认Flutter应用程序的管道。 但是为了将其用于带有Flutter模块的本机iOS应用程序,我们需要对其进行一些修改。
添加环境变量 (Adding Environment variables)
In order to generate iOS .ipa file, we need to set up code signing for the app.
为了生成iOS .ipa文件,我们需要为该应用程序设置代码签名 。
Two files are required for iOS code signing:
iOS代码签名需要两个文件:
- Certificate 证书
- Provisioning Profile 供应配置文件
In the environment variables section of the codemagic.yaml file, we can add the certificate and the provisioning profile in encrypted form as key-value pairs.
在codemagic.yaml文件的环境变量部分中,我们可以将加密形式的证书和配置文件作为键值对添加。
So, we will be adding the following keys:
因此,我们将添加以下键:
CM_CERTIFICATE (Encrypted version of the Certificate)
CM_CERTIFICATE (证书的加密版本)
CM_CERTIFICATE_PASSWORD (Encrypted version of Certificate Password)
CM_CERTIFICATE_PASSWORD (证书密码的加密版本)
CM_PROVISIONING_PROFILE (Encrypted version of Provisioning Profile)
CM_PROVISIONING_PROFILE (配置文件的加密版本)
You can generate the encrypted version of the files / variables by following these steps.
您可以按照以下步骤生成文件/变量的加密版本。
Go to the project Settings from Codemagic UI.
从Codemagic UI转到项目设置 。
In the right sidebar, click Encrypt environment variables.
在右侧栏中,点击加密环境变量 。

Here, you can drag and drop the files or type in the variable to generate their encrypted version.
在这里,您可以拖放文件或键入变量以生成其加密版本 。
定义脚本 (Defining the script)
I will be going through the build script, explaining line-by-line.
我将遍历构建脚本,逐行解释。
Also, as we have two folders, one for native iOS and the other for the Flutter module, we have to make sure that the commands are run in the correct folder.
另外,由于我们有两个文件夹,一个用于本机iOS,另一个用于Flutter模块,因此我们必须确保命令在正确的文件夹中运行。
So, let’s get started.
因此,让我们开始吧。
- Getting Flutter packages 获取Flutter软件包
- cd $FCI_BUILD_DIR/bmi_flutter && flutter packages pub getInstalling the Podfile
安装Podfile
- find . -name "Podfile" -execdir pod install \;- keychain initializeDecoding the Provisioning Profile and placing it in a folder from where it can be accessed while performing code signing
解码配置文件并将其放在执行代码签名时可从中访问的文件夹中
PROFILES_HOME="$HOME/Library/MobileDevice/Provisioning Profiles" mkdir -p "$PROFILES_HOME" PROFILE_PATH="$(mktemp "$PROFILES_HOME"/$(uuidgen).mobileprovision)" echo ${CM_PROVISIONING_PROFILE} | base64 --decode > $PROFILE_PATH echo "Saved provisioning profile $PROFILE_PATH"Decoding the Signing Certificate and adding it to the keychain
解码签名证书并将其添加到钥匙串
echo $CM_CERTIFICATE | base64 --decode > /tmp/certificate.p12 keychain add-certificates --certificate /tmp/certificate.p12 --certificate-password $CM_CERTIFICATE_PASSWORDBuild the Flutter module only (this step is necessary in order to generate some files required by the native iOS app in order to retrieve the Flutter module)
仅构建Flutter模块 (此步骤对于生成本机iOS应用所需的一些文件以检索Flutter模块是必需的)
- cd $FCI_BUILD_DIR/bmi_flutter && flutter build ios --release --no-codesignUsing a profile and building the native iOS app with Flutter module to generate
.ipafile使用配置文件并使用Flutter模块构建本机iOS应用程序以生成
.ipa文件
- cd $FCI_BUILD_DIR/BMI\ Calculator && xcode-project use-profiles - xcode-project build-ipa --workspace "$FCI_BUILD_DIR/BMI Calculator/BMI Calculator.xcworkspace" --scheme "BMI Calculator"TIPS: You can add this flag --disable-xcpretty to view the whole Xcode verbose output directly on the Codemagic UI during build.
提示:您可以添加此标志--disable-xcpretty以在构建期间直接在Codemagic UI上查看整个Xcode详细输出。
You can get more information about configuration options for the build‑ipa command here.
您可以在此处获得有关build‑ipa命令的配置选项的更多信息。
检索生成的工件 (Retrieve the generated artifacts)
To get the .ipa file after build, you need to define the correct path to the generated artifact.
要在构建后获取.ipa文件,您需要定义生成的工件的正确路径。
artifacts:
  - build/ios/ipa/*.ipa
Before running the script, don’t forget to place the codemagic.yaml file in the root directory of the project.
在运行脚本之前,请不要忘记将codemagic.yaml文件放置在项目的根目录中。
运行构建脚本 (Running the build script)
1. Go to your project from the Applications dashboard on Codemagic UI.
1.从Codemagic UI上的“ 应用程序”仪表板转到您的项目。
2. Click on Start new build.
2.单击开始新版本 。
3. Click on Select workflow from codemagic.yaml.
3.单击从codemagic.yaml选择工作流 。
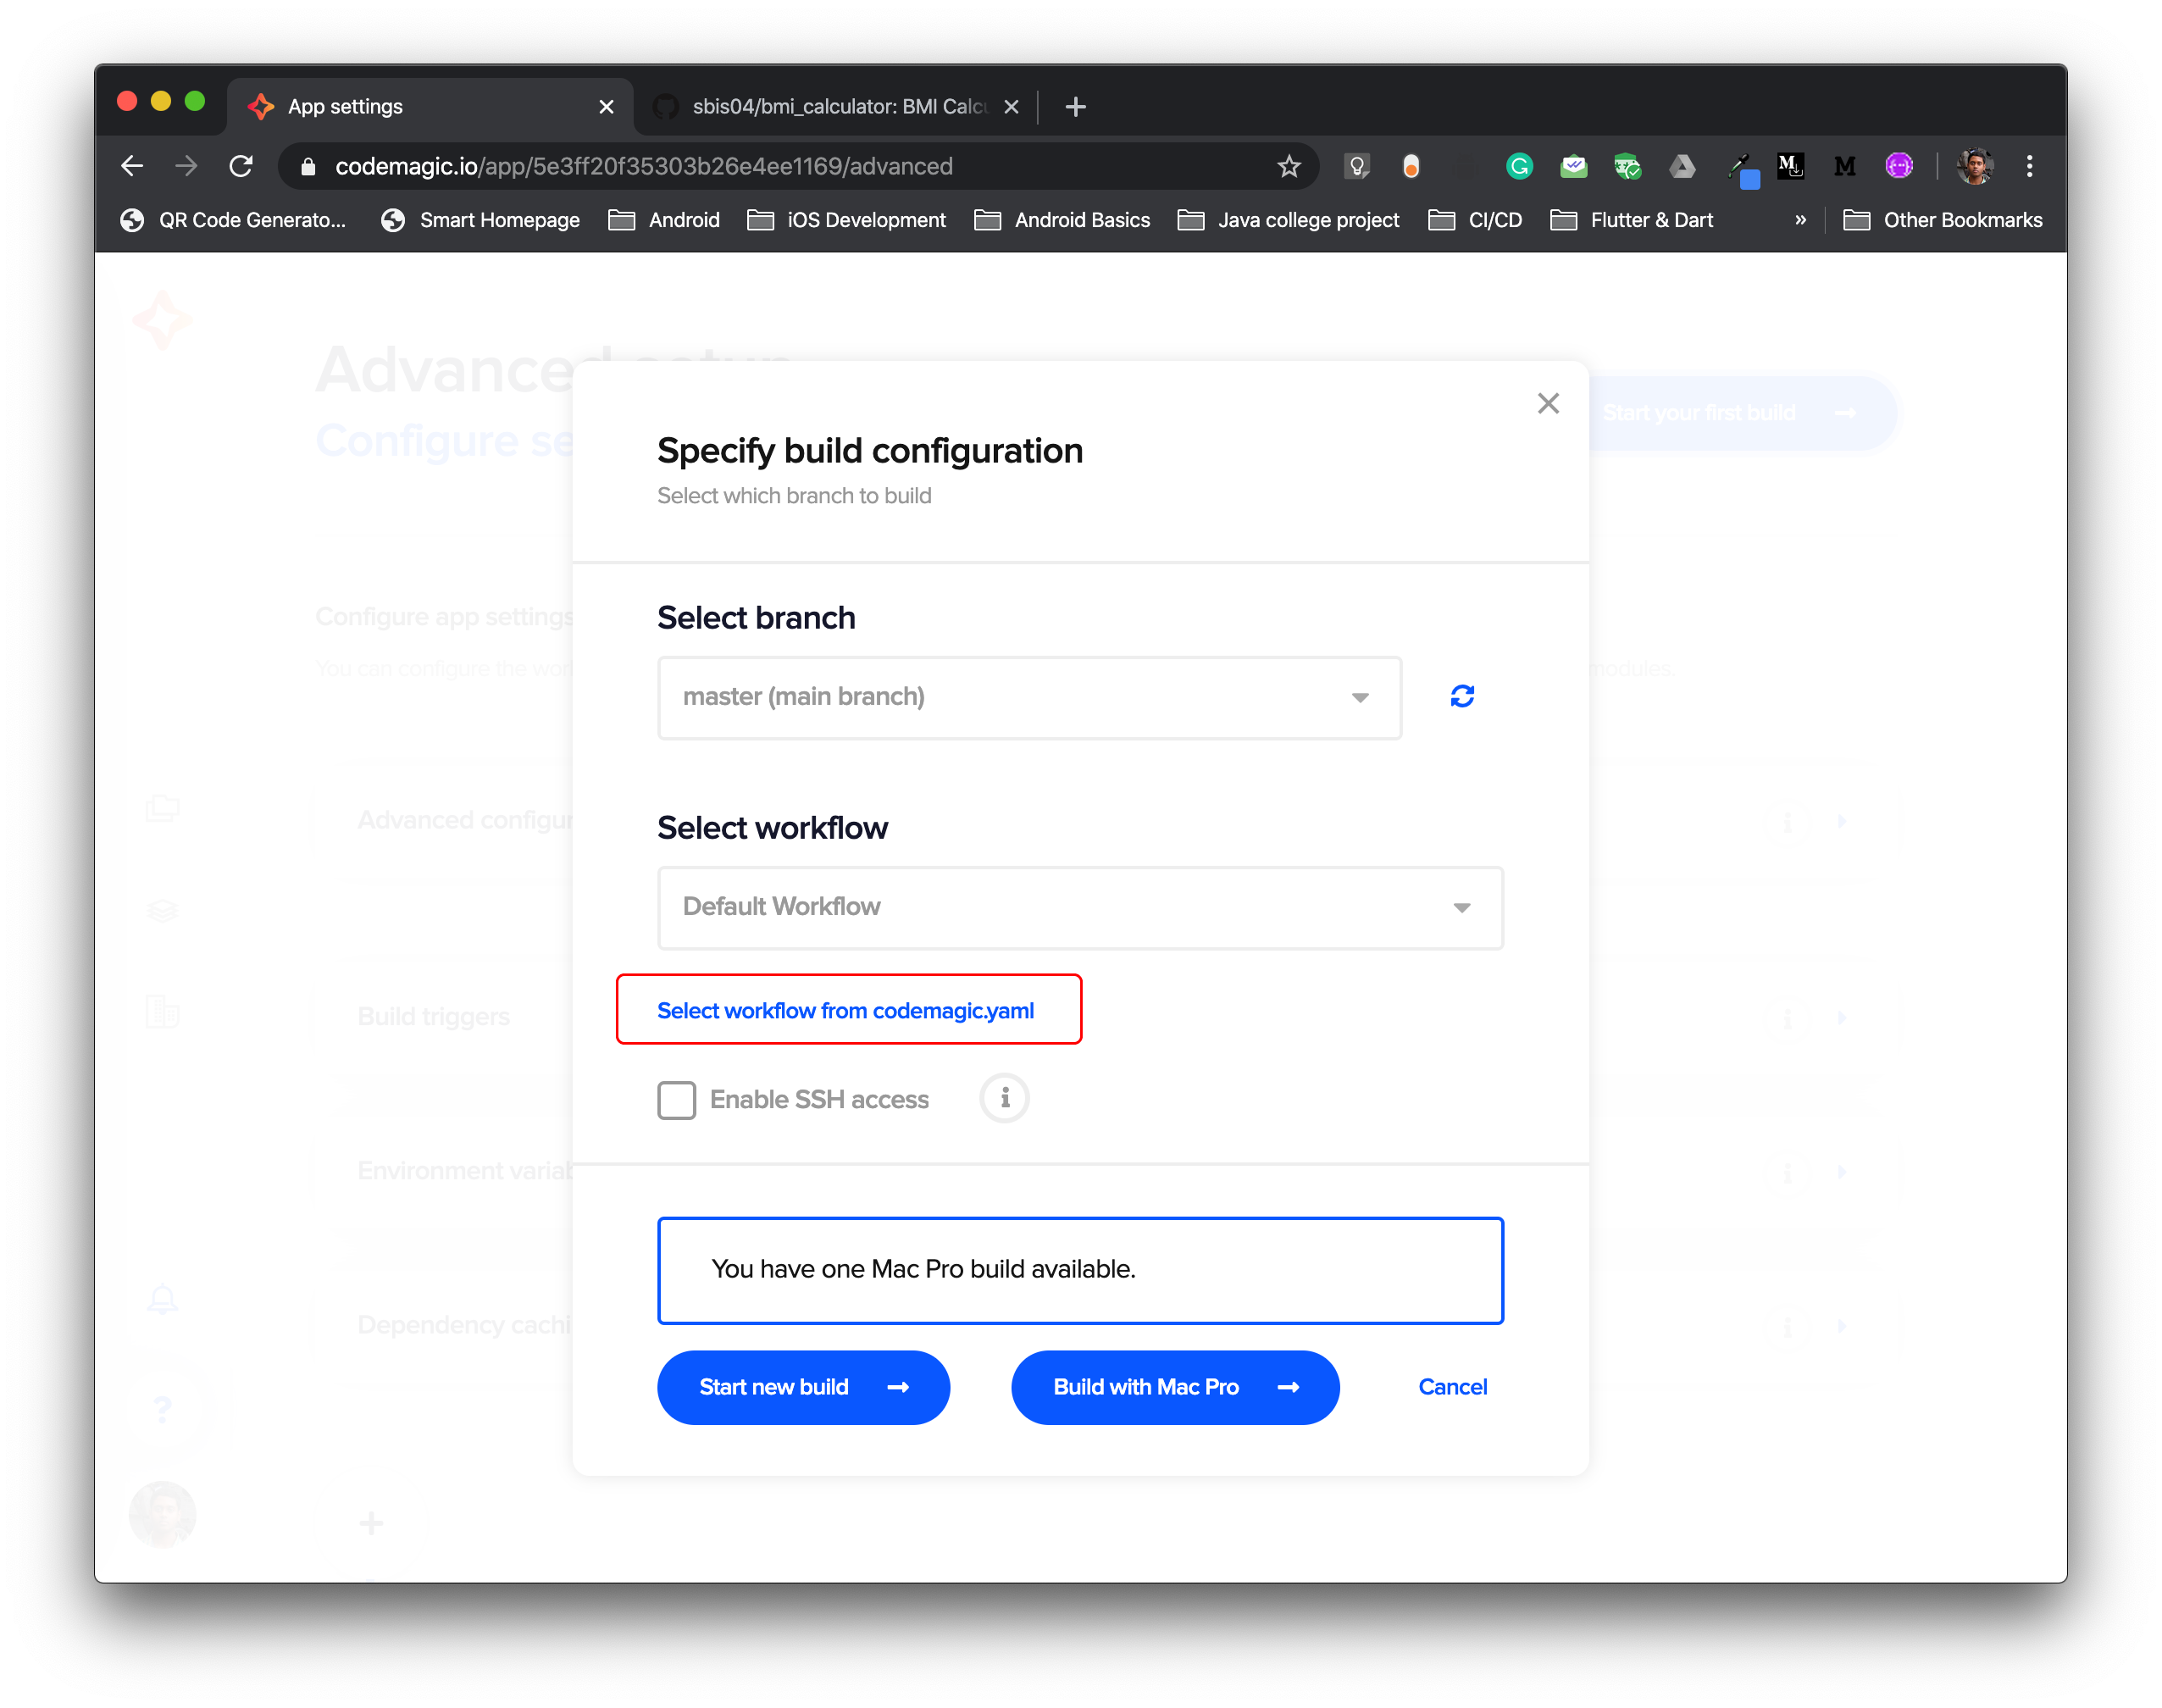
4. Select the correct workflow and click on Start new build to start the building process.
4.选择正确的工作流程,然后单击“ 开始新的构建”以开始构建过程。

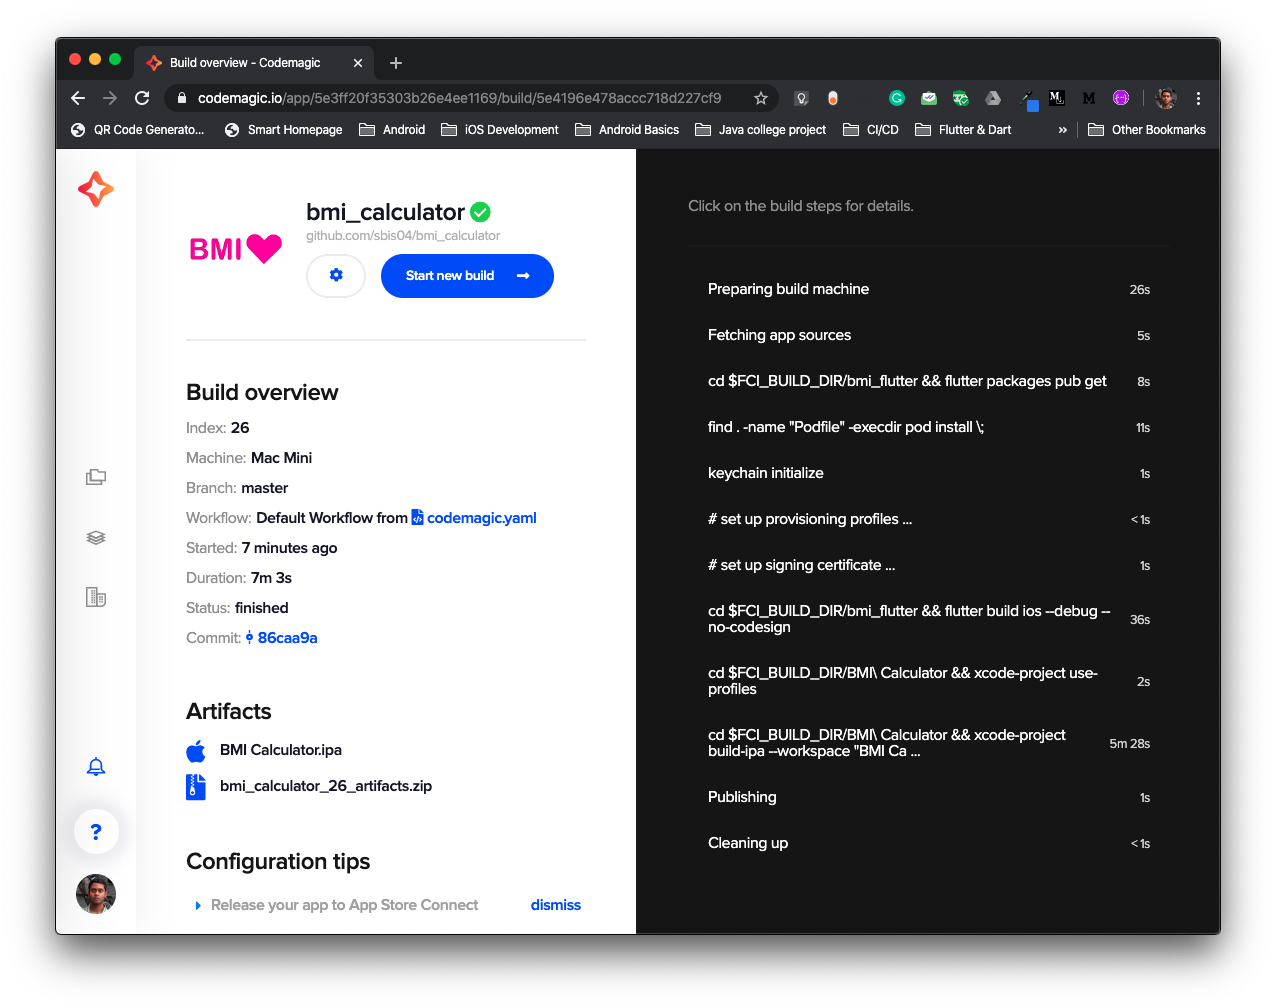
Congratulations! You have successfully completed the building process on Codemagic using YAML.
恭喜你! 您已成功使用YAML在Codemagic上完成了构建过程。
在Codemagic上测试(使用YAML) (Testing on Codemagic (using YAML))
It’s very simple to perform any testing on Codemagic using YAML.
使用YAML在Codemagic上执行任何测试都非常简单。
Let’s add a demo unit test to the Flutter module.
让我们向Flutter模块添加一个演示单元测试。
import 'dart:convert';
import 'package:flutter_test/flutter_test.dart';void main() {
  String jsonTest = '{' +
      '"value" : "44.4",' +
      '"color" : "pink",' +
      '"advice" : "Eat less pies!"' +
      '}';  var jData = jsonDecode(jsonTest);
  test("Json Data Test", (){
    expect(jData['value'], "44.4");
    expect(jData['color'], "pink");
    expect(jData['advice'], "Eat less pies!");
  });
}
In order to test it on Codemagic CI/CD, we have to just include one more line to our script in codemagic.yaml file.
为了在Codemagic CI / CD上进行测试,我们只需要在codemagic.yaml文件中的脚本中codemagic.yaml一行即可。
Add this line before the ios build:
在ios构建之前添加以下行:
- cd $FCI_BUILD_DIR/bmi_flutter && flutter testThe whole YAML script for this build is available here.
此版本 的完整 YAML 脚本 在此处提供 。
结论 (Conclusion)
The codemagic.yaml file makes it possible to build and test a native iOS app with a Flutter module on Codemagic CI/CD. Maintaining the YAML file is convenient, it gets checked into the VCS and is auto-detected by Codemagic CI/CD during the build. Access it locally and you can modify it even without internet connection.
使用codemagic.yaml文件,可以使用Codemagic CI / CD上的Flutter模块构建和测试本机iOS应用程序。 维护YAML文件很方便,可以将其检入VCS,并在构建过程中由Codemagic CI / CD自动检测。 在本地访问它,即使没有互联网也可以对其进行修改。
有用的链接和参考 (Useful links and references)
The official documentation for integrating a Flutter module into your iOS project is here.
将Flutter模块集成到iOS项目中的官方文档在这里 。
The official documentation for Codemagic YAML is available here.
可从此处获得Codemagic YAML的官方文档。
You can get more information about the CLI tools here.
您可以在此处获取有关CLI工具的更多信息。
The GitHub repo for this project is available here.
此项目的GitHub存储库可在此处获得 。
Souvik Biswas is a passionate Mobile App Developer (Android and Flutter). He has worked on a number of mobile apps throughout his journey. Loves open source contribution on GitHub. He is currently pursuing a B.Tech degree in Computer Science and Engineering from Indian Institute of Information Technology Kalyani. He also writes Flutter articles on Medium — Flutter Community.
Souvik Biswas是一位充满激情的移动应用程序开发人员(Android和Flutter)。 在他的整个旅程中,他从事过许多移动应用程序的研究。 喜欢GitHub上的开源贡献。 他目前正在从印度信息技术学院Kalyani获得计算机科学与工程学士学位。 他还在“ Flutter 中型社区”上撰写Flutter文章。
More articles by Souvik:
Souvik的其他文章:
flutter ios测试


 2006
2006

 被折叠的 条评论
为什么被折叠?
被折叠的 条评论
为什么被折叠?
 到【灌水乐园】发言


