


层层递进
UI编程 (UI PROGRAMMING)
At Bending Spoons, we use shadows in almost all our applications.Shadows are helpful to draw lightweight-looking contours around views.They give depth to the apps, making them look less flat and more pleasing.
在Bending Spoons中,我们几乎在所有应用程序中都使用阴影,阴影有助于在视图周围绘制轻量级的轮廓,它们使应用程序具有深度,使它们看起来不那么平整,更令人愉悦。
I used to struggle to figure out how all the shadows parameters work and how we can use them to implement what the designer prepared.I more than once found my self wondering: “Where is the shadow I implemented? I can’t see it!”.
我过去一直在努力弄清所有阴影参数是如何工作的,以及如何使用它们来实现设计人员准备的东西。我不止一次地发现自己想知道: “我在哪里实现阴影? 我看不到!”。
Thus, I’d like to walk through them together to understand them better. I’d also like to share a small playground I prepared to play with the shadows and see how they update when we change their parameters. You can download the code at this link: just copy and paste it in a new playground and it should work!
因此,我想一起浏览它们以更好地了解它们。 我还想分享一个我准备与阴影一起玩耍的小操场,看看当我们更改其参数时它们如何更新。 您可以在此链接下载代码:只需将其复制并粘贴到新的游乐场中,它应该可以工作!
CALayer的Shadow属性 (CALayer’s Shadow property)
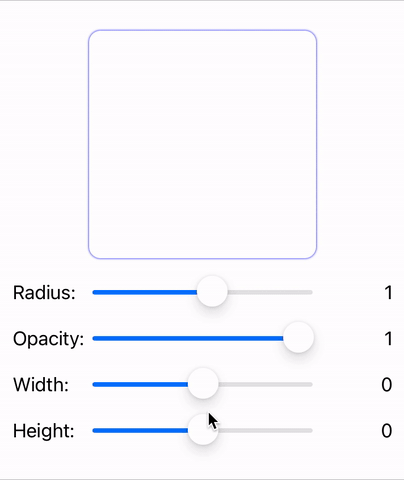
First of all, let’s see what are the shadow’s properties.
首先,让我们看看阴影的属性是什么。
Note: Before we start, keep in mind that shadows are rendered outside the bounds of the view. So, if you set either the
view.clipToBoundsor theview.layer.maskToBoundsproperty totrue, you won’t be able to see your shadows rendered.注意:在开始之前,请记住,阴影是在视图范围之外渲染的。 因此,如果将
view.clipToBounds或view.layer.maskToBounds属性设置为true,则将无法看到渲染的阴影。
All the shadow’s properties belong to the CALayer object and every view has a hidden CALayer that can be accessed by the .layer property.
所有阴影的属性都属于CALayer对象,并且每个视图都有一个隐藏的CALayer ,可以通过.layer属性进行访问。
From the .layer, we can type .shadow and see what the Xcode’s auto-completion feature suggests:
在.layer ,我们可以键入.shadow然后查看Xcode的自动.shadow全功能建议:
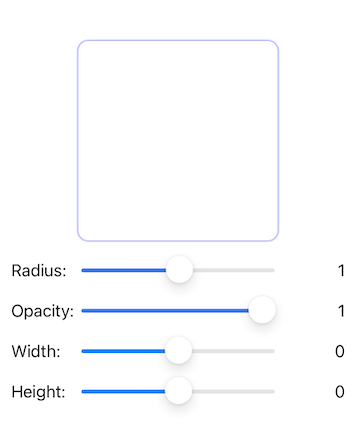
shadowOpacity: it ranges between0and1and works as the.opacityproperty of everyUIView.shadowOpacity:介于0到1之间,用作每个UIView的.opacity属性。shadowColor: it accepts aCGColorand sets the color of the shadow. If you wonder what aCGColoris, it is a color that belongs to theCoreGraphicsframework instead of theUIKitone. Luckily, everyUIColorhas a.cgColorproperty that performs the conversion.shadowColor:它接受CGColor并设置阴影的颜色。 如果您想知道CGColor是什么,那么它是属于CoreGraphics框架而不是UIKit一种颜色。 幸运的是,每个UIColor都有一个.cgColor属性来执行转换。shadowRadius: it accepts aFloat. It defines how “spread” the shadow should be.shadowRadius:接受Float。 它定义了阴影应该如何“扩散”。shadowOffset: it accepts aCGSizeobject. Its.widthproperty defines a horizontal translation for the shadow where positive values move the shadow to the right and negative values move the shadow to the left. Its.heightproperty defines a vertical translation where positive values move the shadows to the bottom while negative values push it to the top.shadowOffset:它接受CGSize对象。 其.width属性定义了阴影的水平平移,其中正值将阴影向右移动,负值将阴影向左移动。 其.height属性定义了垂直平移,其中正值将阴影移至底部,而负值将阴影移至顶部。shadowPath: this is the most complex property and we will explore it separately. It allows us to do pretty powerful things.shadowPath:这是最复杂的属性,我们将分别进行探讨。 它使我们能够做非常强大的事情。
Most of these properties are pretty self-explanatory. I prepared a video to show how the shadow changes when we modify some values.
这些属性大部分都是不言而喻的。 我准备了一个视频,展示了当我们修改某些值时阴影如何变化。
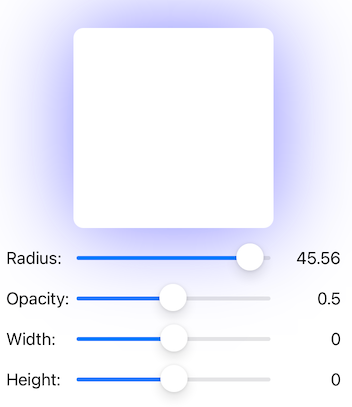
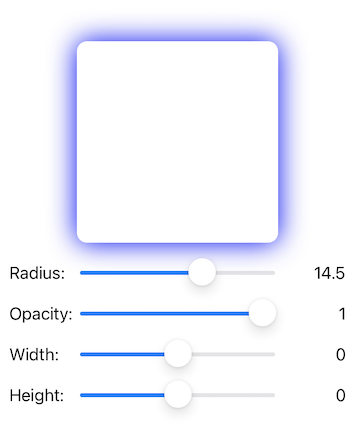
As you can see, the more I increase the radius, the more blurred and extended the shadow is. We can play with all the other parameters to make it more or less intense, or to make the view pop out in a specific direction.For this example, I decided to use -10 and +10 as limits for both the radius and the offset. However, the shadow is not limited to them: we can push them further. This is how the view looks like with a shadow of radius == 45 and opacity == 0.5
如您所见,半径增加得越多,阴影就越模糊和扩展。 我们可以使用所有其他参数来增加或减少强度,或使视图朝特定方向弹出。在此示例中,我决定使用-10和+10作为半径和偏移量的限制。 但是,阴影不仅限于它们:我们可以进一步推动它们。 这是radius == 45和opacity == 0.5的阴影时的视图外观
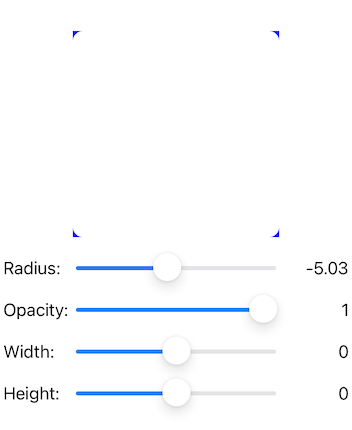
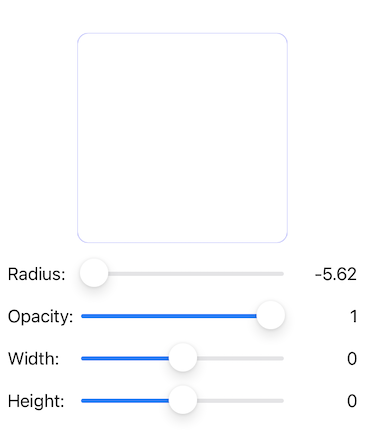
There are a couple of issues with the current implementation:1. the shadow around the corners of the view is kind of weird, unprecise;2. when we set some negative value for the radius, something weird happens:
当前的实现有两个问题:1。 视图拐角处的阴影有点怪异,不精确; 2。 当我们为半径设置一些负值时,会发生一些奇怪的事情:
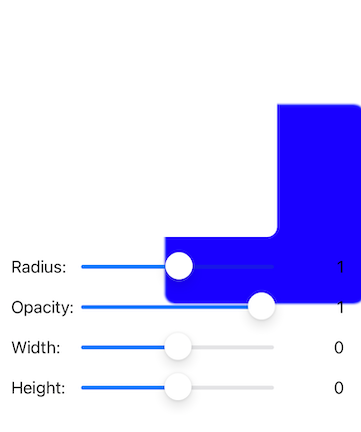
This happens because our shadow is applied to the whole frame of the UIView. The frame is a simple CGRect and it does not know that the actual view has rounded corners.To fix this, we need the .shadowPath property, so… Let’s see how it works.
发生这种情况是因为我们的阴影应用于UIView的整个框架。 该框架是一个简单的CGRect ,它不知道实际的视图是否具有圆角。要解决此问题,我们需要.shadowPath属性,因此……让我们看一下它是如何工作的。
CALayer.shadowPath (CALayer.shadowPath)
The shadow path property is pretty well documented by Apple. It also presents an interesting example of how to use it, so I suggest reading the full documentation for this field.For the sake of this article, this is the most relevant part:
Apple很好地记录了阴影路径属性。 它还提供了一个有趣的用法示例,因此,我建议阅读该领域的完整文档 。就本文而言,这是最相关的部分:
If you specify a value for this property, the layer creates its shadow using the specified path instead of the layer’s composited alpha channel. The path you provide defines the outline of the shadow. It is filled using the non-zero winding rule and the current shadow color, opacity, and blur radius.
如果为此属性指定一个值,则图层将使用指定的路径而不是图层的合成Alpha通道创建阴影。 您提供的路径定义了阴影的轮廓。 使用非零缠绕规则以及当前阴影颜色,不透明度和模糊半径填充该图像。
Therefore, we can define any custom path and draw our shadow as we please. To create the rounded corner path, we can leverage one of the predefined initializers of the CGPath object: init(roundedRect:cornerWidth:cornerHeight:transform:). This initializer requires 4 parameters:
因此,我们可以定义任何自定义路径并根据需要绘制阴影。 要创建圆角路径,我们可以利用CGPath对象的预定义初始化程序之一: init(roundedRect:cornerWidth:cornerHeight:transform:) 。 此初始化程序需要4个参数:
roundedRect: the enclosingCGRect.roundedRect:CGRect。cornerWidth: the width of the corners.cornerWidth:角的宽度。cornerHeight: the height of the corners.cornerHeight:角的高度。transform: an optional transformation.transform:可选的转换。
cornerWidth and cornerHeight are separated to allow the creation of non-square corners.
cornerWidth和cornerHeight分开以允许创建非正方形的角。
There are a couple of caveats on how to use this:
有关如何使用此方法的一些注意事项:
passing the
view.framewould end up in something different from what you expect. Remember that theframe“describes the view’s location and size in its superview’s coordinate system”. So yes, it will create a shadow with the proper size and corners but it won’t be behind theviewas you expect. Instead, we can use theview.boundswhich “describes the view’s location and size in its own coordinate system”. And this is exactly what we need.通过
view.frame最终会得到与您期望的不同的结果。 请记住,frame“在其超级视图的坐标系中描述视图的位置和大小”。 因此,是的,它将创建具有适当大小和角的阴影,但不会像您期望的那样位于view后面。 相反,我们可以使用view. bounds“描述视图在其自己的坐标系中的位置和大小”的view. bounds。 这正是我们所需要的。
view.frameview.frame
view.bounds is used.
view.bounds时。
If you use some properties of the view that depends on the layout, the view must be laid out before the shadow is set. Otherwise, you won’t see the shadow until the view is laid out a second time. At creation time, the view’s
frameandboundsare set to 0 and the shadow will be drawn using that reference. A simple solution to this is to create a shadow after the layout:如果您使用取决于布局的视图的某些属性, 则必须在设置阴影之前对视图进行布局 。 否则,直到第二次布局视图后,您才能看到阴影。 在创建时,视图的
frame和bounds设置为0,并且将使用该引用绘制阴影。 一个简单的解决方案是在布局后创建阴影:
With this simple trick, the corners are now smooth and the shadow behaves well also with negative values of the radius.
通过这个简单的技巧,拐角现在变得光滑,阴影在半径为负值的情况下也表现良好。
You may have noticed that we left out the transform property. This is a powerful property that can give us much more freedom over the shadow of our view.
您可能已经注意到,我们省略了transform属性。 这是一个强大的属性,可以为我们提供更大的视野范围之外的自由。
CALayer.shadowPath.transform属性 (CALayer.shadowPath.transform property)
This property allows transformations on the shadow. The theory of geometric transformations is complex and outside this article's scope. We will focus on the practical aspects of it.To use this property, we need to provide a CGAffineTransform. To create a valid transformation, we can start with the .identity, a transformation that does nothing, and build on top of it.
此属性允许在阴影上进行变换。 几何变换理论很复杂,不在本文讨论范围之内。 我们将重点关注它的实际方面。要使用此属性,我们需要提供CGAffineTransform 。 要创建有效的转换,我们可以从.identity开始,该转换不执行任何操作,并在其之上进行构建。
For example, we can:
例如,我们可以:
rotate the view by 45 degrees:
.rotated(by: CGFloat.pi/4)将视图旋转45度:
.rotated(by: CGFloat.pi/4)translate it by 100 pixels horizontally and -6 pixels vertically:
.translatedBy(dx: 100, dy: -6). Notice that the translation works exactly as theshadowOffsetproperty.将其水平平移100个像素,垂直
.translatedBy(dx: 100, dy: -6)-6个像素:.translatedBy(dx: 100, dy: -6)。 请注意,转换的工作方式与shadowOffset属性完全相同。shrink it by 75%:
.scaledBy(x: 0.75, y: 0.75).将其缩小75%
.scaledBy(x: 0.75, y: 0.75)。
Finally, the transform property requires an UnsafePointer. The UnsafeXXX are some weird Swift types that tell the compiler: “don’t worry about memory management and nillability. I’ll do it for you”.This looks a little bit dangerous, and it is. However Swift is kind enough to give us some free functions to manage the unsafe API easily. In this case, we will use the withUnsafePointer function.This function takes a value of type T and transforms it into the UnsafePointer<T> we need. Finally, it gives us the unsafe reference as a parameter of a callback: memory management is handled by the withUnsafePointer function before and after the callback invocation, so we don’t have to worry about that.
最后,transform属性需要一个UnsafePointer 。 UnsafeXXX是一些奇怪的Swift类型,它们告诉编译器: “不用担心内存管理和可移植性。 “我帮你做。”这看起来有点危险,确实如此。 但是,Swift非常友好,可以为我们提供一些免费功能来轻松管理不安全的API。 在这种情况下,我们将使用withUnsafePointer函数,该函数采用类型T的值并将其转换为所需的UnsafePointer<T> 。 最后,它给我们提供了不安全引用作为回调的参数:内存管理在回调调用之前和之后由withUnsafePointer函数处理,因此我们不必为此担心。
Here the resulting snippet:
这是结果片段:
And the final appearance of our shadow:
和我们的影子的最终外观:

Today we explored an aspect of the UI that can give depth and a feeling of professionalism to our apps. Shadows are great, they can define views in a nice and not intrusive way and they make the apps more natural and polished. Let’s pick up your app and think about how to integrate shadows in it: you will be delighted by the result!
今天,我们探索了UI的一个方面,该方面可以使我们的应用程序具有深度和专业感。 阴影很棒,它们可以用一种不错的方式来定义视图,而不是侵入性,它们可以使应用程序更加自然和优美。 让我们拿起您的应用程序并考虑如何在其中集成阴影:您将对结果感到满意!
翻译自: https://uxdesign.cc/calayers-shadow-explained-6f4e3f21c02a
层层递进


 369
369


 被折叠的 条评论
为什么被折叠?
被折叠的 条评论
为什么被折叠?
 到【灌水乐园】发言


