


mvvm 耗时加载进度条
In this article, we’ll explore a complete reactive MVVM implementation based on the sample app that fetches photos from the Unsplash API and loads them in an asynchronous manner.
在本文中,我们将基于示例应用程序探索一个完整的React式MVVM实现,该示例应用程序从Unsplash API中获取照片并以异步方式加载它们。
We’ll cover how to implement infinite scrolling, image caching, and doing navigation just right. We’ll also learn how to deal with some lower-level features in accordance to the overall app architecture, as MVVM is responsible only for the presentation layer.
我们将介绍如何实现无限滚动,图像缓存以及进行正确的导航。 由于MVVM仅负责表示层,因此我们还将学习如何根据整个应用程序体系结构处理一些较低级别的功能。
The source code of the project is available at the bottom of the article.
该项目的源代码位于文章底部。
Without further ado, let’s get started.
事不宜迟,让我们开始吧。
快速设置 (Quick Setup)
First, in order for our app to function the way we want, we need to obtain a free Unsplash API key:
首先,为了使我们的应用按我们想要的方式运行,我们需要获得一个免费的Unsplash API密钥:
Paste it into the the APIKeys.swift file inside the Core Layer/Network/API Keys directory:
将其粘贴到Core Layer/Network/API Keys目录内的APIKeys.swift文件中:
import Foundation


struct APIKeys {
    static let unsplash = "YOUR UNSPLASH API KEY"
}
Now we’re ready to explore the project.
现在,我们准备探索该项目。
开始吧 (Let’s Start)
Our project is divided into four layers (folders):
我们的项目分为四层(文件夹):
Application Layer: Contains the
AppDelegate.swiftfile andAppCoordinator, which is responsible for setting up the initial view controller of our app (you’ll learn more about it soon in this article)应用程序层:包含
AppDelegate.swift文件和AppCoordinator,后者负责设置应用程序的初始视图控制器(您将在本文中很快了解更多信息)Presentation Layer: Contains view controllers, view models, and their coordinators. It has two scenes:
Photos(displays Unsplash photos in aUICollectionView) andPhotoDetail(shows a photo that the user selects on thePhotosscene).表示层:包含视图控制器,视图模型及其协调器。 它有两个场景:
Photos(显示Unsplash照片在UICollectionView)和PhotoDetail(节目中的照片是在用户选择Photos场景)。Business Logic Layer: Consists of a model and services. The
UnsplashPhotostruct acts as a model and represents a particular photo we retrieve from the API. We use services to implement a certain business logic — e.g., fetching a list of Unsplash photos.业务逻辑层:由模型和服务组成。
UnsplashPhoto结构充当模型,代表我们从API检索的特定照片。 我们使用服务来实现某种业务逻辑-例如,获取Unsplash照片列表。Core Layer: Defines all of the settings we need for our Business Logic Layer to function and other small utilities. For example, it contains base URLs, API keys, and a network client.
核心层:定义我们的业务逻辑层和其他小型实用程序正常运行所需的所有设置。 例如,它包含基本URL,API密钥和网络客户端。

使用协调器 (Using Coordinators)
I’ve chosen to use the Coordinator design pattern because MVVM doesn’t cover navigation inside the app. Though it’s relatively simple and you could catch the idea of it reading this article, feel free to learn about it here.
我选择使用Coordinator设计模式,因为MVVM并不涵盖应用程序内部的导航。 尽管它相对简单,但您可以在阅读本文时了解它的想法,请随时在此处进行学习。
We provide the base Coordinator protocol, which PhotosCoordinator and PhotoDetailCoordinator will conform to:
我们提供基础Coordinator协议, PhotosCoordinator和PhotoDetailCoordinator将符合:
protocol Coordinator: class {
    func start()
    func coordinate(to coordinator: Coordinator)
}


extension Coordinator {
    func coordinate(to coordinator: Coordinator) {
        coordinator.start()
    }
}
The start() method is responsible for creating the current view controller and its dependencies, while the coordinate(to) is run when we want to navigate to another view controller, which, in its order, triggers the start() method of that view controller.
start()方法负责创建当前视图控制器及其依赖项,而当我们要导航至另一个视图控制器时,将运行coordinate(to) ,该控制器按其顺序触发该视图的start()方法控制器。
Now we can set up the initial flow of our app. We define the AppCoordinator, which has a dependency on the UIWindow property that AppDelegate provides:
现在,我们可以设置应用程序的初始流程。 我们定义AppCoordinator ,它依赖于AppDelegate提供的UIWindow属性:
import UIKit


@UIApplicationMain
class AppDelegate: UIResponder, UIApplicationDelegate {


    var window: UIWindow?
    var appCoordinator: AppCoordinator?

    func application(_ application: UIApplication, didFinishLaunchingWithOptions launchOptions: [UIApplication.LaunchOptionsKey: Any]?) -> Bool {
        window = UIWindow()
        appCoordinator = AppCoordinator(window: window!)
        appCoordinator?.start()
        return true
    }


}
import UIKit
class AppCoordinator: Coordinator {
let window: UIWindow
init(window: UIWindow) {
self.window = window
}
func start() {
let navigationController = UINavigationController()
if #available(iOS 13.0, *) {
navigationController.overrideUserInterfaceStyle = .light
}
window.rootViewController = navigationController
window.makeKeyAndVisible()
let photosCoordinator = PhotosCoordinatorImplementation(navigationController: navigationController)
coordinate(to: photosCoordinator)
}
}We can see that inside the start() method of the AppCoordinator, we coordinate to the PhotosCoordinator, which creates the initial scene of our app: Photos.
我们可以看到,在AppCoordinator的start()方法AppCoordinator ,我们与PhotosCoordinator进行了PhotosCoordinator ,后者创建了我们应用程序的初始场景: Photos 。
Let’s explore its implementation.
让我们探索其实现。
“照片”场景 (The ‘Photos’ Scene)
The PhotosCoordinator constructs the PhotosViewController and PhotosViewModel, as follows:
PhotosCoordinator构造PhotosViewController和PhotosViewModel ,如下所示:
import UIKit


protocol PhotosCoordinator: class {
    func pushToPhotoDetail(with photoId: String)
}


class PhotosCoordinatorImplementation: Coordinator {
    unowned let navigationController: UINavigationController

    init(navigationController: UINavigationController) {
        self.navigationController = navigationController
    }

    func start() {
        let photosViewController = PhotosViewController()
        let photosViewModel = PhotosViewModelImplementation(
            photosService: UnsplashPhotosServiceImplementation(),
            photoLoadingService: DataLoadingServiceImplementation(),
            dataToImageService: DataToImageConversionServiceImplementation(),
            coordinator: self
        )
        photosViewController.viewModel = photosViewModel

        navigationController
            .pushViewController(photosViewController, animated: true)
    }
}


extension PhotosCoordinatorImplementation: PhotosCoordinator {

    func pushToPhotoDetail(with photoId: String) {
        let photoDetailCoordinator = PhotoDetailCoordinatorImplementation(
            navigationController: navigationController,
            photoId: photoId
        )

        coordinate(to: photoDetailCoordinator)
    }
}
We provide three dependencies for the PhotosViewModel:
我们为PhotosViewModel提供了三个依赖关系:
UnsplashPhotosService: Fetches an array ofUnsplashPhotomodelsUnsplashPhotosService:获取一组UnsplashPhoto模型DataLoadingService: Loads and returnsDatabased on the URL providedDataLoadingService:根据提供的URL加载并返回DataDataToImageService: Returns aUIImagebased on the providedDataDataToImageService:基于提供的Data返回UIImage
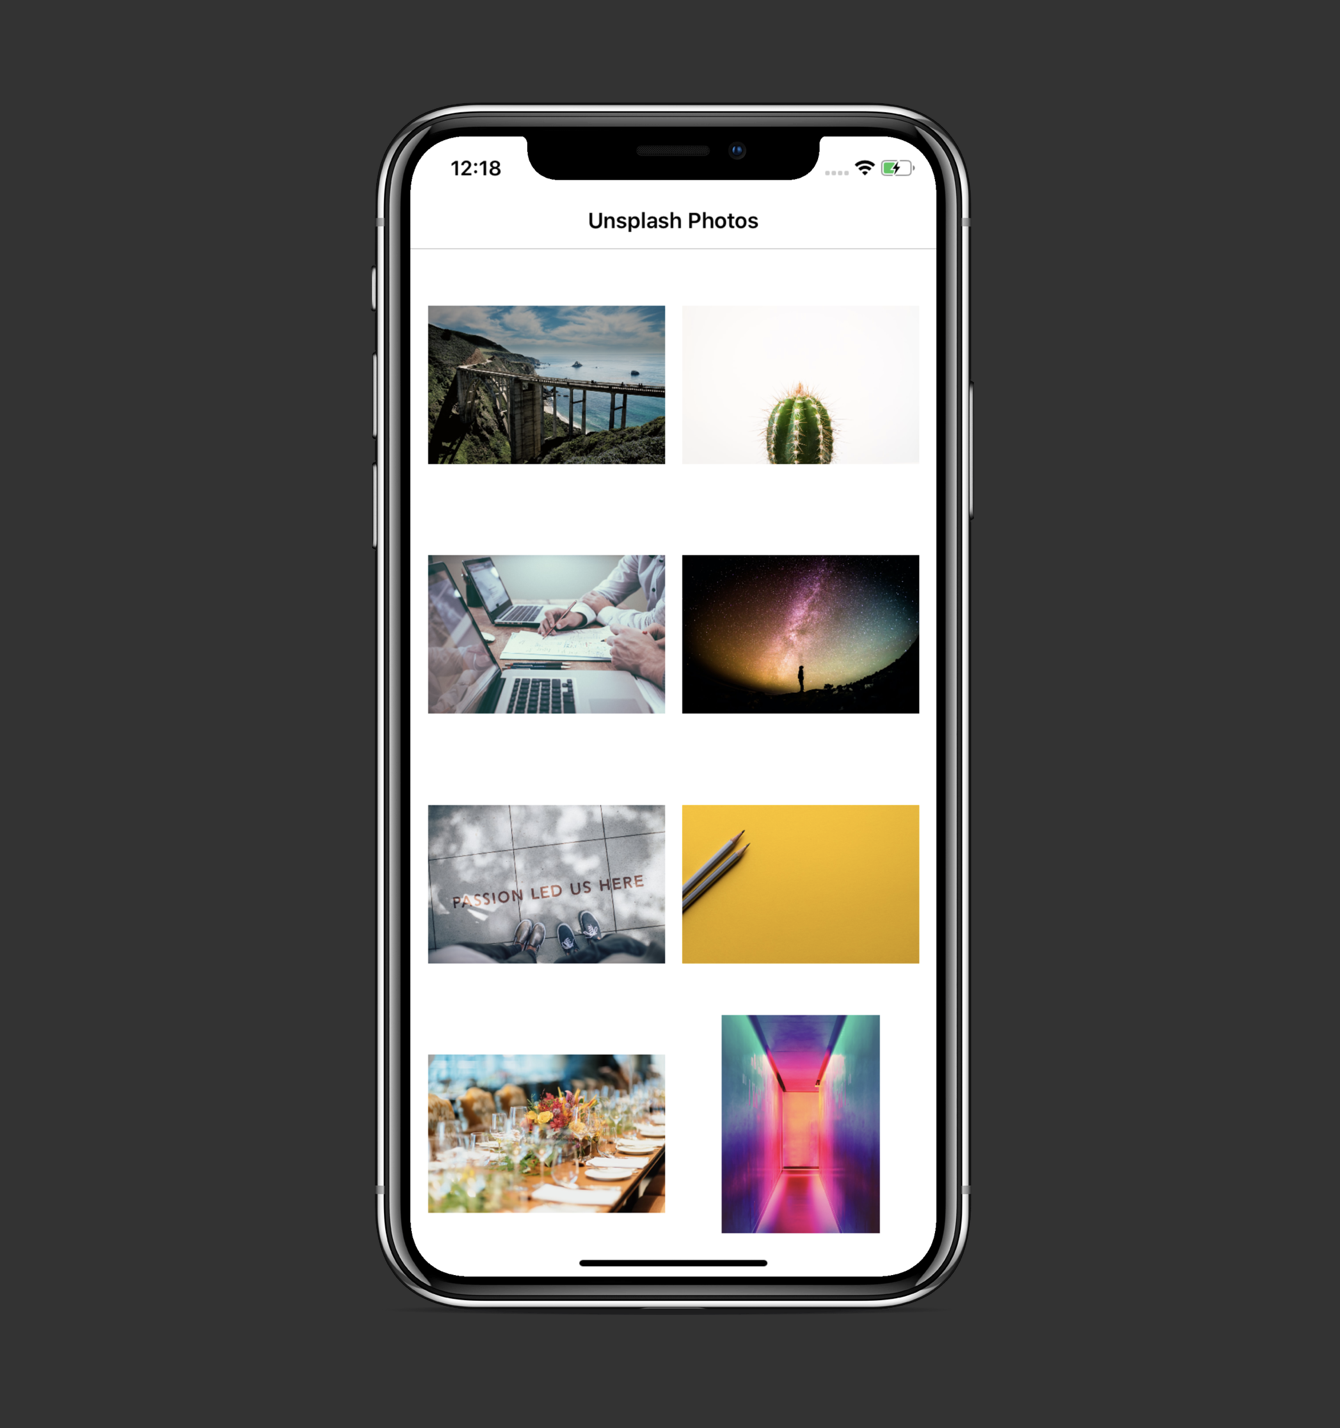
This is how our screen looks like:
这是我们的屏幕外观:
Let’s explore the view model and view controller implementations in detail (we’ll start with the view model because it is UI-independent and has clear input/output distinctions, so the view controller’s code will make more sense after this).
让我们详细研究视图模型和视图控制器的实现(我们将从视图模型开始,因为它是独立于UI的,并且具有明确的输入/输出区别,因此在此之后,视图控制器的代码将更有意义)。
'PhotosViewModel' (‘PhotosViewModel’)
import RxSwift
import RxCocoa


/// View model interface that is visible to the PhotosViewController
protocol PhotosViewModel: class {
    // Input
    var viewDidLoad: PublishRelay<Void>
    { get }
    var willDisplayCellAtIndex: PublishRelay<Int>
    { get }
    var didEndDisplayingCellAtIndex: PublishRelay<Int>
    { get }
    var didChoosePhotoWithId: PublishRelay<String>
    { get }
    var didScrollToTheBottom: PublishRelay<Void>
    { get }

    // Output
    var isLoadingFirstPage: BehaviorRelay<Bool>
    { get }
    var isLoadingAdditionalPhotos: BehaviorRelay<Bool>
    { get }
    var unsplashPhotos: BehaviorRelay<[UnsplashPhoto]>
    { get }
    var imageRetrievedSuccess: PublishRelay<(UIImage, Int)>
    { get }
    var imageRetrievedError: PublishRelay<Int>
    { get }
}


final class PhotosViewModelImplementation: PhotosViewModel {

    // MARK: - Private Properties
    private let photosService: UnsplashPhotosService
    private let photoLoadingService: DataLoadingService
    private let dataToImageService: DataToImageConversionService
    private let coordinator: PhotosCoordinator

    private let disposeBag = DisposeBag()
    private let pageNumber = BehaviorRelay<Int>(value: 1)
    lazy var pageNumberObs = pageNumber.asObservable()

    // MARK: - Input
    let viewDidLoad
        = PublishRelay<Void>()
    let didChoosePhotoWithId
        = PublishRelay<String>()
    let willDisplayCellAtIndex
        = PublishRelay<Int>()
    let didEndDisplayingCellAtIndex
        = PublishRelay<Int>()
    let didScrollToTheBottom
        = PublishRelay<Void>()

    // MARK: - Output
    let isLoadingFirstPage
        = BehaviorRelay<Bool>(value: false)
    let isLoadingAdditionalPhotos
        = BehaviorRelay<Bool>(value: false)
    let unsplashPhotos
        = BehaviorRelay<[UnsplashPhoto]>(value: [])
    let imageRetrievedSuccess
        = PublishRelay<(UIImage, Int)>()
    let imageRetrievedError
        = PublishRelay<Int>()

    // MARK: - Initialization
    init(photosService: UnsplashPhotosService,
         photoLoadingService: DataLoadingService,
         dataToImageService: DataToImageConversionService,
         coordinator: PhotosCoordinator) {

        self.photosService = photosService
        self.photoLoadingService = photoLoadingService
        self.dataToImageService = dataToImageService
        self.coordinator = coordinator

        bindOnViewDidLoad()
        bindOnWillDisplayCell()
        bindOnDidEndDisplayingCell()
        bindOnDidScrollToBottom()
        bindPageNumber()

        bindOnDidChoosePhoto()
    }

    // MARK: - Bindings
    private func bindOnViewDidLoad() {
        viewDidLoad
            .observeOn(MainScheduler.instance)
            .do(onNext: { [unowned self] _ in
                self.getPhotos()
            })
            .subscribe()
            .disposed(by: disposeBag)
    }

    private func bindOnWillDisplayCell() {
        willDisplayCellAtIndex
            .customDebug(identifier: "willDisplayCellAtIndex")
            .filter({ [unowned self] index in
                self.unsplashPhotos.value.indices.contains(index)
            })
            .map { [unowned self] index in
                (index, self.unsplashPhotos.value[index])
            }
            .compactMap({ [weak self] (index, photo) in
                guard let urlString = photo.urls?.regular else {
                    DispatchQueue.main.async {
                        self?.imageRetrievedError.accept(index)
                    }
                    return nil
                }
                return (index, urlString)
            })
            .flatMap({ [unowned self] (index, urlString) in
                self.photoLoadingService
                    .loadData(at: index, for: urlString)
                    .observeOn(
                        ConcurrentDispatchQueueScheduler(qos: .background)
                    )
                    .concatMap { (data, error) in
                        Observable.of((index, data, error))
                    }
            })
            .subscribe(onNext: { [weak self] (index, data, error) in
                guard let self = self else { return }

                guard let imageData = data,
                    let image = self.dataToImageService
                        .getImage(from: imageData) else {
                    self.imageRetrievedError.accept(index)
                    return
                }

                 self.imageRetrievedSuccess
                    .accept((image, index))
            })
            .disposed(by: disposeBag)
    }

    private func bindOnDidEndDisplayingCell() {
        didEndDisplayingCellAtIndex
            .subscribe(onNext: { [weak self] (index) in
                guard let self = self else { return }

                self.photoLoadingService.stopLoading(at: index)
            })
            .disposed(by: disposeBag)
    }

    private func bindOnDidScrollToBottom() {
        didScrollToTheBottom
            .flatMap({ [unowned self] _ -> Observable<Int> in
                let newPageNumber = self.pageNumber.value + 1
                return Observable.just(newPageNumber)
            })
            .bind(to: pageNumber)
            .disposed(by: disposeBag)
    }

    private func bindPageNumber() {
        pageNumber
            .subscribe(onNext: { [weak self] _ in
                self?.getPhotos()
            })
            .disposed(by: disposeBag)
    }

    private func bindOnDidChoosePhoto() {
        didChoosePhotoWithId
            .subscribe(onNext: { [unowned self] (id) in
                self.coordinator.pushToPhotoDetail(with: id)
            })
            .disposed(by: disposeBag)
    }

    // MARK: - Service Methods
    private func getPhotos() {
        if pageNumber.value == 1 {
            isLoadingFirstPage.accept(true)
        } else {
            isLoadingAdditionalPhotos.accept(true)
        }

        photosService.getPhotos(pageNumber: pageNumber.value, perPage: 30)
            .do(onNext: { [weak self] _ in
                guard let self = self else { return }


                if self.pageNumber.value == 1 {
                    self.isLoadingFirstPage.accept(false)
                } else {
                    self.isLoadingAdditionalPhotos
                        .accept(false)
                }
            })
            .filter { $0.1 == nil && $0.0 != nil }
            .map { return $0.0! }
            .flatMap({ [unowned self] (unsplashPhotos) -> Observable<[UnsplashPhoto]> in

                var photos: [UnsplashPhoto] = []

                // Add previously fetched photos to the array
                let existingPhotos = self.unsplashPhotos.value
                if !existingPhotos.isEmpty {
                    photos.append(contentsOf: existingPhotos)
                }

                // Add newly fetched photos to the array
                photos.append(contentsOf: unsplashPhotos)

                return Observable.just(photos)
            })
            .bind(to: unsplashPhotos)
            .disposed(by: disposeBag)
    }
}
We define the PhotosViewModel protocol and its implementation in this file. The protocol describes input (events received from the view controller) and output (results of the view model’s work that’s used by the view controller to drive its UI). Here’s how we react to input and provide output inside the PhotosViewModelImplementation:
我们在此文件中定义PhotosViewModel协议及其实现。 该协议描述了输入(从视图控制器接收的事件)和输出(视图控制器用来驱动其UI的视图模型工作的结果)。 这是我们对PhotosViewModelImplementation内部的输入做出React并提供输出的PhotosViewModelImplementation :
PhotosViewControllerloads and sends a value on to theviewDidLoadrelay of the view modelPhotosViewController加载并将值发送到视图模型的viewDidLoad中继The
getPhotos()method of the view model is fired视图模型的
getPhotos()方法被触发An array of
UnsplashPhotos is retrieved and sent onto theunsplashPhotosrelay检索
UnsplashPhoto的数组并将其发送到unsplashPhotos中继
private func bindOnViewDidLoad() {
    viewDidLoad
        .observeOn(MainScheduler.instance)
        .do(onNext: { [unowned self] _ in
            self.getPhotos()
        })
        .subscribe()
        .disposed(by: disposeBag)
}
private func getPhotos() {
if pageNumber.value == 1 {
isLoadingFirstPage.accept(true)
} else {
isLoadingAdditionalPhotos.accept(true)
}
photosService.getPhotos(pageNumber: pageNumber.value, perPage: 30)
.do(onNext: { [weak self] _ in
guard let self = self else { return }
if self.pageNumber.value == 1 {
self.isLoadingFirstPage.accept(false)
} else {
self.isLoadingAdditionalPhotos
.accept(false)
}
})
.filter { $0.1 == nil && $0.0 != nil }
.map { return $0.0! }
.flatMap({ [unowned self] (unsplashPhotos) -> Observable<[UnsplashPhoto]> in
var photos: [UnsplashPhoto] = []
// Add previously fetched photos to the array
let existingPhotos = self.unsplashPhotos.value
if !existingPhotos.isEmpty {
photos.append(contentsOf: existingPhotos)
}
// Add newly fetched photos to the array
photos.append(contentsOf: unsplashPhotos)
return Observable.just(photos)
})
.bind(to: unsplashPhotos)
.disposed(by: disposeBag)
}Notice that we also send relevant Bool events onto the isLoadingFirstPage and isLoadingAdditionalPhotos relays, which our view controller uses to show/hide a loading indicator (more about this in the view controller part).
请注意,我们还将相关的Bool事件发送到isLoadingFirstPage和isLoadingAdditionalPhotos中继上,我们的视图控制器使用这些事件来显示/隐藏加载指示符(有关更多信息,请参见视图控制器部分)。
PhotosViewControlleruses theunsplashPhotosproperty to drive theUICollectionViewand to display a number of cells corresponding to the count of models receivedPhotosViewController使用unsplashPhotos属性来驱动UICollectionView并显示与接收到的模型数量相对应的多个单元格PhotosViewControllersends values onto thewillDisplayCellAtIndexproperty of the view model, which triggers the loading of dataPhotosViewController将值发送到视图模型的willDisplayCellAtIndex属性,这将触发数据加载When the image is loaded, it’s sent onto the
imageRetrievedSuccessrelay, whichPhotosViewControlleruses to display the image in the corresponding cell加载图像后,将其发送到
imageRetrievedSuccess中继,PhotosViewController使用该中继在相应的单元格中显示图像
private func bindOnWillDisplayCell() {
    willDisplayCellAtIndex
        .customDebug(identifier: "willDisplayCellAtIndex")
        .filter({ [unowned self] index in
            self.unsplashPhotos.value.indices.contains(index)
        })
        .map { [unowned self] index in
            (index, self.unsplashPhotos.value[index])
        }
        .compactMap({ [weak self] (index, photo) in
            guard let urlString = photo.urls?.regular else {
                DispatchQueue.main.async {
                    self?.imageRetrievedError.accept(index)
                }
                return nil
            }
            return (index, urlString)
        })
        .flatMap({ [unowned self] (index, urlString) in
            self.photoLoadingService
                .loadData(at: index, for: urlString)
                .observeOn(
                    ConcurrentDispatchQueueScheduler(qos: .background)
                )
                .concatMap { (data, error) in
                    Observable.of((index, data, error))
                }
        })
        .subscribe(onNext: { [weak self] (index, data, error) in
            guard let self = self else { return }


            guard let imageData = data,
                let image = self.dataToImageService
                    .getImage(from: imageData) else {
                self.imageRetrievedError.accept(index)
                return
            }


             self.imageRetrievedSuccess
                .accept((image, index))
        })
        .disposed(by: disposeBag)
}
First, we check if the unsplashPhotos property contains the index of the cell that’s being displayed. Then, we obtain the URL of the image and fire the DataLoadingService’s loadData(at:) method and observe for the result in the background so our main thread isn’t blocked.
首先,我们检查unsplashPhotos属性是否包含要显示的单元格的索引。 然后,我们获取图像的URL并触发DataLoadingService的loadData(at:)方法,并在后台观察结果,以免主线程被阻塞。
When we receive Data, we call the DataToImageService’s getImage(from:) method to obtain a UIImage object. Finally, we either send an event onto the imageRetrievedError property (if we couldn’t obtain an image) or to the imageRetrievedSuccess relay.
收到Data ,我们调用DataToImageService的getImage(from:)方法来获取UIImage对象。 最后,我们将事件发送到imageRetrievedError属性(如果无法获取图像)或imageRetrievedSuccess中继。
To optimize memory usage, we also want to cancel a data-loading task if the cell for which it was intended for disappears from the screen. For this purpose, we provide the didEndDisplayingCellAtIndex relay, which is used as follows:
为了优化内存使用量,如果原本打算用于其的单元格从屏幕上消失了,我们还想取消数据加载任务。 为此,我们提供了didEndDisplayingCellAtIndex中继,其用法如下:
The view controller notices that a certain cell disappeared while scrolling the
UICollectionViewand sends its index onto thedidEndDisplayingCellAtIndexproperty视图控制器注意到在滚动
UICollectionView某个单元格消失了,并将其索引发送到didEndDisplayingCellAtIndex属性上The view model calls the
DataLoadingService’sstopLoading(at:)method to cancel the task in progress视图模型调用
DataLoadingService的stopLoading(at:)方法来取消正在进行的任务
private func bindOnDidEndDisplayingCell() {
    didEndDisplayingCellAtIndex
        .subscribe(onNext: { [weak self] (index) in
            guard let self = self else { return }


            self.photoLoadingService.stopLoading(at: index)
        })
        .disposed(by: disposeBag)
}
The DataLoadingService keeps track of tasks in a dictionary and disposes ones we no longer need:
DataLoadingService跟踪字典中的任务,并处理我们不再需要的任务:
import RxSwift


protocol DataLoadingService: class {
    func loadData(for urlString: String) -> Observable<(Data?, Error?)>
    func loadData(at index: Int,
                  for urlString: String) -> Observable<(Data?, Error?)>
    func stopLoading(at index: Int)
}


class DataLoadingServiceImplementation: DataLoadingService {
    private var tasks: [Int: Disposable] = [:]

    func loadData(at index: Int, for urlString: String) -> Observable<(Data?, Error?)> {
        return Observable.create { [weak self] observer in
            guard let url = URL(string: urlString) else {
                observer.onNext((nil, NetworkError.invalidURL))
                return Disposables.create()
            }

            let task = NetworkClient.getData(url)
                .subscribe(onNext: { (data, error) in
                    guard let data = data, error == nil else {
                        observer.onNext((nil, error))
                        return
                    }

                    observer.onNext((data, nil))
                })
            self?.tasks[index] = task

            return Disposables.create {
                task.dispose()
            }
        }
    }

    func loadData(for urlString: String) -> Observable<(Data?, Error?)> {
         return Observable.create { observer in

            guard let url = URL(string: urlString) else {
                observer.onNext((nil, NetworkError.invalidURL))
                return Disposables.create()
            }

            let task = NetworkClient.getData(url)
                .subscribe(onNext: { (data, error) in
                    guard let data = data, error == nil else {
                        observer.onNext((nil, error))
                        return
                    }

                    observer.onNext((data, nil))
                })

            return Disposables.create {
                task.dispose()
            }
        }
    }

    func stopLoading(at index: Int) {
        print("Cancel task at index: \(index)")
        tasks[index]?.dispose()
    }
}
We also want to navigate to another screen and display a selected image and its description in it, so we define the didChoosePhotoWithId relay. When a value is sent onto the relay, we trigger PhotosCoordinator’s pushToPhotoDetail(with:) method:
我们还想导航到另一个屏幕并在其中显示选定的图像及其描述,因此我们定义了didChoosePhotoWithId中继。 当值发送到中继时,我们触发PhotosCoordinator的pushToPhotoDetail(with:)方法:
private func bindOnDidChoosePhoto() {
    didChoosePhotoWithId
        .subscribe(onNext: { [unowned self] (id) in
            self.coordinator.pushToPhotoDetail(with: id)
        })
        .disposed(by: disposeBag)
}
Now the final feature remains — infinite scrolling. It allows us to load UnsplashPhotos by pages, saving API resources and optimizing performance. So our goal is to load an additional array of UnsplashPhotos and append it to the existing array. We do it by defining the didScrollToTheBottom relay inside the view model and using it like this:
现在,最后的功能仍然存在-无限滚动。 它使我们可以按页面加载UnsplashPhoto ,从而节省API资源并优化性能。 因此,我们的目标是加载一个额外的UnsplashPhoto数组,并将其附加到现有数组中。 我们通过在视图模型内定义didScrollToTheBottom中继并像这样使用它来实现:
The view controller notices that the user scrolled till the last cell available and sends a
Voidevent onto thedidScrollToTheBottomrelay视图控制器注意到用户滚动到最后一个可用单元格,并将
Void事件发送到didScrollToTheBottom中继上The view model reacts by incrementing the
pageNumberand triggering an additional data fetching视图模型通过增加
pageNumber并触发附加数据获取来做出React
private func bindOnDidScrollToBottom() {
didScrollToTheBottom
.flatMap({ [unowned self] _ -> Observable<Int> in
let newPageNumber = self.pageNumber.value + 1
return Observable.just(newPageNumber)
})
.bind(to: pageNumber)
.disposed(by: disposeBag)
}
private func bindPageNumber() {
pageNumber
.subscribe(onNext: { [weak self] _ in
self?.getPhotos()
})
.disposed(by: disposeBag)
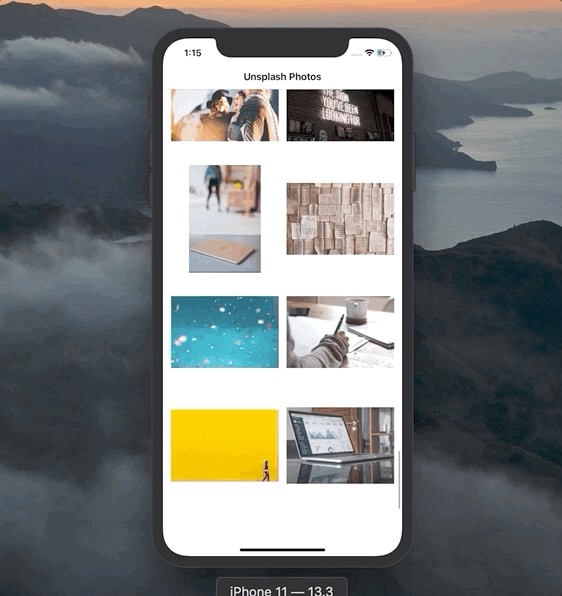
}As a result, we have the pagination feature implemented:
结果,我们实现了分页功能:
'PhotosViewController' (‘PhotosViewController’)
import UIKit


import RxSwift
import RxCocoa


class PhotosViewController: UIViewController {

    // MARK: - Lifecycle Methods
    override func viewDidLoad() {
        super.viewDidLoad()
        setupUI()
        bindCollectionView()
        bindLoadingState()
        bindBottomActivityIndicator()

        viewModel.viewDidLoad.accept(())
    }

    override func viewWillAppear(_ animated: Bool) {
        super.viewWillAppear(animated)
        setupNavigationBar()
        setupNavigationItem()
    }

    // MARK: - Properties
    private let disposeBag = DisposeBag()
    var viewModel: PhotosViewModel!
    private var cachedImages: [Int: UIImage] = [:]

    lazy var photosCollectionView: UICollectionView = {
        let collectionView = UICollectionView(frame: .zero, collectionViewLayout: collectionViewLayout())
        collectionView.backgroundColor = .white
        collectionView.register(PhotoCell.self, forCellWithReuseIdentifier: PhotoCell.reuseIdentifier)
        collectionView.translatesAutoresizingMaskIntoConstraints = false
        return collectionView
    }()

    var bottomConstraint: NSLayoutConstraint?

    lazy var bottomActivityIndicator: UIActivityIndicatorView = {
        let indicator = UIActivityIndicatorView(style: .large)
        indicator.hidesWhenStopped = true
        indicator.translatesAutoresizingMaskIntoConstraints = false
        return indicator
    }()

}


// MARK: - Binding
extension PhotosViewController {
    private func bindCollectionView() {
        /// Bind unsplash photos to the collection view items
        viewModel.unsplashPhotos
            .bind(to: photosCollectionView.rx.items(
                cellIdentifier: PhotoCell.reuseIdentifier,
                cellType: PhotoCell.self)) { _, _, _ in }
            .disposed(by: disposeBag)

        /// Prepare for cell to be displayed. Launch photo loading operation if no cached image is found
        photosCollectionView.rx.willDisplayCell
            .filter { $0.cell.isKind(of: PhotoCell.self) }
            .map { ($0.cell as! PhotoCell, $0.at.item)}
            .do(onNext: { (cell, index) in
                cell.imageView.image = nil
            })
            .subscribe(onNext: { [weak self] (cell, index) in
                if let cachedImage = self?.cachedImages[index] {
                    print("Using cached image for: \(index)")
                    cell.imageView.image = cachedImage
                } else {
                    cell.activityIndicator.startAnimating()
                    self?.viewModel
                        .willDisplayCellAtIndex
                        .accept(index)
                }
            })
            .disposed(by: disposeBag)

        /// On image retrival, 1)stop activity indicator, 2) animate the cell, 3) assign the image, and 4) add it to cached images
        viewModel.imageRetrievedSuccess
            .customDebug(identifier: "imageRetrievedSuccess")
            .observeOn(MainScheduler.asyncInstance)
            .subscribe(onNext: { [weak self] (image, index) in
                if let cell = self?.photosCollectionView.cellForItem(at: IndexPath(item: index, section: 0)) as? PhotoCell {

                    // 1
                    cell.activityIndicator.stopAnimating()

                    // 2
                    cell.transform = CGAffineTransform(scaleX: 0.1, y: 0.1)
                    UIView.animate(withDuration: 0.25) {
                        cell.transform = .identity
                    }

                    // 3
                    cell.imageView.image = image

                    // 4
                    self?.cachedImages[index] = image
                }
            })
            .disposed(by: disposeBag)

        /// On image retrieval error, stop activity indicator, and assign image to **nil**
        viewModel.imageRetrievedError
            .customDebug(identifier: "imageRetrievedError")
            .observeOn(MainScheduler.asyncInstance)
            .subscribe(onNext: { [weak self] (index) in
                if let cell = self?.photosCollectionView.cellForItem(at: IndexPath(item: index, section: 0)) as? PhotoCell {
                    cell.activityIndicator.stopAnimating()
                    cell.imageView.image = nil
                }
            })
            .disposed(by: disposeBag)

        /// Cancelling image loading operation for a cell that disappeared
        photosCollectionView.rx.didEndDisplayingCell
            .map { $0.1 }
            .map { $0.item }
            .bind(to: viewModel.didEndDisplayingCellAtIndex)
            .disposed(by: disposeBag)

        photosCollectionView.rx.modelSelected(UnsplashPhoto.self)
            .compactMap { $0.id }
            .bind(to: viewModel.didChoosePhotoWithId)
            .disposed(by: disposeBag)

        /// Infinite scrolling
        photosCollectionView.rx.willDisplayCell
            .flatMap({ (_, indexPath) -> Observable<(section: Int, row: Int)> in
                return Observable.of((indexPath.section, indexPath.row))
            })
            .filter { (section, row) in
                let numberOfSections = self.photosCollectionView.numberOfSections
                let numberOfItems = self.photosCollectionView.numberOfItems(inSection: section)

                return section == numberOfSections - 1
                    && row == numberOfItems - 1
            }
            .map { _ in () }
            .bind(to: viewModel.didScrollToTheBottom)
            .disposed(by: disposeBag)
    }

    private func bindLoadingState() {
        viewModel.isLoadingFirstPage
            .observeOn(MainScheduler.instance)
            .map({ (isLoading) in
                return isLoading ? "Fetching..." : "Unsplash Photos"
            })
            .bind(to: navigationItem.rx.title)
            .disposed(by: disposeBag)
    }

    private func bindBottomActivityIndicator() {
        viewModel.isLoadingAdditionalPhotos
            .observeOn(MainScheduler.instance)
            .do(onNext: { [weak self] isLoading in
                self?.updateConstraintForMode(loadingMorePhotos: isLoading)
            })
            .bind(to: bottomActivityIndicator.rx.isAnimating)
            .disposed(by: disposeBag)
    }
}


// MARK: - UI Setup
extension PhotosViewController {
    private func setupUI() {
        if #available(iOS 13.0, *) {
            self.overrideUserInterfaceStyle = .light
        }
        self.view.backgroundColor = .white
        self.view.addSubview(photosCollectionView)
        self.view.addSubview(bottomActivityIndicator)

        bottomConstraint = photosCollectionView.bottomAnchor
            .constraint(equalTo: self.view.safeAreaLayoutGuide.bottomAnchor)

        NSLayoutConstraint.activate([
            photosCollectionView.leftAnchor
                .constraint(equalTo: self.view.leftAnchor),
            photosCollectionView.topAnchor
                .constraint(equalTo: self.view.safeAreaLayoutGuide.topAnchor),
            photosCollectionView.rightAnchor
                .constraint(equalTo: self.view.rightAnchor),
            bottomConstraint!
        ])

        NSLayoutConstraint.activate([
            bottomActivityIndicator.centerXAnchor
                .constraint(equalTo: self.view.centerXAnchor),
            bottomActivityIndicator.bottomAnchor
                .constraint(equalTo: self.view.safeAreaLayoutGuide.bottomAnchor),
            bottomActivityIndicator.widthAnchor
                .constraint(equalToConstant: 44),
            bottomActivityIndicator.heightAnchor
                .constraint(equalToConstant: 44)
        ])
    }

    /// Changes photoCollectionView's bottom constraint with a subtle animation
    private func updateConstraintForMode(loadingMorePhotos: Bool) {
        self.bottomConstraint?.constant = loadingMorePhotos ? -20 : 0
        UIView.animate(withDuration: 0.25) {
            self.view.layoutIfNeeded()
        }
    }

    private func setupNavigationBar() {
        self.navigationController?.navigationBar.tintColor = .black
        self.navigationController?.navigationBar.barTintColor = .white
        self.navigationController?.navigationBar.isTranslucent = false
    }

    private func setupNavigationItem() {
        self.navigationItem.title = "Unsplash Photos"
    }

    private func collectionViewLayout() -> UICollectionViewLayout {
        let layout = UICollectionViewFlowLayout()
        layout.scrollDirection = .vertical
        layout.itemSize = Dimensions.photosItemSize
        let numberOfCellsInRow = floor(Dimensions.screenWidth / Dimensions.photosItemSize.width)
        let inset = (Dimensions.screenWidth - (numberOfCellsInRow * Dimensions.photosItemSize.width)) / (numberOfCellsInRow + 1)
        layout.sectionInset = .init(top: inset,
                                    left: inset,
                                    bottom: inset,
                                    right: inset)
        return layout
    }
}
We won’t cover how the UI is created, as it’s not the focus of this article. If you wish to learn about programmatic UICollectionView implementation, visit this article. We’ll focus on two key responsibilities here: providing input for the view model and hooking up the output from the view model to our UI.
我们不会介绍如何创建UI,因为这不是本文的重点。 如果您希望了解方案UICollectionView实施,请访问此文章。 在这里,我们将重点关注两个关键职责:为视图模型提供输入并将视图模型的输出连接到我们的UI。
We create the cachedImages property to save loaded images in a dictionary so we can later save resources by using a cached image in a cell, instead of firing a data-loading operation again.
我们创建cachedImages属性以将加载的图像保存在字典中,以便稍后可以通过在单元格中使用缓存的图像来节省资源,而不是再次触发数据加载操作。
This is how we bind the view model’s unsplashPhotos property to the photosCollectionView:
这是我们将视图模型的unsplashPhotos属性绑定到photosCollectionView :
// MARK: - Binding
extension PhotosViewController {
    private func bindCollectionView() {
        /// Bind unsplash photos to the collection view items
        viewModel.unsplashPhotos
            .bind(to: photosCollectionView.rx.items(
                cellIdentifier: PhotoCell.reuseIdentifier,
                cellType: PhotoCell.self)) { _, _, _ in }
            .disposed(by: disposeBag)
    ....
Send the value onto the willDisplayCellAtIndex to trigger data loading (if no cached image is found at that index):
将值发送到willDisplayCellAtIndex以触发数据加载(如果在该索引处未找到缓存的图像):
photosCollectionView.rx.willDisplayCell
    .filter { $0.cell.isKind(of: PhotoCell.self) }
    .map { ($0.cell as! PhotoCell, $0.at.item)}
    .do(onNext: { (cell, index) in
        cell.imageView.image = nil
    })
    .subscribe(onNext: { [weak self] (cell, index) in
        if let cachedImage = self?.cachedImages[index] {
            print("Using cached image for: \(index)")
            cell.imageView.image = cachedImage
        } else {
            cell.activityIndicator.startAnimating()
            self?.viewModel
                .willDisplayCellAtIndex
                .accept(index)
        }
    })
    .disposed(by: disposeBag)
We also react to the view model’s imageRetrievedSuccess and imageRetrievedError events:
我们还对视图模型的imageRetrievedSuccess和imageRetrievedError事件做出React:
/// On image retrival, 1)stop activity indicator, 2) animate the cell, 3) assign the image, and 4) add it to cached images
viewModel.imageRetrievedSuccess
    .customDebug(identifier: "imageRetrievedSuccess")
    .observeOn(MainScheduler.asyncInstance)
    .subscribe(onNext: { [weak self] (image, index) in
        if let cell = self?.photosCollectionView.cellForItem(at: IndexPath(item: index, section: 0)) as? PhotoCell {


            // 1
            cell.activityIndicator.stopAnimating()


            // 2
            cell.transform = CGAffineTransform(scaleX: 0.1, y: 0.1)
            UIView.animate(withDuration: 0.25) {
                cell.transform = .identity
            }


            // 3
            cell.imageView.image = image


            // 4
            self?.cachedImages[index] = image
        }
    })
    .disposed(by: disposeBag)


/// On image retrieval error, stop activity indicator, and assign image to **nil**
viewModel.imageRetrievedError
    .customDebug(identifier: "imageRetrievedError")
    .observeOn(MainScheduler.asyncInstance)
    .subscribe(onNext: { [weak self] (index) in
        if let cell = self?.photosCollectionView.cellForItem(at: IndexPath(item: index, section: 0)) as? PhotoCell {
            cell.activityIndicator.stopAnimating()
            cell.imageView.image = nil
        }
    })
    .disposed(by: disposeBag)
We send a value onto the didEndDisplayingCellAtIndex relay of the view model when a particular cell disappears:
当特定单元格消失时,我们将值发送到视图模型的didEndDisplayingCellAtIndex中继上:
/// Cancelling image loading operation for a cell that disappeared
photosCollectionView.rx.didEndDisplayingCell
    .map { $0.1 }
    .map { $0.item }
    .bind(to: viewModel.didEndDisplayingCellAtIndex)
    .disposed(by: disposeBag)
Using RxSwift’s willDisplayCell wrapper again, we determine if we reached the end of the list.
再次使用RxSwift的willDisplayCell包装器,我们确定是否到达列表的末尾。
If so, we send a Void value onto the didScrollToTheBottom relay:
如果是这样,我们将Void值发送到didScrollToTheBottom中继上:
/// Infinite scrolling
photosCollectionView.rx.willDisplayCell
    .flatMap({ (_, indexPath) -> Observable<(section: Int, row: Int)> in
        return Observable.of((indexPath.section, indexPath.row))
    })
    .filter { (section, row) in
        let numberOfSections = self.photosCollectionView.numberOfSections
        let numberOfItems = self.photosCollectionView.numberOfItems(inSection: section)


        return section == numberOfSections - 1
            && row == numberOfItems - 1
    }
    .map { _ in () }
    .bind(to: viewModel.didScrollToTheBottom)
    .disposed(by: disposeBag)
We react to the view model’s isLoadingFirstPage and isLoadingAdditionalPhotos by changing the title on the navigationItem and showing/hiding a loading indicator in each PhotoCell:
我们通过更改navigationItem的标题并在每个PhotoCell显示/隐藏加载指示器来对视图模型的isLoadingFirstPage和isLoadingAdditionalPhotos做出React:
private func bindLoadingState() {
    viewModel.isLoadingFirstPage
        .observeOn(MainScheduler.instance)
        .map({ (isLoading) in
            return isLoading ? "Fetching..." : "Unsplash Photos"
        })
        .bind(to: navigationItem.rx.title)
        .disposed(by: disposeBag)
}


private func bindBottomActivityIndicator() {
    viewModel.isLoadingAdditionalPhotos
        .observeOn(MainScheduler.instance)
        .do(onNext: { [weak self] isLoading in
            self?.updateConstraintForMode(loadingMorePhotos: isLoading)
        })
        .bind(to: bottomActivityIndicator.rx.isAnimating)
        .disposed(by: disposeBag)
}
Finally, when we tap on a particular cell, we grab the selected UnsplashPhoto’s id and send an Int value to the didChoosePhotoWithId relay:
最后,当我们点击一个特定的单元格时,我们获取选定的UnsplashPhoto的id并将一个Int值发送到didChoosePhotoWithId中继:
photosCollectionView.rx.modelSelected(UnsplashPhoto.self)
    .compactMap { $0.id }
    .bind(to: viewModel.didChoosePhotoWithId)
    .disposed(by: disposeBag)
Great! We’ve covered the Photos scene, let’s now move on to the final one — PhotoDetail.
大! 我们已经介绍了Photos场景,现在让我们进入最后一个— PhotoDetail 。
'PhotoDetail' (‘PhotoDetail’)
When we coordinate to this scene from Photos, the PhotoDetailCoordinator constructs it like this:
当我们从Photos协调到该场景时, PhotoDetailCoordinator会像这样构造它:
import UIKit


protocol PhotoDetailCoordinator: class {}


class PhotoDetailCoordinatorImplementation: Coordinator {
    unowned let navigationController: UINavigationController
    let photoId: String

    init(navigationController: UINavigationController, photoId: String) {
        self.navigationController = navigationController
        self.photoId = photoId
    }

    func start() {
        let photoDetailViewController = PhotoDetailViewController()
        let photoDetailViewModel = PhotoDetailViewModelImplementation(
            photosService: UnsplashPhotosServiceImplementation(),
            photoLoadingService: DataLoadingServiceImplementation(),
            dataToImageService: DataToImageConversionServiceImplementation(),
            coordinator: self,
            photoId: photoId
        )
        photoDetailViewController.viewModel = photoDetailViewModel

        navigationController.pushViewController(photoDetailViewController,
                                                animated: true)
    }
}


extension PhotoDetailCoordinatorImplementation: PhotoDetailCoordinator {}
We can see we have the photoId property that we get from a previous coordinator and assign it to the photoId property of the PhotoDetailViewModel.
我们可以看到,我们有photoId的性质,我们从以前的协调得到,并将其分配给photoId的财产PhotoDetailViewModel 。
'PhotoDetailViewModel' (‘PhotoDetailViewModel’)
Similarly to how we did it in the PhotosViewModel, here we use the viewDidLoad property as an input and the isLoading, imageRetrievedError, imageRetrievedSuccess, and description properties as outputs:
与在PhotosViewModel中进行操作PhotosViewModel ,在这里我们将viewDidLoad属性用作输入,并将isLoading , imageRetrievedError , imageRetrievedSuccess和description属性用作输出:
import RxSwift
import RxRelay


/// View model interface that is visible to the PhotoDetailViewController
protocol PhotoDetailViewModel: class {
    // Input
    var viewDidLoad: PublishRelay<Void> { get }

    // Output
    var isLoading: BehaviorRelay<Bool> { get }
    var imageRetrievedError: PublishRelay<Void> { get }
    var imageRetrievedSuccess: PublishRelay<UIImage> { get }
    var description: PublishRelay<String> { get }
}


final class PhotoDetailViewModelImplementation: PhotoDetailViewModel {

    // MARK: - Input
    let viewDidLoad = PublishRelay<Void>()

    // MARK: - Output
    let isLoading = BehaviorRelay<Bool>(value: false)
    let imageRetrievedError = PublishRelay<Void>()
    let imageRetrievedSuccess = PublishRelay<UIImage>()
    let description = PublishRelay<String>()

    // MARK: - Private Properties
    private let photosService: UnsplashPhotosService
    private let photoLoadingService: DataLoadingService
    private let dataToImageService: DataToImageConversionService
    private let coordinator: PhotoDetailCoordinator

    private let disposeBag = DisposeBag()
    private let unsplashPhoto = PublishRelay<UnsplashPhoto>()
    private let photoId: String

    // MARK: - Initialization
    init(photosService: UnsplashPhotosService,
         photoLoadingService: DataLoadingService,
         dataToImageService: DataToImageConversionService,
         coordinator: PhotoDetailCoordinator,
         photoId: String) {

        self.photosService = photosService
        self.photoLoadingService = photoLoadingService
        self.dataToImageService = dataToImageService
        self.coordinator = coordinator

        self.photoId = photoId

        bindOnViewDidLoad()
        bindOnPhotoRetrieval()
    }

    private func bindOnViewDidLoad() {
        viewDidLoad
            .do(onNext: { [unowned self] _ in
                self.getPhoto()
            })
            .subscribe()
            .disposed(by: disposeBag)
    }

    private func bindOnPhotoRetrieval() {
        // Bind to description
        unsplashPhoto
            .flatMap({ (unsplashPhoto) -> Observable<String?> in
                var description: String?

                if let photoDescription = unsplashPhoto.description {
                    description = photoDescription
                } else if let alternativeDescription = unsplashPhoto.altDescription {
                    description = alternativeDescription
                }

                return Observable.just(description)
            })
            .compactMap { $0 }
            .bind(to: description)
            .disposed(by: disposeBag)

        // Bind to image
        unsplashPhoto
            .flatMap { [weak self] (photo) -> Observable<(Data?, Error?)> in
                guard let self = self else { return .empty() }

                if let photoURL = photo.urls?.regular {
                    return self.photoLoadingService
                        .loadData(for: photoURL)
                        .observeOn(
                            ConcurrentDispatchQueueScheduler(qos: .background)
                    )
                } else {
                    self.imageRetrievedError.accept(())
                    return Observable.of((nil, NetworkError.decodingFailed))
                }
            }
            .do(onNext: { [weak self] _ in
                self?.isLoading.accept(false)
            })
            .map({ [weak self] (data, error) -> (UIImage?, Error?) in
                if let imageData = data,
                    let image = self?.dataToImageService.getImage(from: imageData) {
                    return (image, nil)
                } else {
                    self?.imageRetrievedError.accept(())
                    return (nil, NetworkError.decodingFailed)
                }
            })
            .compactMap { $0.0 }
            .bind(to: imageRetrievedSuccess)
            .disposed(by: disposeBag)
    }

    // MARK: - Service Methods
    private func getPhoto() {
        isLoading.accept(true)

        photosService.getPhoto(id: photoId)
            .compactMap({ [weak self] (unsplashPhoto, error) in
                guard let photo = unsplashPhoto, error == nil else {
                    self?.imageRetrievedError.accept(())
                    return nil
                }

                return photo
            })
            .bind(to: unsplashPhoto)
            .disposed(by: disposeBag)
    }

}
As before, when we receive a Void value on viewDidLoad, we fire the getPhoto() method, which binds the result to the unsplashPhoto property:
和以前一样,当我们在viewDidLoad上收到Void值时,将触发getPhoto()方法,该方法将结果绑定到unsplashPhoto属性:
private func getPhoto() {
    isLoading.accept(true)


    photosService.getPhoto(id: photoId)
        .compactMap({ [weak self] (unsplashPhoto, error) in
            guard let photo = unsplashPhoto, error == nil else {
                self?.imageRetrievedError.accept(())
                return nil
            }


            return photo
        })
        .bind(to: unsplashPhoto)
        .disposed(by: disposeBag)
}
As a result, it triggers the loading of image data and its description:
结果,它触发了图像数据及其描述的加载:
private func bindOnPhotoRetrieval() {
    // Bind to description
    unsplashPhoto
        .flatMap({ (unsplashPhoto) -> Observable<String?> in
            var description: String?


            if let photoDescription = unsplashPhoto.description {
                description = photoDescription
            } else if let alternativeDescription = unsplashPhoto.altDescription {
                description = alternativeDescription
            }


            return Observable.just(description)
        })
        .compactMap { $0 }
        .bind(to: description)
        .disposed(by: disposeBag)


    // Bind to image
    unsplashPhoto
        .flatMap { [weak self] (photo) -> Observable<(Data?, Error?)> in
            guard let self = self else { return .empty() }


            if let photoURL = photo.urls?.regular {
                return self.photoLoadingService
                    .loadData(for: photoURL)
                    .observeOn(
                        ConcurrentDispatchQueueScheduler(qos: .background)
                )
            } else {
                self.imageRetrievedError.accept(())
                return Observable.of((nil, NetworkError.decodingFailed))
            }
        }
        .do(onNext: { [weak self] _ in
            self?.isLoading.accept(false)
        })
        .map({ [weak self] (data, error) -> (UIImage?, Error?) in
            if let imageData = data,
                let image = self?.dataToImageService.getImage(from: imageData) {
                return (image, nil)
            } else {
                self?.imageRetrievedError.accept(())
                return (nil, NetworkError.decodingFailed)
            }
        })
        .compactMap { $0.0 }
        .bind(to: imageRetrievedSuccess)
        .disposed(by: disposeBag)
}
'PhotoDetailViewController' (‘PhotoDetailViewController’)
Here we similarly send events on to the viewDidLoad property and bind imageRetrievedSuccess, imageRetrievedError, description, and isLoading to the UI:
在这里,我们类似地将事件发送到viewDidLoad属性,并将imageRetrievedSuccess , imageRetrievedError , description和isLoading到UI:
import UIKit
import RxSwift


class PhotoDetailViewController: UIViewController {

    // MARK: - Lifecycle Methods
    override func viewDidLoad() {
        super.viewDidLoad()
        setupUI()
        bindImageView()
        bindDescriptionLabel()
        bindActivityIndicator()

        viewModel.viewDidLoad.accept(())
    }

    override func viewWillAppear(_ animated: Bool) {
        super.viewWillAppear(animated)
        setupNavigationBar()
        setupNavigationItem()
    }

    override func viewDidLayoutSubviews() {
        super.viewDidLayoutSubviews()
        activityIndicator.center = self.photoImageView.center
    }

    // MARK: - Properties
    let disposeBag = DisposeBag()
    var viewModel: PhotoDetailViewModel!

    lazy var photoImageView: UIImageView = {
        let imageView = UIImageView()
        imageView.contentMode = .scaleAspectFit
        imageView
            .translatesAutoresizingMaskIntoConstraints = false
        return imageView
    }()

    lazy var descriptionLabel: UILabel = {
        let label = UILabel()
        label.textColor = .black
        label.numberOfLines = 0
        label.translatesAutoresizingMaskIntoConstraints = false
        return label
    }()

    lazy var activityIndicator: UIActivityIndicatorView = {
        let indicator = UIActivityIndicatorView()
        indicator.hidesWhenStopped = true
        return indicator
    }()
}


// MARK: - Binding
extension PhotoDetailViewController {
    func bindImageView() {
        viewModel.imageRetrievedSuccess
            .observeOn(MainScheduler.instance)
            .do(onNext: { [weak self] _ in
                self?.photoImageView.alpha = 0
                UIView.animate(withDuration: 0.25) {
                    self?.photoImageView.alpha = 1.0
                }
            })
            .bind(to: photoImageView.rx.image)
            .disposed(by: disposeBag)

        viewModel.imageRetrievedError
            .observeOn(MainScheduler.instance)
            .do(onNext: { [weak self] _ in
                self?.photoImageView.alpha = 0
                UIView.animate(withDuration: 0.25) {
                    self?.photoImageView.alpha = 1.0
                    self?.photoImageView.backgroundColor = .black
                }
            })
            .subscribe()
            .disposed(by: disposeBag)
    }

    func bindDescriptionLabel() {
        viewModel.description
            .observeOn(MainScheduler.instance)
            .bind(to: descriptionLabel.rx.text)
            .disposed(by: disposeBag)
    }

    func bindActivityIndicator() {
        viewModel.isLoading
            .observeOn(MainScheduler.instance)
            .bind(to: activityIndicator.rx.isAnimating)
            .disposed(by: disposeBag)
    }
}


// MARK: - UI Setup
extension PhotoDetailViewController {
    private func setupUI() {
        if #available(iOS 13.0, *) {
            self.overrideUserInterfaceStyle = .light
        }
        self.view.backgroundColor = .white

        self.view.addSubview(photoImageView)
        self.view.addSubview(descriptionLabel)
        photoImageView.addSubview(activityIndicator)

        NSLayoutConstraint.activate([
            photoImageView.leftAnchor
                .constraint(equalTo: self.view.leftAnchor),
            photoImageView.topAnchor
                .constraint(equalTo: self.view.safeAreaLayoutGuide.topAnchor),
            photoImageView.rightAnchor
                .constraint(equalTo: self.view.rightAnchor),
            photoImageView.heightAnchor
                .constraint(equalToConstant: Dimensions.screenHeight * 0.3)
        ])

        NSLayoutConstraint.activate([
            descriptionLabel.leftAnchor
                .constraint(equalTo: self.view.leftAnchor,
                            constant: 20),
            descriptionLabel.topAnchor
                .constraint(equalTo: self.photoImageView.bottomAnchor,
                            constant: 20),
            descriptionLabel.rightAnchor
                .constraint(equalTo: self.view.rightAnchor,
                            constant: -20),
        ])
    }

    private func setupNavigationBar() {
           self.navigationController?.navigationBar.barTintColor = .white
           self.navigationController?.navigationBar.isTranslucent = false
       }

       private func setupNavigationItem() {
           self.navigationItem.title = "Photo Detail"
       }
}
As a result, we have this final workflow:
结果,我们有了最后的工作流程:
We’ve implemented a fully functional app using a reactive MVVM architecture.
我们已经使用React式MVVM架构实现了功能齐全的应用程序。
结语 (Wrapping Up)
Want to learn more about design or architectural patterns? Feel free to check out my other relevant pieces:
想更多地了解设计或建筑模式? 随时查看我的其他相关文章:
Thanks for reading!
谢谢阅读!
mvvm 耗时加载进度条


 845
845

 被折叠的 条评论
为什么被折叠?
被折叠的 条评论
为什么被折叠?
 到【灌水乐园】发言


