


css浮动占位
要求: (Requirements:)
Cocoapods (Cocoapods install steps)
Cocoapods( Cocoapods安装步骤 )
Xcode (Mac App Store)
Xcode( Mac App Store )
- Swift Swift
前言 (Preface)
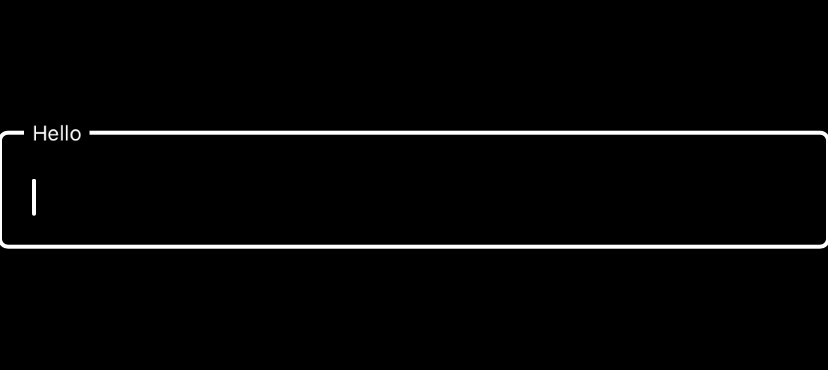
Material design in iOS. Since many developers have a single design for both platforms and Material UI is a viable and simple solution to standardize UI design, we are going to explore how to create one of the best looking elements Material UI design has for us, the floating placeholder text field.
中号 aterial设计的iOS。 由于许多开发人员在两个平台上都有一个单一的设计,并且Material UI是标准化UI设计的可行且简单的解决方案,因此我们将探讨如何创建Material UI设计对我们而言最好看的元素之一,即浮动占位符文本字段。
让我们开始编码 (Let’s begin coding)
建立 (setup)
To start we are going to need to import the Material library, this library has the benefit of being modular and as such you can import the specific element you want so as to not overstuff your application with code you will not use.
首先,我们将需要导入Material库,该库具有模块化的优点,因此,您可以导入所需的特定元素,以免使用不会使用的代码来过度填充应用程序。
For this example we are going to import this pod:
对于此示例,我们将导入此pod:
(If you haven’t installed cocoapods yet refer to the requirements section)
(如果尚未安装cocoapods,请参阅需求部分)
# Inside in your Podfile after # Pods for {PROJECTNAME}
pod ‘MaterialComponents/TextFields’
And install with:
并安装:
$ pod installAfter installing remember to use the .xcworkspace file instead of the .xcodeproj file.
安装后,请记住使用.xcworkspace文件而不是.xcodeproj文件。
项目 (Project)
We are going to create a new .swift file, to create a TextField object.
我们将创建一个新的.swift文件,以创建一个TextField对象。
Why are we going to do that? you ask. Why not just import the text field class and use it?
我们为什么要这样做? 你问。 为什么不只导入文本字段类并使用它呢?
Well the floating placeholder text field is not one of the TextField elements that come prepackaged in the library.
好吧,浮动占位符文本字段不是库中预包装的TextField元素之一。
You need to assemble it (simple stuff don’t panic). Remember to check the completed code at the end if you get lost.
您需要组装它(简单的东西不要惊慌)。 如果您迷路了,请记住在最后检查完整的代码。
To start we will import the library:
首先,我们将导入库:
import MaterialComponents.MaterialTextFieldsOur text field object needs to handle two elements:
我们的文本字段对象需要处理两个元素:
1.- The material text field class.
1.-物质文本字段类。
2.- The controller that will manage the class.
2.-将管理课程的控制器。
Every text field will need a controller to manage it, for this reason it is better to create this subclass to handle every instance of text field + controller.
每个文本字段都需要一个控制器来管理它,因此,最好创建这个子类来处理文本字段+控制器的每个实例。
To use both we will create a new subclass of UIView:
要同时使用两者,我们将创建一个新的UIView子类:
class FloatingPlaceholderTextField: UIView{


}
Now we will add the variables that will be used by the class:
现在,我们将添加该类将使用的变量:
@IBDesignable  // Lets you change a UIView instance in storyboard to this class, so you can visualize it and add constraints to it
class FloatingPlaceholderTextField: UIView{


    private var textInput: MDCTextField!
    private var controller: MDCTextInputControllerOutlined!
    private let textColor = UIColor(named: "textColor")

    private var placeholderText = ""
    //@IBDesignable lets you modify an instance of this element in the main.storyboard
    @IBInspectable var setPlaceholderText: String{
        get{
            return placeHolderText
        }
        set(str){
            placeHolderText = str
        }
    }


}
The previous code tells the compiler that the declared variables will have an instantiation in the future (It will crash if it doesn’t). And that this UIView subclass can be used in a storyboard file. The “private” reserved word lets the IDE know that these variables cannot be accessed in another class or subclass.
前面的代码告诉编译器将来声明的变量将具有实例化(否则将崩溃)。 而且此UIView子类可以在情节提要文件中使用。 “私有”保留字使IDE知道无法在另一个类或子类中访问这些变量。
The variables are the following:
变量如下:
- An MDCTextField (We will initialize and use this textfield in a function later) This is a Material Design Text Field that we will use in our text field controller. MDCTextField(稍后将在函数中初始化并使用此文本字段)这是一个材料设计文本字段,将在文本字段控制器中使用。
- An MDCTextInputController (We will use the MDCTextInputControllerOutlined to have an outlined text field) MDCTextInputController(我们将使用MDCTextInputControllerOutlined来显示文本框)
- A UIColor, for this color you can use any color, but to adapt it to the new user interface styles (Light & Dark) we created an new UIColor in the assets folder. (Not covered in this article) UIColor,对于这种颜色,您可以使用任何颜色,但是为了使其适应新的用户界面样式(浅色和深色),我们在assets文件夹中创建了一个新的UIColor。 (本文未涵盖)
- placeholderText is the String that the Placeholder view will have. placeholderText是“占位符”视图将具有的String。
- setPlaceholderText is a computed variable that we can use in th storyboard to set the placeholder or wherever you instantiate the class. setPlaceholderText是一个计算变量,我们可以在情节提要中使用它来设置占位符或实例化该类的任何位置。
Afterwards add the following code:
然后添加以下代码:
private func setupInputView(){
        //MARK: Text Input Setup

        // Step 1
        textInput = MDCTextField()

        // Step 2
        textInput.tag = 1

        // Step 3
        textInput.translatesAutoresizingMaskIntoConstraints = false

        // Step 4

        self.addSubview(textInput)

        // Step 5
        textInput.placeholder = placeHolderText

        // Step 6
        textInput.delegate = self

        // Step 7
        textInput.textColor = textColor

        // Step 8
        NSLayoutConstraint.activate([
            (textInput.topAnchor.constraint(equalTo: self.topAnchor)),
            (textInput.bottomAnchor.constraint(equalTo: self.bottomAnchor)),
            (textInput.leadingAnchor.constraint(equalTo: self.leadingAnchor)),
            (textInput.trailingAnchor.constraint(equalTo: self.trailingAnchor))
        ])
    }
This code is comprised of 8 short steps:
该代码包含8个简短步骤:
1.- Initialize a new MDCTextField with it’s default initializer.
1.-使用默认的初始化程序初始化一个新的MDCTextField。
2.- We add a tag number to the view. This helps with avoiding to add the view again when layoutSubviews is called again (discussed below).
2.-我们在视图中添加标签号。 这有助于避免在再次调用layoutSubviews时再次添加视图(在下面讨论)。
3.- Disable translatesAutoresizingMaskIntoConstraints to add layout with NSLayouts.
3.-禁用translatesAutoresizingMaskIntoConstraints以使用NSLayouts添加布局。
4.- Add the subview, to our UIView
4.-将子视图添加到我们的UIView
5.- Set the placeholder to the placeholderText variable
5.-将占位符设置为placeholderText变量
6.- Set the UIView as a delegate. You should add a class extension at the end of your file as such:
6.-将UIView设置为委托。 您应该在文件末尾添加类扩展名,如下所示:
extension FloatingPlaceholdetTextField: UITextFieldDelegate{
}
(you can also add the protocol at the start but that makes for messier code)
(您也可以在开始时添加协议,但这会使代码更混乱)
7.- Set the color for the placeholder text (if you want)
7.-设置占位符文本的颜色(如果需要)
8.- Set the layout for the InputView inside this view. All top, bottom, right, left anchors, so that the text field uses the maximum available space in your view.
8.-在此视图内设置InputView的布局。 所有顶部,底部,右侧,左侧锚点,以便文本字段使用视图中的最大可用空间。
Now we need the Material Design Components Text Input Controller (You can use the controller with the design you choose, for this example we’ll use the Outlined Controller), this handles the text field. Add this function:
现在,我们需要“材料设计组件”文本输入控制器(您可以将控制器与您选择的设计一起使用,在本示例中,我们将使用“轮廓控制器”),它可以处理文本字段。 添加此功能:
private func setupContoller(){
        // MARK: Text Input Controller Setup

        // Step 1
        controller = MDCTextInputControllerOutlined(textInput: textInput)

        // Step 2
        controller.activeColor = textColor
        controller.normalColor = textColor
        controller.textInput?.textColor = textColor
        controller.inlinePlaceholderColor = textColor
        controller.floatingPlaceholderActiveColor = textColor
        controller.floatingPlaceholderNormalColor = textColor

    }
Now let’s break down the previous code:
现在,让我们分解前面的代码:
1.- Initialize the Controller.
1.-初始化控制器。
2.- Setup the colors for the controller’s managed floating text field’s and active text field’s text.
2.-为控制器的托管浮动文本字段和活动文本字段的文本设置颜色。
Now to remove the keyboard when the return button is pressed:
现在在按下返回按钮时卸下键盘:
Since we only have 1 delegated text field we can use this function to remove the keyboard when we’re done typing.
由于我们只有1个委派的文本字段,因此我们可以在输入完毕后使用此功能删除键盘。
func textFieldShouldReturn(_ textField: UITextField) -> Bool {
        textField.resignFirstResponder()
 }
Now we need to call the functions from our layoutSubviews() functions:
现在,我们需要从layoutSubviews()函数中调用这些函数:
override func layoutSubviews() {

        setupInputView()
        setupContoller()

  }
Since the layoutSubviews() function is called every time we change the screen orientation, and when we bring the app to the foreground, we should add a check in our first function to see if the text field already exists inside our UIView. For this we add the following at the start of our setInputView() function:
由于每次更改屏幕方向以及将应用程序置于前台时都会调用layoutSubviews()函数,因此应在第一个函数中添加一个检查,以查看UIView中是否已存在文本字段。 为此,我们在setInputView()函数的开头添加以下内容:
private func setupInputView(){
        //MARK: Text Input Setup
        // Add this to the top of you code
        if let _ = self.viewWithTag(1){return}

         // the rest of the function is the same
    }
The finished code:
完成的代码:
import Foundation
import MaterialComponents.MaterialTextFields


@IBDesignable
class FloatingPlaceholderTextField: UIView{

    private var textInput: MDCTextField!
    private var controller: MDCTextInputControllerOutlined!
    private let textColor = UIColor(named: "textColor") // Dynamic dark & light color created in the assets folder
    private var placeHolderText = ""

    @IBInspectable var setPlaceholder: String{
        get{
            return placeHolderText
        }
        set(str){
            placeHolderText = str
        }
    }

    override func layoutSubviews() {

        setupInputView()
        setupContoller()

    }

    private func setupInputView(){
        //MARK: Text Input Setup

        if let _ = self.viewWithTag(1){return}

        textInput = MDCTextField()

        textInput.tag = 1

        textInput.translatesAutoresizingMaskIntoConstraints = false

        self.addSubview(textInput)

        textInput.placeholder = placeHolderText

        textInput.delegate = self

        textInput.textColor = textColor

        NSLayoutConstraint.activate([
            (textInput.topAnchor.constraint(equalTo: self.topAnchor)),
            (textInput.bottomAnchor.constraint(equalTo: self.bottomAnchor)),
            (textInput.leadingAnchor.constraint(equalTo: self.leadingAnchor)),
            (textInput.trailingAnchor.constraint(equalTo: self.trailingAnchor))
        ])
    }

    private func setupContoller(){
        // MARK: Text Input Controller Setup

        controller = MDCTextInputControllerOutlined(textInput: textInput)

        controller.activeColor = textColor
        controller.normalColor = textColor
        controller.textInput?.textColor = textColor
        controller.inlinePlaceholderColor = textColor
        controller.floatingPlaceholderActiveColor = textColor
        controller.floatingPlaceholderNormalColor = textColor

    }

    func textFieldShouldReturn(_ textField: UITextField) -> Bool {
        textField.resignFirstResponder()
    }

}


extension FloatingPlaceholderTextField: UITextFieldDelegate {

}
It contains some elements to change the color of the text depending on your user interface style. (Light and Dark mode included in iOS 13). Granted you have a iOS 13 compatible Xcode and device. You also need a new color set with the dark & light style attributes .
它包含一些根据用户界面样式更改文本颜色的元素。 (iOS 13中包括了明暗模式)。 授予您具有与iOS 13兼容的Xcode和设备。 您还需要具有深色和浅色样式属性的新颜色集。
由Reboot Club的 David A. Perez P.提供。 (By David A. Perez P. from Reboot Club.)
翻译自: https://medium.com/@davidpp124/material-design-floating-placeholder-in-swift-5-c5c0a1db1458
css浮动占位


 783
783


 被折叠的 条评论
为什么被折叠?
被折叠的 条评论
为什么被折叠?
 到【灌水乐园】发言


