ios开发swift
动机 (Motivation)
I've been an iOS developer since 2015 and lately I've been researching a lot about how to develop code which is reliable and better aligned with my stakeholders' expectations.
自2015年以来,我一直是iOS开发人员,最近我一直在研究如何开发可靠且更符合利益相关者期望的代码。
Last year, I discovered Behavior-Driven Development (BDD), a software engineering methodology proposed by Dan North, and began to study it more deeply.
去年,我发现了行为驱动开发(BDD),这是Dan North提出的一种软件工程方法,并开始对其进行更深入的研究。
What I found out is that BDD is a great way to avoid re-work. By ensuring our code is both correct (i.e. it follows software engineering best practices) and right (i.e. it aligns with our customers expectations), it allows us to focus in the important (and fun) parts of the development process.
我发现BDD是避免返工的好方法。 通过确保我们的代码既正确( 即遵循软件工程最佳实践)又正确( 即符合客户期望),则可以使我们专注于开发过程中的重要(有趣)部分。
After experiencing some of the benefits and challenges of BDD, I've created a personal workflow for developing Apps in Xcode using it. This post will detail this workflow and provide some considerations about it. I hope you enjoy it.
体验了BDD的一些优点和挑战之后,我创建了一个个人工作流,用于使用BDD在Xcode中开发Apps。 这篇文章将详细介绍此工作流程并提供一些注意事项。 我希望你喜欢它。
先决条件 (Pre-requisites)
The following guide assumes you are familiarized with Apple's Development Ecosystem. In addition to this, we assume you are using Agile software development practices.
以下指南假定您已熟悉Apple的开发生态系统。 除此之外,我们假设您正在使用敏捷软件开发实践。
Besides Xcode, all you need are two testing frameworks, Quick & Nimble.
除了Xcode,您只需要两个测试框架Quick & Nimble 。
示例应用 (Example App)
The App we will be developing to better experience the workflow is a simple Weather-App. The complete code is available here.
我们将开发以更好地体验工作流程的App是一个简单的Weather-App。 完整的代码在这里 。
This app uses the OpenWeather API to display weather forecast of cities to world travellers.
该应用程序使用OpenWeather API向世界旅行者显示城市的天气预报。
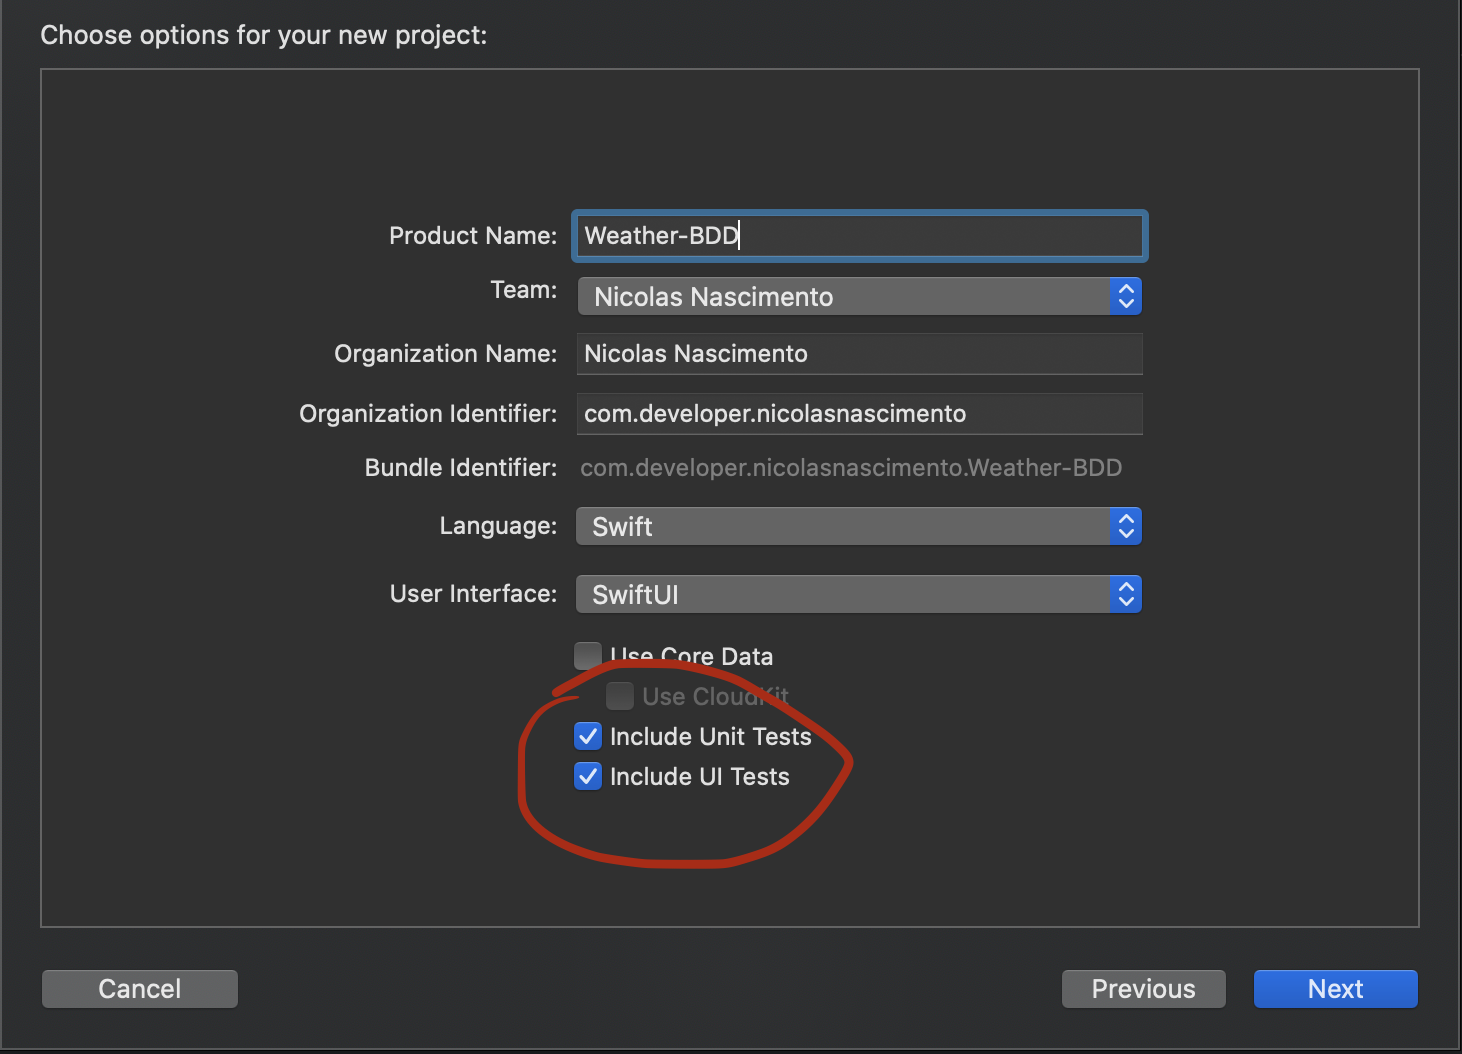
If you want to code together, simply create a new project and make sure you are using SwiftUI and have the "Include Unit Tests" and "Include UI Tests" checkboxes enabled.
如果您想一起编码,只需创建一个新项目并确保您正在使用SwiftUI,并启用“包括单元测试”和“包括UI测试”复选框。
工作流程 (Workflow)
The workflow proposed is divided in the following steps.
建议的工作流程分为以下步骤。
🛠 Augmenting user stories using BDD scenarios;
using使用BDD场景增强用户故事;
🛠 Coding high-level features using executable specifications;
using使用可执行规范对高级功能进行编码;
⏭ Coding low-level features using low-level specifications ;
using使用底层规范对底层特征进行编码;
⏭ Coding high-level UI features using executable specifications;
using使用可执行文件规范对高级UI功能进行编码;
Items marked with 🛠 will be covered in this part, while items marked with ⏭ will be implemented in other parts.
标有🛠的项目将在本部分中介绍,而标有⏭的项目将在其他部分中实现。
The beauty of each one of these steps is that they are independent, but work together pretty nicely.
这些步骤中每个步骤的优点在于它们是独立的,但可以很好地协同工作。
As such, the two steps for this post are further explained below.
因此,此帖子的两个步骤将在下面进一步说明。
使用BDD场景增强用户故事 (Augmenting user stories using BDD scenarios)
User stories are a common format used to specify what needs to be developed in an software project. These stories are lightweight requirements and are usually created in collaboration with stakeholders. Even though BDD provides collaboration oportunities for the initial phases, we will assume that the stories have been created and focus in the processes used to implement it.
用户故事 是用于指定在软件项目中需要开发什么的通用格式。 这些故事是轻量级需求,通常是与利益相关者协作创建的。 尽管BDD在初始阶段提供了合作机会,但我们仍将假设故事已创建并且将重点放在实现该故事的过程中。
In this context, user stories are usually structured in the following format.
在这种情况下,用户故事通常以以下格式构建。
AS A <STAKEHOLDER> I WANT TO BE ABLE TO <CAPABILITY>SO THAT I <VALUE>
作为<利益相关者>,我希望能够<能力>,这样我<值>
For our example App, we will implement the user story below.
对于我们的示例应用程序,我们将在下面实现用户案例。
AS A WORLD TRAVELLERI WANT TO BE ABLE TO SEE CITIES AND THEIR FORECASTSSO THAT I CAN KNOW THE FORECAST AROUND THE WORLD
作为世界旅行者,我希望能够看到城市及其预测,这样我就可以知道世界各地的预测
This format clearly presents the "who", the "what" and the "why" for a specific requirement. However, few direction is given to the "how" and it is part of the work of the software engineering team to figure this out.
此格式明确表示特定要求的“谁” , “什么”和“为什么” 。 但是,很少给出“方法”的方向,这是软件工程团队工作的一部分。
BDD proposes user stories to be augmented by "scenarios". Scenarios are concrete examples for a user story. These examples should emerge from the collaboration among stakeholders in a project and can be discussed in simple conversations. As such, BDD enhances the collaboration capabilities of an agile team.
BDD建议通过“场景”来扩充用户故事。 场景是用户故事的具体示例。 这些示例应该来自项目中利益相关者之间的协作,并且可以通过简单的对话进行讨论。 因此,BDD增强了敏捷团队的协作能力。
BDD scenarios are usually specified following a Gherkin template.
通常在Gherkin模板之后指定BDD方案。
GIVEN <PRECONDITION> WHEN <ACTION>THEN <OUTPUT>
GIVEN <前提> WHEN <ACTION> THEN <OUTPUT>
The "GIVEN" statement sets what is assumed to have already happened, providing a known previous state. Next, the "WHEN" statement provides the action which should alter this previous state. Finally, the "THEN" statement asserts that the modifications to the previous state have generated a new valid state.
“ GIVEN”语句设置假定已经发生的情况,并提供已知的先前状态。 接下来,“ WHEN”语句提供应更改此先前状态的操作。 最后,“ THEN”语句断言对先前状态的修改已生成新的有效状态。
Optionally, the GIVEN and THEN steps can have more than just one statement. These additional statements should be added below their main context using the word AND.
可选地,GIVEN和THEN步骤可以具有多个语句。 这些附加语句应在其主要上下文下面使用单词AND添加。
A user story can have one or many associated scenarios. The terms used for creating scenarios should be familiar to to all stakeholders, avoiding technical jargons.
用户故事可以具有一个或多个关联方案。 所有涉众都应该熟悉用于创建方案的术语,避免使用技术术语。
In this post, we will take a look at the implementation of one scenario for the example user story. The complete set of developed scenarios will be available here.
在本文中,我们将研究示例用户案例的一种方案的实现。 完整的已开发方案集将在此处提供 。
使用可执行规范对高级功能进行编码 (Coding high-level features using executable specifications)
The scenario we will be developing in this first part is the following.
我们将在第一部分中开发的场景如下。
Scenario — Loading forecast successfully for two citiesGIVEN the target cities are San Francisco (SFO) and Porto Alegre (POA)AND in SFO, it is 20º, “Sunny”, with a min-max of 15º and 25ºAND in POA, it is 15º, “Cloudy”, with a min-max of 10º and 20ºAND the App has started to load the forecast for the target citiesWHEN loading finishes successfullyTHEN there should be two cities loaded, SFO and POAAND the cities should be in alphabetic orderAND it should be 15º, “Cloudy”, with a min-max of 10º and 20ºAND it should be 20º, “Sunny”, with a min-max of 15º and 25º
方案- 加载成功给定的目标城市 两市预测 是旧金山(SFO)和阿雷格里港(POA),并在证券及期货条例,这是20º,“ 艳阳天”, 用最小-最大的15º 和25ºANDI N POA是 15º, “阴天”,最小-最大为 10º 和 20º, 并且应用成功开始加载目标城市的预测。 成功完成加载之后 ,应该再加载两个城市,即SFO和POA , 城市应按字母顺序排列 , 并且应为 15º, “阴天”,最小最大值为 10º 和 20º, 并且应为 20º, “ Sunny” , 其最小最大值为 15º 和25 º
Our first step is to translate this scenario into an executable specification. This is where Quick & Nimble will be used. We will use Quick to exactly translate the natural-language scenario to our code "driver" and then use Nimble to assert our code outputs are the expected ones.
我们的第一步是将这种情况转换为可执行规范。 这是使用Quick & Nimble的地方。 我们将使用Quick将自然语言场景准确地转换为我们的代码“驱动程序”,然后使用Nimble断言我们的代码输出是预期的。
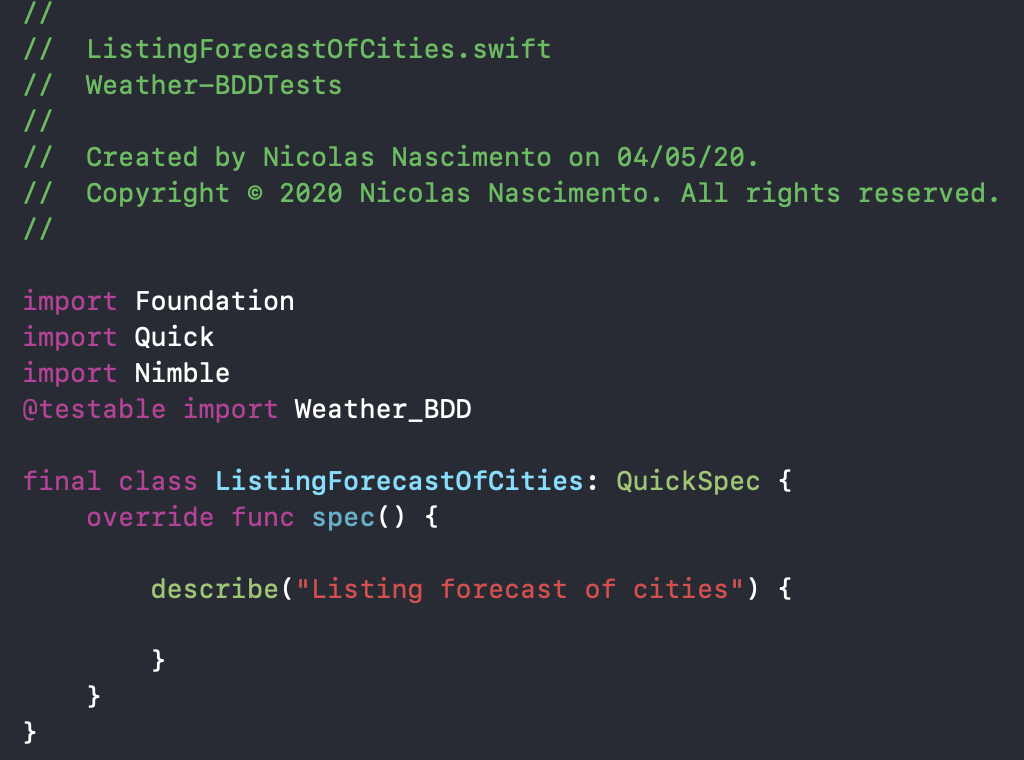
In your test target, create a new empty QuickSpec. A nice way to keep a reference to the feature you are implementing is to name the spec using the name of the feature and use the "describe" function provided by Quick. The final file should look similar to the one below.
在测试目标中,创建一个新的空QuickSpec。 保留对要实现的功能的引用的一种好方法是使用功能名称命名规范,并使用Quick提供的“描述”功能。 最终文件应类似于以下文件。
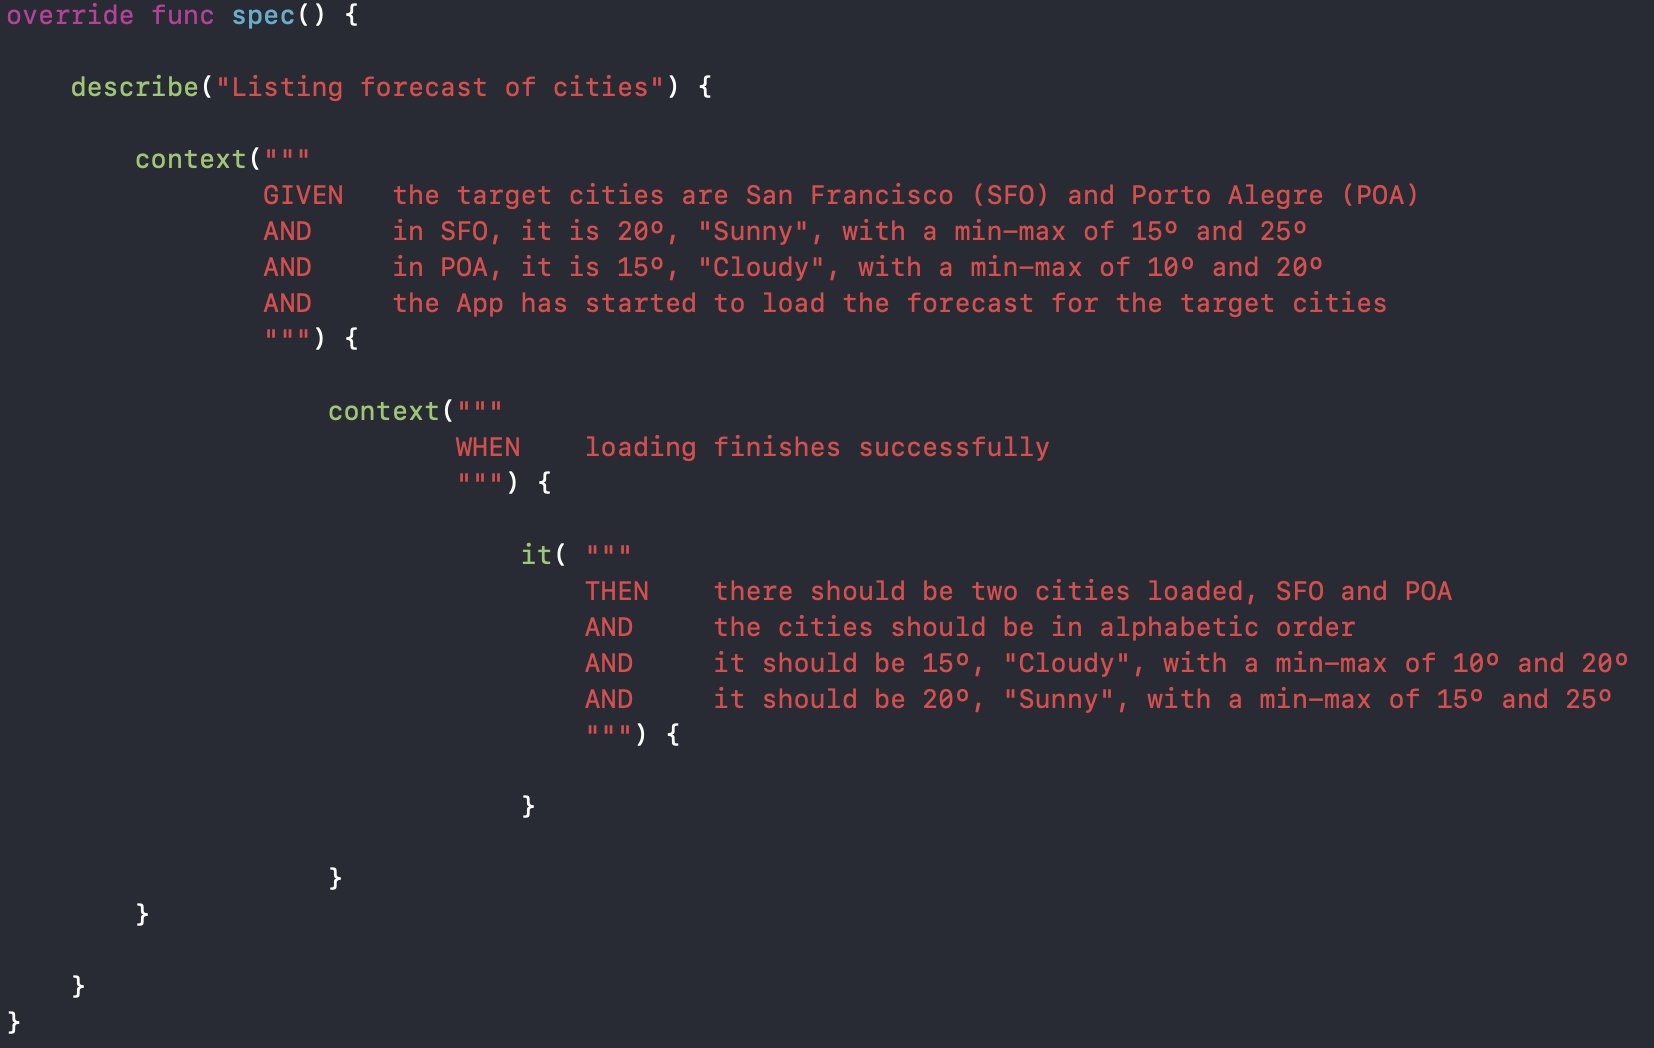
From this, inside our "describe", we can use the "context" and "it" functions to translate our scenario to an executable specification. The final result should be similar to the one below.
由此,在“描述”内部,我们可以使用“上下文”和“ it”函数将我们的方案转换为可执行规范。 最终结果应类似于以下结果。
Next, we should proceed to implementation. BDD is usually implemented using an outside-in approach, meaning we should start by writing how the code should be used prior to actually implementing it. Another way . This is aproach is also applied in Test-Driven Development (TDD) and follows a three-step process:
接下来,我们应该继续执行。 BDD通常是使用“由外而内”的方法来实现的,这意味着我们应该首先编写代码,然后再实际实现它。 其他方式 。 这个方法也适用于测试驱动开发(TDD),并遵循三个步骤:
- Write a failing test. 编写失败的测试。
- Make the test pass. 使测试通过。
- Refactor. 重构。
步骤1 —编写失败的测试 (Step 1 — Writing a failing test)
We start by the "GIVEN" statement. One possible implementation, inspired by Clean architecture and using Combine, is presented below.
我们从“ GIVEN”语句开始。 下面介绍了受Clean架构启发并使用Combine的一种可能的实现。
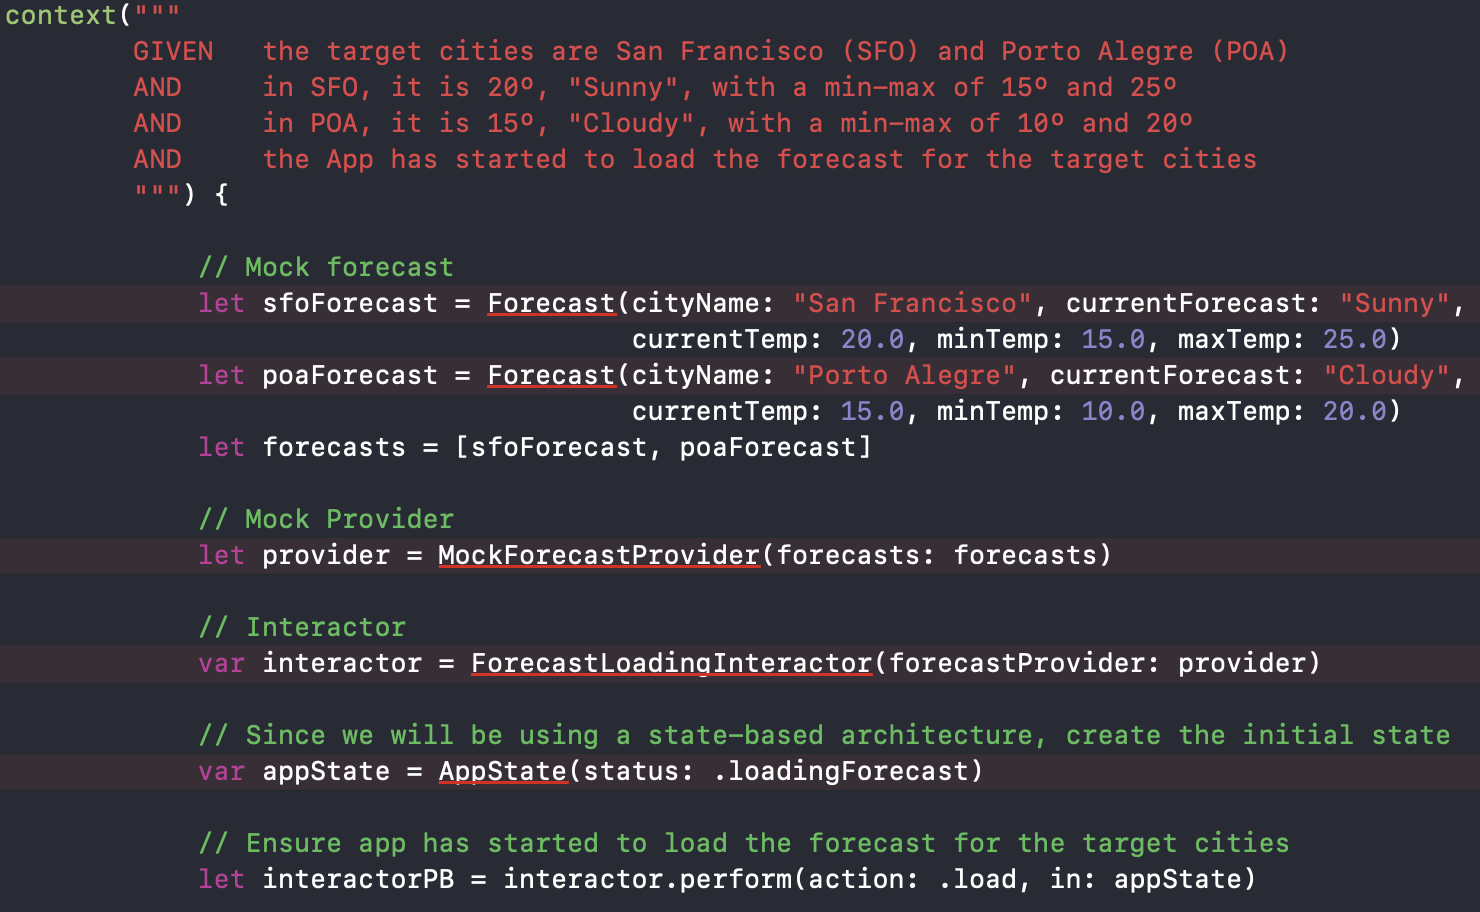
This code creates the proposed preconditions, using Mocks where appropriate. Note that Xcode has already started to warn us that none of the code we are using actually exists.
该代码在适当的地方使用Mocks创建建议的前提条件。 请注意,Xcode已经开始警告我们所使用的代码实际上不存在。
Let us withstand the burden for now and move on. Next, we implement the "WHEN" statement. This part is usually the shortest one. As such, a possible implementation using combine is presented below.
让我们暂时承受重担并继续前进。 接下来,我们实现“ WHEN”语句。 这部分通常是最短的部分。 因此,下面介绍使用合并的可能实现。
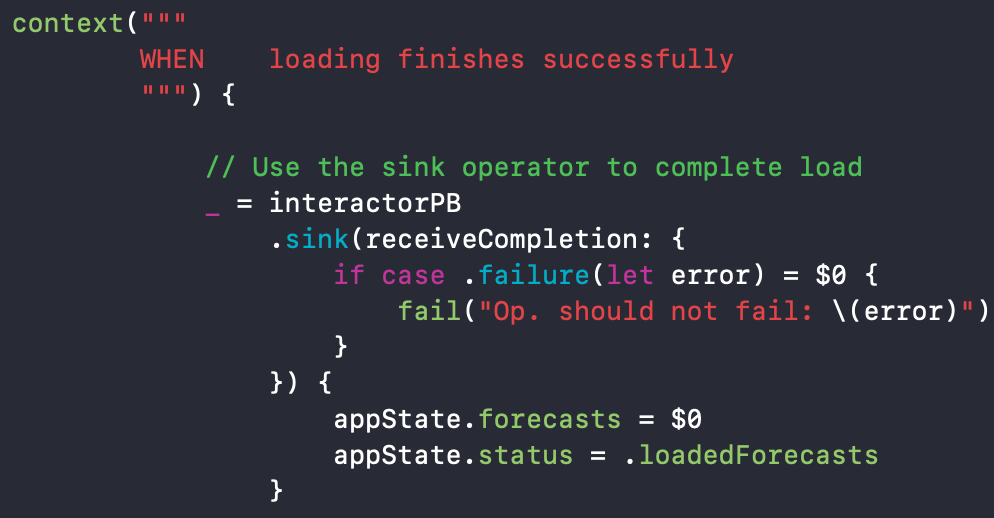
Finally, we implement the "THEN" statement. A proposal implementation is shown below.
最后,我们实现“ THEN”语句。 提案实施如下所示。
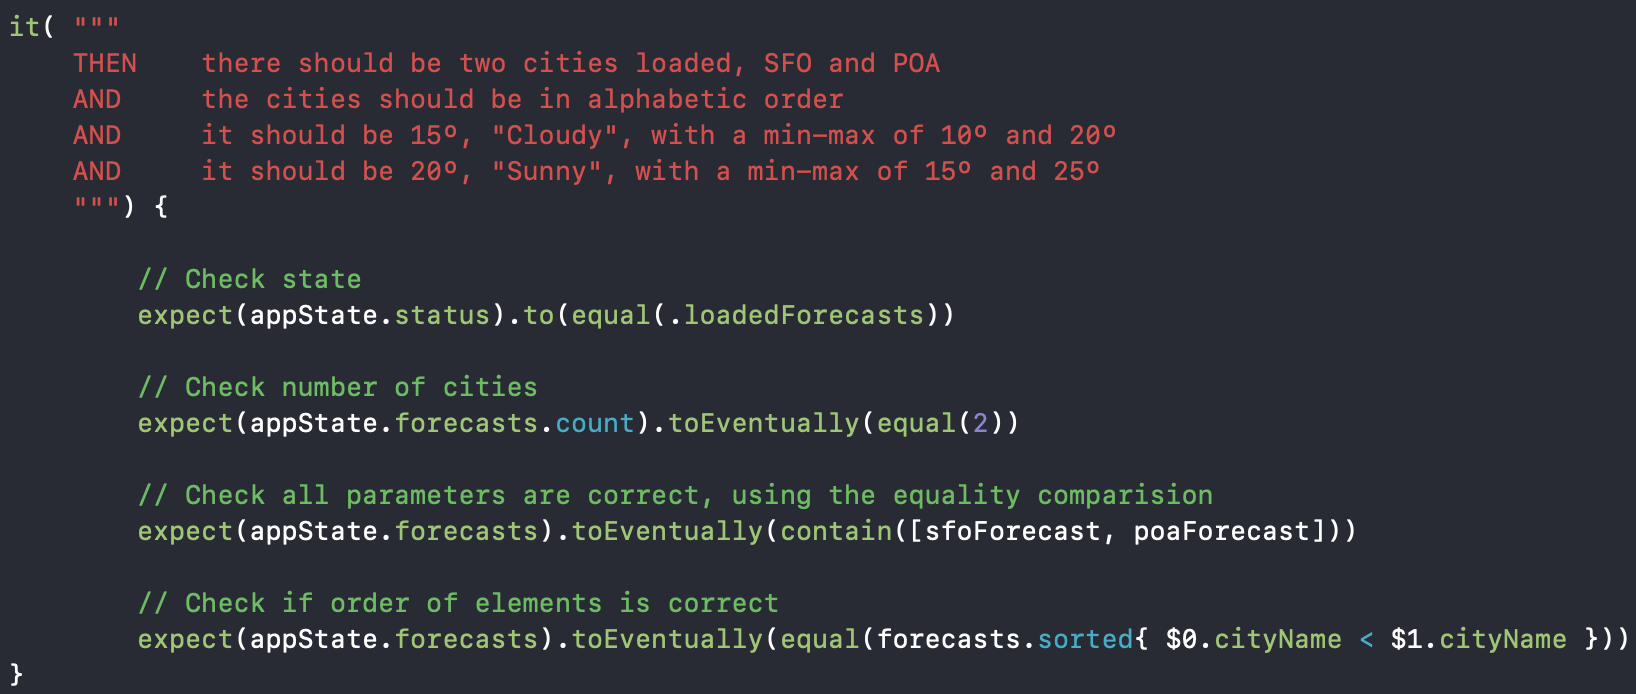
Now that we have the "blueprint" for our code, we should proceed to actually implementing it.
现在我们有了代码的“蓝图”,我们应该继续实际实施它。
第2步-通过测试 (Step 2— Making the test pass)
Our goal now is to write the simplest code that makes the tests we have just written pass.
现在我们的目标是编写使我们刚刚编写的测试通过的最简单的代码。
We will start by the code in the "GIVEN" statement, specifically the Forecast struct.
我们将从“ GIVEN”语句中的代码开始,特别是Forecast结构。
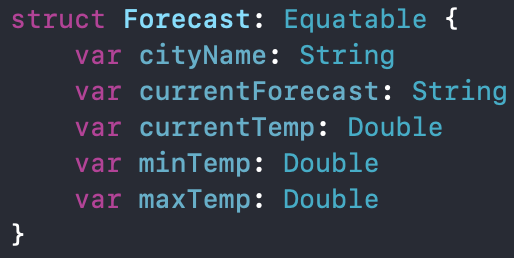
We make it Equatable so we can compare it later in the "THEN" statement. Next, the MockForecastProvider.
我们将其设为Equatable,以便稍后可以在“ THEN”语句中进行比较。 接下来, MockForecastProvider 。

You wil notice that we are conforming to a ForecastProvider protocol. We are using this protocol, which wil be created later, to use dependency injection, a concern separation technique. As this provider is purely used for creating mock objects in our tests, we will keep it in the test target.
您会注意到我们符合ForecastProvider协议。 我们正在使用此协议(稍后会创建)来使用依赖关系注入 (一种关注点分离技术)。 由于此提供程序仅用于在测试中创建模拟对象 ,因此我们将其保留在测试目标中。
For the ForecastLoadingInteractor, we create the ForecastProvider protocol and the interactor struct which uses it.
对于ForecastLoadingInteractor ,我们创建了ForecastProvider协议以及使用该协议的交互器结构。

Proceeding to the AppState, we must create a status property, which can be injected, and the forecasts property, which is used in the "THEN" step.
继续到AppState ,我们必须创建一个状态属性(可以注入)和预报属性(在“ THEN”步骤中使用)。

To end the "GIVEN" statement implementation, we simply add the perform(action: in:) method to the interactor.
要结束“ GIVEN”语句的实现,我们只需将perform(action:in :)方法添加到交互器。

Here we are using Combine's built-in Fail publisher to simulate an empty implementation.
在这里,我们使用Combine的内置Fail 发布商模拟一个空的实现。
Next, we begin implementing the "WHEN" statement. All it requires is that we actually perform the action in the interactor using the provider. We can do this by making our interactor use its provider to get the forecasts.
接下来,我们开始实现“ WHEN”语句。 它所需要的只是我们实际上使用提供程序在交互器中执行操作。 我们可以通过使我们的交互者使用其提供程序来获取预测来实现。

This update requires that we change all implementations of the ForecastProviderProtocol, such as in our MockForecastProvider.
此更新要求我们更改ForecastProviderProtocol的所有实现,例如在MockForecastProvider中。

Next, we move on to the "THEN" statement implementation. Luckily for us, we have nothing to implement here, since the properties required for assertions have been created previously.
接下来,我们继续执行“ THEN”语句。 对我们来说幸运的是,这里没有什么要实现的,因为断言所需的属性是先前创建的。
Since our code compiles, it is time to see if our test passes.
由于我们的代码已编译,现在该看看我们的测试是否通过了。

The last assertion tells us that we have not sorted the results properly, following an alphabetic order. As such, we add this rule in our interactor.
最后一个断言告诉我们,我们没有按照字母顺序对结果进行正确排序。 因此,我们将此规则添加到交互器中。

Done. Now the test runs sucessfully.
做完了 现在测试成功运行。
第3步-重构 (Step 3— Refactor)
Now that our test passes, we can spend some time refactoring our implementation. It is nice to remove any shortcut you might have taken or improve your abstraction at this point. Just avoid falling into the over-engineering temptation.
现在我们的测试通过了,我们可以花一些时间重构实现了。 最好删除您可能采取的任何快捷方式,或者在此时改善抽象。 只是要避免陷入过度设计的诱惑。
In our example App, we chose to keep implementation as it is.
在示例应用程序中,我们选择保持原样。
结论 (Conclusion)
This post covered the first two parts of the proposed BDD workflow.
这篇文章涵盖了建议的BDD工作流程的前两个部分。
The first part of the workflow has two main goals. First, increasing your overall understanding of the user story by collaborating with stakeholders and second, creating a high-level acceptance criteria for your user stories, i.e. the scenarios.
工作流的第一部分有两个主要目标。 首先,通过与利益相关者的协作来增强对用户故事的总体理解,其次,为用户故事(即场景)创建高级接受标准。
The second part of the workflow has one main goal, to ensure we implement code for our business rules and nothing more!
工作流的第二部分有一个主要目标,即确保我们为业务规则实现代码,仅此而已!
As such, our current status is:
因此,我们的当前状态是:
✅ Augmenting user stories using BDD scenarios;
using使用BDD场景增强用户故事;
✅ Coding high-level features using executable specifications;
using使用可执行规范对高级功能进行编码;
⏭ Coding low-level features using low-level specifications ;
using使用底层规范对底层特征进行编码;
⏭ Coding high-level UI features using executable specifications;
using使用可执行文件规范对高级UI功能进行编码;
The next parts of the workflow will be covered in upcoming posts. In the meantime, you access the developed code here.
工作流的下一部分将在以后的文章中介绍。 同时,您可以在此处访问开发的代码。
Finally, I hope you find this guide useful and if you want to continue learning more about BDD, sign up for a complete BDD course in iOS.
最后,希望本指南对您有所帮助,如果您想继续学习有关BDD的更多信息,请在iOS上注册完整的BDD课程。
Thanks.
谢谢。
(EDIT: Part 2 is here)
(编辑:第2部分在这里 )
翻译自: https://medium.com/swlh/behavior-driven-development-in-ios-using-swift-part-1-15bdff91ce4d
ios开发swift


 641
641

 被折叠的 条评论
为什么被折叠?


