


django react
This article is a continuation of Django and React Full Stack — Django. If you have not read that part or your backend environment is not ready, you can find the article I developed using Django — I shared my notes while developing — here.
本文是Django和React Full Stack(Django)的延续。 如果您尚未阅读该部分,或者您的后端环境尚未准备就绪,则可以在此处找到我使用Django开发的文章(在开发时共享了我的笔记)。
I know it’s a very comprehensive title so I’ll keep it as simple as possible.
我知道这是一个非常全面的标题,所以我将使其尽可能简单。
In this article, we will make a book application from installation to the final product using Django and React. I hope to make a nice and simple introduction-development-product series for a CRUD (Create, Read, Update, Delete) application. I want to share the notes I took and the steps I followed while making an app without getting overwhelmed by a lot of information from both sides (back end and front end).
在本文中,我们将使用Django和React从安装到最终产品的制作一个书本应用程序。 我希望为CRUD(创建,读取,更新,删除)应用程序制作一个简单,漂亮的介绍-开发-产品系列。 我想分享我在制作应用程序时所采取的笔记和所采取的步骤,而又不会因为双方(后端和前端)的大量信息而感到不知所措。
I will try not to dwell on the questions such as what and why, but to explain it purposefully. For every command I use, I will cite since there may be people who do not know, in this way you can quickly get an idea from their documentation pages and return to the article.
我将不去赘述诸如什么以及为什么之类的问题,而是有目的地对其进行解释。 我会引用我使用的每个命令,因为可能有些人不知道,这样您就可以从他们的文档页面中快速了解想法并返回本文。
Django is a Python-based free and open-source web library based on the model-template-view architecture.
Django是一个基于Python的免费开源Web库,它基于model-template-view体系结构。
React is a JavaScript library that allows you to create user interfaces for your web projects on a component basis.
React是一个JavaScript库,允许您基于组件为Web项目创建用户界面。
入门#1 (Getting started #1)
We established our backend structure with Django, we used our data with HTML. Now it’s time to heat things up a bit. If you still haven’t read that article, you can read it here.We can start by installing our React application in our project.
我们使用Django建立了后端结构,我们使用了HTML数据。 现在是时候加热一下了。 如果您仍未阅读该文章,则可以在此处阅读。我们可以从在项目中安装React应用程序开始。
安装 (Installation)
Inside of our project, run npx create-react-app frontend on the command line. The reason I create a project called Frontend is that I don’t want the files to interfere and appear more understandable. I want the node files and Django files in separate folders so that they are easy to access and edit.
在我们的项目中,在命令行上运行npx create-react-app frontend 。 我创建一个名为Frontend的项目的原因是,我不希望这些文件干扰并且看起来更易于理解。 我希望将节点文件和Django文件放在单独的文件夹中,以便易于访问和编辑。
After installation is done, run cd frontend & npm start commands. While running the project browser will be opened automatically and you’ll see your first react app. If it runs on another port you can see which port react using is on the terminal screen.
安装完成后,运行cd frontend & npm start命令。 在运行项目时,浏览器将自动打开,您将看到您的第一个React应用。 如果它在另一个端口上运行,则可以在终端屏幕上看到使用哪个端口进行React。
我应该知道多少? (How much should I know?)
If you use React the first time or you’ve never written JavaScript you may have some struggle. If we consider it as JavaScript, not just React: it can be a bit annoying to adapt to an asynchronous language. JavaScript is not a completely top-down language. Do not be surprised if the code you write at the bottom works before you write at the top. It is beautifully described as titles at https://javascript.info/. At least, getting enough information to understand what you read later in the article will make your job easier in the continuation of the article.
如果您是第一次使用React,或者从未编写过JavaScript,则可能会遇到困难。 如果我们将其视为JavaScript,而不仅仅是React:适应异步语言可能会有些烦人。 JavaScript并不是一种完全自上而下的语言。 如果您在底部编写的代码先于顶部编写的代码起作用,请不要感到惊讶。 它在https://javascript.info/上被精美地描述为标题。 至少,获得足够的信息来理解您在本文后面的内容将使您在本文的后续工作中更加轻松。
功能组件 (Functional Components)
To create our interface we’ll use functional components. The reason we prefer functional components is that convenience about readability, renewability, and testing.
为了创建我们的界面,我们将使用功能组件。 我们之所以选择功能组件,是因为在可读性,可更新性和测试方面都非常方便。
I don’t want to dig the difference between class and functional components. Focusing on the pros and cons of them will probably deflect us from our main goal of this article. If you want to focus on these, you may follow the link below.
我不想挖掘类和功能组件之间的区别。 专注于它们的优缺点可能会使我们偏离本文的主要目标。 如果您想专注于这些,可以点击下面的链接。
Function and class components: https://tr.reactjs.org/docs/components-and-props.html
函数和类组件: h ttps://tr.reactjs.org/docs/components-and-props.html
The idea of developing based on functional components will be saved us from excess codes and disorganization.
基于功能组件进行开发的想法将使我们免于多余的代码和混乱的局面。
import React from 'react';
import logo from './logo.svg';
import './App.css';
function App() {
return (
<div className="App">
<header className="App-header">
<img src={logo} className="App-logo" alt="logo" />
<p> Test </p>
</header>
</div>
);
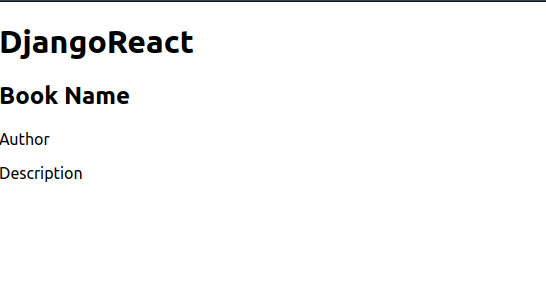
}The above code is the first functional component that comes with the installation of react. It returns a DOM element which includes header, image and a text. It looks clean and basic, right? Let’s start with writing code that lists our books.
上面的代码是React安装随附的第一个功能组件。 它返回一个DOM元素,其中包括标题,图像和文本。 它看起来干净基本,对吗? 让我们从编写列出我们的书的代码开始。
function App() {
  return (
     <div className="App">
       <header className="App-header">
         <h1>DjangoReact</h1>
       </header>
       <div className="book-list">
         <div className="book-item">
           <h2>Book Name</h2>
           <p>Author</p>
           <p>Description</p>
         </div>
       </div>
     </div>
  );
}
With basic HTML knowledge we prepared a template for our books list. The only difference between HTML and JSX is that we used className instead of class — for now.
凭借基本HTML知识,我们为图书清单准备了模板。 HTML和JSX之间的唯一区别是,我们现在使用的是className而不是class。
挂钩-useEffect和useState (Hooks — useEffect ve useState)
Hooks are a new addition in React 16.8. They let you use state and other React features without writing a class.(https://reactjs.org/docs/hooks-intro.html#no-breaking-changes)
挂钩是React 16.8中的新增功能。 它们使您无需编写类即可使用状态和其他React功能。( https://reactjs.org/docs/hooks-intro.html#no-breaking-changes )
In React lifecycle there’s some methods such as componentDidMount , componentDidUpdate andcomponentWillUnmount . With hooks we use useEffectfor all of them .
在React生命周期中,有一些方法,例如componentDidMount , componentDidUpdate和componentWillUnmount 。 对于钩子,我们对它们全部使用useEffect 。
Let’s import useState and useEffect and define our first state inside of function.
让我们导入useState和useEffect并在函数内部定义我们的第一个状态。
import {useState, useEffect } from 'React'function App(){...
const [books, setBooks] = useState([])
...
}
I defined a state named books and initialized it with an empty array. This process was as follows in the class components:
我定义了一个名为books的状态,并使用一个空数组对其进行了初始化。 该过程在类组件中如下所示:
class Test extends React.Component{
  constructor(props){
    super(props)
    this.state = {
      books : []
    }
  }
}
Now we see first benefit of functional components. Let’s try to fill our state and use it with useEffect.
现在我们看到了功能组件的第一个好处。 让我们尝试填充状态并将其与useEffect一起使用。
useEffect (() => {
    setBooks([
         {
           "name":"Otostopçunun Galaksi Rehberi",
           "author":    "Douglas Adams",
           "description": "Lorem ipsum"
         },
         {
           "name":"Hikayeler",
           "author":    "Edgar Allan Poe",
           "description": "Lorem ipsum sit door amet"
         }
      ])
},[])
We placed two objects in our books state. Now, let me print them with JSX using Array.prototype.map
我们在books状态下放置了两个对象。 现在,让我使用Array.prototype.map用JSX打印它们
books.map((book,index) => {
   return (
     <div className="book-item">
       <h2>{book.name}</h2>
       <p>{book.author}</p>
       <p>{book.description}</p>
    </div>
   )}
)}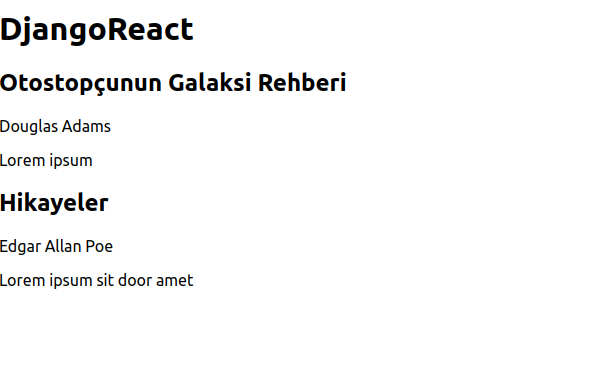
When we run our code, we can now see the data. However, we will get this data from the API we prepared with django. On the Django side, we received our data with XMLHttpRequst operation with pure javascript. We can run the same code again, but we will go one step further and this time we will use the Fetch API, which allows us to retrieve data from a different address.
当我们运行代码时,我们现在可以看到数据。 但是,我们将从使用django准备的API中获取此数据。 在Django方面,我们使用纯JavaScript的XMLHttpRequst操作接收了数据。 我们可以再次运行相同的代码,但是我们将更进一步,这一次我们将使用Fetch API,该API允许我们从其他地址检索数据。
提取API (Fetch API)
We will get our data via the REST API that I prepared with Django. If you have not read this series from the beginning and are using a different backend infrastructure, this process will be the same on front-end side.
我们将通过与Django一起准备的REST API获取数据。 如果您没有从头开始阅读本系列文章,而是使用不同的后端基础架构,则此过程在前端方面将是相同的。
Let’s send a request to get our data from API and store them.
让我们发送一个请求,以从API获取数据并存储它们。
useEffect (() => {
   async function fetchBooks() {
     const res = await fetch("http://127.0.0.1:8000/books/");
     res.json()
    .then(res => setBooks(res.response))
    .catch(err => setErrors(err));
   }
   fetchBooks();
},[])
You may find more information about async functions from this link. To explain this with an example:
您可以从此链接中找到有关异步功能的更多信息。 用一个例子解释一下:
getBooks = () => {
    console.log('first book');
    setTimeout(() => {
        console.log('second book');
},3000);
console.log('third book');}getBooks ();
JavaScript has a sync and single-thread structure. After printing first bookin the above code, it will print third bookand then wait for 3 seconds and display the second bookoutput. The reason we use asyn function is that we want it to wait for that 3 seconds.
JavaScript具有同步和单线程结构。 在上面的代码中打印了first book之后,它将打印third book ,然后等待3秒钟并显示second book输出。 我们使用asyn函数的原因是我们希望它等待3秒钟。
Now returning to the react side (I assume Django and React are working) when we open the browser, we will see an error on the console like this:
现在,当我们打开浏览器时,返回到React端(我假设Django和React正在工作),我们将在控制台上看到如下错误:
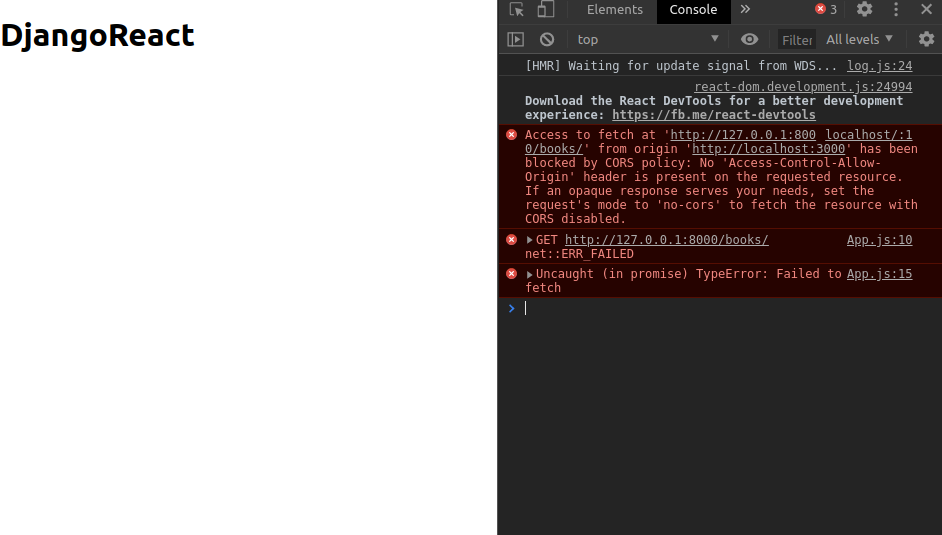
Cross-Origin Resource Sharing (CORS) is a mechanism that uses additional HTTP headers to tell browsers to give a web application running at one origin, access to selected resources from a different origin.
跨域资源共享 ( CORS )是一种机制,它使用附加的HTTP标头来告诉浏览器以使Web应用程序在一个来源运行,并从另一个来源访问选定的资源。
In order to our API resource to grant this access, we need to configure Django.
为了使我们的API资源授予此访问权限,我们需要配置Django。
Runningpipenv install django-cors-headers code on back-end side we install django-cors-headers app. You may see more details of its installation on the documentation page.
在后端运行pipenv install django-cors-headers代码,我们安装django-cors-headers应用程序。 您可能会在文档页面上看到其安装的更多详细信息。
After installation is done configure settings.py file as follows:
安装完成后,如下配置settings.py文件:
Add corsheadersinto INSTALLED_APPS and 'cors.headers.middelware.Corsmiddleware into MIDDLEWARE .
将corsheaders添加到INSTALLED_APPS并将'cors.headers.middelware.Corsmiddleware添加到MIDDLEWARE 。
Now we should determine which addresses can be accessed. We can do this in two ways: allowing all addresses or determine particular addresses.
现在,我们应该确定可以访问的地址。 我们可以通过两种方式做到这一点:允许所有地址或确定特定地址。
CORS_ORIGIN_WHITELIST = [
    "https://example.com",
    "https://sub.example.com",
    "http://localhost:8080",
    "http://127.0.0.1:9000"
]
You may also use a regex pattern. After saving the file, now we can see the data on the browser.
您也可以使用正则表达式模式。 保存文件后,现在我们可以在浏览器中看到数据。
Since we run it in a way, we can do a little more simplification. Let’s not forget that we work component-based. We printed our books on the screen in a direct loop. Let’s take this data as a separate component.
由于我们以某种方式运行它,因此我们可以做更多的简化。 别忘了我们是基于组件的。 我们将书直接在屏幕上打印。 让我们将此数据作为一个单独的组件。
We create a new function called Book and set its return value as the elements we list in our books.
我们创建一个名为Book的新函数,并将其返回值设置为我们在书中列出的元素。
function Book(props){
  const { book } = props
  return(
    <div className="book-item">
      <h2>{book.name}</h2>
      <p>{book.author}</p>
      <p>{book.description}</p>
    </div>
  );
}
We received the prop named book from the incoming props and we can now print it on the screen. When we add <Book book={item} key={index} />code between our map code in the app, will see the same list again. (I changed the name of the book variable to item to avoid confusion)
我们从传入的道具中收到了名为book的道具,现在我们可以将其打印在屏幕上了。 当我们在应用程序中的地图代码之间添加<Book book={item} key={index} />代码时,将再次看到相同的列表。 (为了避免混淆,我将book变量的名称更改为item)
For the repetitive values, React asked us to send a selector, so we sent our index value into the key.
对于重复的值,React要求我们发送选择器,因此我们将索引值发送到键中。
Now, let’s move book creation page to React side. We create a new component and place our form elements in it.
现在,让我们将书籍创建页面移至React端。 我们创建一个新组件并将表单元素放入其中。
function SendBook(props){
  return(
   <div className="book-create">
     <form>
      <input type="text" name="name" />
      <input type="text" name="author" />
      <textarea name="description"></textarea>
      <button> Save </button>
     </form>
   </div>
  )
}
Axios (Axios)
We created our form in a basic way. We will use Axios to send our data to API within POST method. In doing so, we will benefit from React Hooks. We will keep our input values in the state, and when we press the save button, we will catch the submission and perform the operations we want with axios.
我们以基本方式创建了表单。 我们将使用Axios通过POST方法将数据发送到API。 这样,我们将从React Hooks中受益。 我们将保持输入值的状态,当我们按下保存按钮时,我们将捕获提交并使用axios执行我们想要的操作。
function SendBook(props){
  const [book, setBook] = useState(
    { name : "", author: "", description: ""}
  );
  const handleSubmit = (e) => {
    e.preventDefault()
    axios.post('http://127.0.0.1:8000/create-book', book)
    .then(function (response) {
      console.log(response)
  })
  .catch(function (error) {
      console.log(error)
   })
  }
  return(
   <div className="book-create">
     <form onSubmit={handleSubmit}>
       <input type="text" name="name" value={book.name} onChange={handleChange} />
       <input type="text" name="author" value={book.author} onChange={handleChange} />
       <textarea name="description" value={book.description} onChange={handleChange} ></textarea>
       <button> Save </button>
     </form>
   </div>
  )
}
CSRF代币 (CSRF Token)
When we send our form we’ll see it will not be saved and return 400 status code(Bad request). The first reason of it is that back-end side await a csrf token from us. In the documentation page, you can see how you can send csrf token. We will use same getCookie function which exists in documentation page. Default cookie name is csrftoken , if you desire you may change it from settings.py page.
当我们发送表格时,我们将看到它不会被保存并返回400状态代码(错误请求)。 其第一个原因是后端等待我们发送的csrf令牌。 在文档页面中,您可以看到如何发送csrf令牌。 我们将使用文档页面中存在的相同getCookie函数。 默认cookie名称是csrftoken ,如果您愿意,可以从settings.py页面进行更改。
function SendBook(props){
  const [book, setBook] = useState(
    { name : "", author: "", description: ""}
  );
  const handleSubmit = (e) => {
    e.preventDefault()
    axios.defaults.xsrfCookieName ='csrftoken';
    axios.defaults.xsrfHeaderName ='X-CSRFToken';
    axios.post('http://127.0.0.1:8000/create-book', book, {headers: {"X-CSRFToken" }})
    .then(function (response) {
      console.log(response)
    })
    .catch(function (error) {
      console.log(error)
    })
  }
  return(
   <div className="book-create">
     <form onSubmit={handleSubmit}>
       <input type="text" name="name" value={book.name} onChange={handleChange} />
       <input type="text" name="author" value={book.author} onChange={handleChange} />
       <textarea name="description" value={book.description} onChange={handleChange} ></textarea>
       <button> Save </button>
     </form>
   </div>
  )
}
Now, we can see the csrftoken information on the network tab of the browser. But, what!? It still returns 400 status code. When we check our serialize code on back-end side we realize that the data we are trying to save is empty. BooksSerializer(data=request.POST or None)
现在,我们可以在浏览器的“网络”标签上看到csrftoken信息。 但是,什么! 它仍然返回400状态代码。 当我们在后端检查序列化代码时,我们意识到我们要保存的数据为空。 BooksSerializer(data=request.POST or None)
The output of print(request.POST) is <QueryDict: []> . Now the value we need is request.data instead of requst.POST . After changing the data we try to serialize with request.data, we can save it.
print(request.POST)的输出是<QueryDict: []> 。 现在我们需要的值是request.data而不是requst.POST 。 更改数据后,我们尝试使用request.data进行序列化,然后将其保存。
Learn more about CSRF Token parameters you may visit this page.
了解有关CSRF令牌参数的更多信息,您可以访问此页面。
React路由 (React Routing)
Last but not least, we want it to be separated pages with special URLs. We can do these things in a single page but I want it to touch router structure too.
最后但并非最不重要的一点是,我们希望将其分隔为带有特殊URL的页面。 我们可以在单个页面中完成这些操作,但我也希望它也可以涉及路由器的结构。
Paste it onto the command line: npm install react-router-dom
将其粘贴到命令行: npm install react-router-dom
I’ve done all components in a single page, you can import seperated components onto different pages and folders using import { ComponentName } from ‘path/file and use them as <ComponentName />
我已经在单个页面中完成了所有组件,您可以使用import { ComponentName } from 'path/file将单独的组件导入到不同的页面和文件夹中,并将它们用作<ComponentName />
App component lists our books and there is a form also. Let’s separate them and set a router. Keep App component which lists our books. Remove export default App code from bottom of the file to change our default function as router.
应用程序组件列出了我们的书籍,并且还有一个表格。 让我们分离它们并设置路由器。 保留列出我们书籍的App组件。 从文件底部删除export default App代码,以更改默认功能作为路由器。
export default function Landing(){
  return(
    <Router>
      <div>
        <nav>
          <ul>
            <li>
              <Link to="/">Book list</Link>
            </li>
            <li>
              <Link to="/create-book">Create Book </Link>
            </li>
          </ul>
        </nav>


        <Switch>
          <Route path="/book/:id">
            <SingularBook />
          </Route>
          <Route path="/create-book">
            <SendBook />
          </Route>
          <Route path="/">
            <App />
          </Route>
        </Switch>
      </div>
    </Router>
  )
}
Like me, do not forget to import the libraries you use.
像我一样,不要忘记导入您使用的库。
import {
  BrowserRouter as Router,
  Switch,
  Route,
  Link
} from "react-router-dom";
Now, to make Landing component index page, change the default component as Landing in index.js file.
现在,要创建Landing组件索引页面,请将默认组件更改为index.js文件中的Landing。
When we refresh the page, we will see the menu links we created in the form of a list at the top of the page. Since we are in the main directory, the <App /> component will be called and our books will be listed.
刷新页面时,我们将在页面顶部看到以列表形式创建的菜单链接。 由于我们位于主目录中,因此将调用<App />组件,并将列出我们的书籍。
Let’s write the code to show singular book with an id in a page. It’s almost same with our full list code. The only difference is that if it doesn’t exist in our database it will return an error message. We already configured our API to return a 404 page if there’s no data. We’ll control it with a status message such as ok/error. And let’s write our code as follows:
让我们编写代码以在页面中显示带有ID的单本书。 与我们的完整列表代码几乎相同。 唯一的区别是,如果它在我们的数据库中不存在,它将返回一条错误消息。 如果没有数据,我们已经配置了API以返回404页面。 我们将通过状态消息(例如“正常/错误”)对其进行控制。 让我们编写如下代码:
function SingularBook(params) {
  const{ id } = useParams()
  const[book,setBook] = useState([])
  const[error, setError] = useState(false)


  useEffect (() => {
    async function fetchBooks() {
      const res = await fetch("http://127.0.0.1:8000/books/"+id);
      res
        .json()
        .then(res => setBook(res))
        .catch(err => setError(err));
    }


    fetchBooks();
  },[])


  return (
    <div className="App">
      <header className="App-header">
      </header>

          { error || book.status==="error" ?
           <p>Something went wrong</p>
           :
           <div className="book-list">
              <h1>{book.name}</h1>
              <h3>{book.author}</h3>
              <p>{book.description}</p>
           </div>
          }
    </div>
  );
}
Now, when we enter localhost:3000/books/1 address, if there’s a data with 1 id in the database, it will print it. If an error occurs or our status code is not 200, it will print the message “Something went wrong” on the screen.
现在,当我们输入localhost:3000/books/1地址时,如果数据库中有一个ID为1的数据,它将进行打印。 如果发生错误或我们的状态码不是200,它将在屏幕上显示消息“发生了错误”。
In the code we list our books, add a hyperlink to our titles to be able to go into the details page.
在我们列出书的代码中,为书名添加一个超链接,以便进入详细信息页面。
Change book listing code as follows:
更改图书清单代码,如下所示:
function Book(props){
  const {book} = props
  return(
    <div className="book-item">
      <Link to ={"/book/"+book.id}><h2>{book.name}</h2></Link>
      <p>{book.author}</p>
      <p>{book.description}</p>
    </div>
  )
}
Now we can click the titles and go into their detail pages.
现在,我们可以单击标题并进入其详细信息页面。
After everything is completed, we can build our optimized react application via npm run build and see them in a folder named build.
一切完成后,我们可以通过npm run build来构建优化的react应用程序,并在名为build的文件夹中查看它们。
So far, we didn’t do anything about styling. I’ll add CSS codes later to the repository but our main goal is to try to understand the main structure. We could deal with CSS later on. You can see the source codes I use in this article on Github, and contribute if you wish.
到目前为止,我们对样式没有做任何事情。 稍后,我将CSS代码添加到存储库中,但我们的主要目标是尝试了解主要结构。 我们稍后可以处理CSS。 您可以在Github上查看我在本文中使用的源代码,并根据需要提供帮助。
You can contact me if you have any questions or about anything you need via my Twitter account.
如果您有任何疑问或需要任何东西,可以通过我的Twitter帐户与我联系。
Happy codding! :)
祝大家高兴! :)
Github, Twitter, Instagram : @baris5d
Github,Twitter,Instagram:@ baris5d
翻译自: https://medium.com/swlh/full-stack-with-django-and-react-react-afae36017852
django react


 476
476


 被折叠的 条评论
为什么被折叠?
被折叠的 条评论
为什么被折叠?
 到【灌水乐园】发言


