


django react
My main goal with this application was to develop a remotely hosted quiz application, which users can choose a quiz, answer the questions, and know how he/she did at the end. This article focuses on: 1. building a Django backend (database & API) 2. hosting the backend and 3. hosting the frontend from a high-level understanding. If you wish for more detailed follow-alongs or tutorials, I would recommend checking out other sources.
我使用此应用程序的主要目的是开发一个远程托管的测验应用程序,用户可以选择一个测验,回答问题并知道他/她最后的表现。 本文着重于:1.构建Django后端(数据库和API)2.托管后端,以及3.从高级理解上托管前端。 如果您希望获得更详细的后续教程或教程,我建议您查看其他资源。
Links to the live servers and my GitHub repository can be found at the end of this article.
可以在本文末尾找到实时服务器和我的GitHub存储库的链接。
Table of Content:1. Building the Django backend2. Building the React frontend3. Hosting the Backend (with Heroku)4. Hosting the Frontend (with Netlify)5. Lessons Learned & Links
目录: 1.构建Django后端2.构建React前端3.托管后端(使用Heroku) 4.托管前端(使用Netlify) 5.经验教训和链接
构建Django后端(Building the Django Backend)
I originally tried following William Vincent’s “Django Rest Framework with React Tutorial” (which is a great tutorial), but knowing how I learn, I knew I needed an understanding from the ground up, as opposed to a quick follow-along.
我最初尝试遵循William Vincent的“带有React教程的Django Rest框架” (这是一个很棒的教程),但是了解我的学习方式,我知道我需要从头开始理解,而不是快速跟进。
To understand Django at a deeper level, I subscribed to Treehouse’s “Exploring Django” course, which gave me a decent understanding of how Python’s Object-relational Mappers work, and how Django’s REST framework could be used to configure APIs. If you wish to learn Django from the ground up, I would recommend you to find an online course as well.
为了更深入地了解Django,我订阅了Treehouse的“探索Django”课程,该课程使我对Python的对象关系映射器如何工作以及如何使用Django的REST框架配置API有了很好的了解。 如果您希望从头开始学习Django,我建议您也查找在线课程。
全局和最终目标 (The Big Picture & End Goal)
This section of the article tackles 2 main questions: 1. how to define the database schema, and 2. how to configure request & response (essentially the API) using Django’s REST framework.
本文的这一部分解决了两个主要问题:1.如何定义数据库模式,以及2.如何使用Django的REST框架配置请求和响应(本质上是API)。
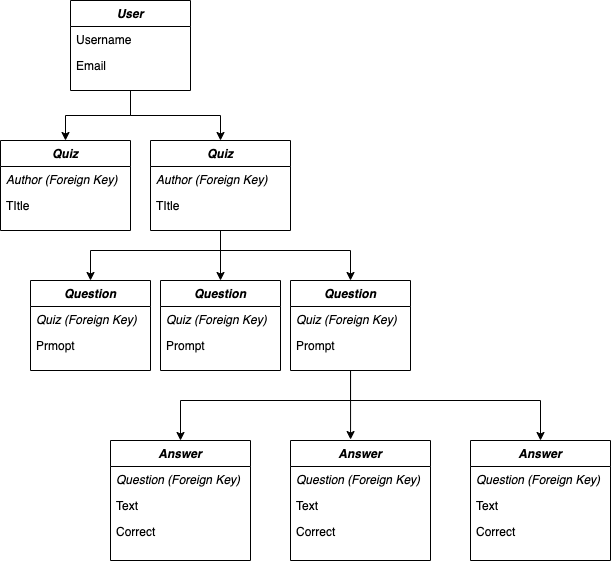
For this project, I knew I wanted to make users, and under each user there could be multiple quizzes, and under each quiz could be multiple questions, and under each question would be multiple answers.
对于这个项目,我知道我想成为用户,并且在每个用户下可以有多个测验,并且在每个测验下可以有多个问题,并且在每个问题下可以有多个答案。
Furthermore, coming from a frontend background, I knew I needed to configure urls to fetch: 1. available quizzes for the user to choose from 2. specific questions under chosen quiz and its answer options, and potentially 3. the results on how the user did.
此外,来自前端背景,我知道我需要配置要获取的URL:1.用户可用的测验2.选择的测验及其答案选项下的特定问题,以及潜在的3.用户的结果做到了。
定义数据库(模型) (Defining the Database (Models))
Once I created the Django project (I named it ‘quiz_api’), and then the Django app within the project (‘quizzes’), I configured quizzes/models.py to reflect the model diagram. Below is an example of the ‘Quiz’ model object:
创建Django项目(我将其命名为“ quiz_api”),然后创建该项目中的Django应用程序(“ quizzes”)后,便配置了quizzes / models.py以反映模型图。 以下是“测验”模型对象的示例:
from django.db import models
from django.contrib.auth.models import Userclass Quiz(models.Model):
  author = models.ForeignKey(User, on_delete=models.DO_NOTHING)
  title = models.CharField(max_length=255, default='')
  created_at = models.DateTimeField(auto_now_add=True)
  times_taken = models.IntegerField(default=0, editable=False)  @property
  def question_count(self):
    ''' Method to get num of Qs for this quiz, used in Serializer'''
    return self.questions.count()

  class Meta:
    verbose_name_plural = "Quizzes"
    ordering = ['id']  def __str__(self):
    return self.title
Once the models were defined, the next step for me was to figure out how to take a client request, process it, and return a response back to the client.
一旦定义了模型,对我而言,下一步就是弄清楚如何处理客户请求,进行处理并将响应返回给客户。
使用Django REST框架配置响应(API) (Using Django REST Framework to Configure Reponses (the API))
What is Django REST Framework (DRF)? DRF can be thought of as a library that you can install into your Django project. We can import useful classes from DRF such as viewsets, serializers, and routers. Using these classes can save you time and reduce the code size.
什么是Django REST Framework (DRF)? 可以将DRF视为可以安装到Django项目中的库。 我们可以从DRF导入有用的类,例如视图集,序列化器和路由器。 使用这些类可以节省时间,并减少代码大小。
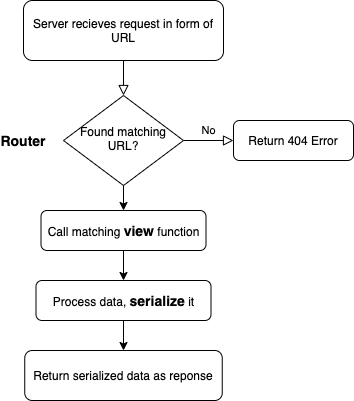
To understand how DRF fits into the picture, first I’ll explain the general request & response pattern between client & server. Below is a brief outline:
为了理解DRF如何适应图片,首先我将解释客户端和服务器之间的一般请求和响应模式。 以下是简要概述:

As we can see from the diagram, the logic of the server can be broken down into 3 parts: 1. recieve requests and look for a matching url pattern 2. map the request to a corresponding function (to process & configure the response), and 3. return the reponse. This is where DRF’s routers (url patterns), view classes, and serializers come into play.
从图中可以看出,服务器的逻辑可以分为三部分: 1.接收请求并查找匹配的url模式2.将请求映射到相应的功能(以处理和配置响应), 3.返回响应。 这是DRF的路由器(URL模式),视图类和序列化器起作用的地方。
So where does DRF come into play? Specifically, how does DRF’s views, serializers, and routers help the logic of the server? Routers map URL patterns to specific view functions, view functions extract the correct data and calls the serializer to turn the data into readable JSON format. Below I’ve made a brief flow chart:
那么DRF在哪里发挥作用? 具体来说,DRF的视图,序列化器和路由器如何帮助服务器逻辑? 路由器将URL模式映射到特定的视图功能,视图功能提取正确的数据并调用序列化程序以将数据转换为可读的JSON格式。 下面我做了一个简短的流程图:
Now that I’ve explained how DRF’s viewsets, serializers, and routers are connected, lets dive into the details and see them in action!
现在,我已经解释了DRF的视图集,序列化器和路由器是如何连接的,让我们深入了解细节并实际使用它们!
首先,免责声明: DRF的一般视图与视图集 (Firstly, a Disclaimer: DRF’s Generic Views v.s. ViewSets)
I have to mention that in my project, I have 2 sets of APIs. This is because I was following along Treehouse’s tutorial and exercised 2 different methods of defining view classes.
我不得不提到,在我的项目中,我有2套API。 这是因为我遵循Treehouse的教程,并练习了两种定义视图类的方法。
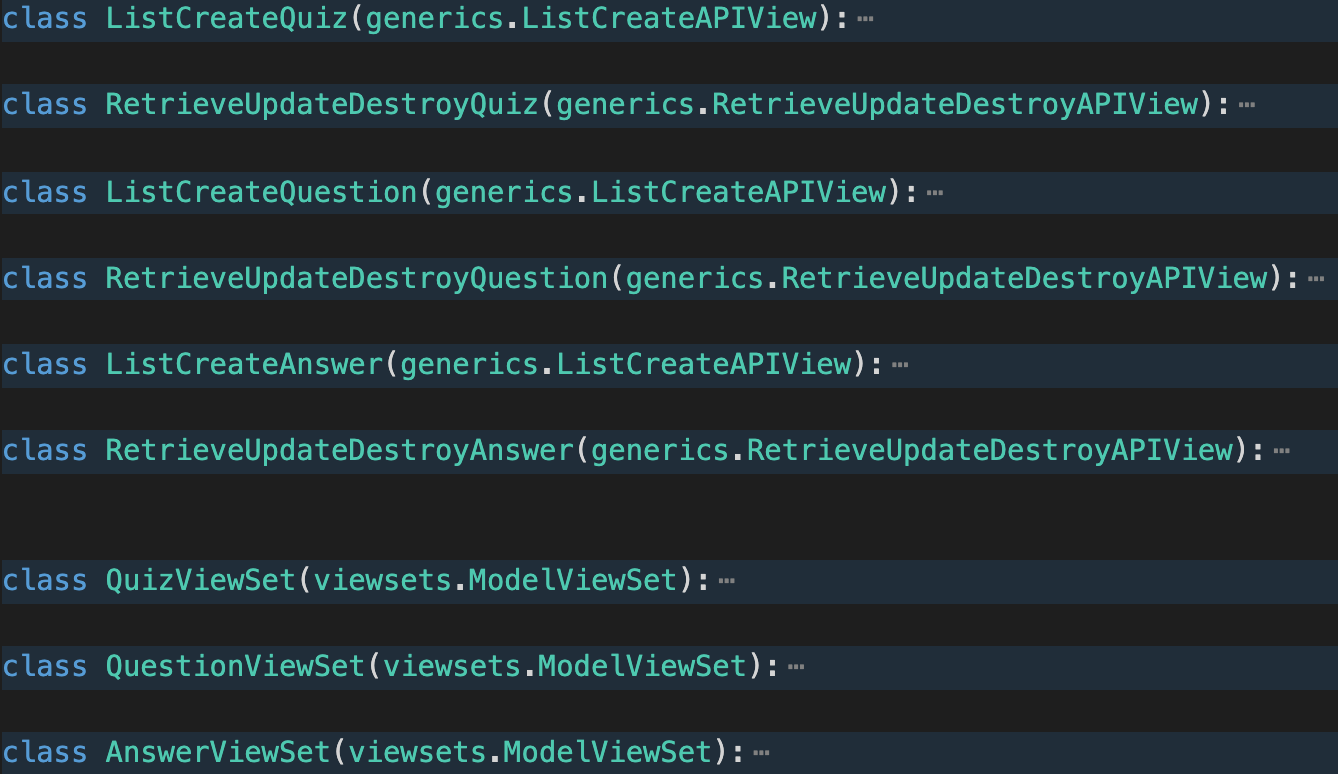
In the first method, I created functions ListCreate<ModelName> & RetrieveUpdateDestroy<ModelName> for each model (quiz, question, answer). This set of view functions extends the DRF generics’ subclasses ListCreateAPIView, and RetrieveUpdateDestroyAPIView, respectively. As suggested by the class names, the ListCreate function handles listing and creating the specified model, wehreas RetrieveUpdateDestroy handles retrieving, updating, and destroying the models. The url patterns for this set of view functions are defined in quizzes/urls.py.
在第一种方法中,我为每个模型(测验,问题,答案)创建了函数ListCreate <ModelName>和RetrieveUpdateDestroy <ModelName> 。 这套视图函数分别扩展了DRF泛型的子类ListCreateAPIView和RetrieveUpdateDestroyAPIView 。 正如类名所建议的那样, ListCreate函数处理列出并创建指定的模型,wehreas RetrieveUpdateDestroy处理检索,更新和销毁模型。 这套视图功能的url模式在quizzes / urls.py中定义。
In the second method, I created functions <ModelName>ViewSet for each model. This set of functions extends DRF’s viewsets’ subclass ModelViewSet. The great thing about using viewsets is that 1. ModelViewSet class already covers the basic create, read, update, delete (CRUD) operations (explained in detail below), and 2. there is no need to configure a urls.py file in the app folder. Instead, we import DRF’s routers class in the root folder’s urls.py, and the URLs are already configured for you.
在第二种方法中,我为每个模型创建了<ModelName> ViewSet函数。 这组功能扩展DRF的viewsets'子类ModelViewSet。 有关使用viewsets伟大的事情是,1 ModelViewSet类已经涵盖了基本的创建,读取,更新,删除(CRUD)操作(在下面详细解释),和2。没有必要在配置urls.py文件应用文件夹。 相反,我们将DRF的routers类导入到根文件夹的urls.py中,并且已经为您配置了URL。
For the rest of the article, I will be referring to the URLs and view functions defined in method 2 (DRF’s viewsets). Having clarified this, let’s first take a closer look at writing the view functions.
对于本文的其余部分,我将引用方法2 (DRF的视图集)中定义的URL和视图函数。 在澄清了这一点之后,让我们首先仔细看一下编写视图函数。
查看功能 (View Functions)
By inheriting the properties of ModelViewSets, writing these view functions were actually quite straightforward. All I had to do was specify the queryset this particular view function will use , and the corresponding serializer class. I’ll get to my serializers in a second. My Quiz view function is show below:
通过继承ModelViewSets的属性,编写这些视图函数实际上非常简单。 我所要做的就是指定此特定视图函数将使用的queryset以及相应的序列化器类。 一会儿,我将介绍序列化程序。 我的测验视图功能如下所示:
class QuizViewSet(viewsets.ModelViewSet):
  queryset = models.Quiz.objects.all()
  serializer_class = serializers.QuizSerializer  @action(detail=True,methods=['get'])
  def questions(self, request, pk=None):
    questions = models.Question.objects.filter(quiz_id=pk)
    serializer = serializers.QuestionSerializer(
      questions,
      many=True
    )
    return Response(serializer.data)  @action(detail=True,methods=['get'])
  def all_questions(self, request, pk=None):
    questions = models.Question.objects.filter(quiz_id=pk)
    serializer = serializers.QuestionSerializer(
      questions,
      many=True
    )
    return Response(serializer.data)
I can define ad-hoc actions with the “@action” decorator. As the name suggests, by setting these ad-hoc actions, I can define more specific URL patterns than the standard methods that ModelViewSet provides.
我可以使用“ @action”修饰符定义临时操作。 顾名思义,通过设置这些临时操作,我可以定义比ModelViewSet提供的标准方法更具体的URL模式。
In this specific scenario, I’ve added the extra actions ‘questions’, and ‘all_questions’ to the QuizViewSet class. ‘questions’ will return a paginated list of questions under the specified quiz. ‘all_questions’ will return all all questions under the specified quiz. The reason why I’ve added these ad-hoc actions is because I needed responses more specific than the stadard list of questions. Later, I will explain how to get the list of quizzes and how to use the ad-hoc actions in the routers section below.
在这种特定情况下,我向QuizViewSet类添加了额外的动作“ questions”和“ all_questions”。 “问题”将返回指定测验下的分页问题列表。 'all_questions'将返回指定测验下的所有问题。 之所以要添加这些临时操作,是因为我需要的回答比标准问题列表更具体。 稍后,我将在下面的路由器部分中说明如何获取测验列表以及如何使用临时操作。
序列化器 (Serializers)
We saw in the previous picture that in the ModelViewSet class, we have to define a serializer class. So what do serializers do? The serializer class dictates how the recieved queryset will be shaped into a JSON object for the reponse. For example, I defined my Quiz serializer as such:
在上图中,我们看到在ModelViewSet类中,我们必须定义一个序列化器类。 那么序列化器做什么? 序列化器类指示如何将接收到的查询集成形为用于响应的JSON对象。 例如,我这样定义测验序列化器:
class QuizSerializer(serializers.ModelSerializer):
  def getFullname(self, obj): ...
  def getQCount(self, obj):
    return obj.question_count #we defined this method in models.py  questions=serializers.HyperlinkedRelatedField(...)
  author_fullname=serializers.SerializerMethodField("getFullname")
  question_count=serializers.SerializerMethodField("getQCount")  class Meta:
    fields = [
      'id',
      'title',
      'author',
      'author_fullname',
      'question_count',
      'created_at',
      'questions'
    ]
    model = models.Quiz
The most important part to focus on is in the Meta class. Here, we define the fields and related model. Fields is an array specifying which attributes of the specified model you want to include in the reponse.
要重点关注的最重要部分是Meta类。 在这里,我们定义字段和相关模型。 字段是一个数组,用于指定要在响应中包括指定模型的哪些属性。
In the quiz serializer example, most of the attributes are already defined when we wrote the models in quizzes/models.py earlier. The fields questions, author_fullname, and question_count are custom fields defined above the Meta class, and are attributes that are not defined in the quizzes.models.Quiz model.
在测验序列化器示例中,大多数属性是我们之前在quizzes / models.py中编写模型时定义的。 字段问题,author_fullname和question_count是在Meta类上方定义的自定义字段,并且是quizzes.models.Quiz模型中未定义的属性。
Earlier in the QuizViewSet view function definition, we defined the seralizer class as QuizSerializer. This means whenever the response data is returned, QuizSerializer is called. Soon, we will see what this means.
在QuizViewSet视图函数定义的前面,我们将seralizer类定义为QuizSerializer 。 这意味着无论何时返回响应数据,都会调用QuizSerializer 。 很快,我们将明白这意味着什么。
路由器 (Routers)
As mentioned earlier, by using DRF’s viewsets.ModelViewSet in combination with routers, the URLs are already configured for us.
如前所述,通过将DRF的viewsets.ModelViewSet与路由器结合使用,已经为我们配置了URL。
To add matching URLs to the ViewSets functions we defined in quizzes/views.py, we simply import routers from rest_framework, and instantiate a SimpleRouter class. Then, we register the viewsets along with its desired regex pattern (e.g. the URL ‘api/v2/quizzes’ will call views.QuizViewSet).
要将匹配的URL添加到我们在quizzes / views.py中定义的ViewSets函数中,我们只需从rest_framework导入路由器,然后实例化SimpleRouter类。 然后,我们将视图集及其所需的正则表达式模式一起注册(例如,URL“ api / v2 / quizzes ”将调用views.QuizViewSet )。
from django.contrib import admin
from django.conf.urls import url, include
from rest_framework import routersfrom quizzes import viewsrouter = routers.SimpleRouter()
router.register(r'quizzes', views.QuizViewSet)
router.register(r'questions', views.QuestionViewSet)
router.register(r'answers', views.AnswerViewSet)urlpatterns = [...]urlpatterns += url(r'^api/v2/', include((router.urls, 'quizzes'), namespace='apiv2'))
We include the router in the project’s URL patterns by adding an url method to the urlpatterns array (last line in the diagram). A note to add here is that by using method 2’s view sets and routers, we can bypass having to define URLs in the app-specific urls.py file (e.g. ‘quizzes/urls.py’).
通过将url方法添加到urlpatterns数组(图中的最后一行),我们将路由器包含在项目的URL模式中。 在此处添加的注释是,通过使用方法2的视图集和路由器,我们可以绕过不必在应用程序特定的urls.py文件(例如“ quizzes / urls.py ”)中定义URL的麻烦。
Having registered the viewsets’ URLs to the router, and adding router.urls to the project’s URLs, let’s see it in action. Let’s try fetching the ‘api/v2/’ URL:
在将视图集的URL注册到路由器后,将router.urls添加到项目的URL中,让我们来看看它的作用。 让我们尝试获取“ api / v2 /” URL:
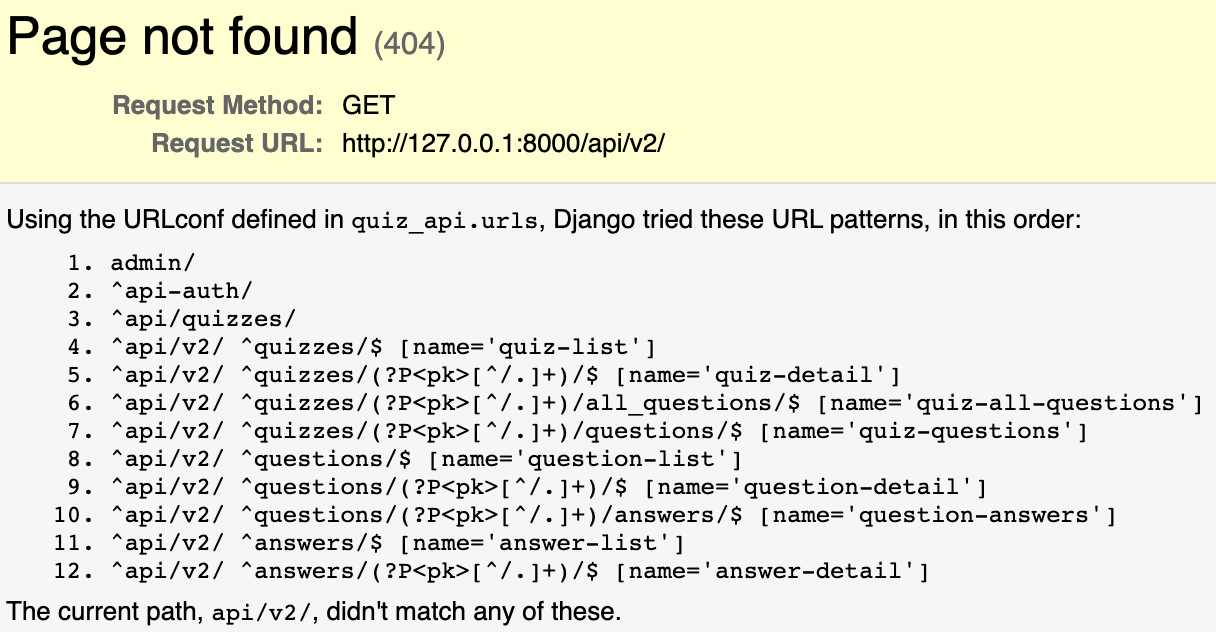
We recieve a “Page not found 404 error” because there is no URL configured as ‘localhost:8000/api/v2/’ followed by nothing. Asides from the top 3 URL patterns,we see a bunch of URLs already defined for us by DRF.
我们收到“找不到页面404错误”的信息,因为没有将URL配置为“ localhost:8000 / api / v2 /”,后面没有任何内容。 从排名前三的URL模式来看,我们看到了DRF已经为我们定义的一堆URL。
We registered the QuizViewSet with a ‘quizzes’ regex pattern to the SimpleRouter, and in line 4 there’s an URL pattern quizzes/; as the name ‘quiz-list’ suggests, it lists the all the available quizzes. In line 5, we have an URL pattern quizzes/(?P<pk>)/, which asks for a primary key; this retrieves the quiz associated with that primary key.
我们向SimpleRouter注册了带有“测验”正则表达式模式的QuizViewSet,在第4行中有一个URL测验quizzes / ; 顾名思义,“测验列表”列出了所有可用的测验。 在第5行中,我们有一个URL模式测验/(?P <pk>)/ ,它要求一个主键; 这将检索与该主键关联的测验。
If we had gone with method 1 of using DRF’s generics classes, we would have had to define a separate set of URLs for the “list all quizzes” and “retrieve a specific quiz” in quizzes/urls.py.
如果我们采用了使用DRF泛型类的方法1,则必须为quizzes / urls.py中的“列出所有测验”和“检索特定测验”定义一组单独的URL。
Remeber the ad-hoc actions ‘questions’ and ‘all_questions’ that we defined under QuizViewSet earlier? DRF’s SimpleRouter automatically registered those actions as a valid URL match in lines 6 & 7. If we specify a primary key for a quiz with URL pattern 6 (quiz-all-questions), we will recieve the list of all related questions to that specific quiz. This is not a default URL that comes with ModelViewSet, but rather an user-defined action that DRF automatically added to the list of valid URLs for the request to be matched with.
记得早些时候在QuizViewSet下定义的即席操作“问题”和“ all_questions”吗? DRF的SimpleRouter在第6行和第7行中将这些操作自动注册为有效的URL匹配。如果我们为URL模式6(quiz-all-questions)的测验指定主键,我们将收到所有与该特定问题相关的问题的列表。测验。 这不是ModelViewSet随附的默认URL,而是DRF自动添加到要匹配的请求的有效URL列表中的用户定义操作。
一起包装 (Wrapping it All Together)
Routers define which URLs the request could be matched to. This takes care of the first layer of server logic. If a matching URL is found, a corresponding view function is called. In our case, we used inherited viewsets.ModelViewSet so all we had to do was define the queryset and serializer class. The serlializer defines the JSON object that will be included in the response body.
路由器定义请求可以匹配到的URL。 这负责服务器逻辑的第一层。 如果找到匹配的URL,则调用相应的视图函数。 在我们的例子中,我们使用了继承的viewsset.ModelViewSet,所以我们要做的就是定义queryset和serializer类。 序列化程序定义将包含在响应主体中的JSON对象。
I promsed to show the seralizer in action earlier. To see it in effect, lets call a valid URL (number 5 ‘quiz-detail’), and see what we get:
我承诺要更早地展示Seralizer的作用。 要查看其效果,请调用一个有效的URL(数字5“测验-详细信息”),然后看看我们得到了什么:
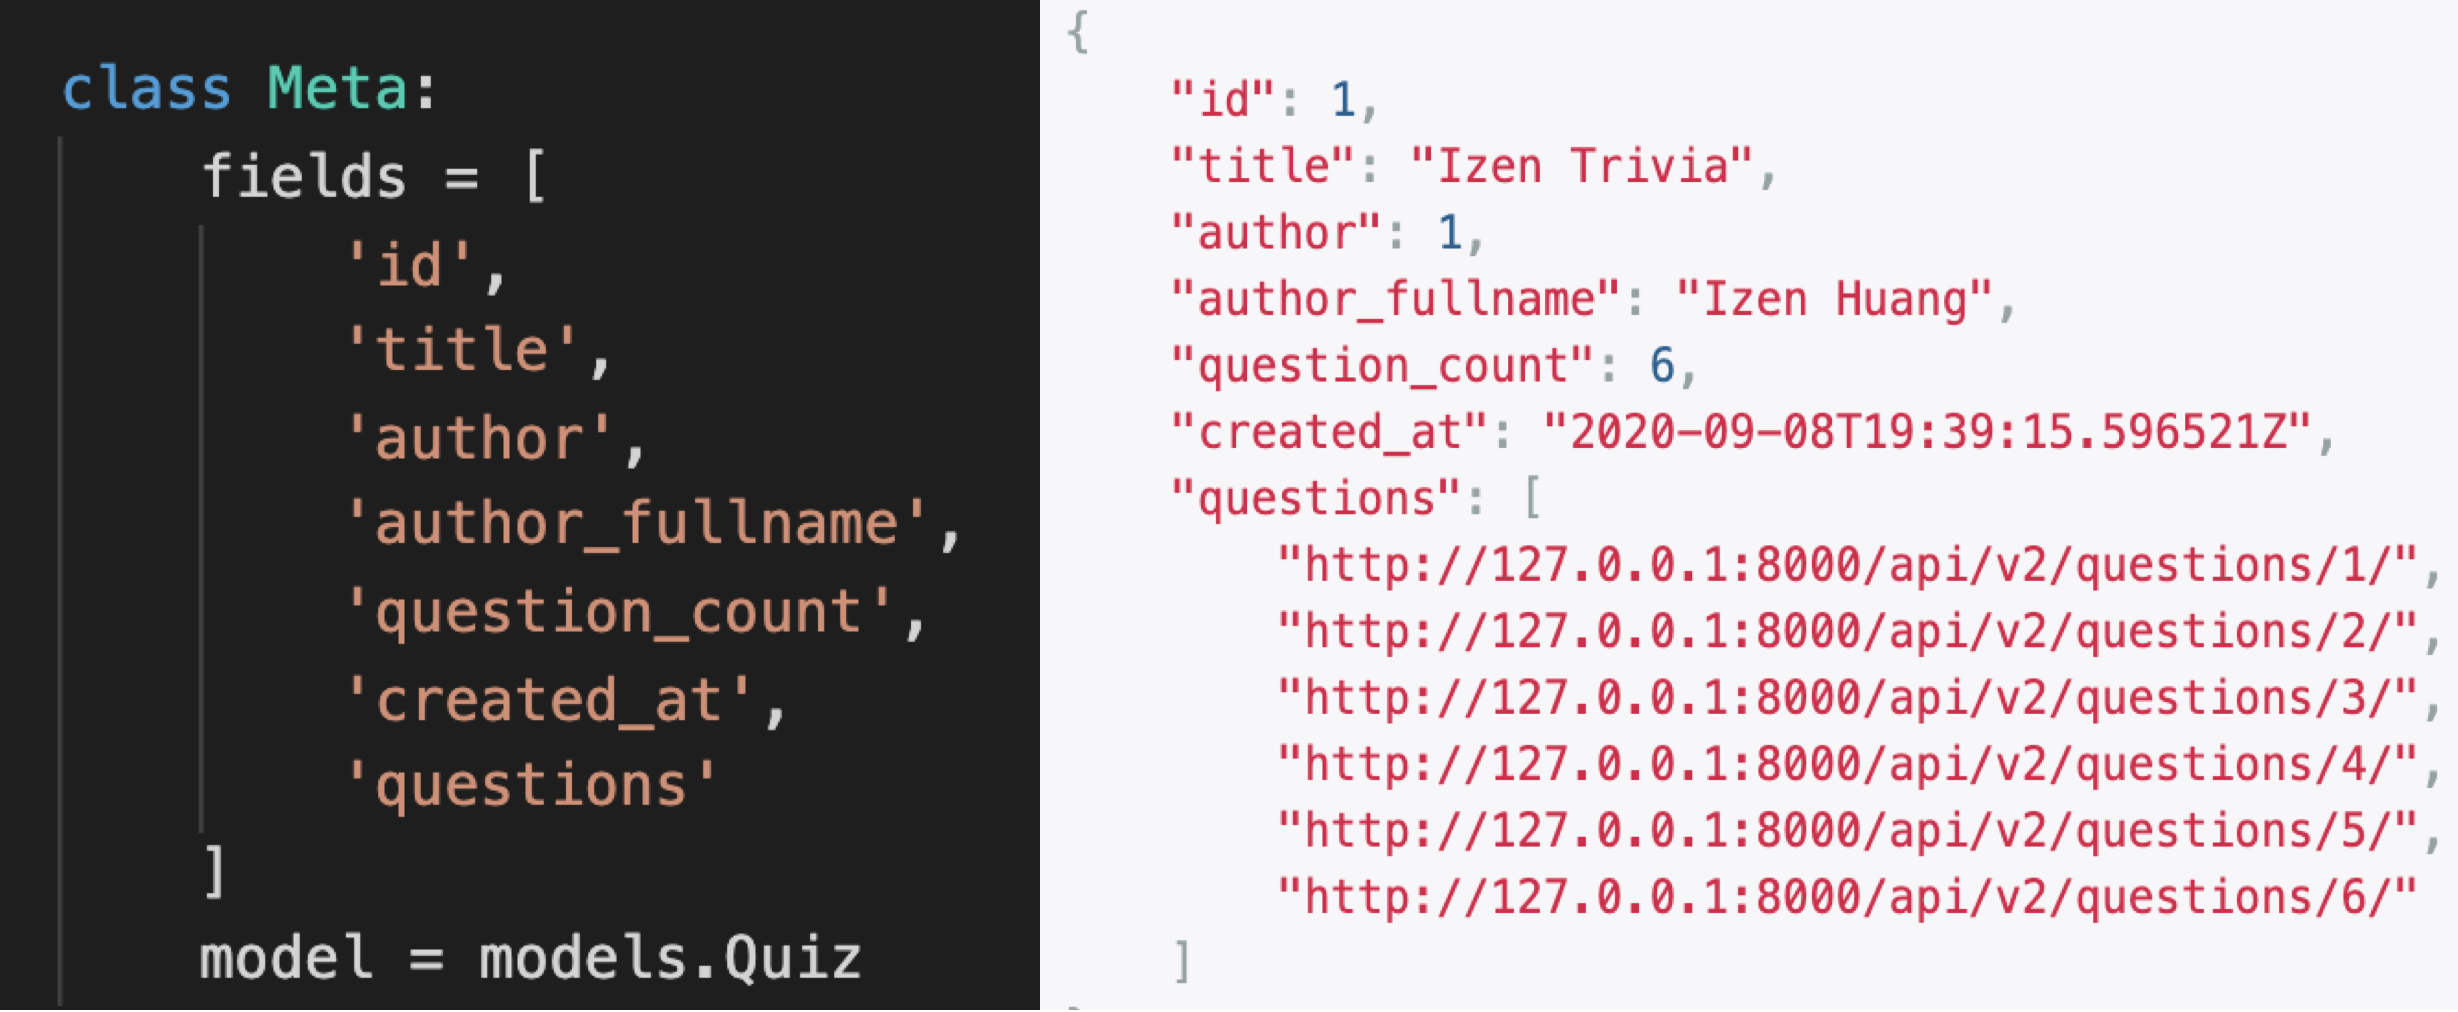
As we can see, the fields that we specified in QuizSerializer define the JSON object returned in the response.
如我们所见,我们在QuizSerializer中指定的字段定义了响应中返回的JSON对象。
So there we have it — routers, view functions, and serializers work together to process the client request, pull the necessary data from the database model, and return the configured data as the response.
这样就可以实现—路由器,查看功能和序列化器共同处理客户端请求,从数据库模型中提取必要的数据,并将配置的数据作为响应返回。
构建React前端 (Building the React Frontend)
Having had previous experience building React projects, I already knew how to structure the frontend. For a quick guide on how to start your first React application, you can follow this tutorial.
拥有过构建React项目的经验,我已经知道如何构建前端。 有关如何启动您的第一个React应用程序的快速指南,可以按照本教程进行操作。
There were some parts I was uncertain about though, specifically having to do with fetching the data from my backend, and dealing with the asynchronous nature of HTTP request/response. For this project, I wanted to learn: 1. how to fetch data from 3rd party API 2. how to setup asynchronous fetching functions and 3. allowing cross-origin-resource-sharing (CORS).
不过,我仍然不确定某些部分,特别是与从后端获取数据以及处理HTTP请求/响应的异步特性有关。 对于这个项目,我想学习:1.如何从第三方API获取数据2.如何设置异步获取功能以及3.允许跨域资源共享(CORS)。
取得回应 (Fetching Responses)
Since I was only building a small-scale application, I decided to centralize my fetch methods in App.js. Specifically, in the componentDidMount and componentDidUpdate functions. In retrospect, I would put the fetch functions in the componentDidMount() or componentWillMount() functions of whichever component the response data should reside in.
由于我只是构建一个小型应用程序,因此我决定将获取方法集中在App.js中。 具体来说,在componentDidMount和componentDidUpdate函数中。 回想起来,我会将获取函数放在响应数据应驻留在哪个组件的componentDidMount()或componentWillMount()函数中。
Due to the asynchronous nature of HTTP requests/responses, you should wrap whatever function that is fetching with an async declaration, and the await operator whenever you’re dealing with a promise object. To learn more about dealing with asynchronous functions, click on this link.
由于HTTP请求/响应的异步特性,您应该使用async声明包装要获取的任何函数,并在处理promise对象时包装await运算符。 要了解有关处理异步功能的更多信息,请单击此链接。
Here is an example of a fetch function, fetchQuizzes(), which fetches the list of available quizzes in the database:
这是获取函数fetchQuizzes()的示例,该函数获取数据库中可用测验的列表:
async fetchQuizzes() {
  const { url_header } = this.state
  // when running backend locally, 'url_header' might be
  // localhost:8000  try {
    const res = await fetch(`${url_header}/quizzes/`)
    const quizzes_body = await res.json();
    if (quizzes_body !== undefined) {
      this.setState({
        isFetchingQuizzes: false,
        quizzes: quizzes_body,
      })
    }
  } catch (error) {
    console.log(error)
  }
}
Once the promise object is returned, we can parse the HTTP response and get the body information with response.json(). Then, I set the response data to a state variable quizzes with this.setState, which is then passed down to lower components.
一旦返回了promise对象,我们就可以解析HTTP响应,并使用response .json()获取主体信息。 然后,我使用this.setState将响应数据设置为状态变量测验,然后将其传递给较低的组件。
允许CORS (Allowing CORS)
You might’ve ran into a timeout problem when trying to fetch data from your locally hosted backend. A main culprit is because you haven’t allowed CORS. There’s a few ways to circumvent this problem.
尝试从本地托管的后端获取数据时,您可能会遇到超时问题。 罪魁祸首是因为您不允许CORS。 有几种方法可以解决此问题。
One way is to install the Allow CORS: Access-Control-Allow-Origin Google Chrome extenstion. However, this is should be ran only during development, not production (the eventual remotely hosted website).
一种方法是安装“允许CORS”:Access-Control-Allow-Origin Google Chrome扩展程序。 但是,只能在开发过程中运行它,而不是在生产过程中运行(最终是远程托管的网站)。
Another way is to configure the headers of your requests in the frontend to always include “Access-Control-Allow-Origin = ‘*’”. I played around with this solution once I’ve setup the frontend server, but to no avail.
另一种方法是将前端的请求标头配置为始终包含“ Access-Control-Allow-Origin ='*'”。 设置前端服务器后,我就试用了此解决方案,但无济于事。
Eventually what worked for me was to allow CORS from the backend. To allow CORS from Django, you need to 1. install django-cors-headers application and 2. configure the CORS whitelist in settings.py.
最终对我有用的是允许后端使用CORS 。 要允许来自Django的CORS,您需要1.安装django-cors-headers应用程序,并2.在settings.py中配置CORS白名单。
The instructions for installing the django-cors-headers application, and adding the necessary apps & middlewares, can be found at Python’s Index Package’s django-cors-headers documentation.
安装django-cors-headers的说明 可以在Python的Index Package的django-cors-headers文档中找到该应用程序以及添加必要的应用程序和中间件。
To configure the CORS whitelist, navigate to settings.py and add the following configuration:
要配置CORS白名单,请导航至settings.py并添加以下配置:
# CORS
CORS_ORIGIN_ALLOW_ALL = FalseCORS_ORIGIN_WHITELIST = [
    'http://localhost:8000',
    'http://localhost:3000', # locally hosted frontend
    'https://izens-quiz.netlify.app' # remotely hosted frontend
]
You should add whatever websites you want to share your backend data with in CORS_ORIGIN_WHITELIST. By adding ‘localhost:3000’, I can run the frontend locally and still recieve the backend data. Eventually, I’ll want to put the working frontend site to the list as well (‘izens-quiz.netlify.app’)
您应该在CORS_ORIGIN_WHITELIST中添加要与之共享后端数据的任何网站。 通过添加“ localhost:3000”,我可以在本地运行前端,并且仍然接收后端数据。 最终,我还要将工作中的前端站点也放在列表中('izens-quiz.netlify.app')
If you’re already hosting the backend on a remote server, remember to commit the changes, and push to the working backend site (instructions for doing so is detailed below).
如果您已经将后端托管在远程服务器上,请记住提交更改,然后推送到工作的后端站点(有关这样做的说明,请参见下文)。
托管后端 (Hosting the Backend)
设置服务器和数据库(Setting Up the Server & Database)
Hosting a Django backend on Heroku is relatively simple. You need to set up a virtual environment, initialize a Heroku repository inside that virtual environment, add the Procfile & requirements.txt, and finally push to the Heroku master branch.
在Heroku上托管Django后端相对简单。 您需要设置一个虚拟环境,在该虚拟环境中初始化一个Heroku存储库,添加Procfile&requirements.txt,最后推送到Heroku master分支。
Furthermore, you should also switch the database from SQLite3 to PostgreSQL. This is because so far we have been saving our data to a disk-based storage in the local folder SQLite3 that was automatically created during the Django development. However, due to the ephermal nature of Heroku’s container engines, all disk-based storage will be wiped clean at least once every 24 hours. To fix this, we will move the database to a remotely hosted server (e.g. an AWS EC2 instance).
此外,您还应该将数据库从SQLite3切换到PostgreSQL 。 这是因为到目前为止,我们已经将数据保存到本地文件夹SQLite3中基于磁盘的存储中,该本地文件夹是在Django开发过程中自动创建的。 但是,由于Heroku容器引擎的复杂性,所有基于磁盘的存储将每24小时至少清除一次。 为了解决此问题,我们将数据库移至远程托管的服务器(例如, AWS EC2实例)。
To learn how to do the steps mentioned above, please follow the step-by-step tutorial on this Youtube video.
要了解如何执行上述步骤,请按照此YouTube视频的分步教程进行操作。
向部署添加静态CSS文件 (Adding Static CSS Files to Deployment)
Finally, if you want to keep the styling of the Django administrative page or REST framework when ran on Heroku, you need to install the middleware WhiteNoise so that Heroku can host static css files. To do so, start your virtual environment, and follow these steps:
最后,如果要在Heroku上运行时保持Django管理页面或REST框架的样式,则需要安装中间件WhiteNoise,以便Heroku可以承载静态css文件。 这样做,启动您的虚拟环境,然后按照下列步骤操作:
- Install WhiteNoise with pip (or pip3) 使用pip(或pip3)安装WhiteNoise
pip3 install whitenoise2. Add whitenoise to MIDDLEWARE in project folder’s settings.py
2.在项目文件夹的settings.py中将whitenoise添加到MIDDLEWARE
MIDDLEWARE = [
    'whitenoise.middleware.WhiteNoiseMiddleware',
    ...
]
3. Configure static routes in settings.py
3.在settings.py中配置静态路由
STATIC_URL = '/static/'
STATIC_ROOT = os.path.join(BASE_DIR, 'staticfiles')
STATIC_FILES_DIR = (
    os.path.join(BASE_DIR, 'static'),
)
4. Commit the changes and push to Heroku master branch
4.提交更改并推送到Heroku master分支
git add .
git commit -m "feat: whitenoise & static path"
git push Heroku Master
托管前端 (Hosting the Frontend)
部署到Netlify(Deploying to Netlify)
I chose to host the frontend with Netlify, which is usually for static websites (i.e. websites that aren’t fetching & posting data to/from a remote server). It seems to work fine with my small-scale application, however that might not be true when the project size becomes bigger.
我选择使用Netlify托管前端,该前端通常用于静态网站(即,不会从远程服务器获取数据或将数据发布到远程服务器的网站)。 在我的小型应用程序上似乎可以正常工作,但是当项目规模变大时,可能就不正确了。
The process was relatively straightforward. Since my backend & frontend folders resided within an existing GitHub repository, I simply had to connect that repository to a Netlify project and set the build settings.
该过程相对简单。 由于我的后端和前端文件夹位于现有的GitHub存储库中,因此我只需要将该存储库连接到Netlify项目并设置构建设置即可。
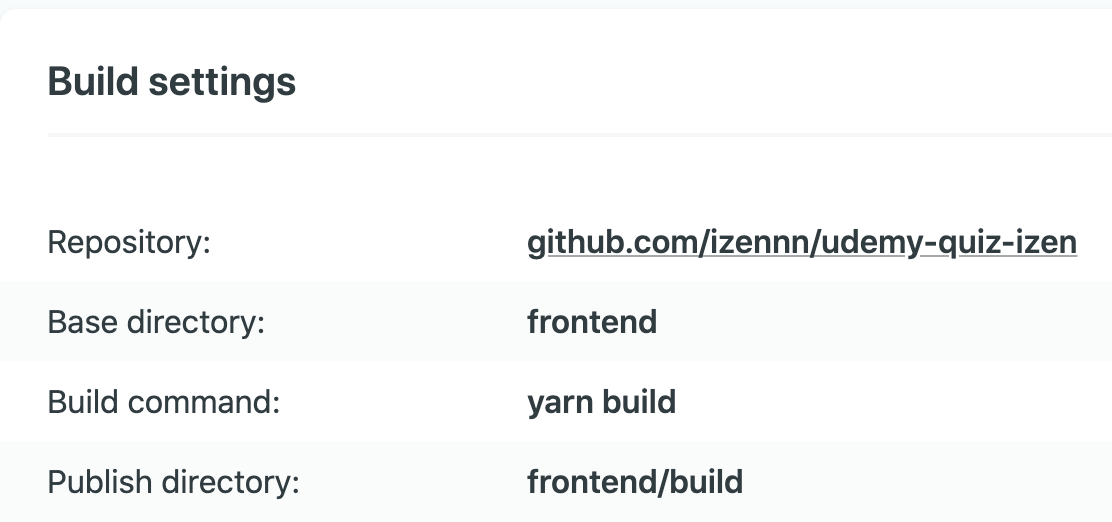
Since my repository contains both the backend and frontend directory, and I’m hosting the frontend on Netlify, I specify the base directory as ‘frontend’. The build command, ‘yarn build’, is a shortcut to call the command ‘react-scripts build’. This command makes a directory ‘build’ within my frontend directory, and correctly bundles React in production for best performance. The created build directory is what Netlify needs for the ‘publish directory’.
由于我的存储库同时包含后端目录和前端目录,并且我将前端托管在Netlify上,因此我将基本目录指定为“ frontend”。 基本命令“ yarn build”是调用命令“ react-scripts build”的快捷方式。 该命令在我的前端目录中创建一个目录“ build”,并在生产中正确捆绑React以实现最佳性能。 Netlify需要为“发布目录”创建的构建目录。
For more detailed instructions, you can visit Netlify’s documentation “Get started with Netlify CLI”.
有关更详细的说明,您可以访问Netlify的文档“ Netlify CLI入门” 。
经验教训和链接 (Lessons Learned & Links)
This project has taught me alot. I knew how the HTTP request/response pattern works, but I had never put it to code. There’s alot of details that I didn’t discuss in this article, such as writing a custom paginator, that I was not aware of from a high-level understanding. This project has taught me how to address these details.
这个项目教了我很多东西。 我知道HTTP请求/响应模式是如何工作的,但是我从未将其放入代码中。 我没有在本文中讨论很多细节,例如编写自定义分页器,但我从高层次的理解中并未意识到这些细节。 这个项目教会了我如何解决这些细节。
A huge learning lesson was learning to write the APIs before starting on the frontend. I made the mistake of writing the frontend first with mock data, and that eventually introduced alot of unnecessary JSON parsing and trasnforming into the frontend logic.
一个巨大的学习课程是在开始前端之前学习编写API。 我犯了一个错误,那就是首先用模拟数据编写前端,最终将大量不必要的JSON解析和转换引入了前端逻辑。
You can find the link to my GitHub repository and working sites for this project here. Thank you for reading!
您可以在此处找到指向我的GitHub存储库和该项目工作站点的链接。 感谢您的阅读!
翻译自: https://medium.com/swlh/overview-building-a-full-stack-quiz-app-with-django-and-react-57fd07449e2f
django react


 722
722

 被折叠的 条评论
为什么被折叠?
被折叠的 条评论
为什么被折叠?
 到【灌水乐园】发言


