


 本文指导如何使用Kotlin和Android Studio创建一个简单的Android计算器应用,能执行基本的加减乘除和百分比计算。首先介绍项目所需的技术背景,接着详细解释创建新项目、设计用户界面和编写Kotlin代码的过程,最后说明如何运行和测试应用。
In this article, we will create a simple calculator android application which would be able to perform simple arithmetic calculations like addition, subtraction, multiplication, division and percentage depending upon the user’s input. Hope you are excited :)
在本文中,我们将创建一个简单的计算器android应用程序,该应用程序将能够根据用户的输入执行简单的算术计算,例如加,减,乘,除和百分比。 希望你很兴奋:)
Kotlin is a prerequisite for this project. Also, you need to install Android Studio on your computer which is an open source software available for download from here: https://developer.android.com/studio.
Kotlin是该项目的先决条件。 另外,您需要在计算机上安装Android Studio,这是一个开放源代码软件,可以从以下位置下载: https : //developer.android.com/studio 。
让我们开始使用我们的计算器Android应用程序: (Let’s get started with our calculator android app:)
Step 1: Create a project:
步骤1:建立专案:
- Go to File -> New -> New Project and you will get a window. Now under Phone and Tablet tab, select Empty Activity and click Next. 转到文件->新建->新建项目,您将获得一个窗口。 现在,在“手机和平板电脑”选项卡下,选择“清空活动”,然后单击“下一步”。
- Now give a Name and Package Name for your project and select the language as Kotlin. 现在为您的项目指定名称和程序包名称,然后选择语言作为Kotlin。
- Ensure that the minimum API level is API 15 as it would work on almost every android device available. Click Finish to continue. 确保最低API级别为API 15,因为它将可在几乎所有可用的Android设备上使用。 单击完成以继续。

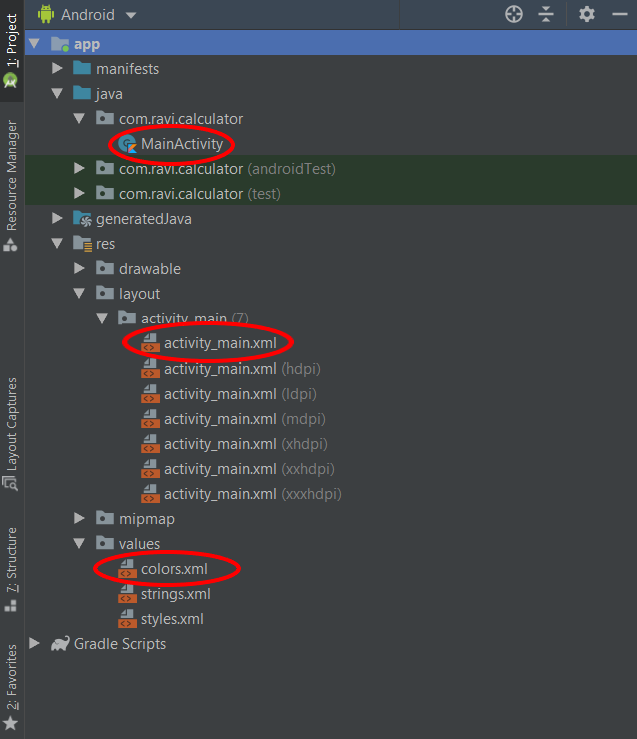
Step 2: Open the required files:
步骤2:打开所需的文件:
- On the leftmost side of the Android Studio, you would see Project tab.Click on it. A palette will appear. 在Android Studio的最左侧,您将看到Project选项卡,然后单击它。 将出现一个调色板。
Go to app -> java -> “your package name” -> MainActivity and open this file.
转到应用程序-> Java-> “您的包名称”-> MainActivity并打开此文件。
Similarly go to res-> layout -> activity_main -> activity_main.xml and open this file.
同样,转到res-> layout-> activity_main-> activity_main.xml并打开此文件。
For adding user defined colors, you need to open color.xml file which is under res -> values.
要添加用户定义的颜色,您需要打开res- >值下的color.xml文件。
Step 3: Designing the User Interface:
步骤3:设计使用者介面:
We are going to design the interface of calculator similar to the one depicted below:
我们将设计类似于以下所示的计算器的界面:

We can divide this interface into 3 parts:
我们可以将该接口分为3部分:

This section is designed using Plain text component.
本部分使用纯文本组件设计。
This section is similar to a table. Therefore, TableLayout is used with 4 TableRow with 4 Button each of same size.
本节类似于表格。 因此, TableLayout与4个TableRow和4个Button一起使用,每个按钮的大小相同。
This section comprises of a LinearLayout(horizontal) with 3 Button including 1 button with double size and 2 same sized buttons as above.
本节包括一个带有3个按钮的LinearLayout(水平),其中3个按钮包括1个两倍大小的按钮和2个相同大小的按钮。
This design would be implemented on a LinearLayout(vertical) .
该设计将在LinearLayout(vertical)上实现 。
You can design this layout in activity_main.xml file by a simple drag and drop option and customizing the attributes accordingly in the Design mode or write a code in the Text mode. The code for this interface would be:-
您可以在activity_main.xml中设计此布局 通过简单的拖放选项创建文件,并在“设计”模式下相应地自定义属性,或在“文本”模式下编写代码。 该接口的代码为:-
<?xml version="1.0" encoding="utf-8"?>
<LinearLayout
        xmlns:android="http://schemas.android.com/apk/res/android"
        xmlns:tools="http://schemas.android.com/tools"
        xmlns:app="http://schemas.android.com/apk/res-auto"
        android:layout_width="match_parent"
        android:layout_height="match_parent"
        tools:context=".MainActivity"
        android:background="@color/gray"
        android:layout_gravity="fill"
        android:layout_margin="0pt"
        android:layout_weight="1"
        android:orientation="vertical">
    //----------------FOR PART 1------------------
    <EditText
            android:layout_width="match_parent"
            android:inputType="textPersonName"
            android:ems="10"
            android:background="@color/gray"
            android:id="@+id/etShowNumber"
            android:text="0"
            android:gravity="right|bottom"
            android:textColor="@color/white"
            android:textSize="36sp"
            android:layout_height="wrap_content"
            android:layout_weight="1"/>
    //----------------FOR PART 2------------------
    <TableLayout
            android:layout_width="match_parent"
            android:layout_height="wrap_content"
            android:layout_gravity="bottom|fill"
            android:gravity="bottom|start|fill">
        <TableRow android:layout_width="match_parent"
                  android:layout_height="match_parent"
                  android:layout_marginBottom="1pt">
            <Button
                    android:text="AC"
                    android:background="@color/whiteback"
                    android:layout_width="30pt"
                    android:layout_height="30pt"
                    android:id="@+id/buAC"
                    android:layout_weight="1"
                    android:textSize="18sp"
                    android:layout_marginRight="1pt"
                    android:onClick="buCleanEvent"/>
            <Button
                    android:text="+/-"
                    android:background="@color/whiteback"
                    android:layout_width="30pt"
                    android:layout_height="30pt"
                    android:id="@+id/buPlusMinus"
                    android:layout_weight="1"
                    android:textSize="18sp"
                    android:onClick="buNumberEvent"
                    android:layout_marginRight="1pt"/>
            <Button
                    android:text="%"
                    android:background="@color/whiteback"
                    android:layout_width="30pt"
                    android:layout_height="30pt"
                    android:id="@+id/buPer"
                    android:layout_weight="1"
                    android:textSize="18sp"
                    android:layout_marginRight="1pt"
                    android:onClick="buPercentEvent"/>
            <Button
                    android:text="÷"
                    android:background="@color/buop"
                    android:textColor="@color/white"
                    android:layout_width="30pt"
                    android:layout_height="30pt"
                    android:id="@+id/buDiv"
                    android:layout_weight="1"
                    android:textSize="18sp"
                    android:onClick="buOpEvent"/>
        </TableRow>
        <TableRow android:layout_width="match_parent"
                  android:layout_height="match_parent"
                  android:layout_marginBottom="1pt">
            <Button
                    android:text="7"
                    android:background="@color/whiteback"
                    android:layout_width="30pt"
                    android:layout_height="30pt"
                    android:id="@+id/bu7"
                    android:layout_weight="1"
                    android:textSize="18sp"
                    android:onClick="buNumberEvent"
                    android:layout_marginRight="1pt"/>
            <Button
                    android:text="8"
                    android:background="@color/whiteback"
                    android:layout_width="30pt"
                    android:layout_height="30pt"
                    android:id="@+id/bu8"
                    android:layout_weight="1"
                    android:textSize="18sp"
                    android:onClick="buNumberEvent"
                    android:layout_marginRight="1pt"/>
            <Button
                    android:text="9"
                    android:background="@color/whiteback"
                    android:layout_width="30pt"
                    android:layout_height="30pt"
                    android:id="@+id/bu9"
                    android:layout_weight="1"
                    android:textSize="18sp"
                    android:onClick="buNumberEvent"
                    android:layout_marginRight="1pt"/>
            <Button
                    android:text="X"
                    android:background="@color/buop"
                    android:textColor="@color/white"
                    android:layout_width="30pt"
                    android:layout_height="30pt"
                    android:id="@+id/buMul"
                    android:layout_weight="1"
                    android:textSize="18sp"
                    android:onClick="buOpEvent"/>
        </TableRow>
        <TableRow android:layout_width="match_parent"
                  android:layout_height="match_parent"
                  android:layout_marginBottom="1pt">
            <Button
                    android:text="4"
                    android:background="@color/whiteback"
                    android:layout_width="30pt"
                    android:layout_height="30pt"
                    android:id="@+id/bu4"
                    android:layout_weight="1"
                    android:textSize="18sp"
                    android:onClick="buNumberEvent"
                    android:layout_marginRight="1pt"/>
            <Button
                    android:text="5"
                    android:background="@color/whiteback"
                    android:layout_width="30pt"
                    android:layout_height="30pt"
                    android:id="@+id/bu5"
                    android:layout_weight="1"
                    android:textSize="18sp"
                    android:onClick="buNumberEvent"
                    android:layout_marginRight="1pt"/>
            <Button
                    android:text="6"
                    android:background="@color/whiteback"
                    android:layout_width="30pt"
                    android:layout_height="30pt"
                    android:id="@+id/bu6"
                    android:layout_weight="1"
                    android:textSize="18sp"
                    android:onClick="buNumberEvent"
                    android:layout_marginRight="1pt"/>
            <Button
                    android:text="-"
                    android:background="@color/buop"
                    android:textColor="@color/white"
                    android:layout_width="30pt"
                    android:layout_height="30pt"
                    android:id="@+id/buSub"
                    android:layout_weight="1"
                    android:textSize="18sp"
                    android:onClick="buOpEvent"/>
        </TableRow>
        <TableRow
                android:layout_width="match_parent"
                android:layout_height="match_parent"
                android:layout_marginBottom="1pt">
            <Button
                    android:text="1"
                    android:background="@color/whiteback"
                    android:layout_width="30pt"
                    android:layout_height="30pt"
                    android:id="@+id/bu1"
                    android:layout_weight="1"
                    android:textSize="18sp"
                    android:onClick="buNumberEvent"
                    android:layout_marginRight="1pt"/>
            <Button
                    android:text="2"
                    android:background="@color/whiteback"
                    android:layout_width="30pt"
                    android:layout_height="30pt"
                    android:id="@+id/bu2"
                    android:layout_weight="1"
                    android:textSize="18sp"
                    android:onClick="buNumberEvent"
                    android:layout_marginRight="1pt"/>
            <Button
                    android:text="3"
                    android:background="@color/whiteback"
                    android:layout_width="74dp"
                    android:layout_height="30pt"
                    android:id="@+id/bu3"
                    android:layout_weight="1"
                    android:textSize="18sp"
                    android:onClick="buNumberEvent"
                    android:layout_marginRight="1pt"/>
            <Button
                    android:text="+"
                    android:background="@color/buop"
                    android:textColor="@color/white"
                    android:layout_width="72dp"
                    android:layout_height="30pt"
                    android:id="@+id/buSum"
                    android:layout_weight="1"
                    android:textSize="18sp"
                    android:onClick="buOpEvent"/>
        </TableRow>
    </TableLayout>
    //----------------FOR PART 3------------------
    <LinearLayout
            android:orientation="horizontal"
            android:layout_width="match_parent"
            android:layout_height="wrap_content"
            android:gravity="bottom"
            android:baselineAligned="true">
        <Button
                android:text="0"
                android:background="@color/whiteback"
                android:layout_height="30pt"
                android:id="@+id/bu0"
                android:layout_width="60pt"
                android:layout_weight="3.7"
                android:textSize="18sp"
                android:onClick="buNumberEvent"
                android:layout_marginRight="1pt"/>
        <Button
                android:text="."
                android:background="@color/whiteback"
                android:layout_height="30pt"
                android:id="@+id/buDot"
                android:layout_width="30pt"
                android:layout_weight="1.9"
                android:textSize="18sp"
                android:onClick="buNumberEvent"
                android:layout_marginRight="1pt"/>
        <Button
                android:text="="
                android:background="@color/buop"
                android:textColor="@color/white"
                android:layout_height="30pt"
                android:id="@+id/buEq"
                android:layout_weight="1.9"
                android:layout_width="30pt"
                android:textSize="18sp"
                android:onClick="buEqualEvent"/>
    </LinearLayout>
</LinearLayout>
For the user defined color scheme used in the above code, you need to make changes in the color.xml file:-
对于以上代码中使用的用户定义的配色方案,您需要在color.xml文件中进行更改:
<?xml version="1.0" encoding="utf-8"?>
<resources>
    <color name="colorPrimary">#008577</color>
    <color name="colorPrimaryDark">#00574B</color>
    <color name="colorAccent">#D81B60</color>
    #user defined colors
    <color name="gray">#6B6B6D</color>
    <color name="whiteback">#D6D6D6</color>
    <color name="buop">#F79261</color>
    <color name="white">#FFFFFF</color>
</resources>
After these changes you would be able to see the interface for your simple calculator application:-
完成这些更改后,您将能够看到简单计算器应用程序的界面:

Step 3: Working with the Kotlin file to make a working application:
步骤3:使用Kotlin文件制作可运行的应用程序:
Till now, we have designed the interface for our simple application. Now is the crucial time! We need to code so that our application can actually work like a real calculator. So let’s get started.
到目前为止,我们已经为简单的应用程序设计了接口。 现在是关键时刻! 我们需要进行编码,以便我们的应用程序实际上可以像真正的计算器一样工作。 因此,让我们开始吧。
For all the the numerical values, dot and +/- operator a function named buNumberEvent is created. This function will be responsible to display the numbers in the view box by clicking the corresponding buttons on the application. In case of a decimal number, it will also ensure that one can’t enter more than one dot in a number.
对于所有数值,点和+/-运算符,将创建一个名为buNumberEvent的函数。 通过单击应用程序上的相应按钮,此功能将负责在视图框中显示数字。 如果是十进制数字,它还可以确保一个数字不能输入多个点。
buOpEvent function is created to assigned the operation buttons to op variable which will then be used to make the calculations.
创建buOpEvent函数,以将操作按钮分配给op变量,然后将其用于进行计算。
Function named buEqualEvent is created to calculate the finalNumber using the oldNumber and newNumber. This function also displays the answer in the view box.
名为buEqualEvent功能创建计算使用oldNumber和newNumber的finalNumber。 此功能还在视图框中显示答案。
For calculating the percentage buPercentEvent function is used which divides the value in the view box with 100 to find the percentage value and displays it.
为了计算百分比,使用了buPercentEvent函数,该函数将视图框中的值除以100,以找到百分比值并将其显示。
At last, for cleaning the screen buCleanEvent is created which deletes all the data in the view box for new calculations.
最后,为了清洁屏幕,创建了buCleanEvent ,该屏幕删除了视图框中的所有数据以进行新的计算。
Note:- Remember to set onClick attribute for each button to the name of corresponding functions listed above.
注意:-请记住,将每个按钮的onClick属性设置为上面列出的相应功能的名称。
Code for these operations is done in MainActivity.kt file:-
这些操作的代码在MainActivity.kt文件中完成:
package com.ravi.calculator
import androidx.appcompat.app.AppCompatActivity
import android.os.Bundle
import android.view.View
import android.widget.Button
import kotlinx.android.synthetic.main.activity_main.*
class MainActivity : AppCompatActivity() {
    override fun onCreate(savedInstanceState: Bundle?) {
        super.onCreate(savedInstanceState)
        setContentView(R.layout.activity_main)
    }var isNewOp=true
var dot=false    fun buNumberEvent(view: View)
    {
        if(isNewOp)
        {
            etShowNumber.setText("")
        }
        isNewOp=false
        val buSelect= view as Button
        var buClickValue:String=etShowNumber.text.toString()
        when(buSelect.id)
        {
            bu0.id->
            {
                buClickValue+="0"
            }
            bu1.id->
            {
                buClickValue+="1"
            }
            bu2.id->
            {
                buClickValue+="2"
            }
            bu3.id->
            {
                buClickValue+="3"
            }
            bu4.id->
            {
                buClickValue+="4"
            }
            bu5.id->
            {
                buClickValue+="5"
            }
            bu6.id->
            {
                buClickValue+="6"
            }
            bu7.id->
            {
                buClickValue+="7"
            }
            bu8.id->
            {
                buClickValue+="8"
            }
            bu9.id->
            {
                buClickValue+="9"
            }
            buDot.id->
            {
                if(dot==false)
                {
                    buClickValue += "."
                }
                dot=true
            }
            buPlusMinus.id->
            {
                buClickValue="-" + buClickValue
            }
        }
        etShowNumber.setText(buClickValue)
    }var op="X"
var oldNumber=""
    fun buOpEvent(view: View)
    {
        val buSelect= view as Button
        when(buSelect.id)
        {
            buMul.id->
            {
                op="X"
            }
            buDiv.id->
            {
                op="÷"
            }
            buSub.id->
            {
                op="-"
            }
            buSum.id->
            {
                op="+"
            }
        }
        oldNumber=etShowNumber.text.toString()
        isNewOp=true
        dot=false
    }
    fun buEqualEvent(view: View)
    {
        val newNumber=etShowNumber.text.toString()
        var finalNumber:Double?=null
        when(op)
        {
            "X"->
            {
             finalNumber=oldNumber.toDouble() * newNumber.toDouble()
            }
            "÷"->
            {
             finalNumber=oldNumber.toDouble() / newNumber.toDouble()
            }
            "-"->
            {
             finalNumber=oldNumber.toDouble() - newNumber.toDouble()
            }
            "+"->
            {
             finalNumber=oldNumber.toDouble() + newNumber.toDouble()
            }
        }
        etShowNumber.setText(finalNumber.toString())
        isNewOp=true
    }
    fun buPercentEvent(view: View)
    {
        val number=(etShowNumber.text.toString().toDouble())/100
        etShowNumber.setText(number.toString())
        isNewOp=true
    }
    fun buCleanEvent(view: View)
    {
        etShowNumber.setText("")
        isNewOp=true
        dot=false
    }
}
Step 4: Running the Application:
步骤4:运行应用程序:
Now you must be keen to run it on a real android smartphone. To do this you must follow these instructions:-
现在,您必须热衷于在真正的android智能手机上运行它。 为此,您必须遵循以下说明:-
- On your smartphone, go to Settings -> About Phone -> Software Information -> Build number. Click on this repeatedly until it you become a developer. Then go back to Settings and click on Developers option is set USB debugging as ON 在智能手机上,转到设置->关于手机->软件信息->内部版本号。 反复单击它,直到您成为开发人员。 然后回到“设置”并单击“开发人员”选项,将“ USB调试”设置为“开”
Connect your android smartphone with your computer and from your phone, set the option for use USB for to MIDI (for some devices it may work on another mode).
将您的android智能手机与计算机连接,然后从手机上,将USB使用选项设置为MIDI (对于某些设备,它可能会在其他模式下工作)。
- Click on RUN (Shift+F10 on keyboard). Then select your connected device and click OK. It will take some time to build and install the apk. You can also create a virtual device to run on the emulator. 单击运行(键盘上的Shift + F10)。 然后选择您连接的设备,然后单击“确定”。 构建和安装apk将花费一些时间。 您也可以创建虚拟设备以在仿真器上运行。
HURRAY !! We have developed an android application capable of performing simple calculations on our android smartphone :) I hope you enjoyed making this application and would love to see more in the future….
欢呼! 我们已经开发了一个能够在我们的android智能手机上执行简单计算的android应用程序:)我希望您喜欢制作此应用程序,并希望在将来看到更多…。


 2085
2085

 被折叠的 条评论
为什么被折叠?
被折叠的 条评论
为什么被折叠?
 到【灌水乐园】发言


