


animated
学习Android开发 (Learning Android Development)
To make our Android app a look a little more polished, we can add Animated Vector Drawable. The subtle animation would differentiate a great app from an ordinary app.
为了使我们的Android应用看起来更加美观,我们可以添加Animated Vector Drawable 。 微妙的动画将使出色的应用程序与普通的应用程序区分开。
We could programmatically write the Animated Vector Drawable, but that will be tedious. Hence here, we’ll be using https://shapeshifter.design/ to help create one.
我们可以以编程方式编写Animated Vector Drawable,但这将是乏味的。 因此,在这里,我们将使用https://shapeshifter.design/来帮助创建一个。
At the end of this article, you’ll get to create a simple Animated Vector Drawable as shown below.
在本文的结尾,您将创建一个简单的Animated Vector Drawable,如下所示。
使用Shapeshifter设计 (Using Shapeshifter Design)
https://shapeshifter.design/ is a free tool you could use to draw your Animated Vector Drawable, then export it out to your Android Studio.
https://shapeshifter.design/是一个免费工具,可用于绘制Animated Vector Drawable,然后将其导出到Android Studio。

绘制矢量层 (Draw the vector layers)
First, let’s draw the Vector Later. The below consist of 2 layers,
首先,让我们绘制矢量。 以下分为2层,
- The grey border 灰色边框
- The black check 黑色支票

To create the border layer, you need to click on Add Layer. Then in Layer Attribute, do the following
要创建边界层,您需要点击添加层 。 然后在Layer Attribute中 ,执行以下操作
Change the name to
border将名称更改为
borderAdd to pathData
M 0 0 L 0 24 L 24 24 L 24 0 L 0 0(L = line, follow by X, Y coordinate)添加到路径数据
M 0 0 L 0 24 L 24 24 L 24 0 L 0 0(L =线,后跟X,Y坐标)In the strokeColor, change to
#888888(grey color)在strokeColor中 ,更改为
#888888(灰色)In the strokeWidth, change to
2在strokeWidth中 ,更改为
2
To create the check layer, you need to click on Add Layer again. Then in Layer Attribute, do the following
要创建检查层,您需要再次单击添加层 。 然后在Layer Attribute中 ,执行以下操作
Change the name to
check更改名称以
checkAdd to pathData
M 4 12 L 9 18 L 20 7(L = line, follow by X, Y coordinate)添加到路径数据
M 4 12 L 9 18 L 20 7(L =线,后跟X,Y坐标)In the strokeColor, change to
#000000(black color)在strokeColor中 ,更改为
#000000(黑色)In the strokeWidth, change to
2在strokeWidth中 ,更改为
2In the strokeLinecap, change to
Round在strokeLinecap中 ,更改为
Round
将动画添加到Check (Add animation to Check)
In the animateDuration, change the duration from 300ms to 1000ms
在animateDuration中 ,将持续时间从300ms更改为1000ms
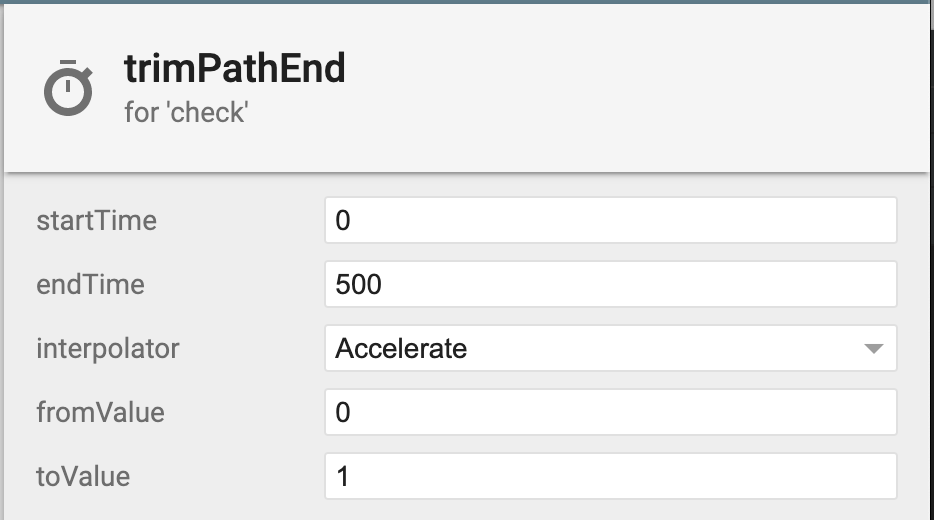
In the check layer, click in the click clock icon to add
trimPathEndAnimation在检查层中,单击“单击时钟”图标以添加
trimPathEnd动画。- After that, click on the Animation (green bar) so the attribute will be shown on the left. Then add the attributes as below. 之后,单击“动画”(绿色条),以便该属性显示在左侧。 然后添加如下属性。
测试动画 (Test the animation)
Just click the play button and see if the animation is what you want.
只需单击播放按钮,看看动画是否是您想要的。
导出可绘制的动画矢量 (Export the Animated Vector Drawable)
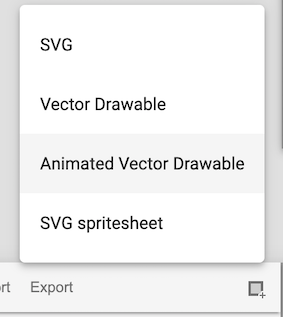
Click on the Export and select the Animated Vector Drawable. Then an avd_anim.xml will be saved to your machine.
单击导出,然后选择Animated Vector Drawable 。 然后avd_anim.xml将保存到您的计算机中。
在Android Studio中加载可绘制动画的矢量 (Load the Animated Vector Drawable in Android Studio)
Now, just copy the avd_anim.xml file into the res/drawable folder of your Android Studio project.
现在,只需将avd_anim.xml文件复制到Android Studio项目的res / drawable文件夹中。
After that, you could then add as the src to your ImageView layout
之后,您可以将src添加为ImageView布局
<ImageView
    android:id="@+id/my_animated_view"
    android:layout_width="200dp"
    android:layout_height="200dp"
    android:src="@drawable/avd_anim" />
As it is Vector Drawable, you could put any width and height you want. If you put
wrap_content, it will be per the size of the Vector Drawable, which in our case is24dp.由于它是Vector Drawable,因此您可以放置任何想要的宽度和高度。 如果放置
wrap_content,它将是Vector Drawable的大小,在我们的例子中是24dp。
In our code, example, we only show the animation upon click, so the code is written as below
在我们的代码示例中,我们仅在单击时显示动画,因此代码编写如下
override fun onCreate(savedInstanceState: Bundle?) {
    super.onCreate(savedInstanceState)
    setContentView(R.layout.activity_main)
    my_animated_view.setOnClickListener {
        animateView(my_animated_view)
    }}
private fun animateView(view: ImageView) {
    when (val drawable = view.drawable) {
        is AnimatedVectorDrawableCompat -> {
            drawable.start()
        }
        is AnimatedVectorDrawable -> {
            drawable.start()        }
    }
}
Now, you’re done!
现在,您完成了!
You can get the code here.
您可以在此处获取代码。
To get more icon animation ideas, check out this link.
要获得更多图标动画的想法,请查看此链接 。
Credit to the below youtube showing how to make the animated vector drawable https://youtu.be/TfiZmzqAMgA.
感谢以下youtube,该视频显示了如何使动画矢量可绘制https://youtu.be/TfiZmzqAMgA 。
Thanks for reading. You can check out my other topics here.
谢谢阅读。 您可以在此处查看我的其他主题。
You can subscribe here or follow me on Medium, Twitter, Facebook, and Reddit for little tips and learning on mobile development, medium writing, etc related topics. ~Elye~
您可以在此处订阅,也可以在Medium , Twitter , Facebook 和 Reddit上关注我,以获取有关移动开发,媒体写作等相关主题的小技巧和学习。 〜艾莉〜
animated


 979
979

 被折叠的 条评论
为什么被折叠?
被折叠的 条评论
为什么被折叠?
 到【灌水乐园】发言


