


api网关调用调用多个服务
Smartphones are used everywhere. Daily usage of smartphones includes entertainment, banking, shopping, videos, images, etc. For smartphones to do many of the things their users request, applications on the smartphone need internet access. Internet access is needed to book movie tickets, order for food, download and watch videos, etc.
智能手机无处不在。 智能手机的日常使用包括娱乐,银行,购物,视频,图像等。为了使智能手机执行用户要求的许多功能,智能手机上的应用程序需要Internet访问。 需要互联网访问才能预订电影票,订购食物,下载和观看视频等。
To develop apps that fetch data from the Internet, you’ll need to know how to make network requests and how to handle the responses properly.
要开发可从Internet获取数据的应用,您需要了解如何发出网络请求以及如何正确处理响应。
One could have wondered how we get data from anywhere in just a click of a button. Say we want to access weather data, we can access the data of any country from anywhere in just a matter of seconds. How is that possible? It’s all thanks to the heroes we call ‘APIs’.
有人可能想知道我们如何只需单击一下按钮就能从任何地方获取数据。 假设我们要访问天气数据,我们可以在几秒钟内从任何地方访问任何国家的数据。 那怎么可能? 这全都归功于我们称之为“ API”的英雄们。
什么是API? (What is an API?)
An application programming interface (API) is a computing interface which defines interactions between multiple software intermediaries. It defines the kinds of calls or requests that can be made, how to make them, the data formats that should be used, the conventions to follow, etc. It can also provide extension mechanisms so that users can extend existing functionality in various ways and to varying degrees — Wikipedia
应用程序编程接口 ( API )是一个计算接口 ,它定义了多个软件中介之间的交互。 它定义了可以进行的调用或请求的类型,如何进行调用,应使用的数据格式,遵循的约定等。它还可以提供扩展机制,以便用户可以通过各种方式扩展现有功能。不同程度上— Wikipedia
Let’s consider this scenario, in which you(client) are in a restaurant. You sit on your table and decide to eat A. You need to call the waiter(API call) and place your order(request) for A. The waiter gets to the kitchen(server) to prepare A and serves(response) A. Now you get your delicious food A(JSON or XML data) and everyone is happy 😂. In this case, your interface between you and the kitchen(Server) is your waiter(API). It’s his responsibility to carry the request from you to the kitchen(Server), make sure it’s getting done, and you know once it is ready he gets back to you as a response(JSON or XML data).
让我们考虑一下这种情况, 您 (客户)在餐厅。 您坐在桌子上决定吃A。您需要致电服务员 (API调用)并下订单 (请求)以获取A。服务员到达厨房 (服务器)准备A并服务 (响应)A。现在,您获得了美味的食物A (JSON或XML数据),每个人都很高兴😂。 在这种情况下,您与厨房( 服务器 )之间的接口就是服务员( API )。 将您的请求传送到厨房( 服务器 )是他的责任,确保已完成,并且您知道一旦准备就绪,他就会作为响应( JSON或XML数据)返回给您。
Going back to our context, you are the client in the need of data and you hit the server with an API call and request for the data. The server will process this request and send back the response to you in JSON or XML format.
回到我们的上下文,您是需要数据的客户端,并且通过API调用和请求数据访问服务器。 服务器将处理此请求,并以JSON或XML格式将响应发送回给您。
We would cover a few things in this article to show the right way in making API network calls.
我们将在本文中介绍一些内容,以显示进行API网络调用的正确方法。
Often, people go with the idea of writing a function to get the data and set the state of a particular variable to the API results in the Views/UI. While this may work, it is not ideal.
通常,人们会想到编写一个函数来获取数据并将特定变量的状态设置为Views / UI中的API结果的想法。 尽管这可能有效,但这并不理想。
We would be creating a simple movie listing app using TMDB API. The application displays popular movies and also shows the movie details. Check here for the application code.
我们将使用TMDB API创建一个简单的电影列表应用程序。 该应用程序显示流行电影,并显示电影详细信息。 在此处查看应用程序代码。
The following items would be covered:
将涵盖以下项目:
- BLOC Architecture BLOC架构
- Network Setup/API calls 网络设置/ API调用
- Repositories and BLoCS 储存库和BLoCS
- UI 用户界面
BLOC架构 (BLOC Architecture)
BLOC gives you a data stream that can be updated by adding new data through streams instead of ViewModel. To learn more about stream, check this article by flutter community.
BLOC为您提供了一个数据流,可以通过通过流而不是ViewModel添加新数据来更新数据流。 要了解有关流的更多信息,请查看Flutter社区的这篇文章 。

开火时间 (Time to fire)
Open your favorite IDE and create a flutter project. You can also create the project from the terminal by running:
打开您喜欢的IDE并创建一个Flutter项目。 您还可以通过运行以下命令从终端创建项目:
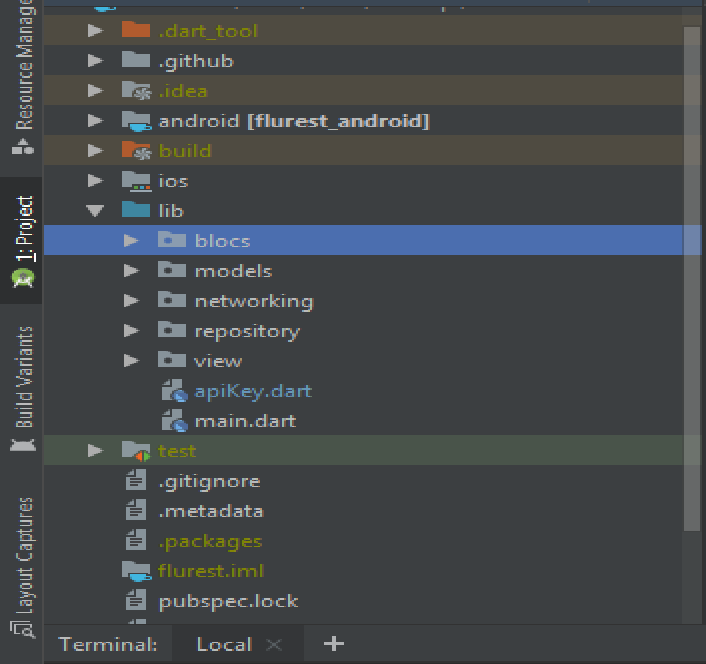
flutter create flurestAfter creating the project we’ll need to set up our packages:Name them “blocs”, “models”, “networking”, “repository” and “view” as shown below. These directory names explain what each one does but if it’s not clear, fear not for it will become more clearer as we get deeper into it. I suggest using this architecture for all your new Flutter projects as you’ll be able to separate and manage all your business logic properly and easily.
创建项目后,我们需要设置我们的软件包:将它们命名为“ blocs”,“ models”,“ networking”,“ repository”和“ view”,如下所示。 这些目录名称说明了每个目录的作用,但是如果不清楚,请担心,随着我们对它的了解,它会变得更加清晰。 我建议对所有新的Flutter项目都使用这种体系结构,因为您将能够正确,轻松地分离和管理所有业务逻辑。
We should also add our dependencies. Since we would be making network calls, our project needs the HTTP library. Open your pubspec.yaml and add the plugin:
我们还应该添加依赖项。 由于我们将进行网络调用,因此我们的项目需要HTTP库。 打开您的pubspec.yaml并添加插件:
name: flurest
description: Making your API calls the right way# The following line prevents the package from being accidentally published to
# pub.dev using `pub publish`. This is preferred for private packages.publish_to: 'none' # Remove this line if you wish to publish to pub.devversion: 1.0.0+1environment:  sdk: ">=2.7.0 <3.0.0"dependencies:
  flutter:
    sdk: flutter
  # The following adds the Cupertino Icons font to your application.
  # Use with the CupertinoIcons class for iOS style icons.
  cupertino_icons: ^0.1.3
  http: ^0.12.1

dev_dependencies:
  flutter_test:
    sdk: flutter
Run flutter packages get or do a “packages get” in Android Studio.
在Android Studio中运行flutter软件包获取或执行“软件包获取”。
网络设置 (Network Setup)
We would be connecting to TMDB API whose URL is in the form http://api.themoviedb.org/3/movie/popular?api_key=“Your_Api_Key”. You can head over to TMDB for an API key. The API churns out popular movies.
我们将连接到URL格式为http://api.themoviedb.org/3/movie/popular?api_key=“Your_Api_Key”的TMDB API 。 您可以前往TMDB获取API密钥。 该API推出了热门电影。
MovieResponse模态类 (MovieResponse modal Class)
We should generate our models from the JSON response.
我们应该从JSON响应中生成模型。

class MovieResponse {
  int totalResults;
  List<Movie> results;MovieResponse({this.page, this.totalResults, this.totalPages, this.results});MovieResponse.fromJson(Map<String, dynamic> json) {
    page = json['page'];
    totalResults = json['total_results'];
    if (json['results'] != null) {
      results = new List<Movie>();
      json['results'].forEach((v) {
        results.add(new Movie.fromJson(v));
      });
    }
  }class Movie {
  int id;
  var voteAverage;
  String title;
  String posterPath;
  String overview;
  String releaseDate;Movie(
      {this.id,
      this.voteAverage,
      this.title,
      this.posterPath,,
      this.overview,
      this.releaseDate});Movie.fromJson(Map<String, dynamic> json) {
    id = json['id'];
    voteAverage = json['vote_average'];
    title = json['title'];
    posterPath = json['poster_path'];
    overview = json['overview'];
    releaseDate = json['release_date'];
  }
}
The above is a basic modal class to hold our movie data.
上面是一个基本的模态类,用于保存我们的电影数据。
API基础助手类 (API Base Helper Class)
For making communication between our Application and API we’ll need three API classes that need some type of HTTP methods to get executed. Let’s dive into the networking directory and create a base API helper class, which will be going to help us communicate with our server.
我们的应用程序和API之间进行通信 ,我们需要的是需要得到执行某种类型的方法的HTTP 3 API类。 让我们进入网络目录并创建一个基本的API帮助器类,它将帮助我们与服务器进行通信。
This helper class contains an HTTP Get method which then can be used by our repository class. In case of applications where you make other forms of request/methods such as “POST”, “DELETE”, “PUT”, you should add them in this helper class.
该帮助器类包含一个HTTP Get方法,然后我们的存储库类可以使用该方法。 如果您要进行其他形式的请求/方法(例如“ POST”,“ DELETE”,“ PUT”) ,则应将它们添加到此帮助器类中 。
import 'dart:io';
import 'package:http/http.dart' as http;
import 'dart:convert';
import 'package:flurest/networking/api_exceptions.dart';
import 'dart:async';class ApiBaseHelper {
  final String _baseUrl = "http://api.themoviedb.org/3/";Future<dynamic> get(String url) async {
    print('Api Get, url $url');
    var responseJson;
    try {
      final response = await http.get(_baseUrl + url);
      responseJson = _returnResponse(response);
    } on SocketException {
      print('No net');
      throw FetchDataException('No Internet connection');
    }
    print('api get recieved!');
    return responseJson;
  }dynamic _returnResponse(http.Response response) {
  switch (response.statusCode) {
    case 200:
      var responseJson = json.decode(response.body.toString());
      print(responseJson);
      return responseJson;
    case 400:
      throw BadRequestException(response.body.toString());
    case 401:
    case 403:
      throw UnauthorisedException(response.body.toString());
    case 500:
    default:
      throw FetchDataException(
          'Error occured while Communication with Server with StatusCode : ${response.statusCode}');
  }
}
In the above helper class, certain exceptions are handled. We are yet to mention exceptions here so why handle them? Every HTTP request on execution returns some type of status codes based on its status. What happens if the request fails? Does our app misbehave? Does our app crash? Not handling such exceptions in-app can lead to poor app rating and usage as your app would behave funny when the request fails.
在上面的帮助程序类中,处理了某些异常。 我们还没有在这里提到异常,那么为什么要处理它们呢? 每个执行的HTTP请求都会根据其状态返回某种类型的状态代码 。 如果请求失败怎么办? 我们的应用行为不当吗? 我们的应用程序崩溃了吗? 如果未在应用内处理此类异常,则可能会导致应用评分和使用情况不佳,因为当请求失败时,您的应用会表现得很滑稽。
We should not worry about the exceptions in the API base helper class as they are custom app exceptions which we are going to create in our next step.
我们不应该担心API基础帮助程序类中的异常,因为它们是我们将在下一步中创建的自定义应用程序异常 。
应用例外 (App Exceptions)
As explained earlier, what happens to our app if the HTTP request fails? Does the app misbehave? acts funny? We don’t want any of these to happen if the request fails hence we are going to handle most of them in our app. For doing so are going to create our custom app exceptions which we can throw based on the response status code.
如前所述,如果HTTP请求失败,我们的应用程序会如何处理? 该应用程序行为不正常吗? 表现有趣吗? 如果请求失败,我们不希望发生任何此类情况,因此我们将在我们的应用程序中处理大多数此类情况。 为此,将创建我们可以根据响应状态代码引发的自定义应用程序异常 。
class AppException implements Exception {
  final _message;
  final _prefix;AppException([this._message, this._prefix]);String toString() {
    return "$_prefix$_message";
  }
}class FetchDataException extends AppException {
  FetchDataException([String message])
      : super(message, "Error During Communication: ");
}class BadRequestException extends AppException {
  BadRequestException([message]) : super(message, "Invalid Request: ");
}class UnauthorisedException extends AppException {
  UnauthorisedException([message]) : super(message, "Unauthorised: ");
}class InvalidInputException extends AppException {
  InvalidInputException([String message]) : super(message, "Invalid Input: ");
}
That is not all to handling the API exceptions. We also have to handle all our API responses on the UI thread. We would do that with an API response class, not a model this time around.
这并不是处理API异常的全部。 我们还必须处理UI线程上的所有API响应。 这次我们将使用API响应类而不是模型来实现。
class ApiResponse<T> {
  Status status;T data;String message;ApiResponse.loading(this.message) : status = Status.LOADING;ApiResponse.completed(this.data) : status = Status.COMPLETED;ApiResponse.error(this.message) : status = Status.ERROR;@override
  String toString() {
    return "Status : $status \n Message : $message \n Data : $data";
  }
}enum Status { LOADING, COMPLETED, ERROR }
What we are doing in the above? We expose all those HTTP errors and exceptions to our UI through a generic class that encloses both the network status and the data coming from the API.
我们在上面做什么? 我们通过一个通用类将所有这些HTTP错误和异常公开给我们的UI,该通用类封装了网络状态和来自API的数据 。
……..there we have it. All networking layers complete. At this point, you may want to go over what we have done.
……..我们有。 所有网络层均已完成。 在这一点上,您可能想回顾一下我们所做的事情。
Up next, are our repository and bloc classes. One can refer to the repository classes as some form of ‘middle-men’ or “gateways” to our data source. Some kind of mediator and abstraction between our UI and API.
接下来是我们的存储库和bloc类。 可以将存储库类称为某种形式的“中间人”或“网关”来访问我们的数据源。 UI和API之间的某种中介和抽象。
We’ll only need 2 repository classes and 2 blocs as we would be hitting 2 endpoints(one for a list of popular movies and the other for the movie detail).
我们只需要2个存储库类和2个块,因为我们将要达到2个端点(一个端点是流行电影的列表,另一个端点是电影的详细信息)。
储存库类 (Repository Class)
As mentioned earlier, we’ll only need 2 repository classes and 2 blocs as we would be hitting 2 endpoints(one for a list of popular movies and the other for the movie detail). The job of the repository is to deliver movie data to the BLoC after fetching it from the API.
如前所述,我们只需要2个存储库类和2个块,因为我们将要达到2个端点(一个端点是流行电影的列表,另一个端点是电影的细节)。 从API提取电影数据后,存储库的工作就是将电影数据传递到BLoC。
Our first repository would be the movie repository
我们的第一个存储库是电影存储库
import 'package:flurest/networking/api_base_helper.dart';
import 'package:flurest/models/movie_response.dart';
import 'package:flurest/apiKey.dart';class MovieRepository {
  final String _apiKey = apiKey;ApiBaseHelper _helper = ApiBaseHelper();Future<List<Movie>> fetchMovieList() async {
    final response = await _helper.get("movie/popular?api_key=$_apiKey");
    return MovieResponse.fromJson(response).results;
  }
}
From the above, we fetch the movie list and pass the response in the format described in the MovieResponse class under our models(movie_response.dart).
从上面的内容中,我们获取电影列表,并以我们的模型(movie_response.dart)下的MovieResponse类中描述的格式传递响应。
Next, we create our movie details repository
接下来,我们创建电影详细信息存储库
import 'package:flurest/networking/api_base_helper.dart';
import 'package:flurest/models/movie_response.dart';
import 'package:flurest/apiKey.dart';class MovieDetailRepository {
  final String _apiKey = apiKey;ApiBaseHelper _helper = ApiBaseHelper();Future<Movie> fetchMovieDetail(int selectedMovie) async {
    final response = await _helper.get("movie/$selectedMovie?api_key=$_apiKey");
    return Movie.fromJson(response);
  }
}
From the above, we fetch the details of a particular movie and pass the response in the format described in the Movie class under our models(movie_response.dart).
从上面的内容中,我们获取特定电影的详细信息,并以我们的模型(movie_response.dart)下的Movie类中描述的格式传递响应。
集团 (BLoC)
BLoC which stands for Business Logic Components represents a stream of events talking to the UI(widgets). The UI widgets get notified by the bloc loading the data if the loading is complete, still being loaded or an error occurred while loading.
BLOC其代表乙 usiness 罗 GICÇomponents表示谈话的UI(小部件)事件流。 如果加载完成,仍在加载或在加载时发生错误,则通过块加载数据来通知UI小部件。
We are going to create 2 blocs for acting according to the various UI events. We would create a movie bloc and a movie detail bloc. Their task is to handle the “fetch movie list” and “fetch movie detail” event, adding the returned data to the Sink which then can be easily listened by our UI with the help of StreamBuilder.
我们将创建2个集团来根据各种UI事件进行操作。 我们将创建一个电影块和一个电影细节块。 他们的任务是处理“ 获取电影列表”和 “ 获取电影详细信息”事件,将返回的数据添加到接收器中,然后在StreamBuilder的帮助下,我们的UI可以轻松地监听到该数据。
We should not forget our API response has 3 states: ‘loading’ which notifies the UI when data is loading, ‘completed’ which notifies the UI when the data has successfully loaded, ‘error’ which notifies the UI that an error occurred while fetching the data.
我们不要忘记我们的API响应具有3种状态:“正在加载”(在加载数据时通知UI),“已完成”(在数据成功加载时通知UI),“错误(Error)”在通知用户获取时发生错误数据 。
movie_bloc.dart
movie_bloc.dart
import 'dart:async';import 'package:flurest/networking/api_response.dart';
import 'package:flurest/repository/movie_repository.dart';import 'package:flurest/models/movie_response.dart';class MovieBloc {
  MovieRepository _movieRepository;StreamController _movieListController;StreamSink<ApiResponse<List<Movie>>> get movieListSink =>
      _movieListController.sink;Stream<ApiResponse<List<Movie>>> get movieListStream =>
      _movieListController.stream;MovieBloc() {
    _movieListController = StreamController<ApiResponse<List<Movie>>>();
    _movieRepository = MovieRepository();
    fetchMovieList();
  }fetchMovieList() async {
    movieListSink.add(ApiResponse.loading('Fetching Movies'));
    try {
      List<Movie> movies = await _movieRepository.fetchMovieList();
      movieListSink.add(ApiResponse.completed(movies));
    } catch (e) {
      movieListSink.add(ApiResponse.error(e.toString()));
      print(e);
    }
  }dispose() {
    _movieListController?.close();
  }
}
movie_detail_bloc.dart
movie_detail_bloc.dart
import 'dart:async';
import 'package:flurest/models/movie_response.dart';
import 'package:flurest/networking/api_response.dart';
import 'package:flurest/repository/movie_detail_repository.dart';class MovieDetailBloc {
  MovieDetailRepository _movieDetailRepository;StreamController _movieDetailController;StreamSink<ApiResponse<Movie>> get movieDetailSink =>
      _movieDetailController.sink;Stream<ApiResponse<Movie>> get movieDetailStream =>
      _movieDetailController.stream;MovieDetailBloc(selectedMovie) {
    _movieDetailController = StreamController<ApiResponse<Movie>>();
    _movieDetailRepository = MovieDetailRepository();
    fetchMovieDetail(selectedMovie);
  }fetchMovieDetail(int selectedMovie) async {
    movieDetailSink.add(ApiResponse.loading('Fetching Details'));
    try {
      Movie details =
          await _movieDetailRepository.fetchMovieDetail(selectedMovie);
      movieDetailSink.add(ApiResponse.completed(details));
    } catch (e) {
      movieDetailSink.add(ApiResponse.error(e.toString()));
      print(e);
    }
  }dispose() {
    _movieDetailController?.close();
  }
}
Cool……… We are almost there. Its time to work on our UI. 😎😎😎
酷…………我们快到了。 是时候在我们的UI上工作了。 😎😎😎
观看次数 (Views)
First, our main.dart file. Here we have a material app with our home set to be the movie screen which shows popular movies.
首先,我们的main.dart文件。 在这里,我们有一个材质应用程序,其主页设置为显示流行电影的电影屏幕。
import 'package:flurest/view/movie_list.dart';
import 'package:flutter/material.dart';void main() => runApp(MyApp());class MyApp extends StatelessWidget {
  // This widget is the root of your application.
  @override
  Widget build(BuildContext context) {
    return MaterialApp(
      debugShowCheckedModeBanner: false,
      title: 'Flurest',
      home: MovieScreen(),
    );
  }
}
It’s preferable to keep all views together hence we would be adding our views in the views directory. We are having 2 views — One for the movie list and the other for movie detail.
最好将所有视图放在一起,因此我们将视图添加到views目录中。 我们有2个视图-一个用于电影列表,另一个用于电影细节。
movie_list.dart
movie_list.dart
import 'package:flurest/blocs/movie_bloc.dart';
import 'package:flurest/models/movie_response.dart';
import 'package:flurest/networking/api_response.dart';
import 'package:flurest/view/movie_detail.dart';
import 'package:flutter/material.dart';class MovieScreen extends StatefulWidget {
  @override
  _MovieScreenState createState() => _MovieScreenState();
}class _MovieScreenState extends State<MovieScreen> {
  MovieBloc _bloc;@override
  void initState() {
    super.initState();
    _bloc = MovieBloc();
  }@override
  Widget build(BuildContext context) {
    return Scaffold(
      appBar: AppBar(
        elevation: 0.0,
        title: Text(
          'Moviez',
          style: TextStyle(
            fontSize: 28,
          ),
        ),
      ),
      body: RefreshIndicator(
        onRefresh: () => _bloc.fetchMovieList(),
        child: StreamBuilder<ApiResponse<List<Movie>>>(
          stream: _bloc.movieListStream,
          builder: (context, snapshot) {
            if (snapshot.hasData) {
              switch (snapshot.data.status) {
                case Status.LOADING:
                  return Loading(loadingMessage: snapshot.data.message);
                  break;
                case Status.COMPLETED:
                  return MovieList(movieList: snapshot.data.data);
                  break;
                case Status.ERROR:
                  return Error(
                    errorMessage: snapshot.data.message,
                    onRetryPressed: () => _bloc.fetchMovieList(),
                  );
                  break;
              }
            }
            return Container();
          },
        ),
      ),
    );
  }@override
  void dispose() {
    _bloc.dispose();
    super.dispose();
  }
}class MovieList extends StatelessWidget {
  final List<Movie> movieList;const MovieList({Key key, this.movieList}) : super(key: key);@override
  Widget build(BuildContext context) {
    return GridView.builder(
      itemCount: movieList.length,
      gridDelegate: SliverGridDelegateWithFixedCrossAxisCount(
        crossAxisCount: 2,
        childAspectRatio: 1.5 / 1.8,
      ),
      itemBuilder: (context, index) {
        return Padding(
          padding: const EdgeInsets.all(8.0),
          child: InkWell(
            onTap: () {
              Navigator.of(context).push(MaterialPageRoute(
                  builder: (context) => MovieDetail(movieList[index].id)));
            },
            child: Card(
              child: Padding(
                padding: const EdgeInsets.all(4.0),
                child: Image.network(
                  'https://image.tmdb.org/t/p/w342${movieList[index].posterPath}',
                  fit: BoxFit.fill,
                ),
              ),
            ),
          ),
        );
      },
    );
  }
}class Error extends StatelessWidget {
  final String errorMessage;final Function onRetryPressed;const Error({Key key, this.errorMessage, this.onRetryPressed})
      : super(key: key);@override
  Widget build(BuildContext context) {
    return Center(
      child: Column(
        mainAxisAlignment: MainAxisAlignment.center,
        children: <Widget>[
          Text(
            errorMessage,
            textAlign: TextAlign.center,
            style: TextStyle(
              color: Colors.red,
              fontSize: 18,
            ),
          ),
          SizedBox(height: 8),
          RaisedButton(
            color: Colors.redAccent,
            child: Text(
              'Retry',
            ),
            onPressed: onRetryPressed,
          )
        ],
      ),
    );
  }
}class Loading extends StatelessWidget {
  final String loadingMessage;const Loading({Key key, this.loadingMessage}) : super(key: key);@override
  Widget build(BuildContext context) {
    return Center(
      child: Column(
        mainAxisAlignment: MainAxisAlignment.center,
        children: <Widget>[
          Text(
            loadingMessage,
            textAlign: TextAlign.center,
            style: TextStyle(
              fontSize: 24,
            ),
          ),
          SizedBox(height: 24),
          CircularProgressIndicator(
            valueColor: AlwaysStoppedAnimation<Color>(Colors.lightGreen),
          ),
        ],
      ),
    );
  }
}
In the above movie list screen, we check the snapshot data status and switch case from LOADING, COMPLETED, ERROR. The data is also updated through Streams and not ViewModel.
在上面的影片列表屏幕中,我们检查快照数据状态并从LOADING,COMPLETED,ERROR切换大小写。 数据也通过Streams而不是ViewModel进行更新。
movie_detail.dart
movie_detail.dart
import 'package:flurest/blocs/movie_detail_bloc.dart';
import 'package:flurest/models/movie_response.dart';
import 'package:flurest/networking/api_response.dart';
import 'package:flutter/material.dart';
import 'dart:ui' as ui;class MovieDetail extends StatefulWidget {
  final int selectedMovie;
  const MovieDetail(this.selectedMovie);@override
  _MovieDetailState createState() => _MovieDetailState();
}class _MovieDetailState extends State<MovieDetail> {
  MovieDetailBloc _movieDetailBloc;@override
  void initState() {
    super.initState();
    _movieDetailBloc = MovieDetailBloc(widget.selectedMovie);
  }@override
  Widget build(BuildContext context) {
    return Scaffold(
      appBar: AppBar(
        elevation: 0.0,
        title: Text(
          'Moviez',
          style: TextStyle(
            fontSize: 20,
          ),
        ),
      ),
      body: RefreshIndicator(
        onRefresh: () =>
            _movieDetailBloc.fetchMovieDetail(widget.selectedMovie),
        child: StreamBuilder<ApiResponse<Movie>>(
          stream: _movieDetailBloc.movieDetailStream,
          builder: (context, snapshot) {
            if (snapshot.hasData) {
              switch (snapshot.data.status) {
                case Status.LOADING:
                  return Loading(loadingMessage: snapshot.data.message);
                  break;
                case Status.COMPLETED:
                  return ShowMovieDetail(displayMovie: snapshot.data.data);
                  break;
                case Status.ERROR:
                  return Error(
                    errorMessage: snapshot.data.message,
                    onRetryPressed: () =>
                        _movieDetailBloc.fetchMovieDetail(widget.selectedMovie),
                  );
                  break;
              }
            }
            return Container();
          },
        ),
      ),
    );
  }@override
  void dispose() {
    _movieDetailBloc.dispose();
    super.dispose();
  }
}class ShowMovieDetail extends StatelessWidget {
  final Movie displayMovie;ShowMovieDetail({Key key, this.displayMovie}) : super(key: key);@override
  Widget build(BuildContext context) {
    return new Scaffold(
      body: Stack(fit: StackFit.expand, children: [
        new Image.network(
          'https://image.tmdb.org/t/p/w342${displayMovie.posterPath}',
          fit: BoxFit.cover,
        ),
        new BackdropFilter(
          filter: new ui.ImageFilter.blur(sigmaX: 5.0, sigmaY: 5.0),
          child: new Container(
            color: Colors.black.withOpacity(0.5),
          ),
        ),
        new SingleChildScrollView(
          child: new Container(
            margin: const EdgeInsets.all(20.0),
            child: new Column(
              children: <Widget>[
                new Container(
                  alignment: Alignment.center,
                  child: new Container(
                    width: 400.0,
                    height: 400.0,
                  ),
                  decoration: new BoxDecoration(
                    borderRadius: new BorderRadius.circular(10.0),
                    image: new DecorationImage(
                        image: new NetworkImage(
                            'https://image.tmdb.org/t/p/w342${displayMovie.posterPath}'),
                        fit: BoxFit.cover),
                    boxShadow: [
                      new BoxShadow(
                          blurRadius: 20.0,
                          offset: new Offset(0.0, 10.0))
                    ],
                  ),
                ),
                new Container(
                  margin: const EdgeInsets.symmetric(
                      vertical: 20.0, horizontal: 0.0),
                  child: new Row(
                    children: <Widget>[
                      new Expanded(
                          child: new Text(
                        displayMovie.title,
                        style: new TextStyle(
                            color: Colors.white,
                            fontSize: 30.0,
                            fontFamily: 'Arvo'),
                      )),
                      new Text(
                        displayMovie.voteAverage.toStringAsFixed(2),
//                      '${widget.movie['vote_average']}/10',
                        style: new TextStyle(
                            color: Colors.white,
                            fontSize: 20.0,
                            fontFamily: 'Arvo'),
                      )
                    ],
                  ),
                ),
                new Text(displayMovie.overview,
                    style:
                        new TextStyle(color: Colors.white, fontFamily: 'Arvo')),
                new Padding(padding: const EdgeInsets.all(10.0)),
                new Row(
                  children: <Widget>[
                    new Expanded(
                        child: new Container(
                      width: 150.0,
                      height: 60.0,
                      alignment: Alignment.center,
                      child: new Text(
                        'Rate Movie',
                        style: new TextStyle(
                            color: Colors.white,
                            fontFamily: 'Arvo',
                            fontSize: 20.0),
                      ),
                      decoration: new BoxDecoration(
                          borderRadius: new BorderRadius.circular(10.0),
                          color: const Color(0xaa3C3261)),
                    )),
                    new Padding(
                      padding: const EdgeInsets.all(16.0),
                      child: new Container(
                        padding: const EdgeInsets.all(16.0),
                        alignment: Alignment.center,
                        child: new Icon(
                          Icons.share,
                          color: Colors.white,
                        ),
                        decoration: new BoxDecoration(
                            borderRadius: new BorderRadius.circular(10.0),
                            color: const Color(0xaa3C3261)),
                      ),
                    ),
                    new Padding(
                        padding: const EdgeInsets.all(8.0),
                        child: new Container(
                          padding: const EdgeInsets.all(16.0),
                          alignment: Alignment.center,
                          child: new Icon(
                            Icons.bookmark,
                            color: Colors.white,
                          ),
                          decoration: new BoxDecoration(
                              borderRadius: new BorderRadius.circular(10.0),
                              color: const Color(0xaa3C3261)),
                        )),
                  ],
                )
              ],
            ),
          ),
        )
      ]),
    );
  }
}class Error extends StatelessWidget {
  final String errorMessage;final Function onRetryPressed;const Error({Key key, this.errorMessage, this.onRetryPressed})
      : super(key: key);@override
  Widget build(BuildContext context) {
    return Center(
      child: Column(
        mainAxisAlignment: MainAxisAlignment.center,
        children: <Widget>[
          Text(
            errorMessage,
            textAlign: TextAlign.center,
            style: TextStyle(
              color: Colors.red,
              fontSize: 18,
            ),
          ),
          SizedBox(height: 8),
          RaisedButton(
            color: Colors.redAccent,
            child: Text(
              'Retry',
              style: TextStyle(
                  ),
            ),
            onPressed: onRetryPressed,
          )
        ],
      ),
    );
  }
}class Loading extends StatelessWidget {
  final String loadingMessage;const Loading({Key key, this.loadingMessage}) : super(key: key);@override
  Widget build(BuildContext context) {
    return Center(
      child: Column(
        mainAxisAlignment: MainAxisAlignment.center,
        children: <Widget>[
          Text(
            loadingMessage,
            textAlign: TextAlign.center,
            style: TextStyle(
              fontSize: 24,
            ),
          ),
          SizedBox(height: 24),
          CircularProgressIndicator(
            valueColor: AlwaysStoppedAnimation<Color>(Colors.lightGreen),
          ),
        ],
      ),
    );
  }
}
Similarly, we check the snapshot data status and switch case from LOADING, COMPLETED, ERROR. The data is also updated through Streams and not ViewModel.
同样,我们检查快照数据状态并从LOADING,COMPLETED,ERROR切换大小写。 数据也通过Streams而不是ViewModel进行更新。
For your API key, you should create the file apiKey.dart in your project tooth containing the following:
对于您的API密钥,您应该在项目牙齿中创建文件apiKey.dart,其中包含以下内容:
String apiKey = "Your_API_Key";And there we have it our app runs 💃💃💃 and should display as shown below:
有了我们的应用程序,它就会运行should并显示如下:


奖金 (Bonus)
While pushing your app to Github, you should not push your API Key. Say, for instance, you are running some GitHub actions to build the application on push or pull request, the application build will surely fail as it can’t find the API key.
在将应用程序推送到Github时,不应推送API密钥。 举例来说,假设您正在运行一些GitHub动作,以根据推或拉请求构建应用程序,则由于找不到API密钥,因此应用程序构建肯定会失败。
So what do you do? GitHub has a service called Secrets. Every repository has its secrets. You should add your API key. That begs the question “how will the application/GitHub actions know where to find the key”.
所以你会怎么做? GitHub有一项名为Secrets的服务。 每个存储库都有其秘密。 您应该添加您的API密钥。 这就引出了一个问题:“应用程序/ GitHub动作将如何知道在哪里找到密钥”。
You should edit your apiKey.dart file to match the below, assuming you saved the secrets as api_key
假设您将机密保存为api_key,则应编辑apiKey.dart文件以使其与以下内容匹配
apiKey.dart
apiKey.dart
import 'dart:io' show Platform;String apiKey = Platform.environment['api_key'];// we comment the previous line our
// String apiKey = "Your_API_KEY";
This way the API key is called an environment variable as all Secrets of a repository are environment variables though they are not available at runtime.
这样,API密钥称为环境变量,因为存储库的所有Secrets都是环境变量,尽管它们在运行时不可用。
By the way, top Flutter engineers around the globe love our tweets and we think you will love them too because we make interesting tweets about Flutter! Want to join our Twitter community? Click the link below
顺便说一下,全球Flutter的顶级工程师都喜欢我们的推文,我们认为您也会喜欢它们,因为我们对Flutter进行了有趣的推文! 想加入我们的Twitter社区吗? 点击下面的链接
其他有用的资源 (Other Useful Resources)
Flutter Stream BasicsHandling Network Calls Like A BossHandling Network Calls Like A Pro In Flutter (Original Concept)
Flutter Stream基础知识 像Boss一样 处理网络呼叫在Flutter中像Pro一样处理网络呼叫 (原始概念)
The complete project can be found below.
完整的项目可以在下面找到。
翻译自: https://medium.com/solidmvp-africa/making-your-api-calls-in-flutter-the-right-way-f0a03e35b4b1
api网关调用调用多个服务


 3099
3099

 被折叠的 条评论
为什么被折叠?
被折叠的 条评论
为什么被折叠?
 到【灌水乐园】发言


