


android辅助功能
This short guideline describes what kind of steps you should perform and what you should expect as a developer if you’re going to support accessibility features and services in your Android app but never thought about that before.
这份简短的指南介绍了如果您要在Android应用中支持辅助功能和服务,但以前从未考虑过,则应该执行哪些步骤以及对开发人员的期望。
分步指南 (Step-by-step guide)
Having an accessibility compliant application is not a trivial task but requires a significant effort from both developer and QA teams. Moreover the final steps imply manual verification by accessibility experts and/or by people with disabilities.
拥有可访问性兼容的应用程序不是一件容易的事,但需要开发人员和质量检查团队的大力投入。 此外,最后步骤意味着由无障碍专家和/或残疾人进行手动验证。
But before that final stage takes place certain steps should be performed to address certain type of issues. That might noticeable reduce cost and boost the process.
但是在最后阶段发生之前,应执行某些步骤以解决某些类型的问题。 这可能会明显降低成本并提高流程。
The process should start with proper static code analysing setup. Then instrumentation test (and probably unit test) should be executed.
该过程应从正确的静态代码分析设置开始。 然后应该执行仪器测试(可能还有单元测试)。
Once the steps above are succeeded the application should be scanned in a semi-automated mode.
成功完成上述步骤后,应以半自动模式扫描应用程序。
The very last step is manual testing which is mandatory for accessibility features.
最后一步是手动测试,这对于可访问性功能是必需的。
This text mainly is about automated/semi-automated tasks.
本文主要涉及自动化/半自动化任务。
1.皮棉验证 (1. Lint verification)
The first step is to check the project using the lint tool to find any accessibility issues the project might have at the moment. While running lint consider to reduce the validation scope to accessibility issues only. The reason is obvious — it’s just save your time.
第一步是使用lint工具检查项目,以查找项目目前可能存在的任何可访问性问题。 运行lint考虑将验证范围缩小到仅可访问性问题。 原因很明显–只是节省您的时间。
At the moment of writing there are five accessibility issues which are verified by lint v 3.2 (http://tools.android.com/tips/lint-checks):
在撰写本文时,lint v 3.2( http://tools.android.com/tips/lint-checks )已验证了五个可访问性问题:
ClickableViewAccessibility— Accessibility in Custom ViewsClickableViewAccessibility自定义视图中的辅助功能ContentDescription— Image without contentDescriptionContentDescription—没有contentDescription的图像KeyboardInaccessibleWidget— Keyboard inaccessible widgetKeyboardInaccessibleWidget—键盘无法访问的小部件LabelFor— Missing labelFor attributeLabelFor—缺少labelFor属性GetContentDescriptionOverride— Overriding getContentDescription() on a ViewGetContentDescriptionOverride—在视图上重写getContentDescription()
Description for every issue can be found at http://tools.android.com/tips/lint-checks. The fixing process can be found below.
有关每个问题的说明,请参见http://tools.android.com/tips/lint-checks 。 固定过程可以在下面找到。
Lint preparation steps
皮棉准备步骤
Before running the lint the must have step is to explore your project to see if certain accessibility issues are suppressed at the moment. So you should check:
在运行lint之前,必须lint的步骤是浏览您的项目,以了解当前是否抑制了某些可访问性问题。 因此,您应该检查:
lint.xml— https://developer.android.com/studio/write/lint#pref. Usually located in the root directory of an Android project. Inspect the file and ensure accessibility checks are not suppressed. For first fast and clean check you can just delete the file.lint.xml— https://developer.android.com/studio/write/lint#pref 。 通常位于Android项目的根目录中。 检查文件,并确保不禁止辅助功能检查。 对于第一次快速和干净的检查,您可以删除文件。lintOptionssection in gradle file — https://developer.android.com/studio/write/lint#gradle. Can be in every module. Ensure accessibility checks are not suppressed or just delete the whole section for fast clean run check.lintOptions文件中的lintOptions部分— https://developer.android.com/studio/write/lint#gradle 。 可以在每个模块中。 确保不禁止辅助功能检查,或只是删除整个部分以进行快速干净运行检查。lint-baseline.xml— https://developer.android.com/studio/write/lint#customize-the-baseline. Also can be found in any module. It will be used by lint iflintOptionssection in gradle file contains baseline command. Ensure the file doesn’t suppress accessibility checks or just delete it as well for the initial clean check.lint-baseline.xml— https://developer.android.com/studio/write/lint#customize-the-baseline 。 也可以在任何模块中找到。 如果gradle文件中的lintOptions部分包含基线命令,它将由lint使用。 确保该文件不会取消可访问性检查,或者仅将其删除以进行初始清除检查。@SuppressLintin *.kt & *.java files. You should perform full text search for the five accessibility issues IDs specified above.@SuppressLint在* .kt&* .java文件。 您应该对上面指定的五个可访问性问题ID进行全文搜索。//noinspectionin *.kt & *.java files. You also should ensure the five accessibility issues IDs are not suppressed.//noinspection在* .kt&* .java文件。 您还应确保不禁止五个可访问性问题ID。tools:ignorein xml files. The same story — run full text search for the five accessibility issues IDs.tools:ignorexml文件。 同一故事-对五个可访问性问题ID进行全文搜索。
So once you’ve found and removed any suppressions for accessibility issues IDs you are good to go with lint verification.
因此,一旦找到并删除了对可访问性问题ID的任何抑制,您就可以进行lint验证。
Running lint
运行皮棉
There are two ways to run lint:
有两种方法可以运行lint:
- Using gradle plugin if you use Android Studio to manage the project or 如果您使用Android Studio管理项目,请使用gradle插件
- Using lint command line if you use anything else 如果使用其他任何工具,请使用lint命令行
The command line way has nice --check switch which allows to specify issue IDs (https://developer.android.com/studio/write/lint#standalone-lint).
命令行方式具有不错的--check开关,它可以指定问题ID( https://developer.android.com/studio/write/lint#standalone-lint )。
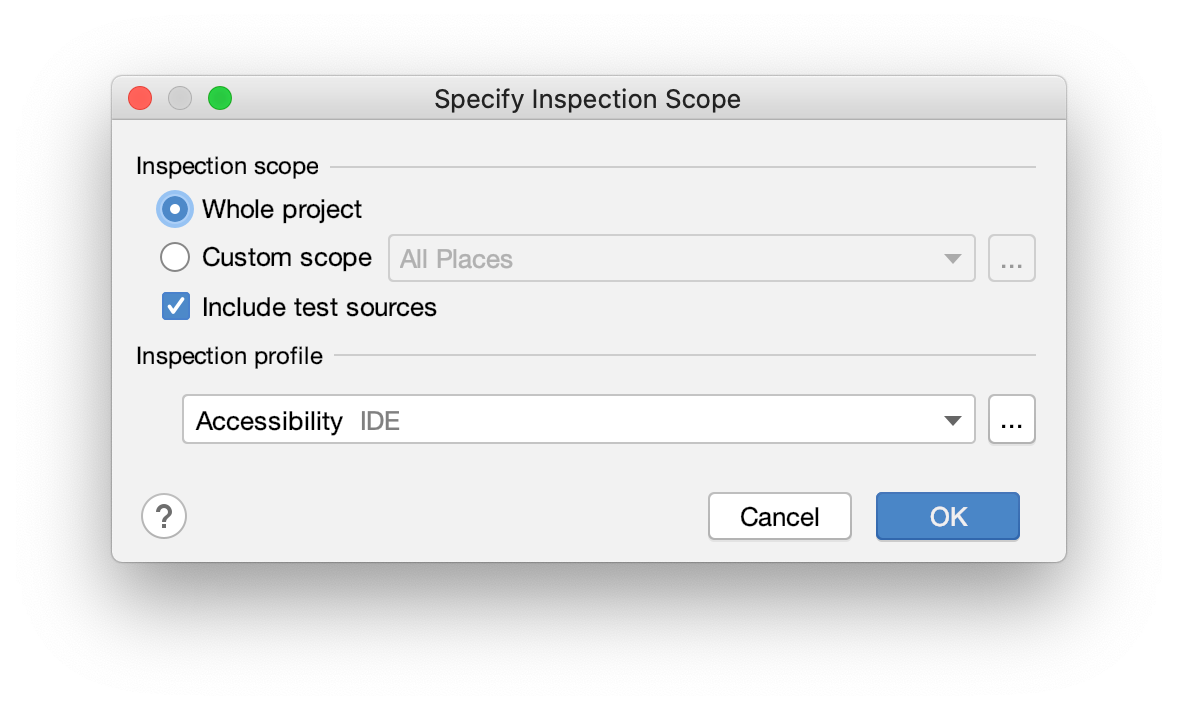
Unfortunately if you’re using Android Studio you can’t populate issue IDs to the ./gradlew lint command. So you have to go to Analyze → Inspect Code and create “Inspection profile” by unchecking everything except Android → Lint → Accessibility:
不幸的是,如果您使用的是Android Studio,则无法将问题ID填充到./gradlew lint命令中。 因此,您必须转到分析→检查代码并通过取消选中除Android→Lint→可访问性以外的所有内容来创建“检查配置文件”:
Then run lint inspection for the whole project:
然后对整个项目运行lint检查:
Fix issues found by lint
修复皮棉发现的问题
It makes sense to address every accessibility issue found during previous step. Otherwise there is a high probability next testing steps will reveal these issues again.
解决上一步中发现的每个可访问性问题都是有意义的。 否则,下一个测试步骤很有可能再次揭示这些问题。
The fixing process is rather trivial but could involve copyright team to provide valid labels/descriptions. As a temporary workaround you might want to use a certain string value as a placeholder for ContentDescription and LabelFor accessibility issues. Consider using @null for android:contentDescription decorative images.
修复过程相当简单,但可能需要版权团队提供有效的标签/说明。 作为临时的解决方法,您可能希望使用某个字符串值作为ContentDescription和LabelFor可访问性问题的占位符。 考虑将@null用于android:contentDescription装饰图像。
The only thing can be tricky is the ClickableViewAccessibility validation. In case onTouchEvent is overridden for swipe action you should analyse the custom widget behaviour to see if it is necessary to trigger performClick or not. If onTouchEvents is overridden to handle a click event just follow guidelines handling custom touch events — https://developer.android.com/guide/topics/ui/accessibility/custom-views.html#custom-touch-events
唯一棘手的是ClickableViewAccessibility验证。 如果对onTouchEvent进行了滑动操作,则应分析自定义窗口小部件行为,以查看是否有必要触发performClick 。 如果重写onTouchEvents来处理单击事件,请遵循处理自定义触摸事件的准则— https://developer.android.com/guide/topics/ui/accessibility/custom-views.html#custom-touch-events
2.仪器和单元测试 (2. Instrumentation and unit tests)
Next step is to integrate accessibility testing into instrumentation Espresso tests if such exist.
下一步是将可访问性测试集成到仪器Espresso测试中(如果存在)。
First the module build.gradle should be updated to include espresso-accessibility artefact:
首先,应该对build.gradle模块进行更新,以包含意式espresso-accessibility伪像:
dependencies {
    androidTestImplementation "androidx.test.espresso:espresso-accessibility:3.2.0"
}
Then global accessibility verification should be enabled according to https://developer.android.com/guide/topics/ui/accessibility/testing#espresso. You want either to update @BeforeClass method of a test class or to modify your subclass of AndroidJUnitRunner.
然后应根据https://developer.android.com/guide/topics/ui/accessibility/testing#espresso启用全局可访问性验证。 您想要更新测试类的@BeforeClass方法或修改AndroidJUnitRunner的子类。
@BeforeClass
fun setup() {
    AccessibilityChecks.enable()
}
There is an option to enable accessibility checking applying setRunChecksFromRootView(true) .
有一个选项可以使用setRunChecksFromRootView(true)启用辅助功能检查。
@BeforeClass
fun setup() {
    AccessibilityChecks.enable().setRunChecksFromRootView(true)           }
Looks like this option should be preferred comparing to just AccessibilityChecks.enable() because if setRunChecksFromRootView(true) is specified the accessibility framework will validate the entire view hierarchy of a screen.
与仅AccessibilityChecks.enable()相比,此选项似乎应该是首选选项,因为如果指定了setRunChecksFromRootView(true)访问性框架将验证屏幕的整个视图层次结构。
For unit tests you can also may want to enable Robolectric for accessibility validation. Since accessibility validation is part of the Robolectric artefact first the build.gradle should be updated:
对于单元测试,您可能还需要启用Robolectric进行辅助功能验证。 由于可访问性验证首先是Robolectric制品的一部分,因此应更新build.gradle :
dependencies {
    testImplementation "org.robolectric:robolectric:4.3.1"
}
Then @AccessibilityChecks annotation should be provided for the test class:
然后应为测试类提供@AccessibilityChecks批注:
@RunWith(RobolectricTestRunner::class)
@AccessibilityChecksclass
MyTest {
}
The result of this step depends on instrumentation tests code coverage for you project.
此步骤的结果取决于项目的工具测试代码覆盖率。
If the previous step “Lint verification” was done well you shouldn’t expect large number of issues during this phase.
如果上一步“皮棉验证”做得很好,那么在此阶段,您不应指望有很多问题。
3.辅助功能扫描器 (3. Accessibility scanner)
The next step is running Accessibility Scanner — https://developer.android.com/guide/topics/ui/accessibility/testing#accessibility-scanner. This step is semi-automated — you should manually specify a screen but the screen is going to be validated automatically.
下一步是运行辅助功能扫描器-https: //developer.android.com/guide/topics/ui/accessibility/testing#accessibility-scanner 。 此步骤是半自动的-您应该手动指定一个屏幕,但是该屏幕将被自动验证。
You have to run the Accessibility Scanner against every screen in your application despite of having complete previous “Instrumentation test” step above. The reason is to cover everything missed:
尽管上面已经完成了之前的“仪器测试”步骤,但是您仍必须在应用程序的每个屏幕上运行辅助功能扫描程序。 原因是涵盖了所有遗漏的内容:
Low contrast issues — https://developer.android.com/guide/topics/ui/accessibility/apps#text-visibility
低对比度问题-https://developer.android.com/guide/topics/ui/accessibility/apps#text-visibility
Touch target size — https://developer.android.com/guide/topics/ui/accessibility/apps#large-controls
触摸目标尺寸-https://developer.android.com/guide/topics/ui/accessibility/apps#large-controls
Duplicate descriptions — https://support.google.com/accessibility/android/answer/7102513
重复说明-https: //support.google.com/accessibility/android/answer/7102513
Link purpose unclear — https://support.google.com/accessibility/android/answer/9663312
链接目的不明确-https: //support.google.com/accessibility/android/answer/9663312
The complete list of issues reported by the Accessibility Scanner can be found here — https://support.google.com/accessibility/android/answer/6376559. Some of the issues would just duplicate what can be found by lint and by Espresso and Robolectric frameworks but others seems to be unique. So it makes sense to fix or suppress issues found in previous steps before running the Accessibility Scanner.
可在此处找到辅助功能扫描器报告的问题的完整列表-https: //support.google.com/accessibility/android/answer/6376559 。 有些问题只会重复lint ,Espresso和Robolectric框架所能找到的问题,而其他问题似乎是独一无二的。 因此,有必要在运行“辅助功能扫描程序”之前修复或抑制先前步骤中发现的问题。
4.发布前报告 (4. Pre-launch report)
You may also want to inspect pre-launch report — https://developer.android.com/guide/topics/ui/accessibility/testing#pre-launch-report. It’s being generated once new version of the app is uploaded to Play Store.
您可能还需要检查发布前的报告— https://developer.android.com/guide/topics/ui/accessibility/testing#pre-launch-report 。 新版本的应用程序上传到Play商店后,就会生成它。
Under the hood it uses the Accessibility Scanner described in the previous step. But since it happens during monkey testing when random screens are shown there is a chance it would report anything missed during step #3.
在引擎盖下,它使用上一步中描述的辅助功能扫描程序。 但是由于这是在猴子测试期间发生的,显示了随机屏幕,因此有机会报告步骤3中遗漏的任何内容。
5.手动测试 (5. Manual testing)
Automation tools should be considered as initial verification steps. Take into account the following:
自动化工具应被视为初始验证步骤。 请考虑以下因素:
- Automated tests can’t detect every potential accessibility issue. For example screen rotation and hover trap issues might not be reported by automation tools 自动化测试无法检测到每个潜在的可访问性问题。 例如,自动化工具可能未报告屏幕旋转和悬停陷阱问题
- Automated tests depend on code coverage 自动化测试取决于代码覆盖率
According to experts the manual testing is the must have step. Because the task is specific one the verification should be performed by experts and/or by impaired persons.
据专家介绍,手动测试是必须采取的步骤。 由于该任务是一项特定的任务,因此应由专家和/或残障人士执行验证。
翻译自: https://medium.com/@artour.bakiev/accessibility-testing-for-android-apps-how-to-start-ce7c09628743
android辅助功能


 2067
2067

 被折叠的 条评论
为什么被折叠?
被折叠的 条评论
为什么被折叠?
 到【灌水乐园】发言


