


API development has become an integral part of any web development. API’s are the ones which decouple the server and the client. With the advent of REST APIs, it has become more common to consume JSON response on the UI side. You can enable CORS and even make cross-domain requests as well. Most of the time the same person doesn’t build or work on them. It’s very difficult for the frontend team to consume the APIs that don’t have proper documentation.
API开发已成为任何Web开发的组成部分。 API是使服务器和客户端脱钩的API。 随着REST API的出现,在UI端使用JSON响应已变得越来越普遍。 您可以启用CORS,甚至还可以发出跨域请求。 在大多数情况下,同一个人不会建立或工作于他们。 对于前端团队来说,使用没有适当文档的API非常困难。
So, it’s very important to write documentation for your APIs so that whoever consumes those understand them, implement them, and play around with them. Swagger simplifies API development for users, teams, and enterprises with the Swagger open source and professional toolset.
因此,为您的API编写文档非常重要,以便任何使用这些API的人都可以理解,实现和使用它们。 Swagger通过Swagger开源和专业工具集简化了用户,团队和企业的API开发。
In this post, we will see how we can use Swagger with the Nodejs REST API (Typescript Version) with an example project.
在本文中,我们将通过示例项目了解如何将Swagger与Nodejs REST API(Typescript版本)一起使用。
Prerequisites
先决条件
Example Project
示例项目
Implementation
实作
Demo
演示版
Summary
摘要
Conclusion
结论
先决条件 (Prerequisites)
There are some prerequisites you need to know before starting this project. You should install nodejs on your machine to run it on your machine. You need to know about nodemon for the development environment.
开始此项目之前,您需要了解一些先决条件。 您应该在计算机上安装nodejs才能在计算机上运行它。 您需要了解有关开发环境的nodemon。
npm install nodemon --save-dev
npm install swagger-jsdoc swagger-ui-express --save
npm install @types/swagger-ui-express @types/swagger-jsdoc --save-dev
示例项目 (Example Project)
This is a simple example nodejs API which has 4 API calls. This is a simple todo application where you can add, edit, delete, and update some tasks. Here is the complete example with swagger documentation.
这是一个简单的示例nodejs API,具有4个API调用。 这是一个简单的待办事项应用程序,您可以在其中添加,编辑,删除和更新某些任务。 这是swagger文档的完整示例。
Here is the Github link where you can clone and run it on your machine.
这是Github链接,您可以在其中链接并在计算机上运行它。
// clone the project
git clone https://github.com/bbachi/nodejs-api-typescript-swagger.git// install and run the project
npm install
npm run dev
实作 (Implementation)
Let’s see how we can add swagger docs to the Nodejs REST API. Consider the below Rest API with 4 HTTP operations post, get, delete, and put. Let’s see how we can convert this to the Typescript version.
让我们看看如何将大量文档添加到Nodejs REST API。 考虑以下带有4个HTTP操作post,get,delete和put的Rest API。 让我们看看如何将其转换为Typescript版本。
const express = require('express');
const path = require('path');
const app = express(),
      bodyParser = require("body-parser"),
      fs = require('fs'),
      port = 3080;


// place holder for the data
const tasks = [
  {
    id: 1,
    task: 'task1',
    assignee: 'assignee1000',
    status: 'completed'
  },
  {
    id: 2,
    task: 'task2',
    assignee: 'assignee1001',
    status: 'completed'
  },
  {
    id: 3,
    task: 'task3',
    assignee: 'assignee1002',
    status: 'completed'
  },
  {
    id: 4,
    task: 'task4',
    assignee: 'assignee1000',
    status: 'completed'
  },

];


app.use(bodyParser.json());


app.get('/api/todos', (req, res) => {
  console.log('api/todos called!!!!!')
  res.json(tasks);
});


app.post('/api/todo', (req, res) => {
   const task = req.body.task;
   tasks.push(task);
   res.json(tasks);
})


app.delete('/api/todo/:id', (req, res) => {
  console.log("Id to delete:::::", req.params.id)
  tasks = tasks.filter(task => task.id != req.params.id);
  res.json(tasks);
})


app.put('/api/todo', (req, res) => {
  const taskToUpdate = req.body.task;
  tasks = tasks.map(task => {
    if (task.id === taskToUpdate.id) task = taskToUpdate;
    return task;
});
  res.json(tasks);
});


app.get('/', (req,res) => {
  res.send(`<h1>API Running on port ${port}</h1>`);
});


app.listen(port, () => {
    console.log(`Server listening on the port::::::${port}`);
});
The first thing we need to do is to install swagger related dependencies with the following command. We need to install types as well since we are implementing a typescript version.
我们需要做的第一件事是使用以下命令安装与swagger相关的依赖项。 由于我们正在实现打字稿版本,因此我们也需要安装类型。
npm install swagger-ui-express swagger-jsdoc --save
npm install @types/swagger-ui-express @types/swagger-jsdoc --save
You need to define the routes and task files separately as below. Routes contain all the route information and it loads appropriate files based on the path.
您需要分别定义路由和任务文件,如下所示。 路由包含所有路由信息,并根据路径加载适当的文件。
import * as express from "express";
import { Logger } from "../logger/logger";
import Task from "./task";


class Routes {


    public express: express.Application;
    public logger: Logger;


    // array to hold users
    public users: any[];


    constructor() {
        this.express = express();
        this.routes();
        this.logger = new Logger();
    }


    private routes(): void {


        // user route
        this.express.use("/", Task);
    }
}


export default new Routes().express;
There are two things you need to understand before implementing swagger docs to your REST API.
在将svagger文档实现到REST API之前,需要了解两点。
Swagger.json (Swagger.json)
The first thing is to add the file swagger.json to define the operations. You can define schemas for the request and response objects, you can define in parameters and body and descriptions of each Http operation, etc. You need to convert the following JSON file into js you can do that with the following line.
第一件事是添加文件swagger.json来定义操作。 您可以为请求和响应对象定义模式,可以在参数和正文以及每个Http操作的描述中进行定义,等等。您需要将以下JSON文件转换为js,然后可以通过以下代码行进行操作。
private swaggerDocument = JSON.parse(this.swaggerData);{
"swagger": "2.0",
"info": {
"description": "This is a simple example NodeJS API project to demonstrate Swagger Documentation",
"version": "1.0.0",
"title": "Tasks API",
"contact": {
"email": "abc@gmail.com"
},
"license": {
"name": "Apache 2.0",
"url": "http://www.apache.org/licenses/LICENSE-2.0.html"
}
},
"schemes": ["http"],
"host": "localhost:3080",
"basePath": "/api",
"paths" : {
"/todos" : {
"get" : {
"summary" : "Get all the tasks",
"description": "Get all the tasks",
"produces": ["application/json"],
"parameters": [],
"responses": {
"200": {
"description": "successful operation",
"schema": {
"type": "array",
"items": {
"$ref": "#/definitions/todosResponse"
}
}
},
"400": {
"description": "Invalid status value",
"schema": {
"$ref": "#/definitions/InvalidResponse"
}
}
}
}
},
"/todo" : {
"post" : {
"summary" : "Save the task",
"description": "Save the task",
"produces": ["application/json"],
"consumes": ["application/json"],
"parameters": [
{
"in": "body",
"name": "body",
"description": "task object",
"required": true,
"schema": {
"type": "object",
"properties": {
"task" : {
"type": "object",
"$ref": "#/definitions/Task"
}
}
}
}
],
"responses": {
"200": {
"description": "successful operation",
"schema": {
"type": "array",
"items": {
"$ref": "#/definitions/todosResponse"
}
}
},
"400": {
"description": "Invalid status value",
"schema": {
"$ref": "#/definitions/InvalidResponse"
}
}
}
}
},
"/todos/{id}" : {
"put" : {
"summary" : "Update the tasks",
"description": "Update the tasks",
"produces": ["application/json"],
"parameters": [
{
"name": "id",
"in": "path",
"description": "task id that needs to be deleted",
"required": true,
"type": "string"
},
{
"in": "body",
"name": "body",
"description": "task object",
"required": true,
"schema": {
"type": "object",
"properties": {
"task" : {
"type": "object",
"$ref": "#/definitions/Task"
}
}
}
}
],
"responses": {
"200": {
"description": "successful operation",
"schema": {
"type": "array",
"items": {
"$ref": "#/definitions/todosResponse"
}
}
},
"400": {
"description": "Invalid status value",
"schema": {
"$ref": "#/definitions/InvalidResponse"
}
}
}
}
},
"/todo/{id}" : {
"delete" : {
"summary" : "Delete the task",
"description": "Delete the task",
"produces": ["application/json"],
"parameters": [
{
"name": "id",
"in": "path",
"description": "task id that needs to be deleted",
"required": true,
"type": "string"
}
],
"responses": {
"200": {
"description": "successful operation",
"schema": {
"type": "array",
"items": {
"$ref": "#/definitions/todosResponse"
}
}
},
"400": {
"description": "Invalid status value",
"schema": {
"$ref": "#/definitions/InvalidResponse"
}
}
}
}
}
},
"definitions": {
"todosResponse": {
"type": "object",
"properties": {
"id": {
"type": "integer"
},
"task": {
"type": "string"
},
"assignee": {
"type": "string"
},
"status": {
"type": "string"
}
}
},
"Task": {
"type": "object",
"properties": {
"task": {
"type": "string"
},
"assignee": {
"type": "string"
},
"status": {
"type": "string"
}
}
},
"InvalidResponse": {
"type": "object",
"properties": {
"statusCode": {
"type": "string"
},
"message": {
"type": "string"
}
}
}
}
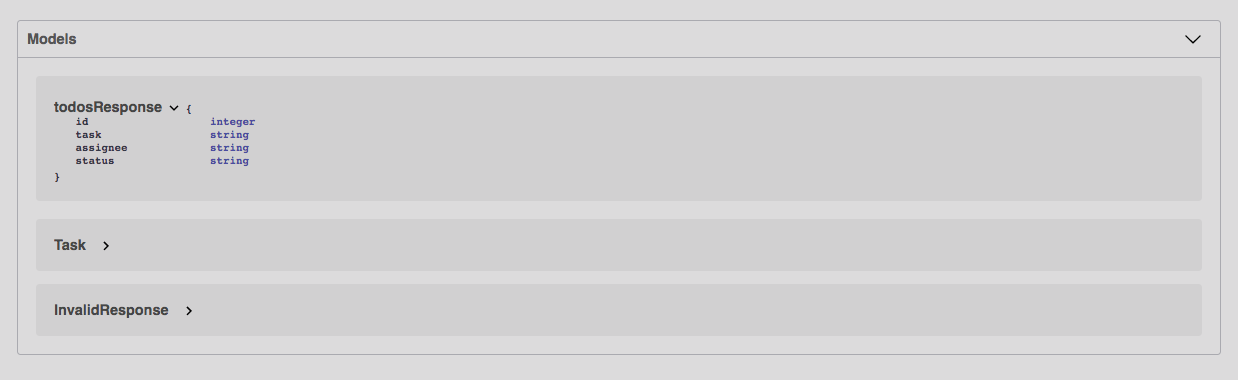
}You can actually see the schemas as well in the swagger page of the Nodejs Rest API.
实际上,您还可以在Nodejs Rest API的醒目的页面中看到这些架构。
自定义CSS (Custom CSS)
You can have your own custom CSS for your swagger docs Rest API. You need to define the swagger.css file where you can put all your CSS that can be applied to the Swagger page.
您可以为庞大的文档Rest API使用自己的自定义CSS。 您需要定义swagger.css文件,您可以在其中放置所有可以应用于Swagger页面CSS。
body {
background-color: #e0e0e0
}
.swagger-ui .topbar {
background-color: rgb(65, 26, 238);
}
.swagger-ui .info .base-url {
font-size: 25px;
}
.swagger-ui .markdown p {
font-size: 40px;
}
.swagger-ui .btn.execute {
background-color: green;
}
.swagger-ui button {
background: orange;
}
.swagger-ui .scheme-container {
background-color: rgb(238, 176, 61);
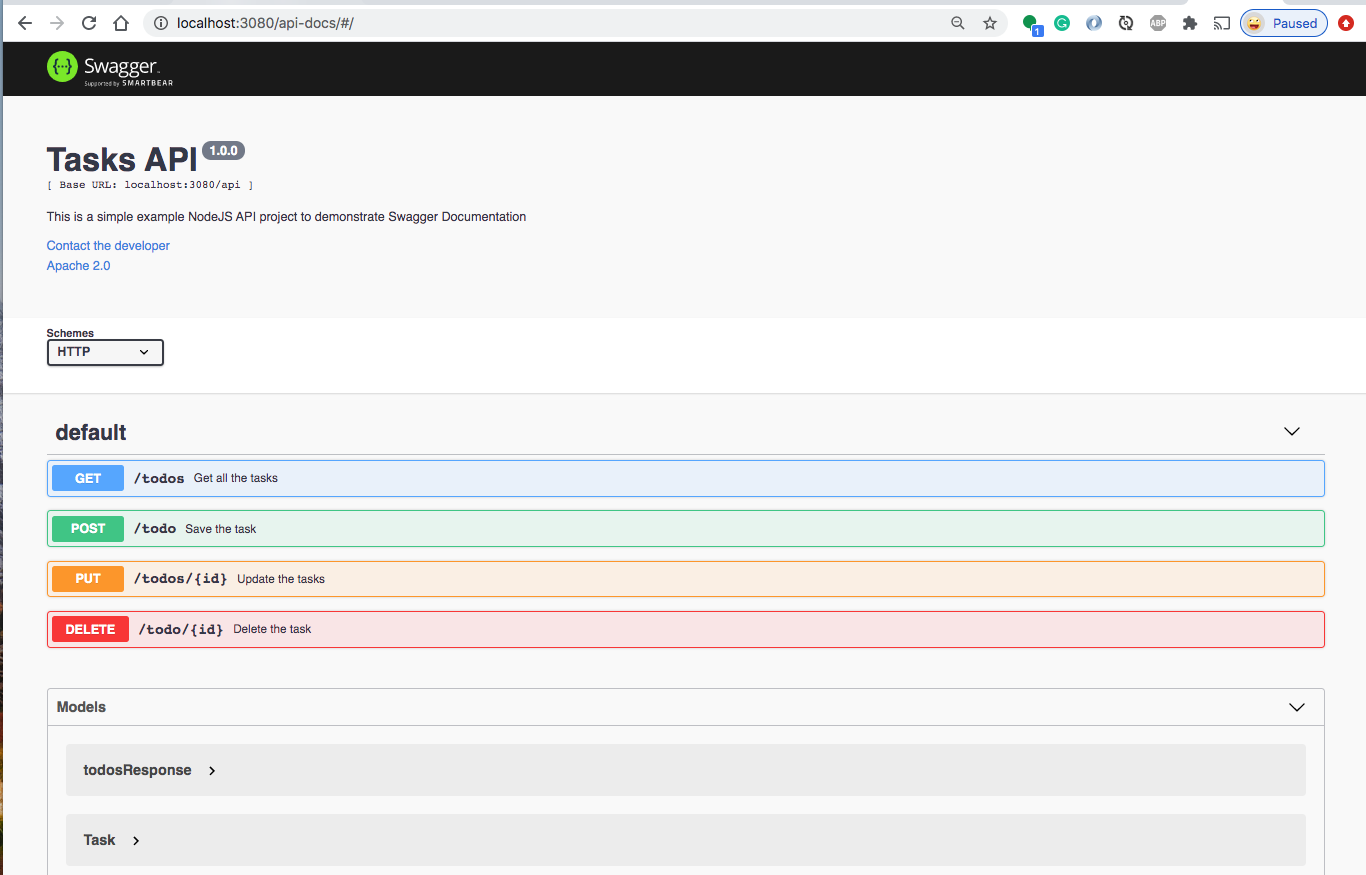
}Without CSS the swagger screen looks like this.
如果没有CSS,那么屏幕就会像这样。
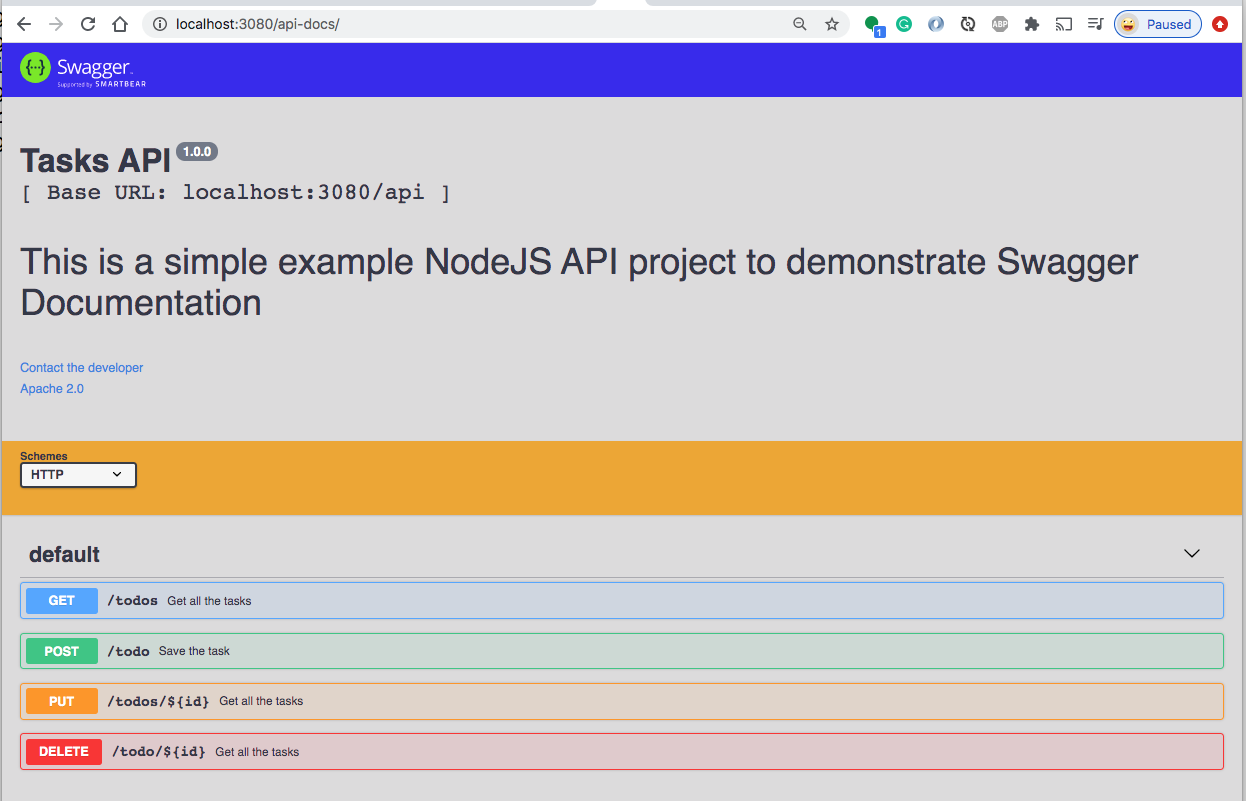
With custom CSS the swagger screen looks like this.
使用自定义CSS时,屏幕显示如下。
Once you have the these files swagger.json and swagger.css in place, it’s time to add the swagger related code in the server.js.
将这些文件swagger.json和swagger.css放置到位后,就该在server.js中添加与swagger相关的代码了。
// import the sagger lib
import swaggerUi = require('swagger-ui-express');/* Swagger files start */private swaggerFile: any = (process.cwd()+"/swagger/swagger.json");
private swaggerData: any = fs.readFileSync(this.swaggerFile, 'utf8');
private customCss: any = fs.readFileSync((process.cwd()+"/swagger/swagger.css"), 'utf8');private swaggerDocument = JSON.parse(this.swaggerData);/* Swagger files end */
Here is the complete app.ts file
这是完整的app.ts文件
import * as bodyParser from "body-parser";
import * as express from "express";
import { Logger } from "./logger/logger";
import Routes from "./routes/routes";
import swaggerUi = require('swagger-ui-express');
import fs = require('fs');


class App {


    public express: express.Application;
    public logger: Logger;


    // array to hold users
    public users: any[];


     /* Swagger files start */
     private swaggerFile: any = (process.cwd()+"/swagger/swagger.json");
     private swaggerData: any = fs.readFileSync(this.swaggerFile, 'utf8');
     private customCss: any = fs.readFileSync((process.cwd()+"/swagger/swagger.css"), 'utf8');
     private swaggerDocument = JSON.parse(this.swaggerData);
     /* Swagger files end */


    constructor() {
        this.express = express();
        this.middleware();
        this.routes();
        this.users = [];
        this.logger = new Logger();
    }


    // Configure Express middleware.
    private middleware(): void {
        this.express.use(bodyParser.json());
        this.express.use(bodyParser.urlencoded({ extended: false }));
    }


    private routes(): void {


        this.express.get("/", (req, res, next) => {
            res.send("API Works!!!!!");
        });


        // user route
        this.express.use("/api", Routes);


        // swagger docs
        this.express.use('/api/docs', swaggerUi.serve,
            swaggerUi.setup(this.swaggerDocument, null, null, this.customCss));


        // handle undefined routes
        this.express.use("*", (req, res, next) => {
            res.send("Make sure url is correct!");
        });
    }
}


export default new App().express;
You can start the project in the development environment with the following command.
您可以使用以下命令在开发环境中启动项目。
npm run start:dev演示版 (Demo)
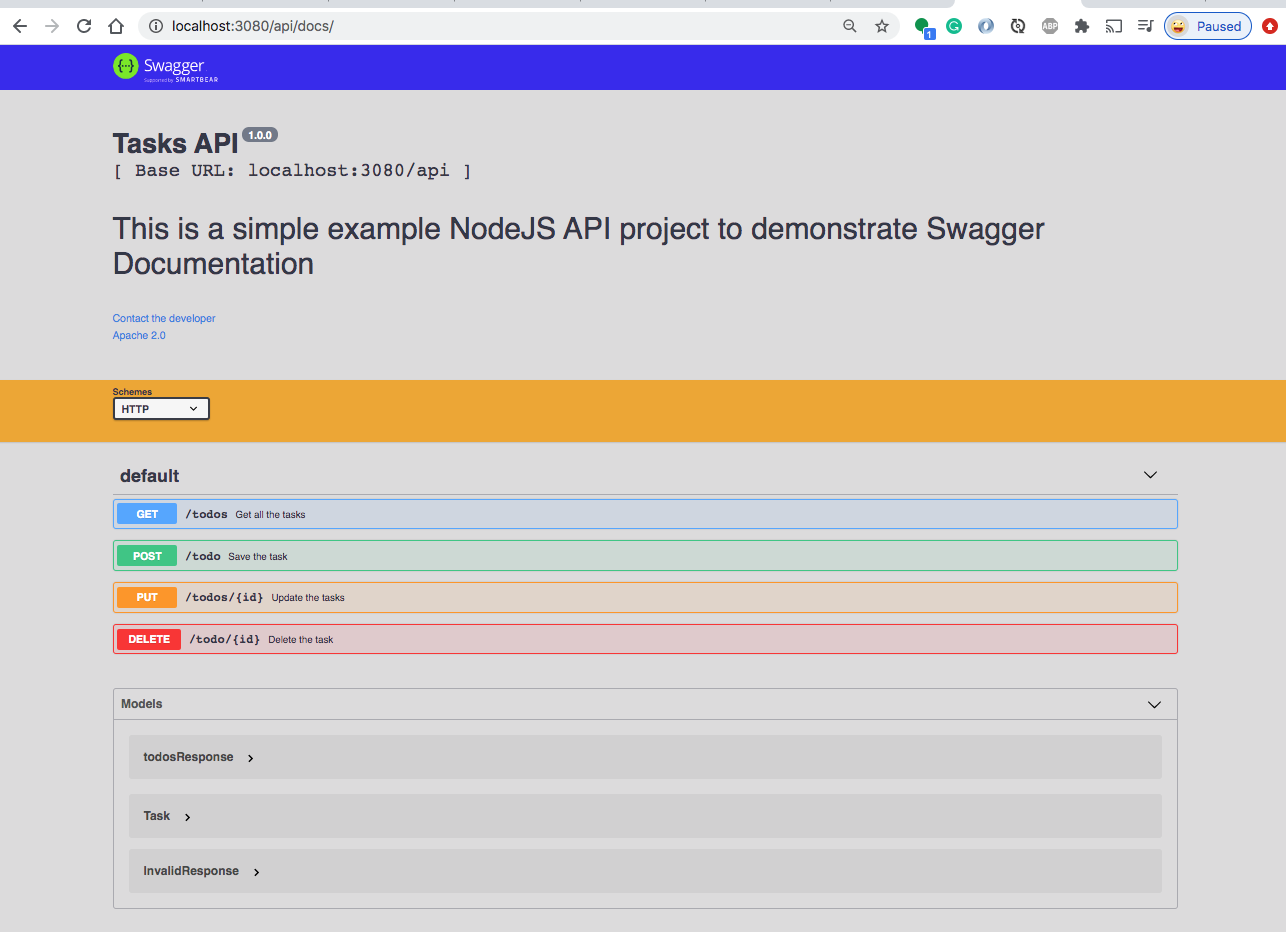
Here is the complete demo where you can execute all the calls through the swagger docs. You can access the swagger page with this URL http://localhost:3080/api-docs/
这是完整的演示,您可以在其中通过swagger文档执行所有调用。 您可以使用以下URL访问招摇页面http:// localhost:3080 / api-docs /

摘要 (Summary)
- API development has become an integral part of any web development. API’s are the ones which decouple the server and the client. API开发已成为任何Web开发的组成部分。 API是使服务器和客户端脱钩的API。
- It’s very important to write documentation for your APIs so that whoever consumes those understand them, implement them, and play around with them. 为您的API编写文档非常重要,以便任何使用这些API的人都可以理解,实现和使用它们。
- Swagger simplifies API development for users, teams, and enterprises with the Swagger open source and professional toolset. Swagger通过Swagger开源和专业工具集简化了用户,团队和企业的API开发。
You can define all the operations in the file
swagger.json.You can also write this file in the YAML format.您可以在文件
swagger.json.定义所有操作swagger.json.您也可以使用YAML格式写入此文件。- Make sure you convert the JSON file with the JSON.parse(), otherwise, you get the parsing error. 确保使用JSON.parse()转换JSON文件,否则,将收到解析错误。
- You can have your custom CSS for your swagger page. You can define that CSS in any file. You need to pass this file in the options object. 您可以为您的招摇页面使用自定义CSS。 您可以在任何文件中定义该CSS。 您需要在options对象中传递此文件。
You can find the full documentation here.
You can find the reference for your swagger.json here.
您可以在此处找到swagger.json的参考。
结论 (Conclusion)
Always document your APIs so that it can be easy to test and it’s easy for others to understand your API well and test it as well. Swagger simplifies API development for users, teams, and enterprises with the Swagger open source and professional toolset.
始终记录您的API,以便易于测试,其他人也容易理解您的API并对其进行测试。 Swagger通过Swagger开源和专业工具集简化了用户,团队和企业的API开发。


 被折叠的 条评论
为什么被折叠?
被折叠的 条评论
为什么被折叠?
 到【灌水乐园】发言


