


Share your python library to contribute more to the open-source world!
分享您的python库,为开源世界做出更多贡献!
Creating your own Python library could be a fun project that you could do to impress your future employer or to impress your fellow Python nerds. It also could be a more noble reason, like helping programmers with a particular task.
创建自己的Python库可能是一个有趣的项目,您可以打动您未来的雇主或打动您的Python书呆子。 这也可能是一个更为崇高的原因,例如帮助程序员完成特定任务。
For whatever reason it is, it’s definitely a fun project to work on which will give you a better understanding of how these libraries function.
无论出于何种原因,这绝对是一个有趣的项目,可让您更好地了解这些库的功能。
从GitHub存储库开始 (Starting with a GitHub Repository)
First, of all go to your GitHub account and login. If you don’t have one then it’s about time you make one.
首先,首先转到您的GitHub帐户并登录。 如果您没有,那您该做一个了。

Go to that “+” icon and create a new repository.
转到该“ +”图标并创建一个新的存储库。


Go to the repository you just created and press the Code section. There you will find the repository address that you need to copy.
转到刚刚创建的存储库,然后按“ 代码”部分。 在这里,您将找到需要复制的存储库地址。
克隆到本地设备 (Clone To Your Local Device)
Now you need to clone the repository to your computer and start setting up your library’s necessary files.
现在,您需要将存储库克隆到计算机,然后开始设置库的必要文件。

Open up a terminal and execute this command on your desired location.
打开终端并在所需位置执行此命令。
git clone <your repository address>设置必要的文件 (Setting Up The Necessary Files)

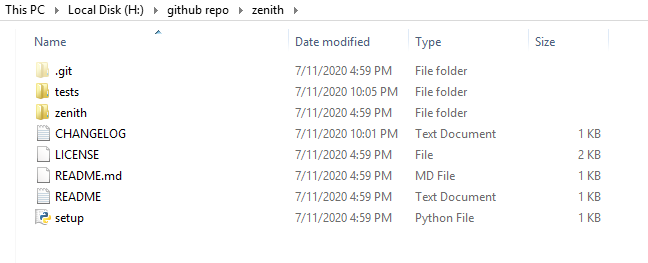
You will already have a LICENSE and README.md inside your repository. You need to make the rest of the folders and files by yourself.
您的存储库中已经有了LICENSE和README.md 。 您需要自己制作其余的文件夹和文件。
Creating the tests folder is optional. Its mainly used to unit test your code which is a very good programming practice and industry standards. Even if you create one you can leave it empty for now.
创建测试文件夹是可选的。 它主要用于对您的代码进行单元测试,这是一种很好的编程习惯和行业标准。 即使您创建了一个,也可以暂时将其保留为空。
Then make folder the same name as your repository eg. name of your library. In my case, my library name is zenith, so I created a folder named zenith.
然后,使文件夹与您的存储库名称相同,例如。 您的图书馆名称。 就我而言,我的库名是zenith ,所以我创建了一个名为zenith的文件夹。
Inside the folder make a python file name __init__.py and leave it empty. Now you can add the more python files there which will work as your library’s functions. For my case, I added a file called overlap_grid.py.
在文件夹内创建一个python文件名__init__.py,并将其保留为空。 现在,您可以在其中添加更多的python文件,这些文件将用作库的功能。 就我而言,我添加了一个名为overlay_grid.py的文件。

CHANGELOG.txt is used to document the changes you did in each version update. Since it is our first version we can leave it empty.
CHANGELOG.txt用于记录您在每个版本更新中所做的更改。 由于这是我们的第一个版本,我们可以将其留空。
Both the README files are just to write down instructions, functionalities, or other stuff about your library. README.md contents will be shown on your GitHub repository.
这两个README文件都只是用来写下有关您的库的说明,功能或其他内容。 README.md内容将显示在您的GitHub存储库中。
However, README.txt contents will be shown on the site we are going to upload our library e.g. PyPi’s website.
但是, README.txt内容将显示在我们要上载库的网站上,例如PyPi的网站。
import setuptools


with open("README.md", "r") as fh:
    long_description = fh.read()


setuptools.setup(
    name="zenith",
    version="0.0.1",
    author="Ovi Paul",
    author_email="ovipaulcs@gmail.com",
    description="A library with various functionality that can be useful in the processing of data in machine learning, computer vision, data science etc.",
    # long_description=long_description,
    long_description_content_type="text/markdown",
    long_description=open('README.txt').read() + '\n\n' + open('CHANGELOG.txt').read(),
    url="https://github.com/ovipaul/zenith",
    packages=setuptools.find_packages(),
    classifiers=[
        "Programming Language :: Python :: 3",
        "License :: OSI Approved :: MIT License",
        "Operating System :: OS Independent",
    ],
    python_requires='>=3.6',
)
Finally, we need to create our setup.py and paste all of this content inside. You can find the link for code here. Change the name and give your library name along with the author and author's email. You can leave out the descriptions for now. Set the URL to your GitHub repository.
最后,我们需要创建setup.py并将所有这些内容粘贴到其中。 您可以在此处找到代码的链接。 更改名称,并提供您的图书馆名称以及作者和作者的电子邮件。 您现在可以省略描述。 将URL设置为您的GitHub存储库。
生成分发包并上传 (Generate Distribution Package & Upload)
Make an account on PyPI where we will upload our library. All the libraries we download using pip are all hosted there.
在PyPI上创建一个帐户,我们将在该帐户上载我们的库。 我们使用pip下载的所有库都托管在该库中。
Then we come back to our main directory and open up our terminal set to this location. Now we just need to execute a bunch of commands to build our library.
然后,我们回到主目录并在此位置打开终端机。 现在,我们只需要执行一堆命令即可构建我们的库。
python -m pip install --user --upgrade setuptools wheelThis will install the latest version of setuptools and wheel which is needed to generate distribution packages.
这将安装生成发行包所需的最新版本的setuptools和wheel。
python setup.py sdist bdist_wheel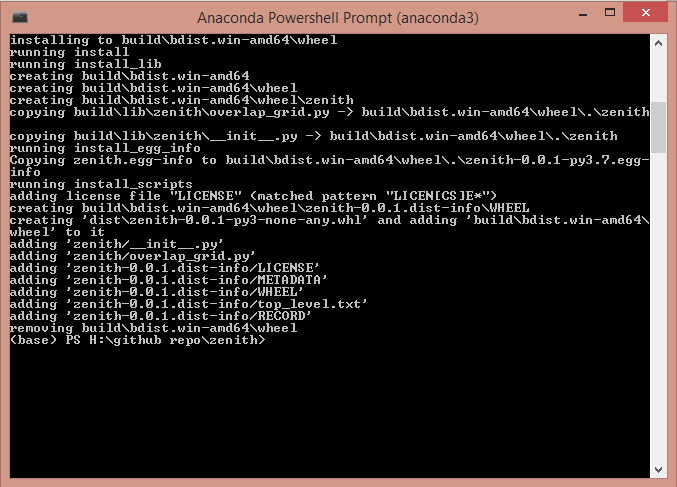
This command will generate the distribution packages.
此命令将生成分发程序包。
python -m pip install --user --upgrade twineNow we have to install the latest version of twine which is used to upload a package to PyPI.
现在,我们必须安装最新版本的twine,该绳索用于将软件包上传到PyPI。
python -m twine upload dist/*
Give your PyPi account’s username and password and your library will be successfully uploaded on the PyPi site.
输入您的PyPi帐户的用户名和密码,您的媒体库将成功上传到PyPi网站上。
给自己一个拍拍背面! (Give Yourself A Pat On The Back!)
After uploading your library, go to the PyPi’s homepage and you will be able to see your published library in the new releases.
上载库后,转到PyPi的主页,您将可以在新版本中查看已发布的库。

Congratulations on your very first Python library! Now you can install your own library using pip on your computer.
祝贺您第一个Python库! 现在,您可以在计算机上使用pip安装自己的库。
You can find the code for this tutorial right here.
您可以找到本教程的代码 就在这里 。
翻译自: https://medium.com/analytics-vidhya/making-a-python-library-with-pypi-29d07c6b5dee


 174
174

 被折叠的 条评论
为什么被折叠?
被折叠的 条评论
为什么被折叠?
 到【灌水乐园】发言


