


aws flask
At the end of 2019 Deeplearning.ai reported that only 22% of companies that use machine learning actually deployed a model. Most companies do not get beyond a proof of concept, often by means of a model in a Jupyter Notebooks. As a result, numerous companies are hiring machine learning engineers who can build machine learning models and put them in production as well.
在2019年底, Deeplearning.ai报告称,只有22%的使用机器学习的公司实际部署了模型。 大多数公司通常不会借助Jupyter笔记本电脑中的模型来超越概念验证。 结果,许多公司正在雇用机器学习工程师,他们可以构建机器学习模型并将其也投入生产。
Data scientists should be at least familiar with some methods of productionizing models. The most important tool in a data scientists toolbox for this purpose is Docker. Docker is a container service that enables you to deploy a model or application beyond your local machine. For example, running it on Amazon Web Services (AWS) or on Google Cloud Platform (GCP). Several frameworks exist to build applications and serve your models within these Docker containers. As many data scientist already know Python, Flask is easy to start with. In addition, Flask provides you with the opportunity to build a (simple) user-interface so your users will be able to interact with your models without having to learn how to use the command line interface or make an API request.
数据科学家至少应该熟悉一些产生模型的方法。 为此,数据科学家工具箱中最重要的工具是Docker。 Docker是一项容器服务,使您能够在本地计算机之外部署模型或应用程序 。 例如,在Amazon Web Services(AWS)或Google Cloud Platform(GCP)上运行它。 存在一些框架来构建应用程序并在这些Docker容器内为您的模型提供服务。 正如许多数据科学家已经了解Python一样, Flask很容易上手。 此外,Flask还为您提供了构建(简单)用户界面的机会,因此您的用户将能够与模型进行交互,而无需学习如何使用命令行界面或发出API请求。
In this hands-on tutorial I will show you how to deploy a simple Flask application in a Docker container on AWS Elastic Beanstalk and how to add a logging functionality, so your users will be able to see what’s happening behind the scenes. The application will not contain any machine learning models, but you can easily extend it on your own. When I first deployed this solution, I had some trouble with getting it to work, as I had to configure the (reverse) proxy server on AWS. In the last part of this tutorial I will show you how to do this.
在本动手教程中,我将向您展示如何在AWS Elastic Beanstalk上的Docker容器中部署一个简单的Flask应用程序,以及如何添加日志记录功能,以便您的用户能够看到幕后发生的事情。 该应用程序将不包含任何机器学习模型,但是您可以轻松地自行扩展它。 首次部署此解决方案时,由于必须在AWS上配置(反向)代理服务器,因此使其无法正常工作会遇到一些麻烦。 在本教程的最后一部分,我将向您展示如何执行此操作。
基础 (The Basics)
First, we set up the basics of our Flask application. It includes an app.py file for all Flask code, a static index.html file to format the structure of our index page and a css stylesheet (custom.css)
首先,我们建立了Flask应用程序的基础。 它包括适用于所有Flask代码的app.py文件,用于格式化索引页面结构的静态index.html文件以及CSS样式表( custom.css)
The app.py has only 7 lines of code. We first initialize a Flask application class and define the static and template folders. Then we define a route (‘/’) and tell the application that it should render index.html. The last line tells the application to expose itself on port 5000. The host arguments is set to 0.0.0.0 for deploying it on AWS Elastic Beanstalk later on.
app.py只有7行代码。 我们首先初始化Flask应用程序类,然后定义静态和模板文件夹。 然后,我们定义一个路由('/'),并告诉应用程序它应该呈现index.html。 最后一行告诉揭露本身端口5000的主机参数设置为0.0.0.0供以后对AWS弹性魔豆部署它的应用程序。
from flask import Flask, render_template


APP = Flask(__name__, static_folder="app/static/", template_folder="app/static/")
@APP.route("/", methods=["GET"])
def root():
    """index page"""
    return render_template("index.html")


if __name__ == "__main__":
    APP.run(host="0.0.0.0", port=5000, threaded=True)
The HTML and CSS files are also quite simple and for the sake of completeness demonstrated below. We define a logging_window class with some style options that will contain the logging later on.
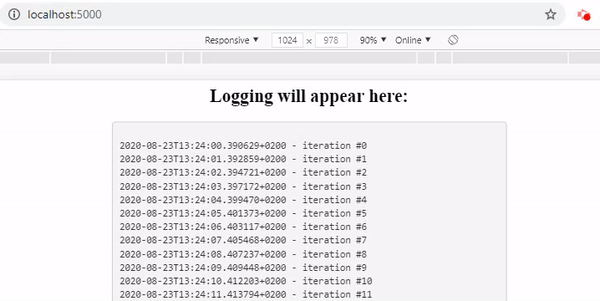
HTML和CSS文件也非常简单,并且为了完整起见,在下面进行了演示。 我们定义了logging_window类,其中包含一些样式选项,这些选项稍后将包含日志记录。
<html>
  <head>
    <link rel="stylesheet" type=text/css href="{{ url_for('static', filename='css/custom.css')}}">
    <title>Flask app with logging</title>
  </head>
  <body id="main">
    <div class="row">
      <h2 align="center">Logging will appear here:</h2>
      <div class="logging_window">
        <pre id="output"></pre>
      </div>
    </div>
  </body>
</html>
.logging_window{
display: block;
padding: 9.5px;
font-size: 13px;
line-height: 1.42857143;
color: #333;
word-break: break-all;
word-wrap: break-word;
background-color: #f5f5f5;
border: 1px solid #ccc;
border-radius: 4px;
width: 50%;
margin: auto;
}We are now able to run our application for the first time to see what it looks like. As you can see still nothing special.
现在,我们可以首次运行我们的应用程序,以查看其外观。 如您所见,仍然没有什么特别的。

添加日志记录功能 (Adding logging functionality)
As mentioned before, displaying the logging of your Python processes will make it a lot easier to work with your application. For example, users can see if a process is stuck or still running and they should be patient.
如前所述,显示您的Python进程的日志记录将使您的应用程序使用起来更加容易。 例如,用户可以查看进程是否卡住或仍在运行,他们应该耐心等待。
To add logging to our application is quite easy. It requires a helper function flask_logger, that (in this example) returns the current datetime as an encoded string every second. In addition, we add a new route (‘/log_stream’) that will return a Flask Response class with the output of our flask_logger function. In addition, don’t forget to import datetime for this example.
向我们的应用程序添加日志非常容易。 它需要一个辅助函数flask_logger,在此示例中,该函数每秒将当前日期时间作为编码字符串返回。 此外,我们添加了一条新路由('/ log_stream'),该路由将返回Flask Response类以及flask_logger函数的输出。 此外,在此示例中,不要忘记导入datetime。
import datetime
def flask_logger():
"""creates logging information"""
for i in range(100):
current_time = datetime.datetime.now().strftime('%H:%M:%S') + "\n"
yield current_time.encode()
sleep(1)
@APP.route("/log_stream", methods=["GET"])
def stream():
"""returns logging information"""
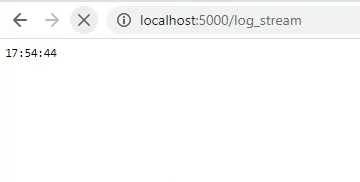
return Response(flask_logger(), mimetype="text/plain", content_type="text/event-stream")If we go to the newly created route (which will be exposed at https://localhost:5000/log_stream), we will now see the following. Not very nicely formatted, but it returns the datetime every second.
如果我们转到新创建的路由(将在https:// localhost:5000 / log_stream公开),现在将看到以下内容。 格式不是很好,但是它每秒都会返回日期时间。
记录您的日志 (Logging your logs)
As we are now able to display an output every second, we can actually display our logger. For this, we have to change our flask_logger function. First, we have to configure our logger. In this example, I will use the logger from loguru but you can use any logger you like. The logger will be configured to write all logs to a file job.log which is located in the static folder. The flask_logger will be configured to read the log-file every second and return the logs. In addition, the log-file will be cleaned after 25 iterations.
由于现在我们能够每秒显示一次输出,因此我们实际上可以显示记录器。 为此,我们必须更改flask_logger函数。 首先,我们必须配置记录器。 在此示例中,我将使用loguru中的记录器,但是您可以使用任何喜欢的记录器。 记录器将配置为将所有日志写入静态文件夹中的文件job.log。 flask_logger将配置为每秒读取一次日志文件并返回日志。 此外,将在25次迭代后清除日志文件。
from loguru import logger


# configure logger
logger.add("app/static/job.log", format="{time} - {message}")


# adjusted flask_logger
def flask_logger():
    """creates logging information"""
    with open("app/static/job.log") as log_info:
        for i in range(25):
            logger.info(f"iteration #{i}")
            data = log_info.read()
            yield data.encode()
            sleep(1)
        # Create empty job.log, old logging will be deleted
        open("app/static/job.log", 'w').close()
This will result in better formatted logging. Be aware that all information that is logged with the loguru logger (in all python processes) will be displayed as these are all written to the job.log file after configuring the logger. So, if you have a line of code logger.info(‘Model is training’) in your training process, it will show up in our logger as well.
这将导致更好的格式化日志记录。 请注意,将显示用loguru记录器记录的所有信息(在所有python进程中),因为在配置记录器后,这些信息均已写入job.log文件。 因此,如果您在培训过程中有一行代码logger.info(“模型正在培训”) ,它也会显示在我们的记录器中。

Include logging into our index page
包括登录我们的索引页面
The last step before we can deploy our application is to include the logging in our created index.html. This is fairly easy, but includes a bit of JavaScript. We create a function that starts after the page has been loaded, makes a GET request to our /log_stream route and writes the response to an HTML element with the id ‘output’. The whole HTML file will look something like this:
部署应用程序之前的最后一步是将日志记录包含在我们创建的index.html中。 这相当容易,但是其中包含一些JavaScript。 我们创建一个函数,该函数在页面加载后启动,向/ log_stream路由发出GET请求,并将响应写入ID为'output'HTML元素。 整个HTML文件如下所示:
<html>
  <head>
    <link rel="stylesheet" type=text/css href="{{ url_for('static', filename='css/custom.css')}}">
    <title>Flask app with logging</title>
    <script src="https://code.jquery.com/jquery-2.1.1.min.js"></script>
    <script>
      $(document).ready(function(){
        var output = document.getElementById('output');
        var xhr = new XMLHttpRequest();
        xhr.open('GET', '{{ url_for('log_stream') }}', true);
        xhr.send();
        setInterval(function() {
          output.textContent = xhr.responseText;
        }, 500);
      });
    </script>
  </head>
  <body id="main">
    <div class="row">
      <h2 align="center">Logging will appear here:</h2>
      <div class="logging_window">
        <pre id="output"></pre>
      </div>
    </div>
  </body>
</html>
As you can see we now have an application that logs all our python processes and displays them to our users.
如您所见,我们现在有了一个应用程序,该应用程序记录了我们所有的python进程并将其显示给我们的用户。
部署到Elastic Beanstalk (Deploy to Elastic Beanstalk)
Now we can deploy our simple application to AWS Elastic Beanstalk so it can be accessed by anyone. Elastic Beanstalk is a so-called ‘orchestration service’ which not only takes care of the deployment of our application, but also sets up server instances, takes care of load balancing (distribution of tasks over your computing resources if multiple instances have been instantiated to make the overall process more efficient) and monitoring the health and status of your application.
现在,我们可以将简单的应用程序部署到AWS Elastic Beanstalk,以便任何人都可以访问它。 Elastic Beanstalk是一种所谓的“编排服务”,它不仅负责我们应用程序的部署,还设置服务器实例,负责负载平衡(如果实例化了多个实例,则将任务分配到您的计算资源上)使整个过程更高效)并监视应用程序的运行状况和状态。
For this step we need two more files in our project’s root folder: a Dockerfile to containerize the application and a requirements.txt containing all the packages that should be installed in this container. Copy-paste the outcome of the pip freeze command to the requirements.txt and set up the Dockerfile as follows.
对于此步骤,我们需要在项目的根文件夹中再添加两个文件:用于将应用程序容器化的Dockerfile和包含所有应安装在此容器中的软件包的requirements.txt。 将pip Frozen命令的结果复制并粘贴到requirements.txt中,并按如下所示设置Dockerfile。
FROM python:3.7-slim


COPY . /src
WORKDIR /src


RUN pip install --upgrade pip
RUN pip install --no-cache-dir -r requirements.txt


EXPOSE 5000


ENTRYPOINT ["python"]


CMD ["app.py"]
Now it is time to let the magic happen. There are several methods to deploy your application to AWS Elastic Beanstalk (assuming you already have an AWS account. If you have not, sign up for 12 months of free tier access on aws.amazon.com). The most convenient method is to install the command line interface of Elastic Beanstalk. After you have installed it, navigate to your project’s root folder with the terminal. Subsequently call eb init and eb create and answer the prompted questions. Elastic Beanstalk will automatically recognize there is a Dockerfile in your project’s folder and will start building the environment. Wait a few minutes (check the progress through the management console of AWS) and afterwards you can access your application via the URL you have defined during the initializing process. You can also find this URL if you navigate to your Elastic Beanstalk environment via the AWS management console.
现在是时候让魔术发生了。 有几种方法可以将应用程序部署到AWS Elastic Beanstalk(假设您已经有一个AWS帐户。如果没有,请在aws.amazon.com上注册12个月的免费层访问)。 最方便的方法是安装Elastic Beanstalk的命令行界面 。 安装完成后,使用终端导航到项目的根文件夹。 随后调用eb init并创建eb并回答提示的问题。 Elastic Beanstalk将自动识别项目文件夹中存在Dockerfile,并将开始构建环境。 等待几分钟(通过AWS的管理控制台检查进度),然后您可以通过在初始化过程中定义的URL访问应用程序。 如果您通过AWS管理控制台导航到Elastic Beanstalk环境,也可以找到此URL。
Nginx的 (Nginx)
However, if you visit the URL of your application you will see that no logging is appearing. After 25 seconds all logs appear simultaneously. To fix this, we have to configure the Nginx reverse proxy server that is being instantiated by default if an Elastic Beanstalk environment is created. Configuring this server may sound scary, but actually it is quite simple. To understand what we are doing, let me explain where the problem comes from.
但是,如果您访问应用程序的URL,将会看到没有日志记录出现。 25秒后,所有日志将同时出现。 为了解决这个问题,如果创建了Elastic Beanstalk环境,我们必须配置默认情况下实例化的Nginx反向代理服务器。 配置该服务器可能听起来很吓人,但实际上它很简单。 要了解我们在做什么,让我解释问题的根源。
As mentioned before, an Nginx reverse proxy server is started when creating the Elastic Beanstalk environment. This proxy server is intended to map your application to your environment’s load balancer. However, one of the feature of Nginx is that it buffers all responses our application is generating, until the process of generating logs is completed. As we would like to display all logs immediately, we have to configure the proxy server to stop buffering them.
如前所述,在创建Elastic Beanstalk环境时,将启动Nginx反向代理服务器。 该代理服务器旨在将您的应用程序映射到环境的负载平衡器。 但是,Nginx的功能之一是它缓冲我们的应用程序正在生成的所有响应,直到生成日志的过程完成为止。 由于我们想立即显示所有日志,因此我们必须配置代理服务器以停止对其进行缓冲。
Configuring Nginx can be done in 2 steps: 1) create a .ebextensions folder in your project’s root folder, 2) add a config file to this folder (it doesn’t matter what it’s name is, as long as it has a .config extension). The content of this file should be:
Nginx的配置可以通过2个步骤完成:1)在项目的根文件夹中创建一个.ebextensions文件夹,2)将配置文件添加到该文件夹中(无论名称是什么,只要它具有.config延期)。 该文件的内容应为:
files:
  "/etc/nginx/conf.d/01_nginx_proxy_buffering.conf":
     content: |
         proxy_buffering off;
Now we can call eb deploy in the terminal from our project’s root folder to update our application and wait for the changes to be deployed.
现在,我们可以从项目的根文件夹在终端中调用eb deploy来更新我们的应用程序,并等待更改被部署。
NB: if you have initialized your project’s root folder as a GitHub repo as well, be sure to commit your changes before deploying the new version of the application. By default, only changes that have been committed will be deployed with the eb deploy call. You can also run eb deploy — staged; then your staged changed (so you have to git add them as well) will also be deployed.
注意:如果您也已将项目的根文件夹初始化为GitHub存储库,请确保在部署新版本的应用程序之前提交更改。 默认情况下,仅已提交的更改将通过eb deploy调用进行部署。 您还可以运行eb deploy –暂存; 那么您上演的更改(因此您也必须git添加它们)也将被部署。
After the deployment, visit your application’s URL and you can see the logging is working as expected!
部署后,访问应用程序的URL,您可以看到日志记录按预期工作!
结论 (Conclusion)
Following these steps, it is fairly easy to create and deploy a simple Flask application with logging functionality in an AWS Elastic Beanstalk environment. Feel free to extend the application to serve your machine learning models and bring them in production using this easy method!
按照这些步骤,在AWS Elastic Beanstalk环境中创建和部署具有日志记录功能的简单Flask应用程序非常容易。 随意扩展该应用程序以服务您的机器学习模型,并使用此简单方法将其投入生产!
关于作者 (About the author)
Rik Kraan is a medical doctor working as a data scientist at Vantage AI, a data science consultancy company in the Netherlands. Get in touch via rik.kraan@vantage-ai.com
Rik Kraan是位荷兰数据科学咨询公司Vantage AI的数据科学家,是一名医学博士。 通过rik.kraan@vantage-ai.com与我们联系
aws flask


 694
694

 被折叠的 条评论
为什么被折叠?
被折叠的 条评论
为什么被折叠?
 到【灌水乐园】发言


