


 本文翻译自《OAuth 2.0 in Go》,深入探讨了OAuth 2.0授权框架,并介绍了如何在Go语言中实现OAuth 2.0流程。
oauth0 oauth2
Access secure HTTP Services in Go
在Go中访问安全的HTTP服务
OAuth 2.0 is how a third party application accesses user data in the cloud. The spec describes it this way: “The OAuth 2.0 authorization framework enables a third-party application to obtain limited access to an HTTP service..” So you need to understand it to programmatically access almost all user data now stored in various online services: Amazon, Google, GitHub, Facebook, LinkedIn, Strava, and countless others. In this article, we’ll build an OAuth 2.0 client application in Go and use it to access our user data in multiple services.
OAuth 2.0是第三方应用程序访问云中用户数据的方式。 规范以这种方式进行描述:“ OAuth 2.0授权框架使第三方应用程序可以获得对HTTP服务的有限访问权。”因此,您需要了解它,才能以编程方式访问现在存储在各种在线服务中的几乎所有用户数据:亚马逊,谷歌,GitHub,Facebook,LinkedIn,斯特拉瓦和其他无数个。 在本文中,我们将在Go中构建一个OAuth 2.0客户端应用程序,并使用它来访问多种服务中的用户数据。
The core spec, RFC 6749, is actually surprisingly readable so don’t be intimidated by the vast amounts of monospace text. Though keep in mind that the core spec is just the beginning of the journey, some parts are now dated and there have been a number of additions and clarifications over the years. In particular now, you’ll want to read the RFC 8252 spec for native apps.
核心规范RFC 6749实际上令人惊讶地可读,因此不要被大量的等宽文本吓倒。 尽管请记住,核心规范只是旅程的开始,但现在有些部分已经过时,并且这些年来已经进行了许多补充和说明。 特别是现在,您将要阅读本机应用程序的RFC 8252规范。
All committee based specs have their own jargon, so we’ll dive into that first to set the context.
所有基于委员会的规范都有自己的术语,因此我们将首先深入探讨它以设置上下文。
赠款类型 (Grant Types)
The core spec outlines five different ways of using OAuth 2.0, called “Grant Types”
核心规范概述了使用OAuth 2.0的五种不同方式,称为“授权类型”
4.1. Authorization Code Grant
4.1 。 授权码授予
4.2. Implicit Grant (now legacy, discouraged)
4.2 。 隐性补助金(现已遗留,不鼓励使用)
4.3. Resource Owner Password Credentials Grant (now legacy, discouraged)
4.3 。 资源所有者密码凭据授予(现已停用,不鼓励使用)
4.4. Client Credentials Grant
4.4 。 客户证书授予
4.5. Extension Grants
4.5 。 扩展赠款
A couple of extensions since then are now best practice:
从那时起,有几个扩展是最佳实践:
PKCE an extension to Authorization Code Grant that has become the preferred flow for all public apps
PKCE对授权码授予的扩展,已成为所有公共应用程序的首选流程
Device Code is an extension for constrained devices with no browser
设备代码是没有浏览器的受限设备的扩展
客户端类型和配置文件(Client Types and Profiles)
The core spec defines two different types of apps, confidential and public where the primary difference is simply that a public app is not able to maintain confidentiality of its credentials (client secret). Based on this, it goes on to list a few application roles:
核心规范定义了两种不同类型的应用程序,即机密应用程序和公共应用程序,主要区别仅在于公共应用程序无法维护其凭据的机密性(客户端机密)。 基于此,它继续列出了一些应用程序角色:
Web application: A confidential client running on a web server. This is the traditional server based web client accessing user data and Authorization Code Grant is the recommended flow. The Authorization Server may or may not allow Extension Grants to refresh the Access Token after it expires. The Client Credentials Grant is useful for a client to get data about itself, not associated with a specific user. In this case the client must be able to authenticate itself using only credentials it has securely stored or through some previous arrangement with the Authorization Server.
Web应用程序:在Web服务器上运行的机密客户端。 这是基于传统服务器的Web客户端访问用户数据,建议使用“授权代码授予”。 授权服务器可能会也可能不允许扩展授权在过期后刷新访问令牌。 客户端证书授予对于客户端获取有关自身的数据很有用,而不与特定用户相关联。 在这种情况下,客户端必须只能使用已安全存储的凭据或通过与授权服务器的某些先前安排来对自己进行身份验证。
User-agent-based application: A public client in which the code and credentials are downloaded from a web server. Single page apps fall in this role. The core spec recommends Implicit Flow for this role, but that has since been deprecated and now Authorization Code Grant with PKCE is recommended.
基于用户代理的应用程序:一个公共客户端,在其中从Web服务器下载代码和凭据。 单页应用程序担当此角色。 核心规范建议为此角色使用隐式流程,但是此建议已被弃用,现在建议使用带有PKCE的授权码授予。
Native application: A public client where code is installed and executed on a device, the application may or may not be secure but is assumed to be insecure. Both mobile and native apps fall in this role and again Authorization Code Grant with PKCE is recommended. For browserless or input constrained devices The Device Code flow is recommended which works conceptually similar to Authorization Code Grant but requires the user to manually enter a User Code (like a Client Secret) at a Verification URI (like a Token Endpoint) to retrieve the Access Token.
本机应用程序:在设备上安装并执行代码的公共客户端,该应用程序可能是安全的,也可能不是安全的,但被认为是不安全的。 移动应用程序和本机应用程序均担当此角色,建议再次使用PKCE授权代码授予。 对于无浏览器或输入受限的设备,建议使用“设备代码”流程,该流程在概念上类似于授权代码授予,但要求用户在验证URI(例如令牌端点)上手动输入用户代码(例如客户端密钥)以检索访问权限令牌。
的角色 (Roles)
The spec identifies a few players in the OAuth dance, called “Roles” which are important to keep the flow straight.
该规范确定了OAuth舞蹈中的一些角色,称为“角色”,这些角色对于保持流程顺畅非常重要。
Resource Owner: the user who owns the data being accessed
资源所有者:拥有被访问数据的用户
Resource Server: the api server that provides the user data
资源服务器:提供用户数据的api服务器
Client: the 3rd party app that uses the api to get the user data
客户端:使用api来获取用户数据的第三方应用程序
Authorization Server: the service issuing tokens on behalf of the resource owner (user) to grant access to the data. This may, or may not, co-reside with the Resource Server, it does not really matter.
授权服务器:代表资源所有者(用户)的服务发行令牌,以授予对数据的访问权限。 这可以与资源服务器共存,也可以不共存,这并不重要。
For the purposes of this article I will add one more, the Developer who creates the 3rd party client
为了本文的目的,我将再添加一个创建第三方客户端的开发人员
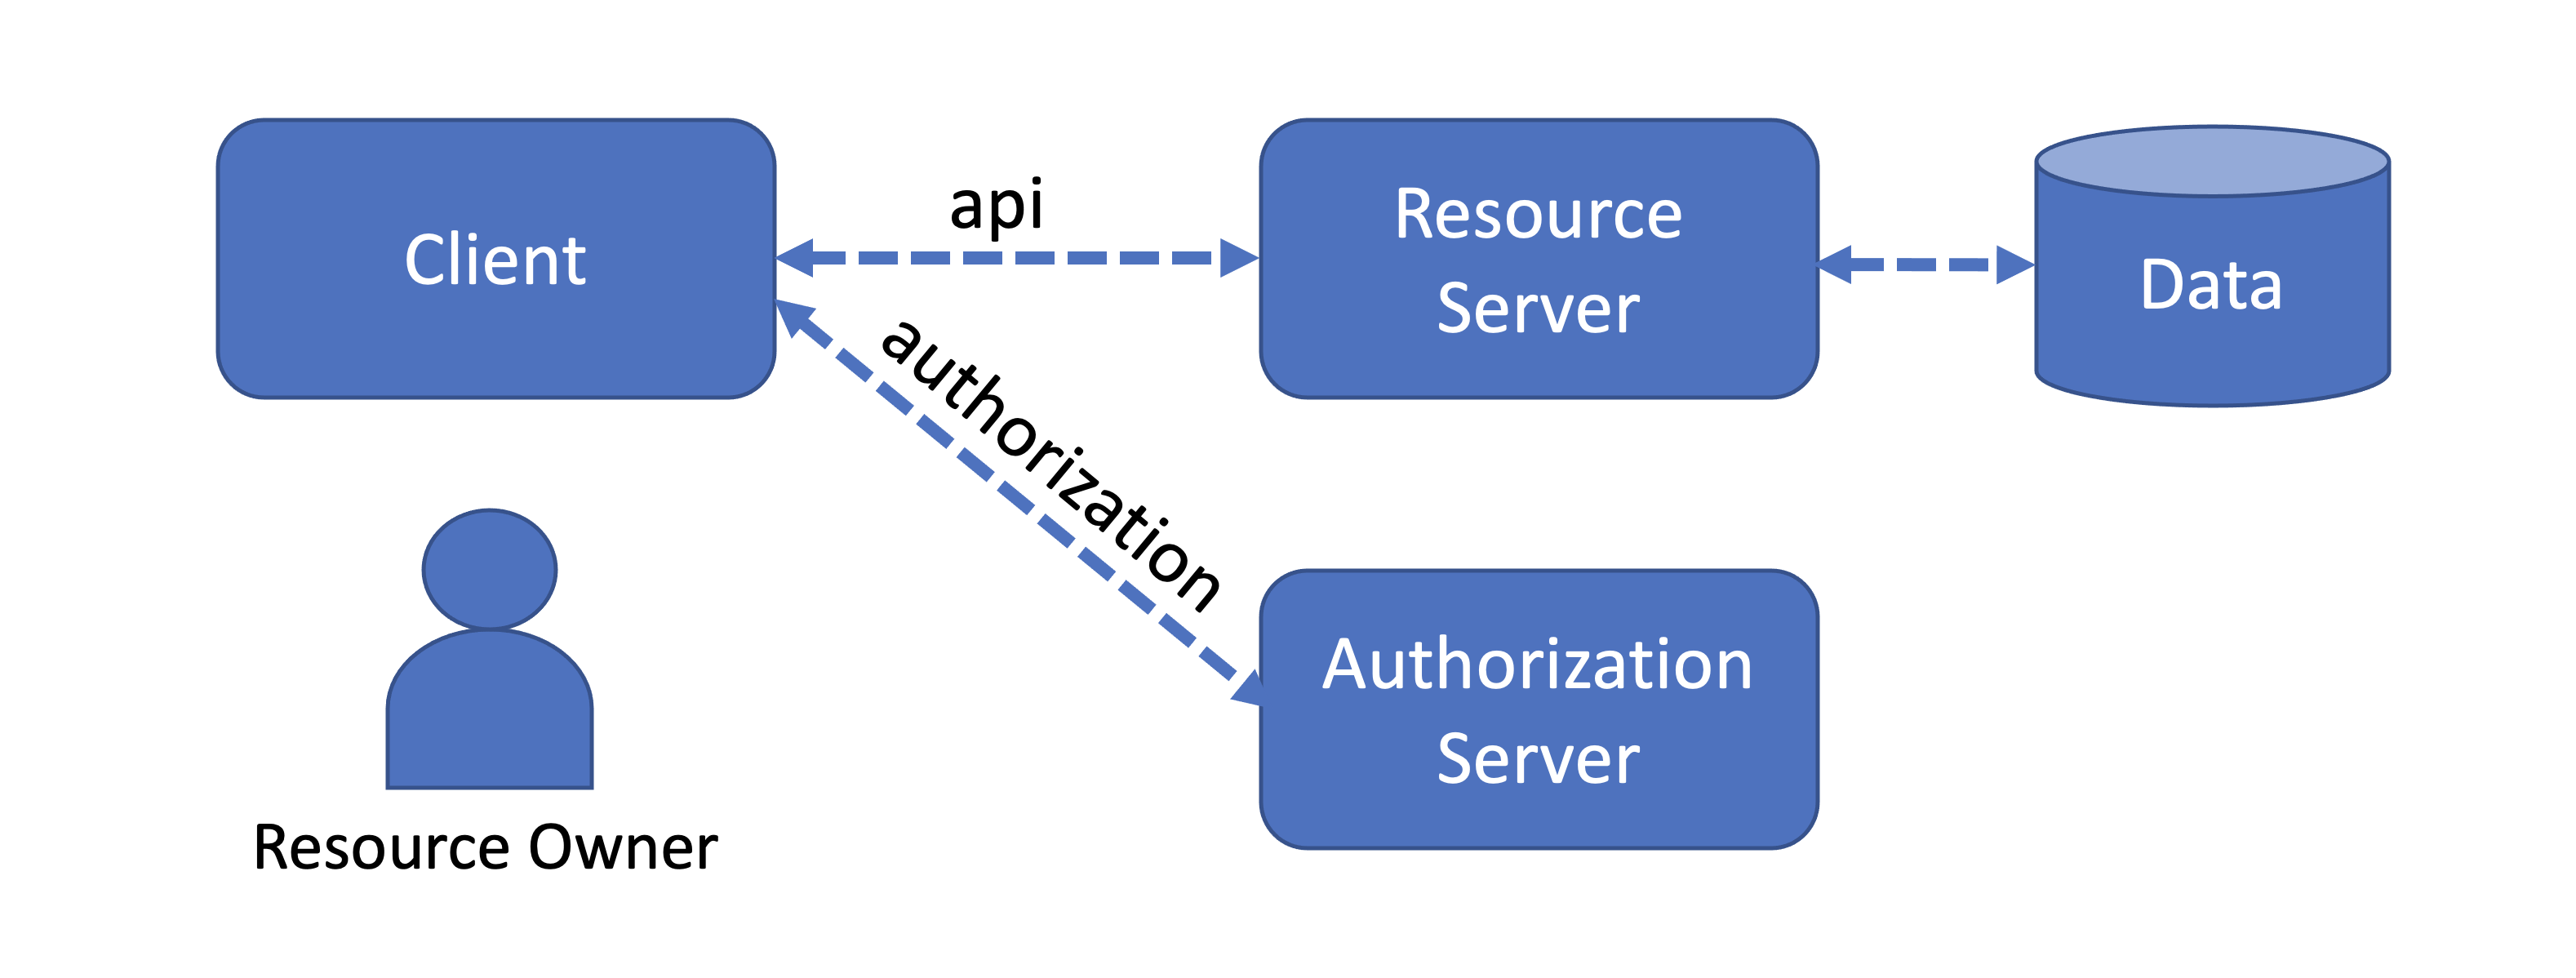
终点(Endpoints)
There are a few “Endpoints” which need to be established. To you and me these are just URI to get stuff done. The Client needs to know where to ask for authorization, tokens, and refresh tokens. The Authorization Server needs to know where to send info back to the Client.
有一些“端点”需要建立。 对您和我来说,这些只是完成工作的URI。 客户端需要知道在哪里请求授权,令牌和刷新令牌。 授权服务器需要知道将信息发送回客户端的位置。
Authorization Endpoint: A URI on the Authorization Server that provides authorization and the Authorization Code
授权端点:授权服务器上的URI,提供授权和授权代码
Token Endpoint: A URI on the Authorization Server that exchanges the short-lived Authorization Code for a longer lived Access Token, or Refresh Token
令牌端点:授权服务器上的URI,用于将短期授权代码交换为寿命更长的访问令牌或刷新令牌。
Redirection Endpoint: A URI on the client that receives Tokens from the Authorization Server
重定向端点:客户端上的一个URI,用于从授权服务器接收令牌
授权码授予(Authorization Code Grant)
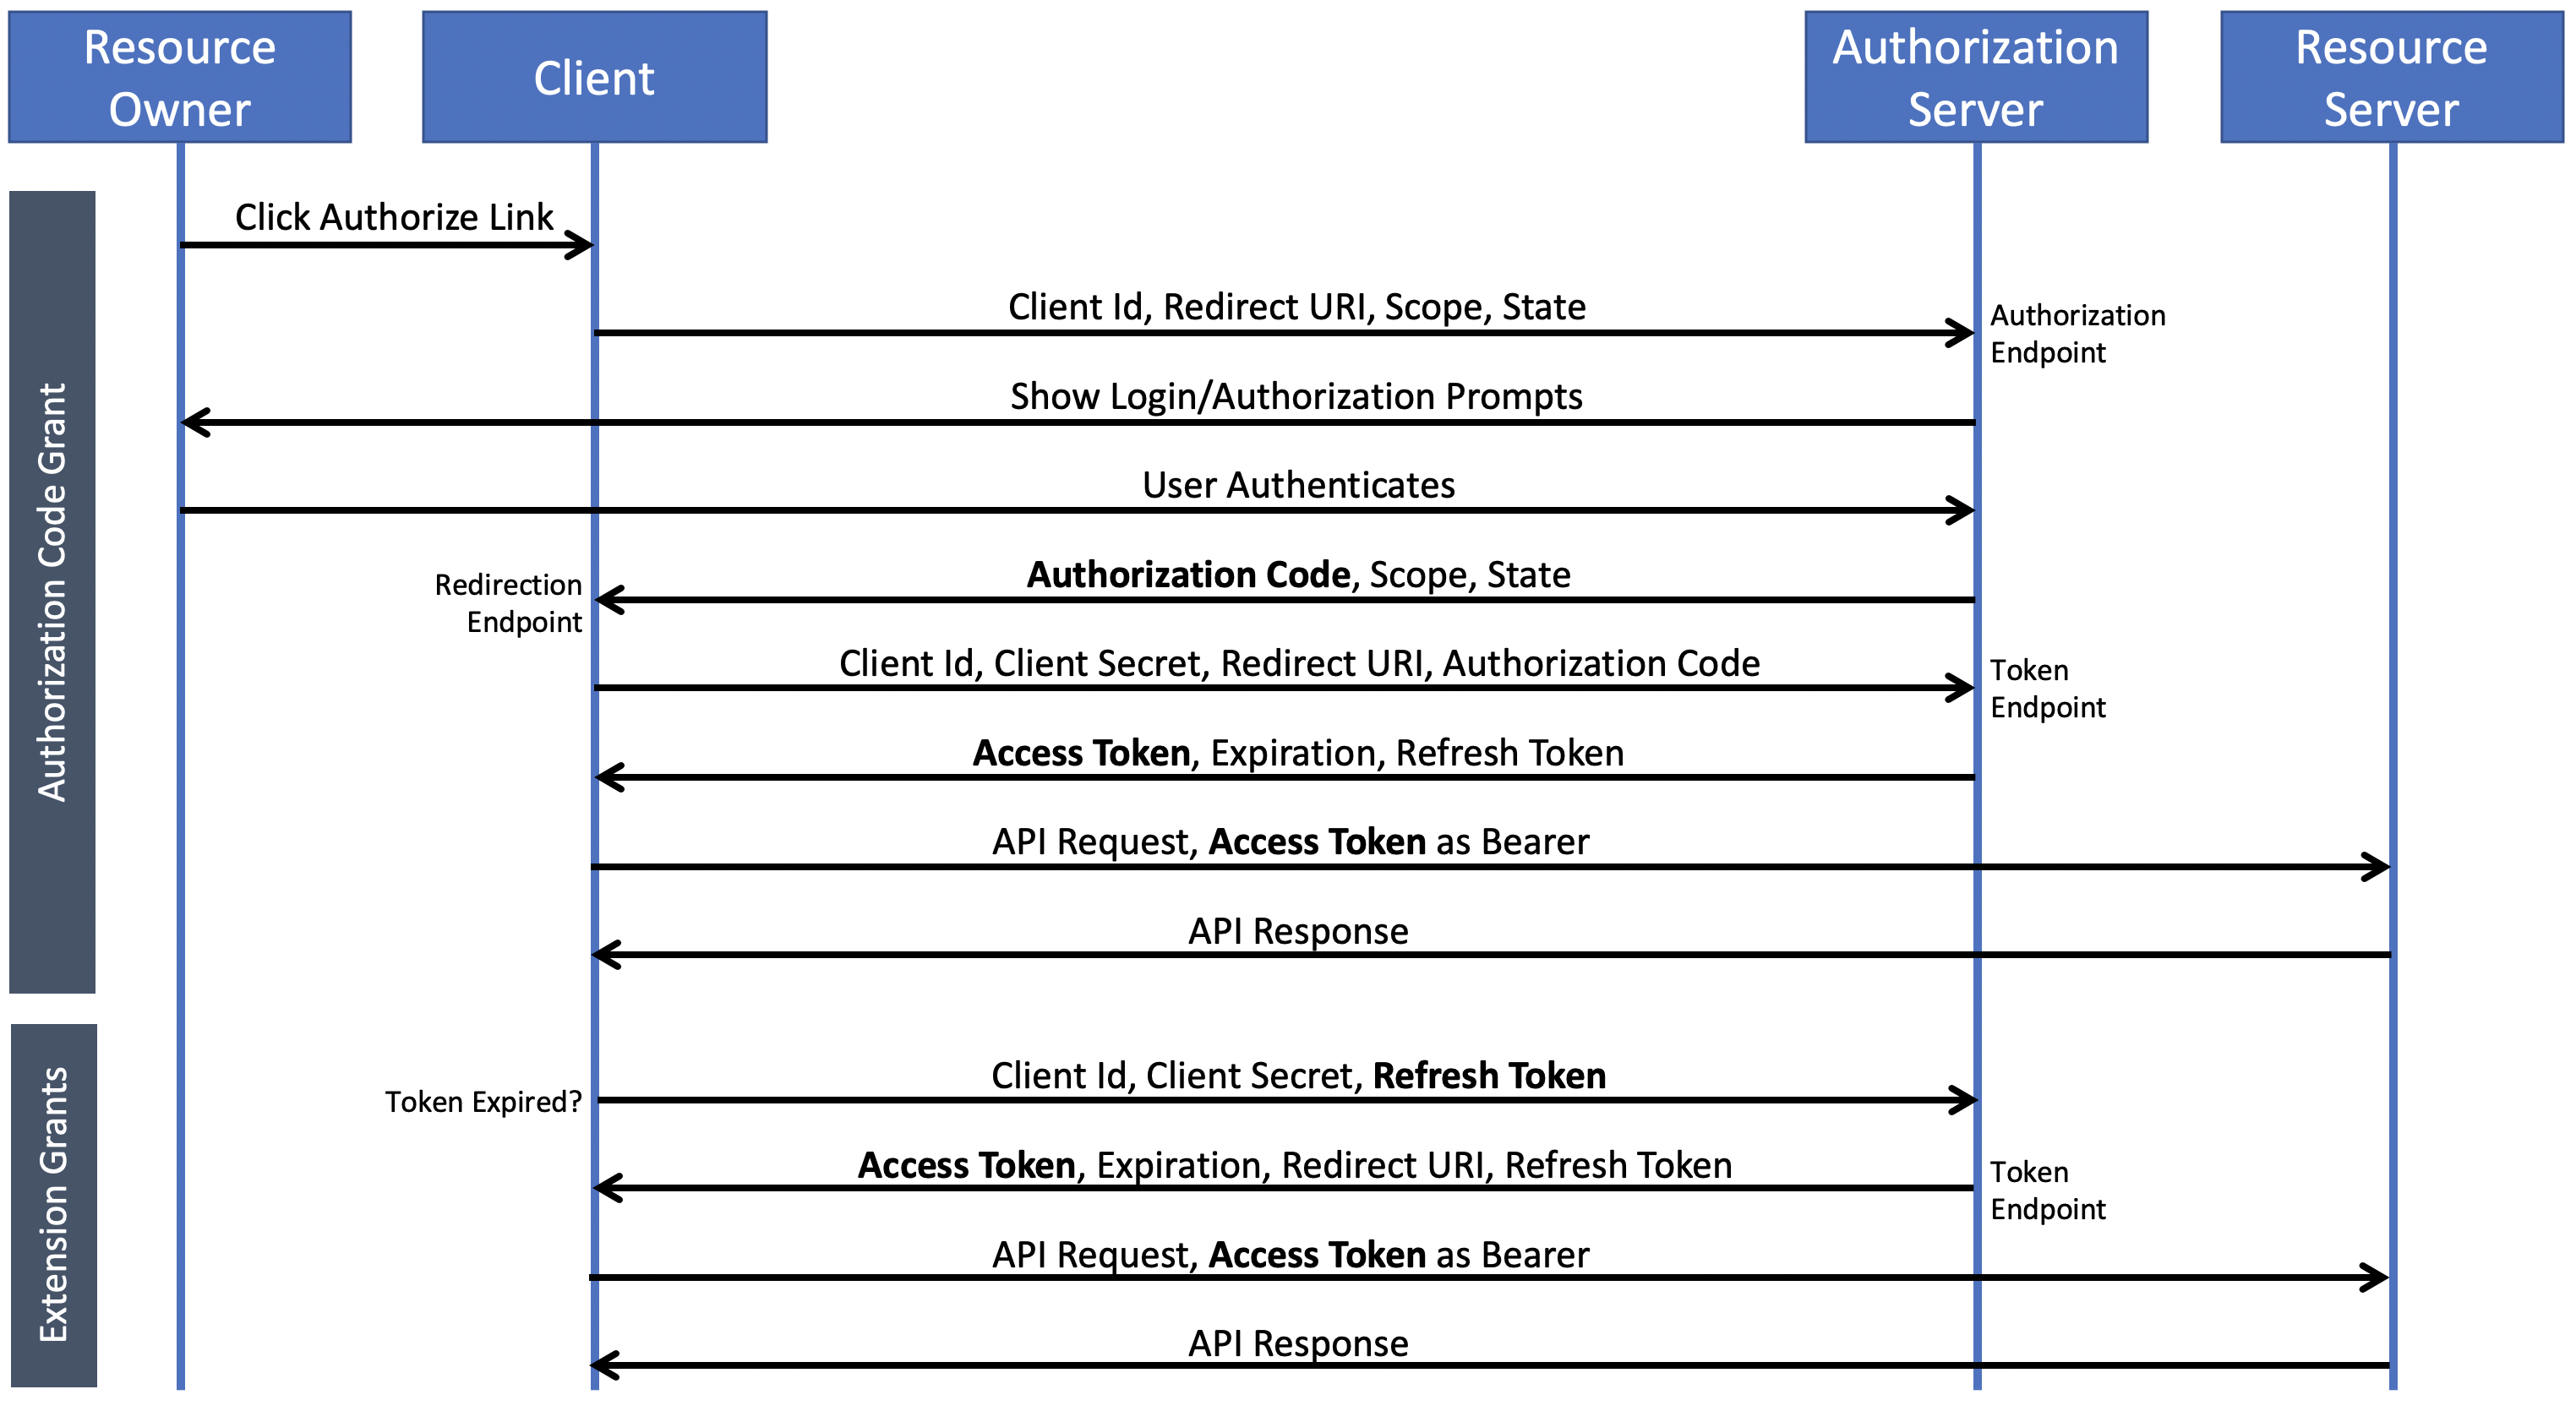
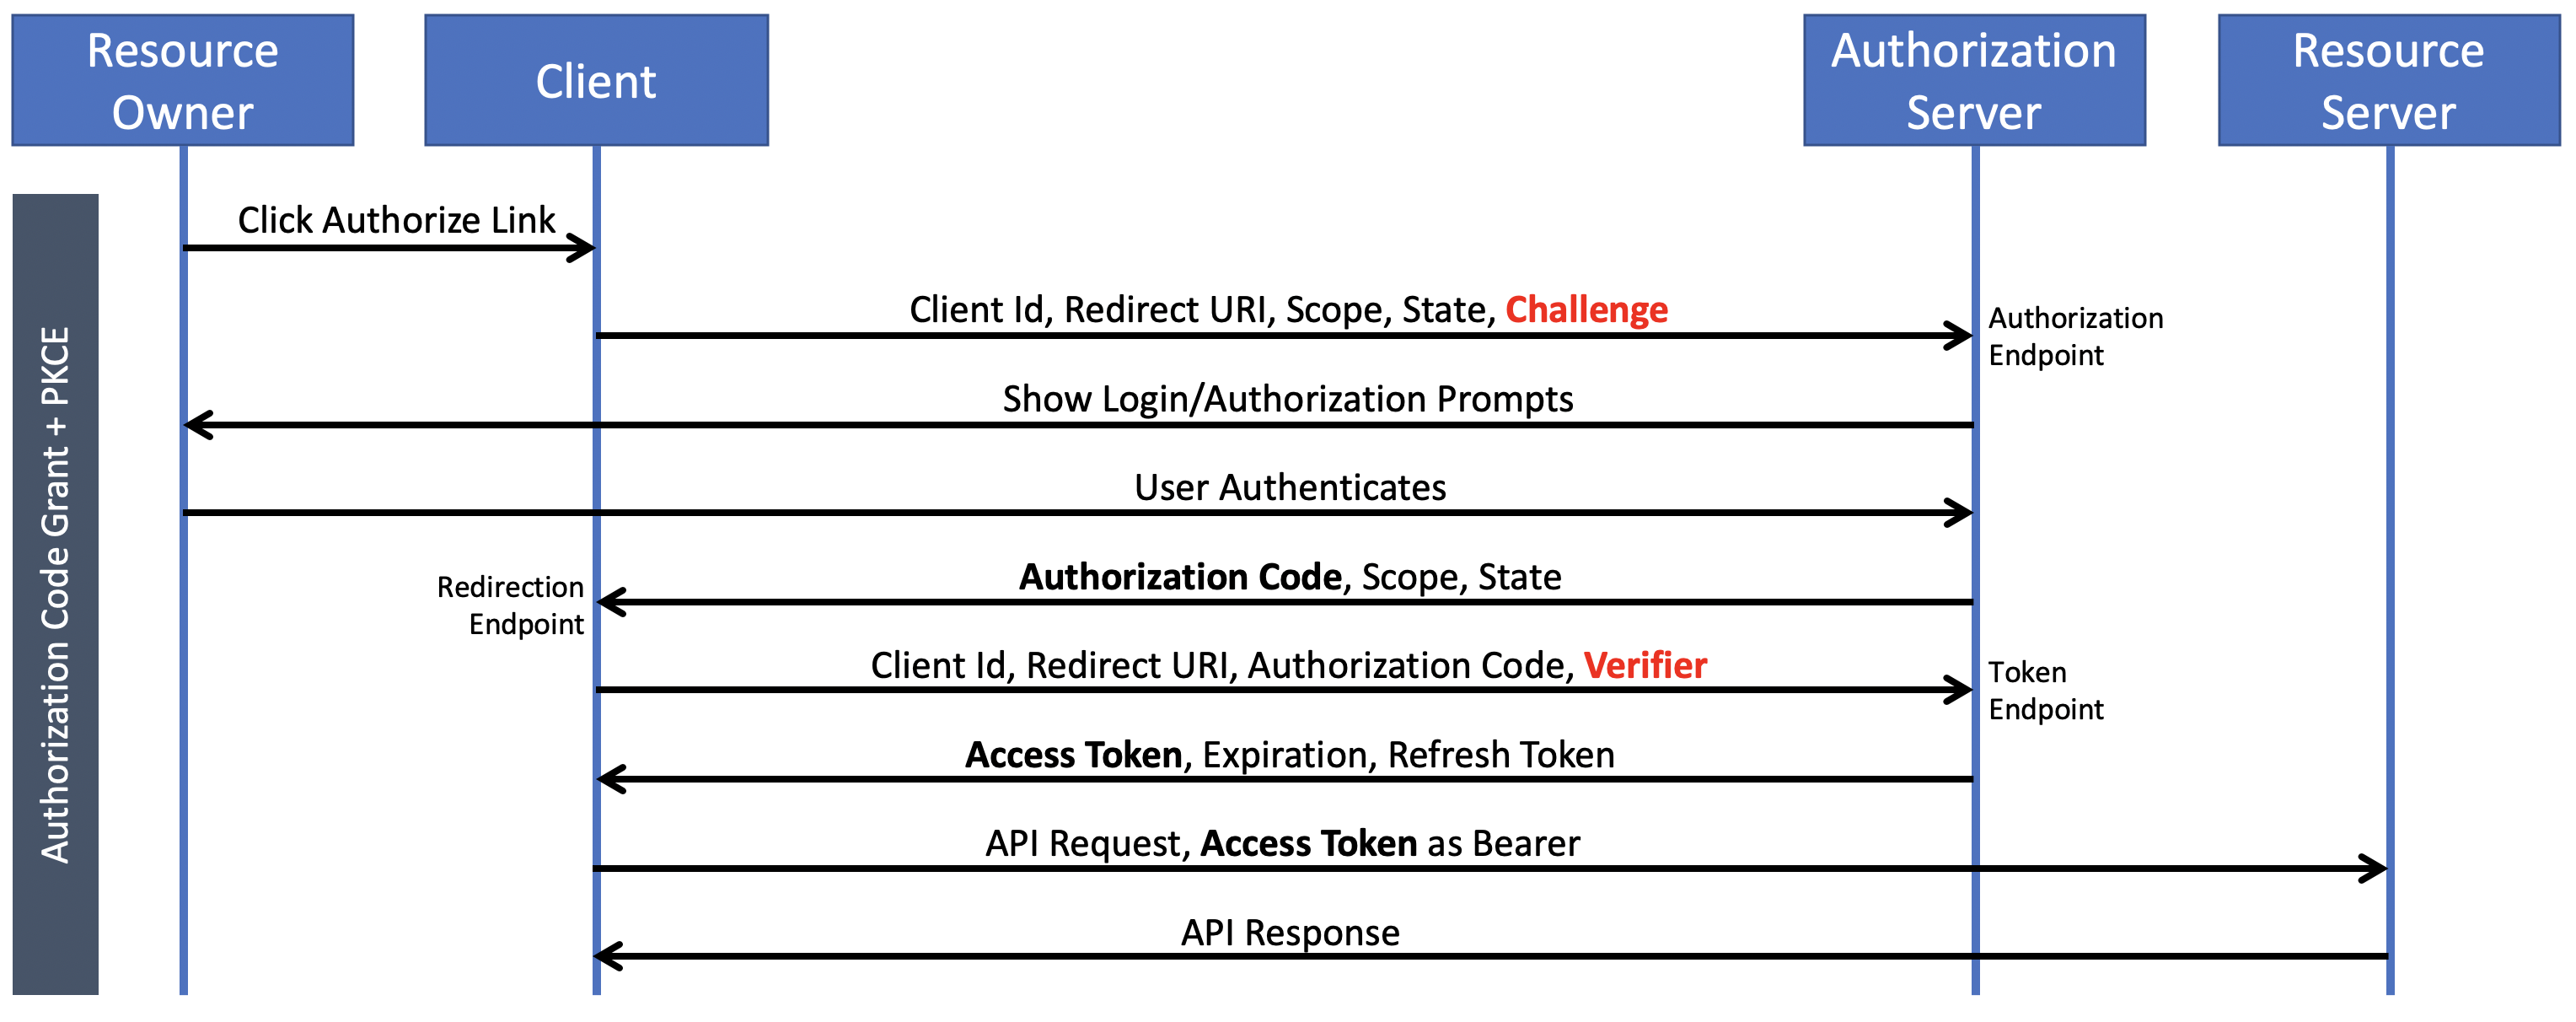
We’ll focus on the Authorization Code Grant in this article. It all comes down to this simplified happy path to unlock our api:
在本文中,我们将重点介绍“授权代码授予”。 一切都归结为解锁我们的api的简化方法:
- Resource Owner (the user) initiates an action on the Client that requests authorization from the Authorization Server 资源所有者(用户)在客户端上发起向授权服务器请求授权的操作
- Authorization Server validates the Resource Owner and Scope of access授权服务器验证资源所有者和访问范围
- Authorization Server sends back a one-time Authorization Code to the Client授权服务器将一次性授权码发送回客户端
- Client exchanges the Authorization Code for a longer-lived Access Token with expiration客户端将授权代码交换为寿命更长的访问令牌,且到期
- Client checks the expiration and if valid uses the Access Token to request User Data via the api, or if expired then the Client requests a Refresh Token or Re-authenticates.客户端检查到期时间,如果有效使用访问令牌通过api请求用户数据,或者如果有效,则客户端请求刷新令牌或重新认证。
In detail, this has the following pattern:
详细地说,它具有以下模式:
开发者(Developer)
As a client developer there are a few things you have to do at the outset:
作为客户开发人员,一开始您需要做一些事情:
- Set up a user and application account on the Authorization Server 在授权服务器上设置用户和应用程序帐户
- Enter the Application Info输入申请信息
- Enter the Redirect URI(s) and/or Callback Domain输入重定向URI和/或回调域
- Get a Client Id获取客户ID
- Get a Client Secret (not needed for PKCE) 获取客户机密(PKCE不需要)
This information establishes the handshake between the Client and Authorization Server.
此信息建立了客户端和授权服务器之间的握手。
例 (Example)
So how does this actually work? Well, let’s suppose that you, the Developer, are building a simple Web Client and you want access to user data through OAuth 2.0. We’ll build the whole flow illustrated above in Go using the Strava OAuth 2.0 service api as an example.
那么,这实际上如何工作? 好吧,假设您(开发人员)正在构建一个简单的Web客户端,并且您希望通过OAuth 2.0访问用户数据。 我们将以Strava OAuth 2.0服务api为例,构建上面在Go中说明的整个流程。
步骤1:帐户设定 (Step 1: Account Settings)
First we’ll set up for our app. In Strava, this is as easy as:
首先,我们将为我们的应用程序设置。 在Strava中,这很简单:
Go to Strava.com, set up an account if you don’t already have one.
转到Strava.com ,如果您还没有帐户,请设置一个。
- Click on My API Application to set up your Application: 单击我的API应用程序以设置您的应用程序:
Sadly, you will need to upload an icon to edit settings
遗憾的是,您需要上传一个图标来编辑设置
- Enter your Application Name输入您的申请名称
- Choose a Category选择一个类别
- Ignore Club for now现在忽略俱乐部
Enter your Website, for this demo enter https://www.strava.testapp.com
输入您的网站,为此演示输入https://www.strava.testapp.com
Enter your Authorization Callback domain, for this demo enter localhost (localhost is always valid, btw).
输入您的授权回调域,为此演示输入localhost (localhost始终有效,顺便说一句)。
Note the following items, which you will need below (you can come back at any time to view them):
请注意以下您需要的以下项目(您可以随时回来查看它们):
- Client ID 客户编号
- Client Secret客户机密
The Strava profile also shows an initial Access Token and Refresh Token that you could use right away, but they’re only valid for a few hours (note the expiration), so we’ll get them the right way, with code.
Strava配置文件还显示了您可以立即使用的初始访问令牌和刷新令牌,但是它们仅在几个小时内有效(请注意有效期),因此我们将通过代码为它们提供正确的方法。
You can extend this example to set up application accounts in LinkedIn, Spotify, and GitHub.
您可以扩展此示例以在LinkedIn , Spotify和GitHub中设置应用程序帐户。
步骤2:要求授权 (Step 2: Request Authorization)
Now we’ll start writing code. We’ll put together a simple web client to demonstrate a round trip from the Authorization Server, and then extend it. First off we need to bring up the Authorization Page on the Authorization Server. We’ll launch it with a button that does a GET on the Access Endpoint with a query string.
现在,我们将开始编写代码。 我们将组装一个简单的Web客户端,以演示来自Authorization Server的往返行程,然后对其进行扩展。 首先,我们需要在授权服务器上打开“授权页面”。 我们将使用在查询查询字符串在Access Endpoint上执行GET的按钮启动它。
oclient/main.go:
oclient / main.go:
package mainimport (
    "fmt"
    "html/template"
    "log"
    "net/http"
    "os"
    "path"
)func main() {
    port := os.Getenv("PORT")
    if port == "" {
        port = "8000"
    }http.HandleFunc("/", HomePageHandler)fmt.Println(">>>>>>> OClient started at:", port)
    log.Fatal(http.ListenAndServe(":"+port, nil))
    return
}func HomePageHandler(w http.ResponseWriter, r *http.Request) {    fp := path.Join("templates", "home.html")
    tmpl, err := template.ParseFiles(fp)
    if err != nil {
        http.Error(w, err.Error(), http.StatusInternalServerError)
        return
    }    if err := tmpl.Execute(w, nil); err != nil {
        http.Error(w, err.Error(), http.StatusInternalServerError)
    }
}
oclient/templates/home.html
oclient / templates / home.html
<!DOCTYPE html>
<html lang="en">
    <head>
        <meta charset="UTF-8">
        <title>OClient</title>
    </head>
    <body>
        <h1>OClient</h1>
        <br>        <button onclick="window.location.href='https://www.strava.com/oauth/authorize?client_id=40022&response_type=code&redirect_uri=' + window.location.origin + '/redirect&approval_prompt=force&scope=activity:read_all&state=foo'">Authorize</button>    </body>
</html>
Compile and run that:
编译并运行:
cd oclient
go install
oclient
open a browser on localhost:8000
在本地主机上打开浏览器:8000
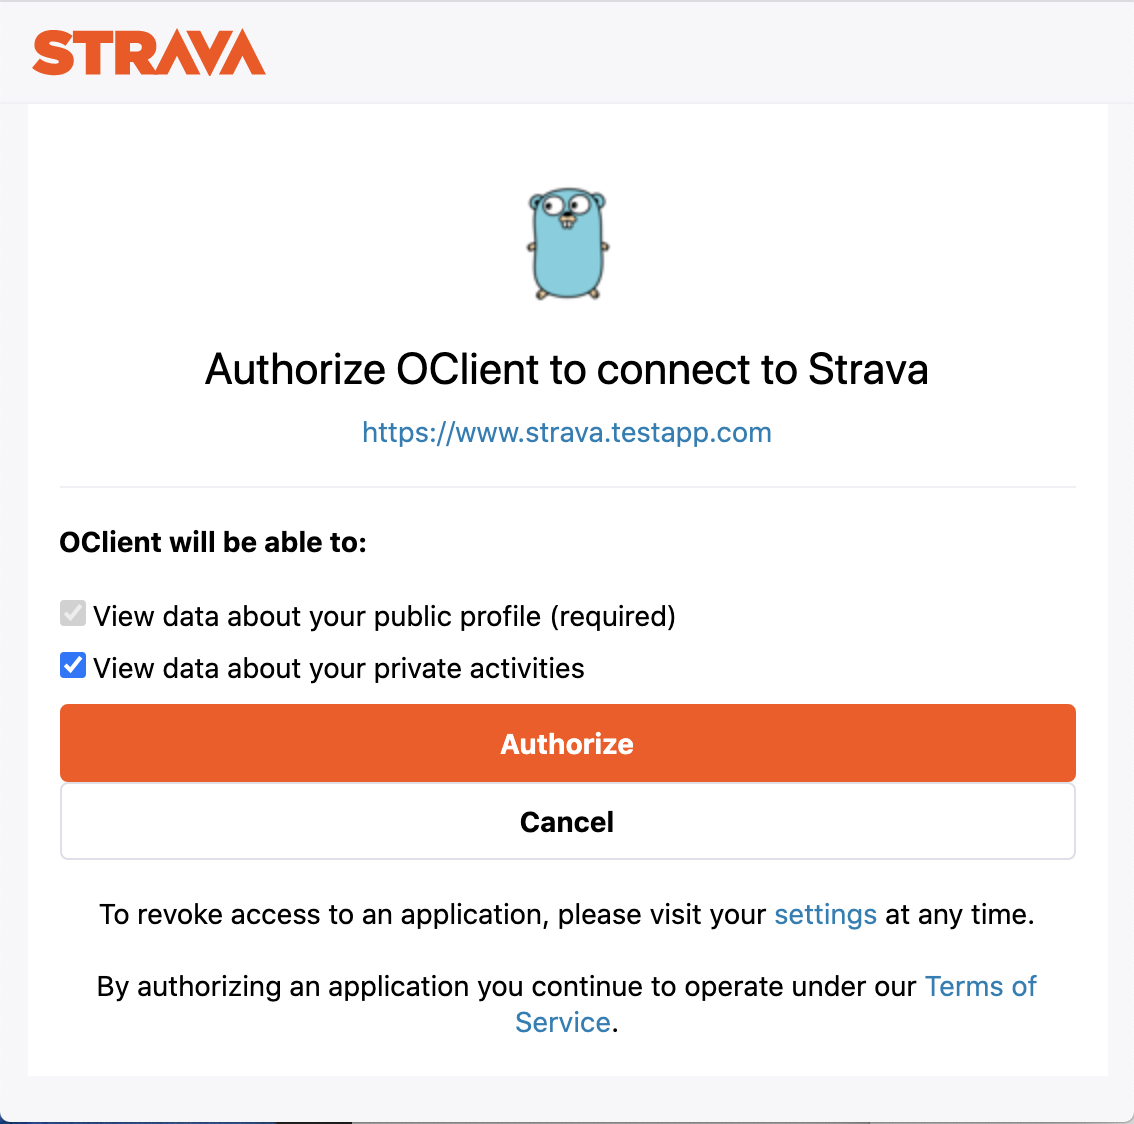
Click on the Authorize button
点击授权按钮
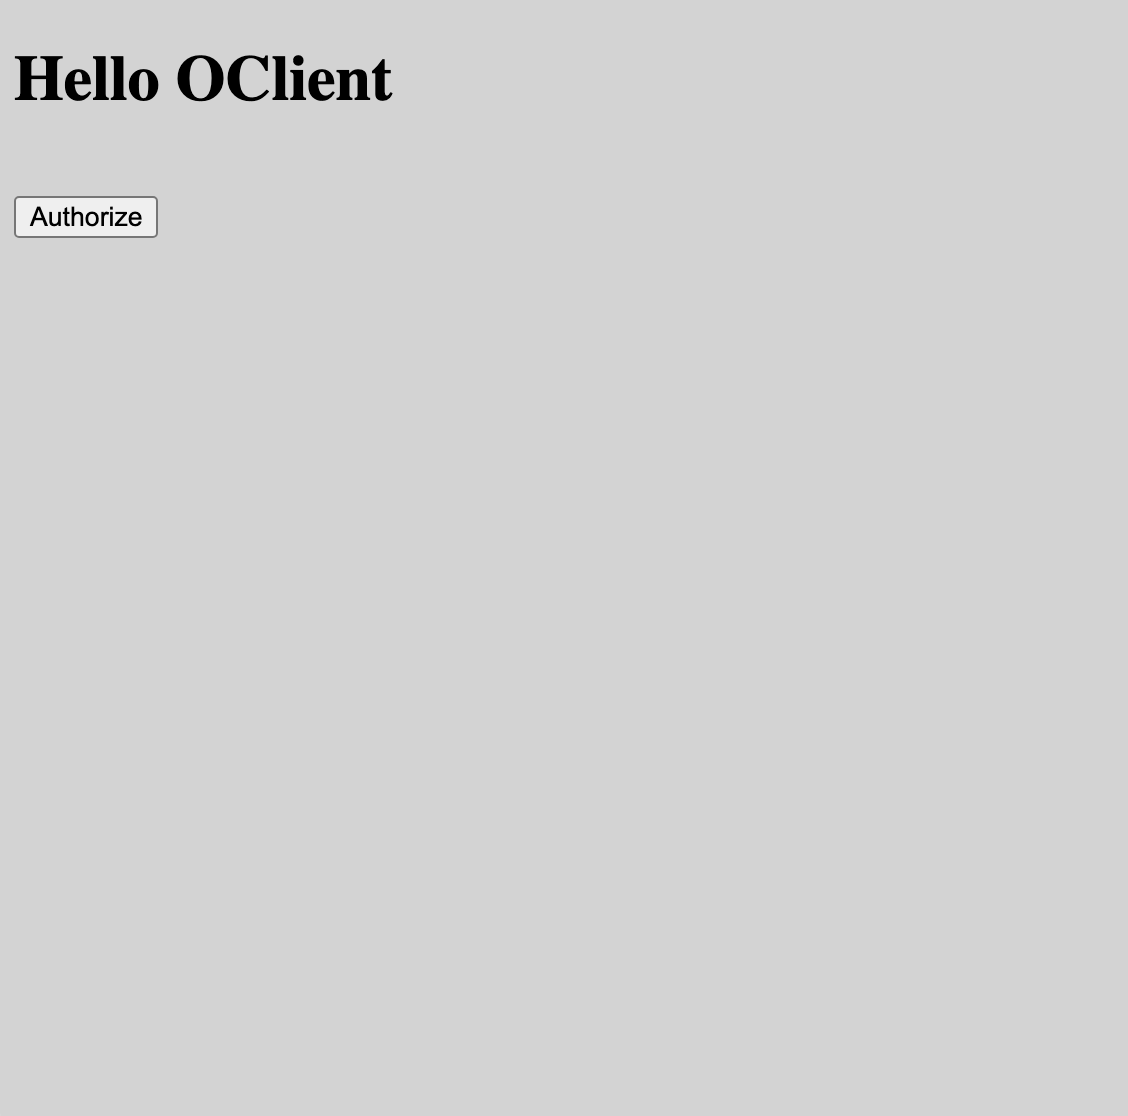
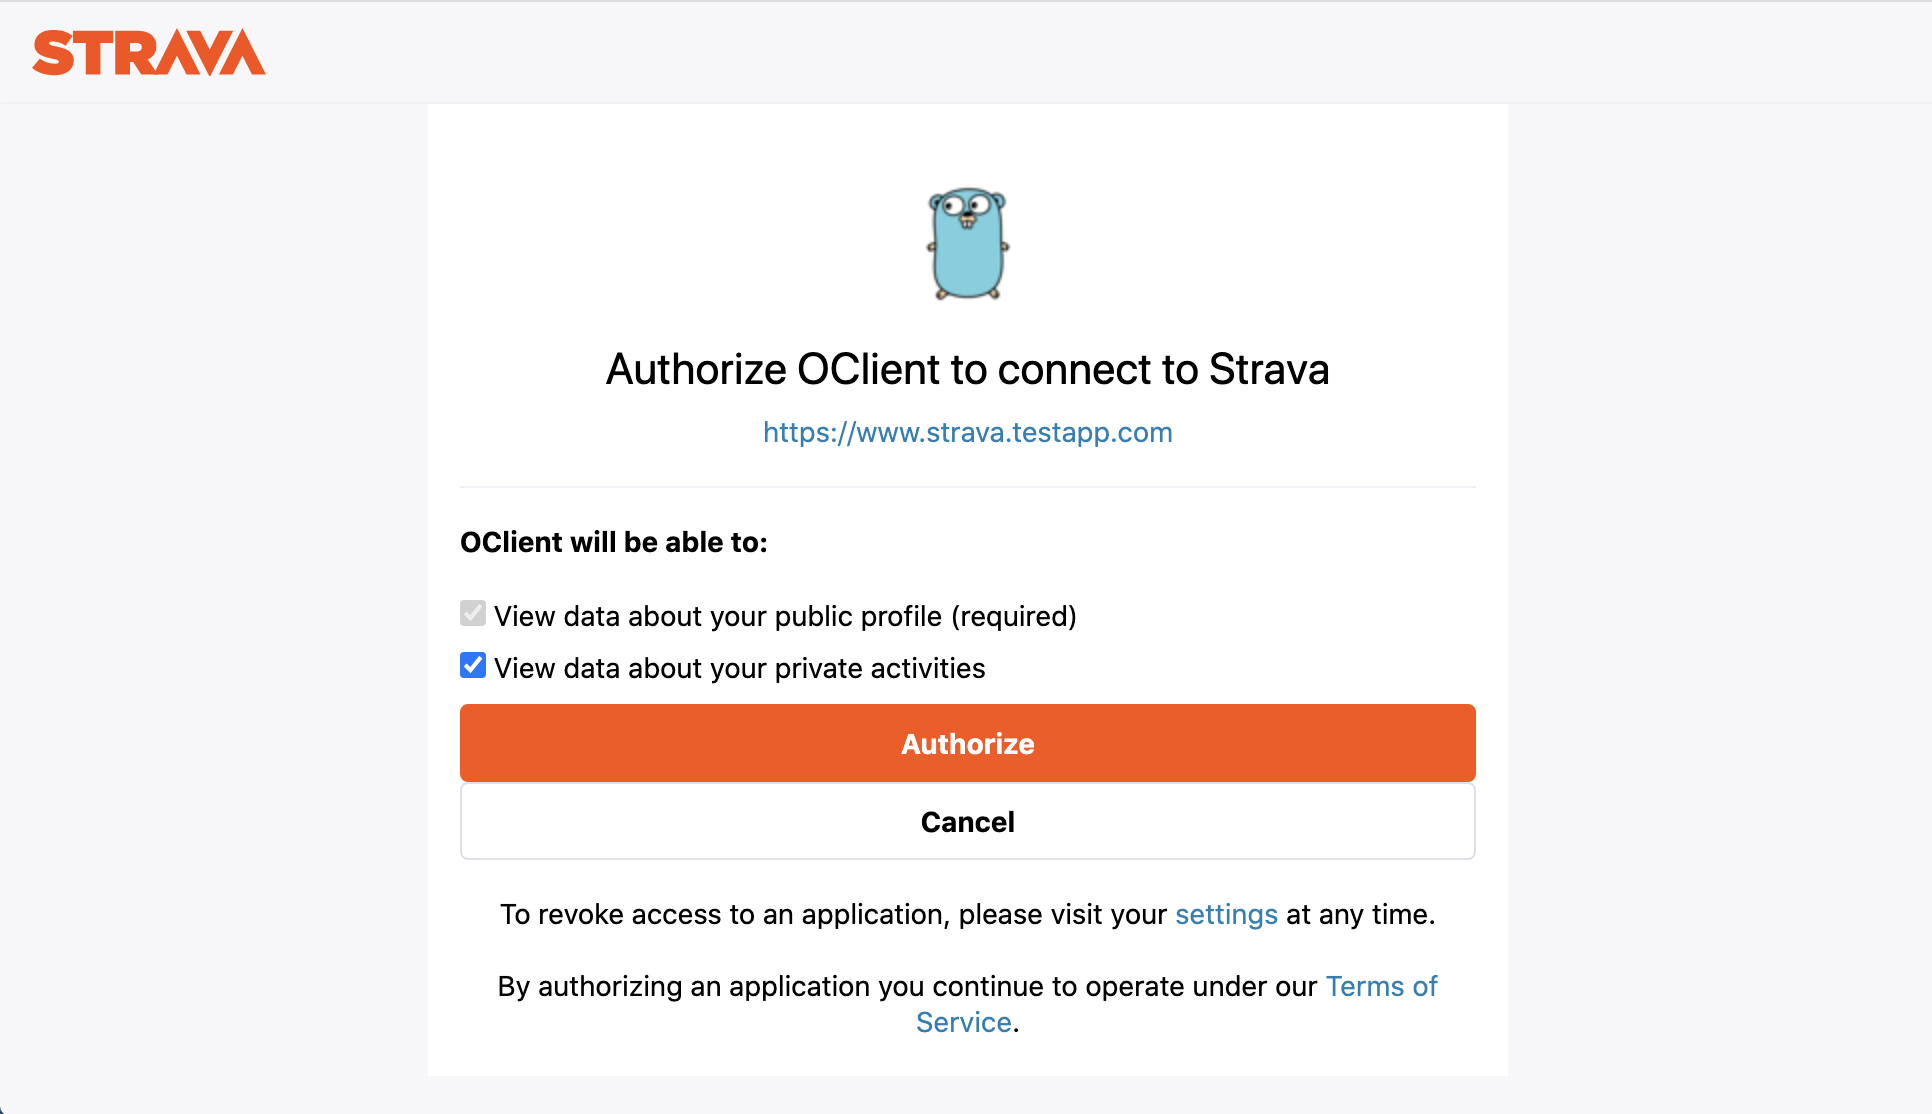
Sure enough, the Strava Authorization Page displays.
果然,将显示Strava授权页面。
Let’s decompose the query string in home.html, note that some of these are required, some are optional, and some are service specific.
让我们在home.html中分解查询字符串,请注意其中一些是必需的,一些是可选的,而某些是特定于服务的。
https://www.strava.com/oauth/authorize this is the Strava Authorization Endpoint. [required]
https://www.strava.com/oauth/authorize 这是Strava授权端点。 [需要]
client_id=40022 this is (my) unique Client Id as provided by Strava for the app, yours will be different. We don’t really need to protect this since it only replies back to our registered domain and redirect_uri (well, ok, maybe you could mess with it on localhost — but I don’t care). [required]
client_id = 40022,这是Strava为该应用程序提供的(我)唯一的客户端ID,您的ID会有所不同。 我们真的不需要保护它,因为它仅会回复我们注册的域和redirect_uri(好吧,也许您可以在localhost上弄乱它-但我不在乎)。 [需要]
response_type=code this tells the Authorization Server that we are requesting an Authorization Code Grant. [required]
response_type = code,它告诉授权服务器我们正在请求授权代码授予。 [需要]
redirect_uri=' + window.location.origin + '/redirect this is our Redirection Endpoint. Note that the domain must match what we provided to Strava above in the settings profile (localhost) — this is why we don’t care that this query string is public. So this tells the Authorization Server that we will receive the code at http://localhost:8000/redirect. [optional, but required by most services]
redirect_uri =' + window.location.origin +'/ redirect,这是我们的重定向端点。 请注意,该域必须与我们在设置配置文件(localhost)中提供给Strava的域匹配-这就是为什么我们不在乎此查询字符串是公共的。 因此,这告诉授权服务器我们将在http:// localhost:8000 / redirect接收代码。 [可选,但大多数服务都需要]
approval_prompt=force this is a Google specific parameter that others have adopted. If “force” then the user is prompted for authorization each time they visit the application, if “auto” then they are only prompted the first time. [optional, service specific]
Approval_prompt = force,这是其他人采用的Google特定参数。 如果为“强制”,则每次访问该应用程序时都会提示用户进行授权;如果为“自动”,则仅在第一次时提示用户。 [可选,服务特定]
scope=activity:read_all this tells the Authorization Server what scope of access you are requesting. The payload is vendor specific since it denotes specific service access, but the query is standard. It is a series of space-delimited, case-sensitive strings. In our case we are requesting read access to the user’s Strava activity data.[optional, but required by most services]
scope = activity:read_all可以告诉授权服务器您请求的访问范围。 有效负载是特定于供应商的,因为它表示特定的服务访问,但是查询是标准的。 它是一系列以空格分隔的,区分大小写的字符串。 在我们的情况下,我们请求对用户的Strava活动数据进行读取访问。[可选,但大多数服务都需要]
state=foo this value is client specific and opaque the Authorization Server. It will be sent back to the client verbatim to the Redirect Endpoint on the client. You can use it to maintain state between the initial client Authorization Code request and subsequent server callback. It is also highly recommended to make use of the state parameter as a randomly generated “binding value” that the client can use to validate the server’s callback to mitigate cross-site request forgery (CSRF). (we’ll do this later) [optional, but recommended]
state = foo此值是客户端特定的,并且对授权服务器不透明。 它会原样发送回客户端上的重定向端点。 您可以使用它来维护初始客户端授权码请求和后续服务器回调之间的状态。 强烈建议将state参数用作随机生成的“绑定值”,客户端可使用该值来验证服务器的回调以减轻跨站点请求伪造(CSRF)。 (我们稍后会做)[可选,但推荐]
步骤3:接收授权码 (Step 3: Receive the Authorization Code)
Now let’s extend our program to receive the Authorization Code from the Authorization Server (in bold below). We’ll set up a new handler at our Redirection URI: /redirect.
现在,让我们扩展程序,以从授权服务器接收授权代码(下面以粗体显示)。 我们将在重定向URI:/ redirect处设置一个新的处理程序。
oclient/main.go
oclient / main.go
package mainimport (
    "fmt"
    "html/template"
    "log"
    "net/http"
    "net/url"
    "os"
    "path"
)func main() {port := os.Getenv("PORT")
    if port == "" {
        port = "8000"
    }//pages
    http.HandleFunc("/", HomePageHandler)
    http.HandleFunc("/redirect", RedirectHandler)fmt.Println(">>>>>>> OClient started at:", port)
    log.Fatal(http.ListenAndServe(":"+port, nil))
    return
}func HomePageHandler(w http.ResponseWriter, r *http.Request) {
fp := path.Join("templates", "home.html")
    tmpl, err := template.ParseFiles(fp)
    if err != nil {
        http.Error(w, err.Error(), http.StatusInternalServerError)
        return
    }    if err := tmpl.Execute(w, nil); err != nil {
        http.Error(w, err.Error(), http.StatusInternalServerError)
    }
}func RedirectHandler(w http.ResponseWriter, r *http.Request) {
    m, err := url.ParseQuery(r.URL.RawQuery)
    if err != nil {
        http.Error(w, err.Error(), http.StatusInternalServerError)
        return
    }
    code := m.Get("code")
    scope := m.Get("scope")
    fmt.Fprintln(w, "Code: ", code, " Scope: ", scope)
}
Compile and Run it again
再次编译并运行
go install
oclient
As before, when you click on the Authorize button in OClient it will bring up the Strava Authorize page. This time click on the Authorize button in the Strava page. You should see the Authorization Code and Scope:
和以前一样,当您在OClient中单击“授权”按钮时,将弹出Strava授权页面。 这次单击Strava页面中的Authorize按钮。 您应该看到授权代码和范围:
Code: 7160d4a21b495bf6e371db6d6aa85ca656c587be Scope: read,activity:read_all步骤4:将授权码交换为访问令牌 (Step 4: Exchange the Authorization Code for an Access Token)
We now have the Authorization Code, but it only tells us that authorization happened, we can’t use it to get data. We have to exchange it for an Access Token, so let’s do that by firing off a POST to the Token Endpoint.
现在我们有了授权码,但是它只告诉我们授权发生了,我们不能用它来获取数据。 我们必须将其交换为访问令牌,因此我们通过触发到令牌端点的POST来实现。
oclient/main.go
oclient / main.go
package mainimport (
    "bytes"
    "encoding/json"
    "fmt"
    "html/template"
    "io/ioutil"
    "log"
    "net/http"
    "net/url"
    "os"
    "path"
)func main() {
    port := os.Getenv("PORT")
    if port == "" {
        port = "8000"
    }
    http.HandleFunc("/", HomePageHandler)
    http.HandleFunc("/redirect", RedirectHandler)fmt.Println(">>>>>>> OClient started at:", port)
    log.Fatal(http.ListenAndServe(":"+port, nil))
    return
}func HomePageHandler(w http.ResponseWriter, r *http.Request) {    fp := path.Join("templates", "home.html")
    tmpl, err := template.ParseFiles(fp)
    if err != nil {
        http.Error(w, err.Error(), http.StatusInternalServerError)
        return
    }    if err := tmpl.Execute(w, nil); err != nil {
        http.Error(w, err.Error(), http.StatusInternalServerError)
    }
}func RedirectHandler(w http.ResponseWriter, r *http.Request) {
    m, err := url.ParseQuery(r.URL.RawQuery)
    if err != nil {
        http.Error(w, err.Error(), http.StatusInternalServerError)
        return
    }
    code := m.Get("code")
    scope := m.Get("scope")
    fmt.Fprintln(w, "Code: ", code, " Scope: ", scope)
    token := getAuthToken(w, r, code)
    fmt.Fprintln(w, "Token: ", token)
}const (
    ClientId      = "40022"
    ClientSecret  = "BlahBlahBlahBlahBlahBlahBlahBlahBlahBlah"
    TokenEndpoint = "https://www.strava.com/oauth/token"
)func getAccessToken(w http.ResponseWriter, r *http.Request, code string) (result string) {
    requestBody, err := json.Marshal(map[string]string{
        "client_id":     ClientId,
        "client_secret": ClientSecret,
        "code":          code,
        "grant_type":    "authorization_code",
    })
    if err != nil {
        http.Error(w, err.Error(), http.StatusInternalServerError)
    }
    resp, err := http.Post(TokenEndpoint, "application/json",   bytes.NewBuffer(requestBody))
    if err != nil {
        http.Error(w, err.Error(), http.StatusInternalServerError)
    }
    defer resp.Body.Close()    body, err := ioutil.ReadAll(resp.Body)
    if err != nil {
        http.Error(w, err.Error(), http.StatusInternalServerError)
    }
    result = string(body)
    return
}
Compile and Run it again
再次编译并运行
go install
oclient
Click the OClient and Strava Authorize buttons. Now, in addition to the Authorization Code and Scope you will also see the Access Token, something like:
单击OClient和Strava授权按钮。 现在,除了授权码和范围,您还将看到访问令牌,类似于:
Token: {"token_type":"Bearer","expires_at":1594843861,"expires_in":19430,"refresh_token":"9ec0cedf070a8b3832f7be43b5acca8bc976deae","access_token":"a16bffde2871928071e98fbff5674b12d4fd0198","athlete":{"id":24336962,"username":null,"resource_state":2,"firstname":"Eric","lastname":"Lang","city":"Seattle","state":"Washington","country":"United States","sex":"M","premium":false,"summit":false,"created_at":"2017-08-19T18:38:37Z","updated_at":"2020-07-07T20:09:26Z","badge_type_id":0,"profile_medium":"https://dgalywyr863hv.cloudfront.net/pictures/athletes/23376952/7221532/1/medium.jpg","profile":"https://dgalywyr863hv.cloudfront.net/pictures/athletes/23376952/7221532/1/large.jpg","friend":null,"follower":null}}So there we are. We have requested an Authorization Code from the Authorization Server, Received the Authorization Code at our Redirection Endpoint, and Exchanged it for an Access Token that we can now use to access secure API.
我们到了。 我们已经从授权服务器请求了一个授权代码,在我们的重定向端点上收到了授权代码,并将其交换为访问令牌,现在我们可以使用该访问令牌来访问安全API。
Note that we are doing a POST to the Strava Token Endpoint with a JSON payload that contains the client_id, client_secret, code, and grant_type. Is this safe? Yes, as long as the Client and Authentication Server are using TLS (HTTPS). Security in OAuth has been thoroughly reviewed and documented. Right now you can see that we are putting the client_id and client_secret in source code, this is not a good idea and in a real system you’d put them in environment variables as is done with “PORT” above. We’ll do that in the next version.
请注意,我们正在使用JSON负载对Strava令牌端点进行POST,该JSON负载包含client_id,client_secret,代码和grant_type。 这样安全吗? 是的,只要客户端和身份验证服务器正在使用TLS(HTTPS)。 OAuth中的安全性已被彻底审查和记录。 现在您可以看到我们正在将client_id和client_secret放入源代码中,这不是一个好主意,在实际系统中,您可以将它们放入环境变量中,就像上面的“ PORT”一样。 我们将在下一个版本中进行。
The Authorization Code is a one-time use code and it is now “used” — if you try to use it again you will find that it is expired. To get a new Access Token you either have to go all the way back to the beginning and re-authorize, or get a Refresh Token.
授权码是一次性使用的代码,现在已被“使用”,如果再次尝试使用它,则会发现它已过期。 要获得新的访问令牌,您必须一直回到开始并重新授权,或者获取刷新令牌。
We can now use the Bearer token that we have to access the Strava api directly and get user information. For instance with a simple curl command.
现在,我们可以使用必须直接访问Strava api并获取用户信息的Bearer令牌。 例如,使用简单的curl命令。
curl -X GET https://www.strava.com/api/v3/athlete -H 'Authorization: Bearer {"id":23318762,"username":null,"resource_state":2,"firstname":"Eric","lastname":"Lang","city":"Seattle","state":"Washington","country":"United States","sex":"M","premium":false,"summit":false,"created_at":"2017-08-19T18:38:37Z","updated_at":"2020-07-25T14:51:31Z","badge_type_id":0,"profile_medium":"https://dgalywyr863hv.cloudfront.net/pictures/athletes/23376952/7221532/1/medium.jpg","profile":"https://dgalywyr863hv.cloudfront.net/pictures/athletes/23376952/7221532/1/large.jpg","friend":null,"follower":null}Done, that is a full -end-end of basic OAuth 2.0 Authorization Code Grant. Though we have not yet solved token refresh, PKCE, or some of the nuanced differences between services. We’ll do that now.
完成,即基本OAuth 2.0授权代码授予的完整端。 尽管我们尚未解决令牌刷新,PKCE或服务之间某些细微差别的问题。 我们现在就做。
OAuth 2.0客户端软件包 (OAuth 2.0 Client Package)
Now we’ll extend our simple example into a general tool that we can use to access any OAuth 2.0 service. We’ll first build some helpers that we will need.
现在,我们将简单的示例扩展为可用于访问任何OAuth 2.0服务的通用工具。 我们将首先构建一些我们需要的帮助程序。
We’d like our library to support any and multiple api servers so lets set up a config file that will hold our service data. Note that the actual client_id and client_secret will be loaded from environment variables with the names given in the file, we do not store them in plain source files. You can extend this file to include any new OAuth 2.0 service. I set up api accounts on Strava, LinkedIn, Spotify, and GitHub to test out the code.
我们希望我们的库支持任何和多个api服务器,因此我们可以设置一个配置文件来保存我们的服务数据。 请注意,实际的client_id和client_secret将使用文件中提供的名称从环境变量加载,我们不会将它们存储在纯源文件中。 您可以扩展此文件以包括任何新的OAuth 2.0服务。 我在Strava,LinkedIn,Spotify和GitHub上设置了api帐户以测试代码。
oclient/oclient/services.json
oclient / oclient / services.json
{
    "strava": {
        "client_id":          "STRAVA_CLIENT_ID",
        "client_secret":      "STRAVA_CLIENT_SECRET",
        "authorize_endpoint": "https://www.strava.com/oauth/authorize",
        "redirect_uri":       "http://localhost:8000/redirect",
        "scope":              "activity:read_all",
        "prompt":             "&approval_prompt=force",
        "token_endpoint":     "https://www.strava.com/oauth/token",
        "post_type":          "json",
        "refresh_allowed":    "true"
    },
    "linkedin": {
        "client_id":          "LINKEDIN_CLIENT_ID",
        "client_secret":      "LINKEDIN_CLIENT_SECRET",
        "authorize_endpoint": "https://www.linkedin.com/oauth/v2/authorization",
        "redirect_uri":       "http://localhost:8000/redirect",
        "scope":              "r_liteprofile%20r_emailaddress",
        "prompt":             "",
        "token_endpoint":     "https://www.linkedin.com/oauth/v2/accessToken",
        "post_type":          "form",
        "refresh_allowed":    "false"
    },
    "spotify": {
        "client_id":          "SPOTIFY_CLIENT_ID",
        "client_secret":      "SPOTIFY_CLIENT_SECRET",
        "authorize_endpoint": "https://accounts.spotify.com/authorize",
        "redirect_uri":       "http://localhost:8000/redirect",
        "scope":              "user-top-read%20user-read-email%20playlist-modify-public",
        "prompt":             "",
        "token_endpoint":     "https://accounts.spotify.com/api/token",
        "post_type":          "form",
        "refresh_allowed":    "true"
    },
    "github": {
        "client_id":          "GITHUB_CLIENT_ID",
        "client_secret":      "GITHUB_CLIENT_SECRET",
        "authorize_endpoint": "https://github.com/login/oauth/authorize",
        "redirect_uri":       "http://localhost:8000/redirect",
        "scope":              "repo",
        "prompt":             "",
        "token_endpoint":     "https://github.com/login/oauth/access_token",
        "post_type":          "json",
        "refresh_allowed":    "true"
    }
}
We’ll read these into a services map[string]map[string]string so that we can lookup by service and data type. After we unmarshal the file we convert the client_id and client_secret names to real values by reading them from environment variables, which you will set up in your local or server environment.
我们将它们读入服务map [string] map [string] string中,以便我们可以按服务和数据类型进行查找。 解组文件后,通过从环境变量中读取它们来将client_id和client_secret名称转换为真实值,您可以在本地或服务器环境中进行设置。
oclient/oclient/oclient.go
oclient / oclient / oclient.go
func InitOclient() error {
    return loadConfig("oclient/services.json", &services)
}//== Servicesvar services map[string]map[string]stringfunc loadConfig(fname string, config *map[string]map[string]string) (err error) {
    file, err := os.Open(fname)
    if err != nil {
        return
    }
    defer file.Close()
    byteValue, err := ioutil.ReadAll(file)
    if err != nil {
        return
    }
    json.Unmarshal([]byte(byteValue), config)
    for k, v := range *config {
        v["client_id"] = os.Getenv(v["client_id"])
        if v["client_id"] == "" {
            err = errors.New("Missing service client_id for " + k)
            return
        }
        v["client_secret"] = os.Getenv(v["client_secret"])
        if v["client_secret"] == "" {
            err = errors.New("Missing service client_secret for " + k)
            return
        }
    }
    return
}
In the first example recall that we hardcoded the Authorization Request in home.html. This is not great for a number of reasons. We must initiate the call on the web client, but it is not good to have it so completely opaque to the web server. Also, if we want to use state as recommended to verify the callback, then we have to somehow make the web server aware of it. So we’ll generate the state and the request link on the web server and provide it as an api to the web client. Much cleaner.
在第一个示例中,我们记得在home.html中对授权请求进行了硬编码。 由于许多原因,这不是很好。 我们必须在Web客户端上发起呼叫,但是使它对Web服务器完全不透明是不好的。 另外,如果我们要使用推荐的状态来验证回调,则必须以某种方式使Web服务器意识到这一点。 因此,我们将在Web服务器上生成状态和请求链接,并将其作为api提供给Web客户端。 清洁得多。
The state verification code should be at least 32 random bytes, but since we need PKCE support anyway we can just use a PKCE(128) verifier for our state code. Let’s build our PKCE helpers. PKCE is Proof Key for Code Exchange, as mentioned above it is now the recommended extension to Authorization Code Grant for any client that is not secure (public). It works by generating a random secret (the verifier) and then doing a SHA256 hash on it (the challenge). The challenge is sent first in the initial request for the Authorization Code. After the Authorization Server does the callback with the Authorization Code you then send the verifier instead of a client secret in the next call to Authorization Server to exchange the Authorization Code for an Access Token. The server checks that the challenge matches the SHA256 hashed verifier that you sent before and if all is good you are rewarded with an Access Token.
状态验证代码应至少为32个随机字节,但是由于我们仍然需要PKCE支持,因此我们可以仅使用PKCE(128)验证程序作为状态代码。 让我们构建我们的PKCE助手。 PKCE是代码交换的证明密钥,如上所述,对于任何不安全(公开)的客户端,PKCE现在都是对授权代码授予的推荐扩展。 它的工作方式是生成一个随机秘密(验证者),然后对其进行SHA256哈希(挑战)。 质询首先在初始请求授权码中发送。 在授权服务器使用授权代码进行回调之后,您可以在下一次对授权服务器的调用中将验证程序而不是客户端密码发送给验证服务器,以交换访问令牌的授权代码。 服务器检查挑战是否与您之前发送的SHA256哈希验证器相匹配,如果一切都很好,您将获得访问令牌作为奖励。
Per RFC 7636, The PKCE verifier can be from 43 to 128 bytes of random text from the [a-z, A-Z, 0–9, -,.,_,~] char set. The PKCE challenge is a base64-URL-encoded SHA256 hash of the verifier.
根据RFC 7636 ,PKCE验证程序可以是[az,AZ,0–9,-,。,_,〜]字符集的43到128字节的随机文本。 PKCE挑战是验证程序的base64-URL编码的SHA256哈希。
oclient/oclient/oclient.go
oclient / oclient / oclient.go
package oclientimport (
    "bytes"
    "crypto/sha256"
    "encoding/base64"
    "encoding/json"
    "errors"
    // "fmt"
    "io"
    "io/ioutil"
    "math/rand"
    "net/http"
    "net/url"
    "os"
    "strings"
    "sync"
    "time"
)const (
    STRAVA    = "strava"
    LINKEDIN  = "linkedin"
    SPOTIFY   = "spotify"
    GITHUB    = "github"
    AUTHORIZE = "authorization_code"
    REFRESH   = "refresh_token"
    SECRET    = "secret"
    PKCE      = "pkce"
)func InitOclient() error {
    PkceInit()
    return loadConfig("oclient/services.json", &services)
}//== PKCEfunc PkceInit() {
    rand.Seed(time.Now().UnixNano())
}//string of pkce allowed chars
func PkceVerifier(length int) string {
    if length > 128 {
        length = 128
    }
    if length < 43 {
        length = 43
    }
    const charset = "abcdefghijklmnopqrstuvwxyz" +
        "ABCDEFGHIJKLMNOPQRSTUVWXYZ0123456789-._~"
    b := make([]byte, length)
    for i := range b {
        b[i] = charset[rand.Intn(len(charset))]
    }
    return string(b)
}//base64-URL-encoded SHA256 hash of verifier, per rfc 7636
func PkceChallenge(verifier string) string {
    sum := sha256.Sum256([]byte(verifier))
    challenge := base64.URLEncoding.WithPadding(base64.NoPadding).EncodeToString(sum[:])
    return (challenge)
}
Since we will need to temporarily store the state between the initial client request and the server callback we will build a small in-memory state management system. This could be done with persistent storage or some other redis-like store system, but the storage time window required is short enough that we can build our own and keep it simple. It does need to be mutex protected since multiple clients could be accessing it. We’ll have the lookup key be the state code and the payload will be a struct that contains an expiration timestamp, service name, authorization type, and the PKCE verifier and challenge that we will eventually need for PKCE support.
由于我们将需要在初始客户端请求和服务器回调之间临时存储状态,因此我们将构建一个小的内存状态管理系统。 这可以通过持久性存储或其他类似Redis的存储系统来完成,但是所需的存储时间窗口足够短,我们可以构建自己的存储窗口并使之保持简单。 它确实需要互斥保护,因为可能有多个客户端访问它。 我们将使用查找键作为状态码,而有效载荷将是一个结构,其中包含到期时间戳记,服务名称,授权类型以及PKCE验证程序和挑战,而最终我们将需要PKCE支持。
There is a potential problem when the client makes a code request to the Authorization Server, which generates a state code that is saved to our map, but then for whatever reason the user does not complete the authorization and so the callback never happens, and so the state code is never deleted from our map. This is why the State struct contains the CreatedAt field, and why we need to kick off garbage collection every so often to clean up the map. We don’t need to cron it, we can be lazy and just check whether we should do GC in the setState() function. This leak should be rare by normal users so we don’t want to overly burden the system, but we need to clean up frequently enough to guard against malicious attack, and if we hit our storage limit we need to aggressively prune. So we check on each call to setState by looking for an ideal surpassing of the garbage collection limit (GcPeriod), and a not so ideal surpassing of the maximum size allowed for the state map (MaxState). Either of these will trigger garbage collection. The Garbage collection routine starts with an ideal expiration of InitAuthTimeout, and the halves it each iteration until it gets back under MaxState. Using a captcha on the input will also help guard against malice. Feel free to change the consts for your specific application.
当客户端向授权服务器发出代码请求时,存在一个潜在的问题,该服务器生成状态代码并保存到我们的地图中,但是由于某种原因,用户没有完成授权,因此回调从未发生,因此状态代码永远不会从我们的地图中删除。 这就是为什么State结构包含CreatedAt字段的原因,以及为什么我们需要如此频繁地启动垃圾收集以清理地图的原因。 我们不需要cron,我们可以很懒惰,只是检查是否应该在setState()函数中执行GC。 对于普通用户来说,这种泄漏应该很少发生,因此我们不想给系统增加过多的负担,但是我们需要经常进行清理,以防止恶意攻击,并且如果达到存储限制,则需要进行大幅修剪。 因此,我们通过查找理想值是否超过垃圾回收限制(GcPeriod)来检查setState的每次调用,而不是理想状态下超过状态映射所允许的最大大小(MaxState)。 这些都会触发垃圾回收。 垃圾回收例程从理想的InitAuthTimeout到期开始,并且每次迭代将其减半,直到返回MaxState。 在输入上使用验证码也可以防止恶意。 随时为您的特定应用程序更改const。
//== State Managementconst (
    GcPeriod        = 60  //minutes - minimum ideal time between GC runs (unless MaxState)
    InitAuthTimeout = 10  //minutes - amount of time user has to complete Authorization and get Access Code from Authorization Server
    MaxState        = 400 //max allowed length of state map, to prevent malicious memory overflow
)type State struct {
    CreatedAt     time.Time
    Service       string
    AuthType      string
    PkceVerifier  string
    PkceChallenge string
}var state = make(map[string]*State)
var lastGc = time.Now().UTC()
var mutex = &sync.Mutex{}//get the payload for a state, check expiration, and delete
func getState(key string) (value *State) {
    mutex.Lock()
    v, exists := state[key]
    if exists {
        n := time.Now().UTC()
        if n.After(v.CreatedAt.Add(InitAuthTimeout * time.Minute)) {
            value = nil //don't accept expired state
        } else {
            value = v
        }
        delete(state, key)
    } else {
        value = nil
    }
    defer mutex.Unlock()
    return
}//set the payload for a state, set expiration, do gc as needed
func setState(key string, value *State) {
    mutex.Lock()
    n := time.Now().UTC()
    value.CreatedAt = n
    state[key] = value
    //gc
    authTimeout := InitAuthTimeout * time.Minute //type Duration
    gcTime := lastGc.Add(GcPeriod * time.Minute)
    if n.After(gcTime) || len(state) >= MaxState {
        for ok := true; ok; ok = len(state) >= MaxState { //keep going till below MaxState, 1/2 each cycle
            for k, v := range state {
                expiresAt := v.CreatedAt.Add(authTimeout)
                if n.After(expiresAt) {
                    delete(state, k)
                }
            }
            authTimeout /= 2
        }
        lastGc = time.Now().UTC()
    }
    defer mutex.Unlock()
    return
}
When we successfully receive an Access Token from the Authorization Server we’ll want to store it somewhere so that we can use it in future api calls until it expires. We will have one token per service. Again, we could use some persistent storage database, but we can also just make it a secure cookie. Note that for localhost testing we set Secure to false and SameSite to http.SameSiteLaxMode but when we deploy to the server we will set Secure to true and SameSite to http.SameSiteStrictMode. Here are the cookie helpers:
当我们成功从授权服务器收到访问令牌后,我们将其存储在某个地方,以便我们可以在以后的api调用中使用它,直到过期为止。 每项服务我们将有一个令牌。 同样,我们可以使用一些持久性存储数据库,但也可以使它成为安全的cookie。 请注意,对于localhost测试,我们将Secure设置为false并将SameSite设置为http.SameSiteLaxMode,但是当我们部署到服务器时,我们将Secure设置为true并将SameSite设置为http.SameSiteStrictMode。 以下是cookie助手:
//== Cookie Helpersconst CookiePrefix = "_OClient"func cookieName(service string) string {
    return (CookiePrefix + service)
}//generic cookie setter
func setCookie(w http.ResponseWriter, token string, cookieName string) {
    tok64 := base64.StdEncoding.EncodeToString([]byte(token))
    cookie := http.Cookie{
        Name:     cookieName,
        Value:    tok64,
        HttpOnly: true,
        Secure:   false, //use true for production
        Path:     "/",
        SameSite: http.SameSiteLaxMode,
    }
    http.SetCookie(w, &cookie)
    return
}//generic cookie getter
func getCookie(r *http.Request, cookieName string) (token string, err error) {
    cookie, err := r.Cookie(cookieName)
    if err != nil {
        return
    }
    tokb, err := base64.StdEncoding.DecodeString(cookie.Value)
    if err != nil {
        return
    }
    token = string(tokb)
    return
}
We need an API helper to create our request link based on a particular service. Our helper will make use of our services map that was loaded with our json file to look up the correct info for a particular service. Note that we call setState() at the end with state as a key — so when we get state back from the Authorization Server we can easily check validity and look up the payload.
我们需要一个API帮助器来基于特定服务创建请求链接。 我们的助手将利用json文件加载的服务映射来查找特定服务的正确信息。 请注意,我们在最后使用状态作为键调用setState(),因此,当我们从授权服务器获取状态时,我们可以轻松地检查有效性并查找有效负载。
//== API Helpers//build service Code Authorize Link and save state as pkceVerifier (128)
func AuthLink(r *http.Request, authtype string, service string) (result string) {
    stData := State{Service: service, AuthType: authtype}
    st := PkceVerifier(128)
    result = services[service]["authorize_endpoint"]
    result += "?client_id=" + services[service]["client_id"]
    result += "&response_type=code&redirect_uri="
    result += services[service]["redirect_uri"]
    result += "&scope=" + services[service]["scope"]
    result += services[service]["prompt"]
    if authtype == PKCE {
        stData.PkceVerifier = PkceVerifier(128)
        stData.PkceChallenge = PkceChallenge(stData.PkceVerifier)
        result += "&code_challenge=" + stData.PkceChallenge
        result += "&code_challenge_method=S256"
    }
    result += "&state=" + st
    setState(st, &stData)
    return
}
Now in our main we’ll build a little server with an api endpoint /authlink/{authtype}/{service} that returns our server generated link above. The {authtype} can be either “secret” for normal client secret based Authorization Code Grant, or it can be “pkce” for the PKCE extension. The {service} can be the name of any of our supported services, currently “strava”, “linkedin”, “spotify”, “github” ..and any others that you add into the services.json file. I added consts for each of these to reduce errors, but it is not necessary.
现在,在我们的主目录中,我们将构建一个带有api端点/ authlink / {authtype} / {service}的小服务器,该服务器返回上面的服务器生成的链接。 {authtype}可以是基于常规客户端机密的授权码授予的“秘密”,也可以是PKCE扩展名的“ pkce”。 {service}可以是我们支持的任何服务的名称,当前为“ strava”,“ linkedin”,“ spotify”,“ github” ..以及您添加到services.json文件中的任何其他服务。 我为每个这些都添加了const以减少错误,但这不是必需的。
oclient/main.go
oclient / main.go
package mainimport (
    "github.com/exyzzy/oclient/oclient"
    "fmt"
    "github.com/gorilla/mux"
    "html/template"
    "io/ioutil"
    "log"
    "net/http"
    "net/url"
    "os"
    "path"
)func main() {
    err := oclient.InitOclient()
    if err != nil {
        log.Fatal(err)
    }
    port := os.Getenv("PORT")
    if port == "" {
        port = "8000"
    }
    r := mux.NewRouter()
    r.HandleFunc("/", PageHomeHandler)
    r.HandleFunc("/page/api", PageApiHandler)
    r.HandleFunc("/authlink/{authtype}/{service}", AuthlinkHandler)
    r.HandleFunc("/redirect", RedirectHandler)
    r.HandleFunc("/strava/get/athlete", StravaGetAthleteHandler)
    r.HandleFunc("/strava/get/activities", StravaGetActivitiesHandler)
    r.HandleFunc("/linkedin/get/me", LinkedinGetMeHandler)
    r.HandleFunc("/spotify/get/me", SpotifyGetMeHandler)
    r.HandleFunc("/spotify/get/newreleases", SpotifyGetNewReleasesHandler)
    r.HandleFunc("/spotify/put/rename", SpotifyPutRenameHandler)
    r.HandleFunc("/github/get/user", GithubGetUserHandler)
    http.Handle("/", r)
    fmt.Println(">>>>>>> OClient started at:", port)
    log.Fatal(http.ListenAndServe(":"+port, nil))
    return
}func PageHomeHandler(w http.ResponseWriter, r *http.Request) {
    pageHandler(w, r, nil, "templates", "home.html")
}func PageApiHandler(w http.ResponseWriter, r *http.Request) {
    pageHandler(w, r, nil, "templates", "api.html")
}func pageHandler(w http.ResponseWriter, r *http.Request, data interface{}, dir string, filenames ...string) {
    var files []string
    for _, file := range filenames {
        files = append(files, path.Join(dir, file))
    }
    tmpl, err := template.ParseFiles(files...)
    if err != nil {
        http.Error(w, err.Error(), http.StatusInternalServerError)
        return
    }
    if err := tmpl.Execute(w, data); err != nil {
        http.Error(w, err.Error(), http.StatusInternalServerError)
        return
    }
}func AuthlinkHandler(w http.ResponseWriter, r *http.Request) {
    vars := mux.Vars(r)
    authtype := vars["authtype"]
    service := vars["service"]
    authlink := oclient.AuthLink(r, authtype, service)
    fmt.Fprintln(w, authlink)
}
Again, note that we do not need any hardcoded request links in our front end since we created an api to generate the link dynamically as needed. A small JS function makes an Axios call to retrieve the link for our client. We only generate a new link and set state on an actual user click.
同样,请注意,由于我们创建了一个API以根据需要动态生成链接,因此前端不需要任何硬编码的请求链接。 一个小的JS函数调用Axios来检索我们客户的链接。 我们仅生成一个新链接,并在实际用户点击时设置状态。
oclient/templates/home.html
oclient / templates / home.html
<!DOCTYPE html>
<html lang="en">
    <head>
        <meta charset="UTF-8">
        <title>OClient</title>
        <style>
            body {
              background-color: lightgray;
            }
        </style>

    </head>
    <body>
        <h1>OClient Authorize</h1>
        <br>
        <button onclick="getLink(`secret`, `strava`)">Code Authorize Strava</button>
        <button onclick="getLink(`secret`,`linkedin`)">Code Authorize LinkedIn</button>
        <button onclick="getLink(`pkce`,`linkedin`)">PKCE Authorize LinkedIn</button>
        <button onclick="getLink(`pkce`,`spotify`)">PKCE Authorize Spotify</button>
        <button onclick="getLink(`secret`,`github`)">Code Authorize Github</button><script src="https://cdn.jsdelivr.net/npm/axios/dist/axios.min.js"></script>
        <script>           function getLink(type, service) {
                console.log(type, service)
            // Make a request for a user with a given ID
                axios.get('/authlink/'+ type + '/' + service)
                .then((response) => {
                    console.log(response.data)
                    window.location.href=response.data
                })
                .catch(function (error) {
                    console.log(error);
                });
            }
        </script></body>
</html>
Now that we are successfully requesting Authorization codes and bringing up the service prompts we need to build the Redirect Endpoint to receive the callback and Exchange the code. The Access Token we receive back from the service is json, so to us it is map[string]interface{}.
现在我们已经成功地请求了授权代码并显示了服务提示,我们需要构建重定向端点来接收回调并交换代码。 我们从服务收到的访问令牌是json,因此对我们来说是map [string] interface {}。
The function getToken() does the heavy lifting by building a stringified map[string][string] of params to post that the service expects to receive at the Token Endpoint. It can post as either application/json (“post_type”: “json”), or as application/x-www-form-urlencoded (“post_type”: “form”) depending on the service preference. OAuth 2.0 specifies form encoded, but most services will accept json. Finally it does the post and ExchangeCode() saves the returned token as a cookie.
函数getToken()通过构建参数化的字符串化map [string] [string]来发布服务期望在令牌端点处接收的参数,从而完成了繁重的工作。 根据服务偏好,它可以发布为application / json(“ post_type”:“ json”),也可以发布为application / x-www-form-urlencoded(“ post_type”:“ form”)。 OAuth 2.0指定表单编码,但是大多数服务将接受json。 最后,它执行发布操作,ExchangeCode()将返回的令牌另存为cookie。
Surprisingly, some services do not have expiration times at all on the token, and some use expires_in vs. expires_at. We unify all of that in getToken() and convert everything to “expires_at” to make the refresh easier to handle.
令人惊讶的是,某些服务在令牌上根本没有到期时间,并且某些服务使用expires_in与expires_at。 我们在getToken()中统一所有这些内容,并将所有内容转换为“ expires_at”,以使刷新更易于处理。
oclient/oclient/oclient.go
oclient / oclient / oclient.go
//== Access Token//exchange the Authorization Code for Access Token
func ExchangeCode(w http.ResponseWriter, r *http.Request, code string, state string) (err error) {
    statePtr := getState(state)
    if statePtr == nil {
        err = errors.New("State Key not found")
        return
    }
    token, err := getToken(w, r, statePtr.Service, AUTHORIZE, code, statePtr.AuthType, statePtr.PkceVerifier)
    if err != nil {
        return
    }
    setCookie(w, token, cookieName(statePtr.Service)) //note: must set cookie before writing to responsewriter
    return
}//wrapper to set accept header
func jsonPost(url string, body io.Reader) (resp *http.Response, err error) {
    var client = &http.Client{
        Timeout: time.Second * 10,
    }
    req, err := http.NewRequest("POST", url, body)
    if err != nil {
        return nil, err
    }
    req.Header.Set("Content-Type", "application/json")
    req.Header.Set("Accept", "application/json")
    return client.Do(req)
}//subtract a small delta from exires_at to account for transport time
const DELTASECS = 5//get a token from authorization endpoint
func getToken(w http.ResponseWriter, r *http.Request, service string, tokType string, code string, authType string, verifier string) (result string, err error) {
    rParams := map[string]string{
        "client_id":    services[service]["client_id"],
        "redirect_uri": services[service]["redirect_uri"],
    }
    switch tokType {
    case AUTHORIZE:
        rParams["code"] = code
        rParams["grant_type"] = AUTHORIZE
    case REFRESH:
        rParams["refresh_token"] = code
        rParams["grant_type"] = REFRESH
    default:
        err = errors.New("Unknown tokType")
        return
    }
    switch authType {
    case SECRET:
        rParams["client_secret"] = services[service]["client_secret"]
    case PKCE:
        rParams["code_verifier"] = verifier
    default:
        err = errors.New("Unknown authType")
        return
    }
    var resp *http.Response
    switch services[service]["post_type"] {
    case "json":
        var requestBody []byte
        requestBody, err = json.Marshal(rParams)
        if err != nil {
            return
        }
        resp, err = jsonPost(services[service]["token_endpoint"], bytes.NewBuffer(requestBody))
        if err != nil {
            return
        }    case "form":
        vals := url.Values{}
        for k, v := range rParams {
            vals.Set(k, v)
        }
        resp, err = http.PostForm(services[service]["token_endpoint"], vals)
        if err != nil {
            return
        }
    default:
        err = errors.New("Unknown post_type")
        return
    }
    defer resp.Body.Close()
    body, err := ioutil.ReadAll(resp.Body)
    if err != nil {
        return
    }
    if resp.StatusCode != 200 {
        err = errors.New(string(body))
        return
    }
    //check for expires_at
    var tokMap map[string]interface{}
    decoder := json.NewDecoder(strings.NewReader(string(body)))
    decoder.UseNumber()
    err = decoder.Decode(&tokMap)
    if err != nil {
        err = errors.New("decoder.Decode: " + err.Error())
        return
    }
    expire, exists := tokMap["expires_at"]    if exists {
        result = string(body)
        return
    }
    var expiresIn int64
    expire, exists = tokMap["expires_in"]
    if !exists { //no expiration, so make it a year
        expiresIn = 31536000
    } else {
        expiresIn, err = expire.(json.Number).Int64()
    }
    tokMap["expires_at"] = epochSeconds() + expiresIn - DELTASECS
    b, err := json.Marshal(tokMap)
    if err != nil {
        err = errors.New("json.Marshal: " + err.Error())
        return
    }
    result = string(b)
    return
}
We already added the route for it above, now let’s fill in the handler.
我们已经在上面添加了路由,现在让我们填写处理程序。
oclient/main.go
oclient / main.go
func RedirectHandler(w http.ResponseWriter, r *http.Request) {
    m, err := url.ParseQuery(r.URL.RawQuery)
    if err != nil {
        http.Error(w, err.Error(), http.StatusInternalServerError)
        return
    }
    code := m.Get("code")
    state := m.Get("state")
    err = oclient.ExchangeCode(w, r, code, state) //do not write to w before this call
    if err != nil {
        http.Error(w, "Exchange Failed: "+err.Error(), http.StatusInternalServerError)
        return
    }
    // fmt.Fprintln(w, "Code: ", code, " Scope: ", scope)
    http.Redirect(w, r, "/page/api", 302)
}
We now have the Access Token, we’ll build some helpers to make an api call to our service api, adding the correct bearer token for the service. Our setHeader() function will check for an expired AccessToken and automatically refresh it if allowed to.
现在,我们有了访问令牌,我们将构建一些帮助程序来对我们的服务api进行api调用,为该服务添加正确的承载令牌。 我们的setHeader()函数将检查过期的AccessToken并在允许时自动刷新它。
oclient/oclient/oclient.go
oclient / oclient / oclient.go
//make call to a resource api, add oauth bearer token
func ApiRequest(w http.ResponseWriter, r *http.Request, service, method, url string, data map[string]interface{}) (response *http.Response, err error) {
    var client = &http.Client{
        Timeout: time.Second * 10,
    }
    var body io.Reader
    if data == nil {
        body = nil
    } else {
        var requestBody []byte
        requestBody, err = json.Marshal(data)
        if err != nil {
            return
        }
        body = bytes.NewBuffer(requestBody)
    }
    request, err := http.NewRequest(method, url, body)
    if err != nil {
        return
    }
    err = setHeader(w, r, service, request)
    if err != nil {
        err = errors.New("Unable to set Header: " + err.Error())
        return
    }
    response, err = client.Do(request)
    return
}func epochSeconds() int64 {
    now := time.Now()
    secs := now.Unix()
    return secs
}//get Access Token via cookie, refresh if expired, set header bearer token
func setHeader(w http.ResponseWriter, r *http.Request, service string, newReq *http.Request) (err error) {
    token, err := getCookie(r, cookieName(service))
    if err != nil {
        return
    }
    var tokMap map[string]interface{}    // err = json.Unmarshal([]byte(token), &tokMap)
    // normally as above, but we want numbers as ints vs floats
    decoder := json.NewDecoder(strings.NewReader(token))
    decoder.UseNumber()
    err = decoder.Decode(&tokMap)expiresAt, err := tokMap["expires_at"].(json.Number).Int64()
    if err != nil {
        return
    }
    if epochSeconds() > expiresAt { //token has expired, refresh it
        if services[service]["refresh_allowed"] == "false" {
            err = errors.New("Non-refreshable Token Expired, Re-authorize")
            return
        }
        refresh, exists := tokMap["refresh_token"]
        if !exists {
            err = errors.New("Refresh Token Not Found")
            return
        }
        var newToken string
        newToken, err = getToken(w, r, service, REFRESH, refresh.(string), SECRET, "")
        if err != nil {
            return
        }
        setCookie(w, newToken, cookieName(service)) //note: must set cookie before writing to responsewriter
        decoder = json.NewDecoder(strings.NewReader(newToken))
        decoder.UseNumber()
        tokMap = make(map[string]interface{})
        err = decoder.Decode(&tokMap)
        if err != nil {
            return
        }
    }
    newReq.Header.Add("Authorization", "Bearer "+tokMap["access_token"].(string))
    newReq.Header.Set("Content-Type", "application/json")
    newReq.Header.Set("Accept", "application/json")
    return
}
We are done with the basic plumbing. Next we’ll actually exercise the various OAuth services api in our services.json config. We’ll set up the service api handlers first. I will just set up a few to demonstrate each service, but here is where you make whatever calls you want to the services using ApiRequest() and layer on any application/business logic.
基本的管道已经完成。 接下来,我们实际上将在services.json配置中练习各种OAuth服务api。 我们将首先设置服务api处理程序。 我将仅设置一些示例来演示每个服务,但是在这里您可以使用ApiRequest()对服务进行任何调用,并在任何应用程序/业务逻辑上进行分层。
oclient/main.go
oclient / main.go
//== APIfunc StravaGetAthleteHandler(w http.ResponseWriter, r *http.Request) {    url := "https://www.strava.com/api/v3/athlete"
    resp, err := oclient.ApiRequest(w, r, oclient.STRAVA, "GET", url, nil)
    if err != nil {
        http.Error(w, err.Error(), http.StatusInternalServerError)
        return
    }
    defer resp.Body.Close()
    body, err := ioutil.ReadAll(resp.Body)
    if err != nil {
        http.Error(w, err.Error(), http.StatusInternalServerError)
        return
    }
    fmt.Fprintln(w, string(body))
}func StravaGetActivitiesHandler(w http.ResponseWriter, r *http.Request) {    url := "https://www.strava.com/api/v3/athlete/activities?page=1&per_page=30"
    resp, err := oclient.ApiRequest(w, r, oclient.STRAVA, "GET", url, nil)
    if err != nil {
        http.Error(w, err.Error(), http.StatusInternalServerError)
        return
    }
    defer resp.Body.Close()
    body, err := ioutil.ReadAll(resp.Body)
    if err != nil {
        http.Error(w, err.Error(), http.StatusInternalServerError)
        return
    }
    fmt.Fprintln(w, string(body))
}func LinkedinGetMeHandler(w http.ResponseWriter, r *http.Request) {    url := "https://api.linkedin.com/v2/me"
    resp, err := oclient.ApiRequest(w, r, oclient.LINKEDIN, "GET", url, nil)
    if err != nil {
        http.Error(w, err.Error(), http.StatusInternalServerError)
        return
    }
    defer resp.Body.Close()
    body, err := ioutil.ReadAll(resp.Body)
    if err != nil {
        http.Error(w, err.Error(), http.StatusInternalServerError)
        return
    }
    fmt.Fprintln(w, string(body))
}func SpotifyGetMeHandler(w http.ResponseWriter, r *http.Request) {    url := "https://api.spotify.com/v1/me"
    resp, err := oclient.ApiRequest(w, r, oclient.SPOTIFY, "GET", url, nil)
    if err != nil {
        http.Error(w, err.Error(), http.StatusInternalServerError)
        return
    }
    defer resp.Body.Close()
    body, err := ioutil.ReadAll(resp.Body)
    if err != nil {
        http.Error(w, err.Error(), http.StatusInternalServerError)
        return
    }
    fmt.Fprintln(w, string(body))
}func SpotifyGetNewReleasesHandler(w http.ResponseWriter, r *http.Request) {    url := "https://api.spotify.com/v1/browse/new-releases"
    resp, err := oclient.ApiRequest(w, r, oclient.SPOTIFY, "GET", url, nil)
    if err != nil {
        http.Error(w, err.Error(), http.StatusInternalServerError)
        return
    }
    defer resp.Body.Close()
    body, err := ioutil.ReadAll(resp.Body)
    if err != nil {
        http.Error(w, err.Error(), http.StatusInternalServerError)
        return
    }
    fmt.Fprintln(w, string(body))
}func SpotifyPutRenameHandler(w http.ResponseWriter, r *http.Request) {    data := map[string]interface{}{
        "name":        "Updated Playlist Name",
        "description": "Updated playlist description",
        "public":      false,
    }    //specific playlist, yours will be different
    url := "https://api.spotify.com/v1/playlists/2RmnrZSPoYtVyjou7DU8We"
    resp, err := oclient.ApiRequest(w, r, oclient.SPOTIFY, "PUT", url, data)
    if err != nil {
        http.Error(w, err.Error(), http.StatusInternalServerError)
        return
    }
    defer resp.Body.Close()
    body, err := ioutil.ReadAll(resp.Body)
    if err != nil {
        http.Error(w, err.Error(), http.StatusInternalServerError)
        return
    }
    fmt.Fprintln(w, string(body))
}func GithubGetUserHandler(w http.ResponseWriter, r *http.Request) {    url := "https://api.github.com/user"
    resp, err := oclient.ApiRequest(w, r, oclient.GITHUB, "GET", url, nil)
    if err != nil {
        http.Error(w, err.Error(), http.StatusInternalServerError)
        return
    }
    defer resp.Body.Close()
    body, err := ioutil.ReadAll(resp.Body)
    if err != nil {
        http.Error(w, err.Error(), http.StatusInternalServerError)
        return
    }
    fmt.Fprintln(w, string(body))
}
Finally, a small api page with buttons to call these services api that we have exposed. The Home page will redirect here after a successful service authorization.
最后,一个小的api页面带有一些按钮,用于调用我们已经公开的这些服务api。 成功的服务授权后,主页将重定向到此处。
oclient/templates/api.html
oclient / templates / api.html
<!DOCTYPE html>
<html lang="en">
    <head>
        <meta charset="UTF-8">
        <title>OClient API</title>
        <style>
            body {
              background-color: lightgray;
            }
        </style>
    </head>
    <body>
        <h1>OClient API</h1>
        <br>
        <a href="/">Home Page</a>
        <br><br>
        <button onclick="window.location.href=window.location.origin + '/strava/get/athlete'">Get Strava Athlete</button>
        <button onclick="window.location.href=window.location.origin + '/strava/get/activities'">Get Strava Activities</button>
        <button onclick="window.location.href=window.location.origin + '/linkedin/get/me'">Get Linkedin Profile</button>
        <button onclick="window.location.href=window.location.origin + '/spotify/get/me'">Get Spotify Profile</button>
        <button onclick="window.location.href=window.location.origin + '/spotify/get/newreleases'">Get Spotify New Releases</button>
        <button onclick="window.location.href=window.location.origin + '/spotify/put/rename'">Spotify Put Rename</button>
        <button onclick="window.location.href=window.location.origin + '/github/get/user'">Github Get User</button>
    </body>
</html>
Ok, let’s clone, compile and run it all. Note that when you do this you’ll have to set environment variables for your services to match the names you have in oclient/services.json for the client_id and client_secret — it will not run until you do so. Also add different service api if you prefer, and change the auth/api calls. Also my demo has a hardcoded spotify playlist id (specific to me) in oclient/main.go, just to test and demo a PUT call.
好的,让我们克隆,编译并运行所有内容。 请注意,执行此操作时,您必须为服务设置环境变量,以使其与在client_id和client_secret的oclient / services.json中具有的名称相匹配-除非您这样做,否则它不会运行。 如果愿意,还可以添加其他服务api,并更改auth / api调用。 另外,我的演示在oclient / main.go中有一个硬编码的Spotify播放列表ID(特定于我),仅用于测试和演示PUT调用。
go get github.com/exyzzy/oclient
go install $GOPATH/src/github.com/exyzzy/oclient
oclient
When you open a browser on localhost:8000 you should see:
当您在localhost:8000上打开浏览器时,您应该看到:
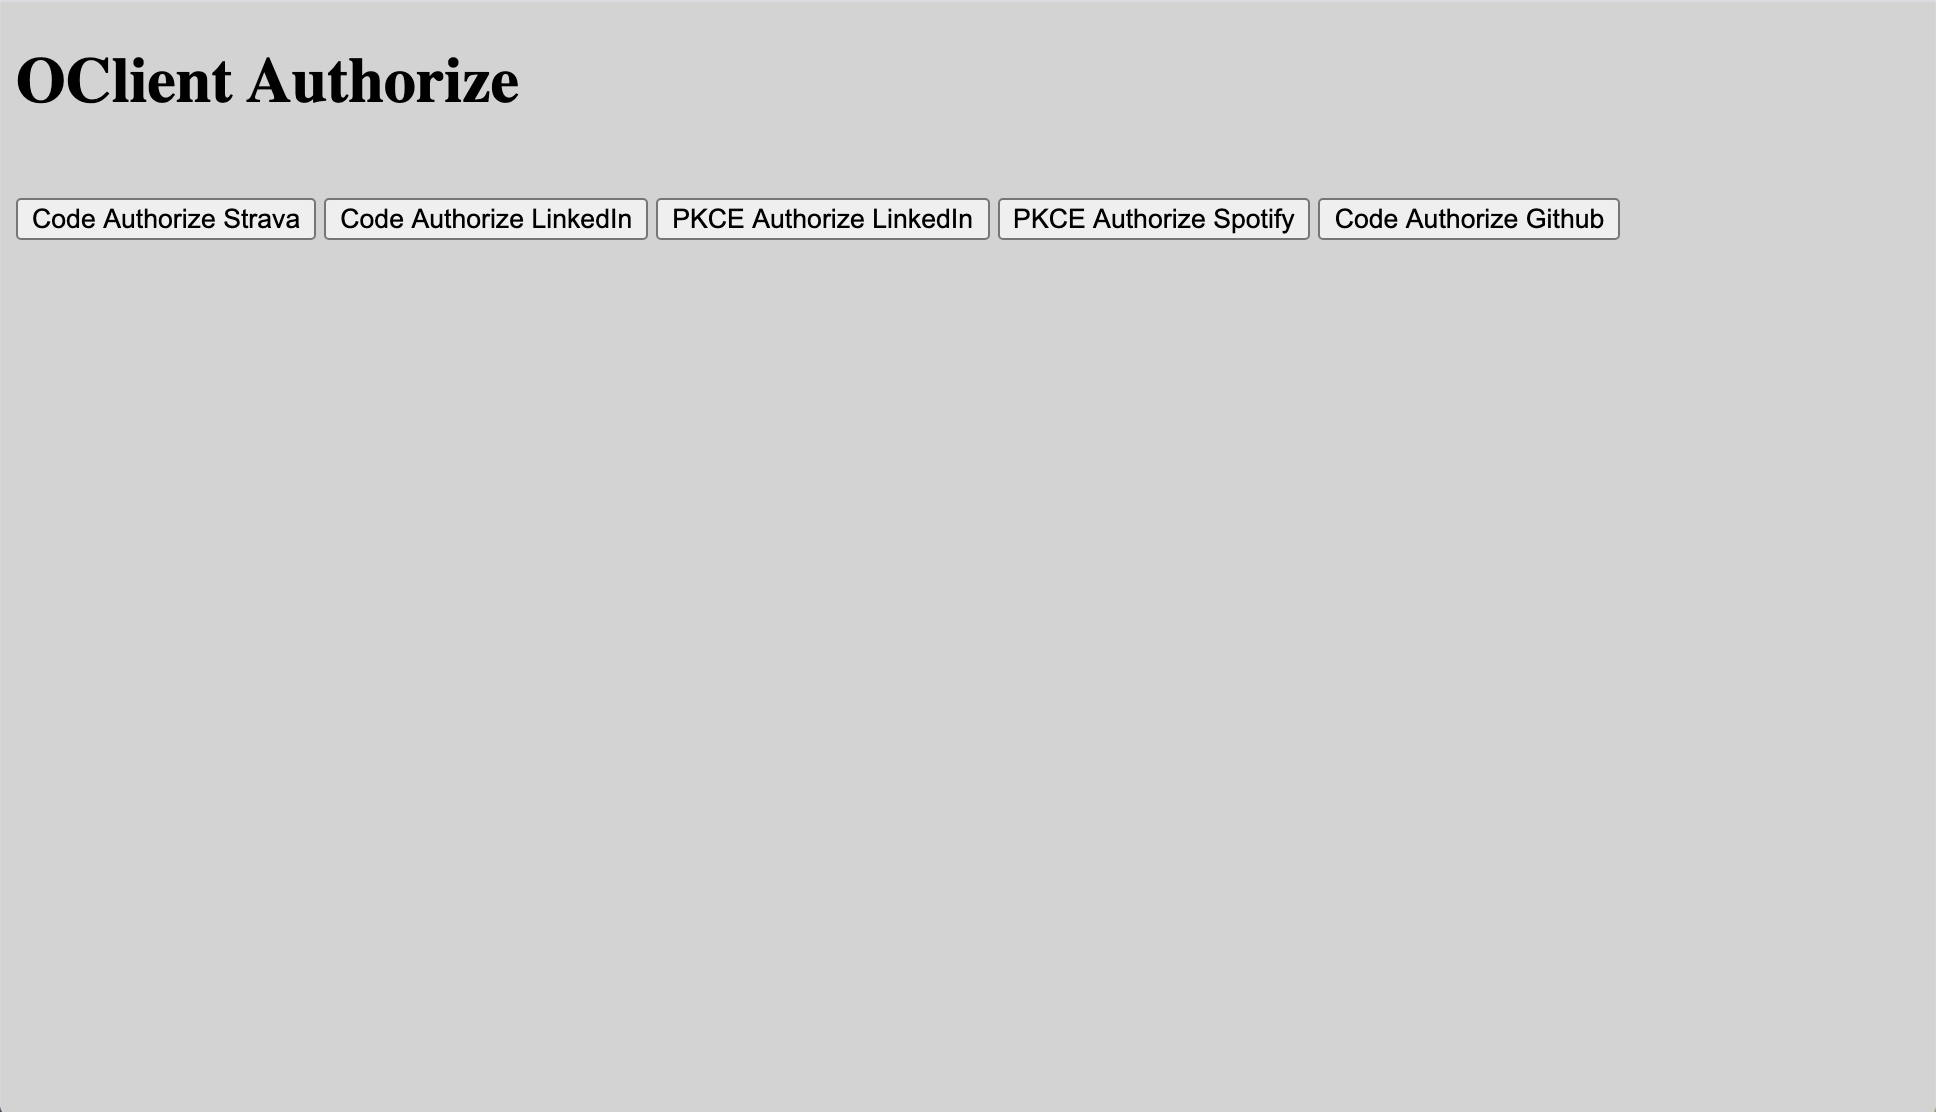
When you click on a button it should bring up the authorization page for that service.
当您单击一个按钮时,它应该会显示该服务的授权页面。
When you authorize, you should be redirected back to the services api page.
授权后,应将您重定向回服务api页面。
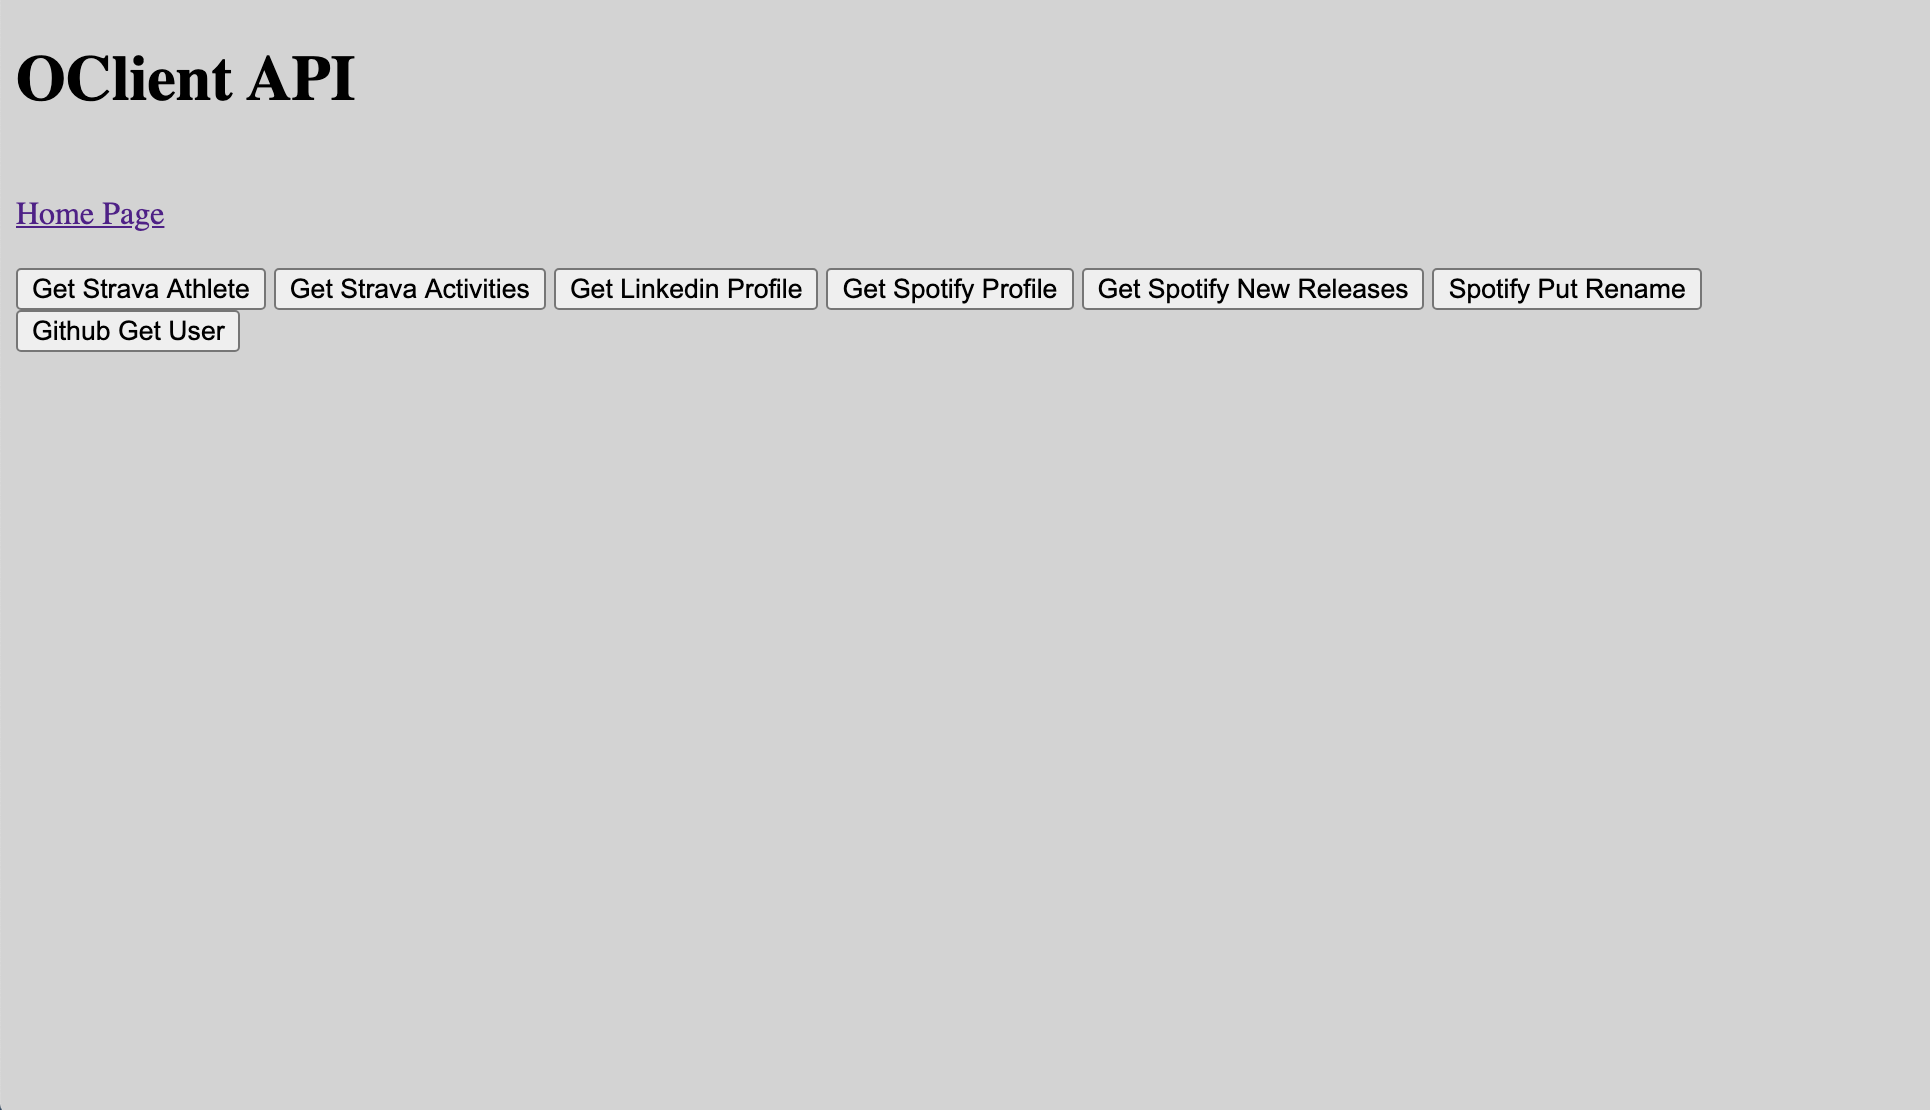
Where you can click on any of the buttons to fire off a specific api and see the return value. Though you must return to the home page an authorize each of them first if you have not done so.
您可以在其中单击任何按钮以触发特定的api并查看返回值。 尽管您必须返回主页,但如果尚未这样做,则首先要授权它们。

If you inspect the application cookies you will see that it has stored our state under an _OClient* cookie for each of the services.
如果检查应用程序cookie,您将看到它已将我们的状态存储在每个服务的_OClient * cookie下。
下一步 (Next Steps)
We have built a nice little general purpose and extendible OAuth 2.0 client library that can be used for any 3rd party service. While it is not yet tested in a production environment it should give you a nice head start on that.
我们建立了一个不错的通用小用途和可扩展的OAuth 2.0客户端库,该库可用于任何第三方服务。 尽管尚未在生产环境中对其进行测试,但它应该为您提供一个很好的起点。
You can find all the code here. Have fun.
您可以在此处找到所有代码。 玩得开心。
翻译自: https://levelup.gitconnected.com/oauth-2-0-in-go-846b257d32b4
oauth0 oauth2


 被折叠的 条评论
为什么被折叠?
被折叠的 条评论
为什么被折叠?
 到【灌水乐园】发言


