


The final part in the series, following Part I and Part II.
During the few months that I stood at my desk in the kitchen, I worked on 3 projects all with very different tech stacks. I wrote some good code and I wrote some bad code. I lost what feels like years of sleep, but more importantly, I gained what feels like years of experience.
在我站在厨房的桌子上的几个月中,我参与了3个项目,每个项目都有非常不同的技术堆栈。 我写了一些好的代码,我写了一些不好的代码。 我失去了多年的睡眠感觉,但更重要的是,我获得了多年的经验感觉。
I want to share some of these experiences and pass on some useful tips that I picked up along the way.
我想分享其中的一些经验,并传递一些我在学习过程中获得的有用技巧。
使用Upstra和Jitsi进行即时消息传递和视频会议 (Instant messaging and video conferencing with Upstra and Jitsi)
Building a web application that supports instant messaging and video calls is a daunting task, especially when you’ve only got the weekend to do it.
构建一个支持即时消息和视频通话的Web应用程序是一项艰巨的任务,尤其是在只有周末才能完成的时候。
That’s why during my second ‘pandemic project’, it was particularly important to pick the correct tools for the job. Thankfully, one of Amity’s core products is a workplace communication tool Eko, meaning we had some good options to choose from right away:
这就是为什么在我的第二个“大流行项目”中,为工作选择正确的工具尤为重要的原因。 值得庆幸的是, Amity的核心产品之一是工作场所通讯工具Eko ,这意味着我们可以立即选择一些不错的选择:
For messaging, we would use our own SDK: Upstra (then called SonarKit).
对于消息传递,我们将使用我们自己的SDK: Upstra (当时称为SonarKit)。
For video calls, we would use the open-source Jitsi Meet API.
对于视频通话,我们将使用开源Jitsi Meet API 。
使用Upstra SDK进行消息传递 (Messaging with Upstra SDK)
The Upstra Messaging SDK promises to take care of the complex stuff required for an instant messaging service— everything from messaging synchronization logic to server infrastructure. This leaves you as the developer with some simple APIs to create and join channels (chats), send and receive messages, and even flag, edit and delete messages.
Upstra Messaging SDK承诺将处理即时消息传递服务所需的复杂工作,从消息传递同步逻辑到服务器基础结构,应有尽有。 这使您作为开发人员可以使用一些简单的API来创建和加入频道(聊天),发送和接收消息,甚至标记,编辑和删除消息。
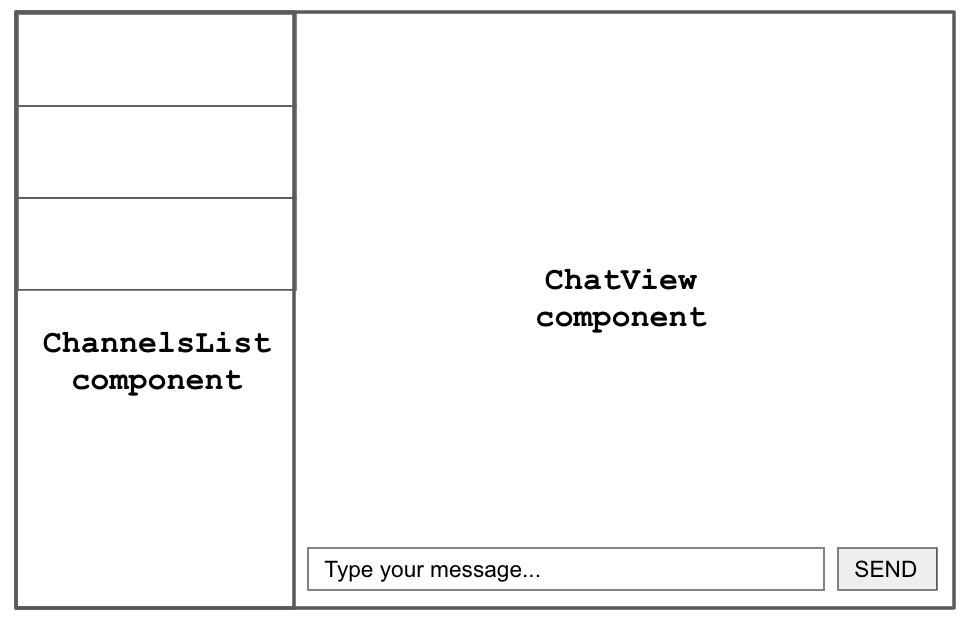
Like any other, our chat application UI was made up of two main features:
与其他任何应用程序一样,我们的聊天应用程序UI由两个主要功能组成:
- A list of all channels (chats) that the user is part of (shown on the left-hand side) 用户所属的所有频道(聊天)的列表(显示在左侧)
- A chat view where a user sends and receive messages 用户发送和接收消息的聊天视图
Using the Upstra Web SDK, each of these features can be built as a single React component. Starting with feature 1 — the list of channels — the code for the component typically looks something like this:
使用Upstra Web SDK,所有这些功能都可以构建为单个React组件。 从功能1(通道列表)开始,该组件的代码通常如下所示:
All of the Upstra SDK logic happens in a single useEffect between lines 12-19 where we do 3 things:
所有Upstra SDK逻辑都在第12-19行之间的单个useEffect发生,我们执行3件事:
Get a list of all channels for the current user (line 13), which comes in the form of a ‘LiveCollection’.
获取“ LiveCollection ”形式的当前用户所有频道的列表(第13行)。
- Listen for changes to this LiveCollection of channels (line 14), and when a change occurs (e.g. new channel, removed channel, modified channel), store the new list of channels in the component state as an ordinary array. 侦听对此LiveCollection通道的更改(第14行),并在发生更改(例如,新通道,已移除通道,已修改通道)时,将组件状态下的新通道列表存储为普通数组。
Dispose of the LiveCollection when the component unmounts (line 18). The
disposemethod will unsubscribe all listeners and stop all internal observers — this is important to prevent potential memory leaks and performance issues.卸载组件时,请丢弃LiveCollection(第18行)。
dispose方法将取消订阅所有侦听器并停止所有内部观察者-这对于防止潜在的内存泄漏和性能问题很重要。
After this, we’re left with just plain React: an array of channels stored in the component state from which we render a list of channel components.
此后,我们只剩下简单的React:在组件状态下存储的通道数组,从中渲染通道组件列表。
For the second feature — the chat view itself — there is a bit more code but the Upstra part remains similar. The component will need to do the following:
对于第二个功能(即聊天视图本身),还有更多代码,但Upstra部分仍然相似。 该组件将需要执行以下操作:
- Join the channel that we want to participate in 加入我们要参与的频道
- Get a list of messages for the channel, and watch this list (LiveCollection) for updates. Given that there could be many messages, we will make use of the LiveCollection’s built-in pagination methods. 获取该频道的消息列表,并观看此列表(LiveCollection)中的更新。 鉴于可能有很多消息,我们将使用LiveCollection的内置分页方法。
- Allow new messages to be sent 允许发送新消息
Most of the Upstra logic now lives in the useEffect between lines 26-41. This is where we get a list of messages — as we did earlier with channels — but this time we also check to see if the list ‘has more’ than just that returned initially.
现在,大多数Upstra逻辑都存在于第useEffect行之间的useEffect 。 这是我们获得消息列表的地方-就像我们之前对通道所做的那样-但是这次我们还检查列表是否比最初返回的“更多”。
For all LiveCollections, Upstra paginates the lists by returning only 20 items at a time, but also offers some convenient methods for handling this pagination. The code above demonstrates this for the messages LiveCollection:
对于所有LiveCollection,Upstra通过一次仅返回20个项目来对列表进行分页,但是还提供了一些方便的方法来处理这种分页。 上面的代码针对LiveCollection消息对此进行了演示:
- Load the most recent messages (line 28) which will be a maximum of 20 加载最新消息(第28行),最多20条
- Check to see if there are more pages of messages (line 31) 检查是否还有更多的消息页面(第31行)
If there are more pages, then store the LiveCollections’
nextPagemethod as aloadMorefunction to use later (line 34 and 37)如果有更多页面,则将LiveCollections的
nextPage方法存储为loadMore函数,以供以后使用(第34和37行)
We pass this loadMore function to the MessagesList component, which uses it to fetch more messages as the user scrolls up through a conversation. This is achieved easily using the InfiniteScroll component from react-infinite-scroller or something similar:
我们将此loadMore函数传递给MessagesList组件,当用户在会话中向上滚动时,该组件将使用它获取更多消息。 使用react-infinite-scroller的InfiniteScroll组件或类似的方法可以轻松实现此目的:
What’s useful is that when the user scrolls up and more messages are fetched using the nextPage method, the MessagesLiveCollection.on('dataUpdated') event will be triggered with a new array containing both the old messages and the 20 new messages. This means that we don’t lose the more recent messages that a user will likely scroll back down to.
有用的是,当用户向上滚动并使用nextPage方法获取更多消息时,将使用包含旧消息和20条新消息的新数组触发MessagesLiveCollection.on('dataUpdated')事件。 这意味着我们不会丢失用户可能会向下滚动到的最新消息。
使用Jitsi Meet API进行视频会议 (Video conferencing with Jitsi Meet API)
The jitsi-meet library is a reminder of how great the open source community is — it’s a library that allows you to easily embed fully-featured video conferencing into an application for free, and with no user accounts required.
jitsi-meet库可以提醒您开源社区有多么伟大-它是一个库,通过它您可以轻松地将功能齐全的视频会议免费免费嵌入到应用程序中,而无需任何用户帐户。
There are three steps required for embedding Jistsi Meet into an application:
将Jistsi Meet嵌入到应用程序中需要三个步骤:
- Load the Jitsi Meet library 加载Jitsi Meet库
- Create an HTML ‘container’ element for the Jitsi Meet iFrame 为Jitsi Meet iFrame创建HTML“容器”元素
- Initialise the Jitsi Meet API — telling it where to render (into the container element from step 2) and with what configuration. 初始化Jitsi Meet API-告诉它在哪里进行渲染(从第2步进入容器元素)以及采用哪种配置。
The Jitsi Meet library must be loaded using a script tag:
Jitsi Meet库必须使用脚本标签加载:
<script src="https://meet.jit.si/external_api.js"></script>In our case, the Jitsi video conferencing wasn’t the app’s only feature, meaning that a user visiting the app would not necessarily need to use Jitsi at all.
在我们的案例中,Jitsi视频会议并不是该应用程序的唯一功能,这意味着访问该应用程序的用户完全不必使用Jitsi。
Given this, we didn’t want to simply add this script into the application’s HTML body, otherwise, it would always be loaded whether or not the user needs it.
鉴于此,我们不想简单地将此脚本添加到应用程序HTML主体中,否则,无论用户是否需要它,总会被加载。
Our solution was to use react-render-props-script-loader to load the library only when the Jitsi component itself is being rendered — in other words, only when the user is about to use Jitsi video.
我们的解决方案是仅在呈现Jitsi组件本身时(即,仅在用户将要使用Jitsi视频时),使用react-render-props-script-loader加载库。
Step number 2 is when we can define where the Jitsi iFrame will render, and with what styling.
第2步是何时可以定义Jitsi iFrame的渲染位置以及样式。
In the above code, we render a JitsiView component once the library has loaded. This JistiView component will render the Jistsi Meet iFrame — the Jitsi Meet library handles mounting the iFrame, we just need to give it a place to be mounted.
在上面的代码中,加载库后,我们将呈现一个JitsiView组件。 这个JistiView组件将呈现Jistsi Meet iFrame — Jitsi Meet库处理安装iFrame的过程,我们只需要为其提供一个放置位置即可。
We define a div element, giving it an id making it easy to find within the DOM. In step 3 we pass this node to the Jitsi API as the ‘parent node’ for the iFrame:
我们定义了一个div元素,为其赋予一个ID,从而可以轻松在DOM中找到它。 在第3步中,我们将此节点作为iFrame的“父节点”传递给Jitsi API:
parentNode: document.querySelector('#jitsi-mount')We also wrap this to-be parent node in styled JitsiViewWrapper component which applies some styles to itself, the div container and the iFrame within:
我们还将这个准父节点包装在样式化的JitsiViewWrapper组件中,该组件将一些样式应用于自身,div容器和内部的iFrame:
By the time we reach step number 3, the library is loaded and the Jitsi iFrame has a place to render. We can now let the user start and join a video conference.
到步骤3时,库已加载,并且Jitsi iFrame已可以渲染。 现在,我们可以让用户开始并加入视频会议。
The logic is again within the JitsiView component, where we initialise the Jitsi Meet API to create a room as the component mounts, add some event listeners for joining and leaving the room, and finally ensure that we dispose of the API before the component unmounts.
该逻辑再次位于JitsiView组件中,在该组件中,我们初始化Jitsi Meet API以在组件安装时创建一个房间,添加一些事件监听器以加入和离开该房间,最后确保在组件卸载之前我们处理该API。
Whilst we’ve only made use of two basic event listeners — conference joined and conference left — there are many more which are documented here.
虽然我们只利用了两个基本的事件监听器-会议加入和离开会议-还有更多的被记录在这里 。
Advice for using the Jitsi Meet API: be aware of the browser limitations. The Jitsi Meet library is only guaranteed to work for users on a desktop device using a recent version of Chrome or Chromium.
使用Jitsi Meet API的建议 :请注意浏览器的限制。 仅保证Jitsi Meet库对使用最新版本的Chrome或Chromium的台式设备上的用户有效。
Reportedly, if some participants of a video conference are using an unsupported browser, it can affect everyone in the conference.
据报道,如果视频会议的某些参与者正在使用不受支持的浏览器,则可能会影响会议中的每个人。
There’s a small summary of browser support here.
有浏览器支持的一个小总结在这里 。
And that’s all from my ‘pandemic projects’. Lots of code, lots of lessons learned.
而这些全都来自我的“大流行项目”。 很多代码,很多经验教训。
翻译自: https://medium.com/@cp.vibert/software-engineering-at-amity-pandemic-edition-part-iii-1c55c347d340


 723
723

 被折叠的 条评论
为什么被折叠?
被折叠的 条评论
为什么被折叠?
 到【灌水乐园】发言


