


jenkins插件介绍
TestCafe can capture videos and screenshots so you can debug your tests and examine page UI. You can record all tests or only those that failed, generate unique video files for each test or record all of them in one take, and single out specific interactions. (For a full list of available options, see the following help topic: Screenshots and Videos).
TestCafe可以捕获视频和屏幕截图,因此您可以调试测试并检查页面UI。 您可以记录所有测试或仅记录失败的测试,可以为每个测试生成唯一的视频文件,也可以一次记录所有的视频,并挑选出特定的交互方式。 (有关可用选项的完整列表,请参见以下帮助主题: 屏幕快照和视频 )。
Many TestCafe users take advantage of Jenkins — a CI/CD solution — to automate their tests. Until recently, they had to manually match the screenshots and videos taken by TestCafe to the individual test reports. The newly implemented TestCafe Jenkins plugin simplifies this process. Links to screenshots and videos taken during the test now automatically appear on the Jenkins test results page. There is no need to keep the testing server running — all required files are stored inside the Jenkins build folder.
许多TestCafe用户利用CI / CD解决方案Jenkins来自动化他们的测试。 直到最近,他们还必须将TestCafe拍摄的屏幕截图和视频手动匹配到各个测试报告。 新实施的TestCafe Jenkins插件简化了此过程。 现在,在测试期间拍摄的屏幕截图和视频的链接会自动显示在Jenkins测试结果页面上。 无需使测试服务器保持运行-所有必需的文件都存储在Jenkins构建文件夹中。
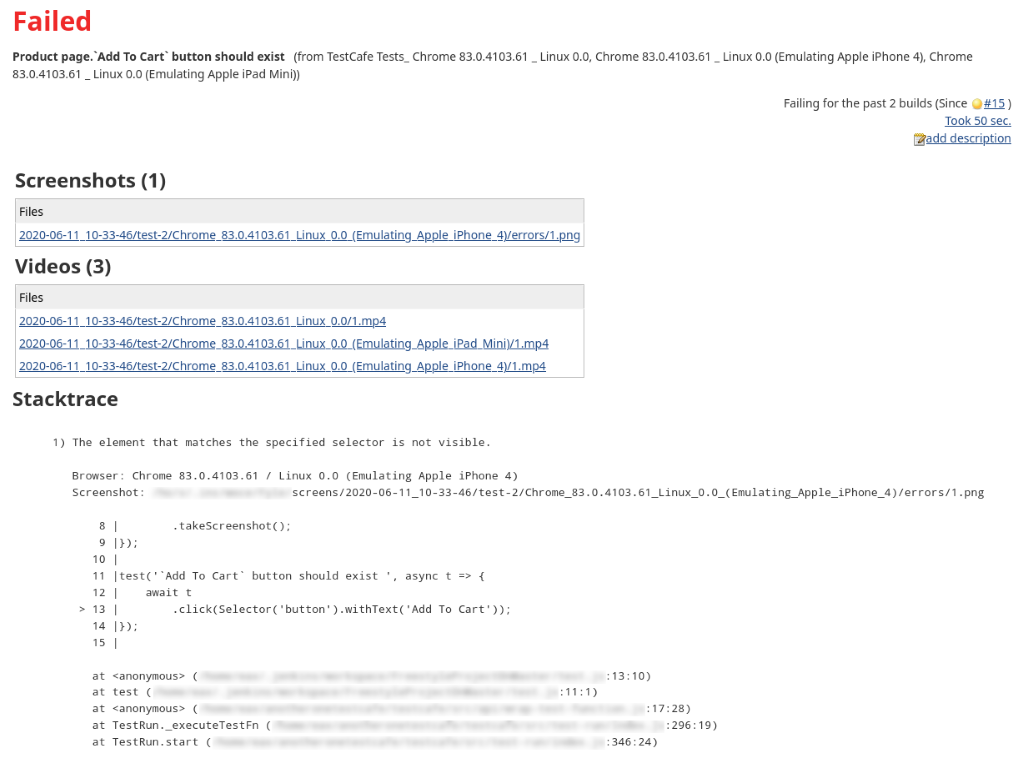
With our plugin enabled, the test results page should appear as follows:
启用我们的插件后,测试结果页面应如下所示:
测试案例:消失的按钮 (Test case: the disappearing button)
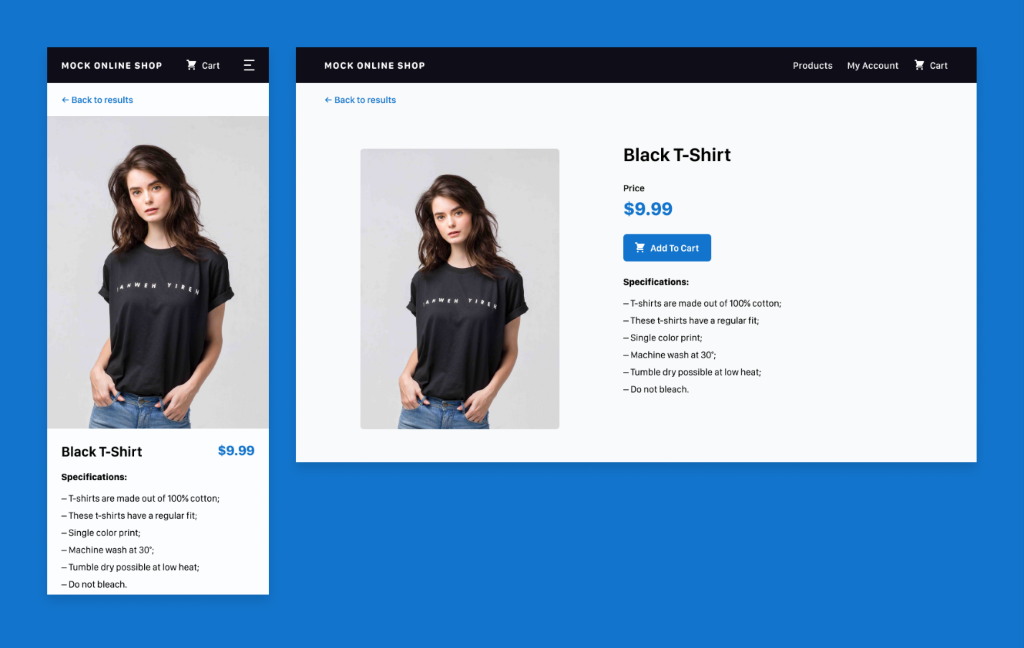
Let’s assume that the ‘Add to Cart’ button disappears on the mobile version of your website.
假设“添加到购物车”按钮在您网站的移动版上消失了。
TestCafe supports the following mobile device emulation methods:
TestCafe支持以下移动设备仿真方法:
Resize the browser window during the test
在测试期间调整浏览器窗口的大小
Run the test through a third-party cloud testing service
The third option offers greater speed and stability. We describe it going forward and recommend that you use it if possible.
第三种选择提供了更高的速度和稳定性。 我们会对其进行描述,并建议您尽可能使用它。
First, let’s write a simple test that checks if the ‘Add to Cart’ button exists:
首先,让我们编写一个简单的测试,检查“添加到购物车”按钮是否存在:
test('`Add To Cart` button should exist', async t => {
    await t
        .expect(Selector('button').withText('Add To Cart').visible).ok();
});
Now let’s configure Jenkins to launch this test every time we build our project.
现在,让我们配置Jenkins在每次构建项目时启动此测试。
基本设定 (Basic setup)
步骤1.安装必备组件 (Step 1. Install prerequisites)
TestCafe requires a working Node.js installation to run. If your testing environment does not contain node.js, the Node.js Jenkins plugin can install it for you. Also ensure that Chromium is installed: TestCafe cannot function without a browser.
TestCafe需要运行的Node.js安装才能运行。 如果您的测试环境不包含node.js, 则Node.js Jenkins插件可以为您安装它。 还要确保已安装Chromium:如果没有浏览器,TestCafe将无法运行。
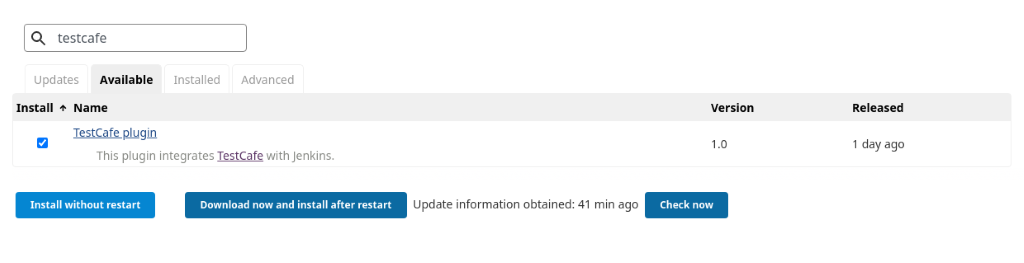
步骤2.安装TestCafe Jenkins插件 (Step 2. Install the TestCafe Jenkins plugin)
To install the TestCafe Jenkins plugin, click the “Manage Plugins” link on the Manage Jenkins page, select the “Available” tab, and enter “testcafe” into the search field. Check the box next to our plugin and click the ‘Install without restart’ button below it.
要安装TestCafe Jenkins插件,请单击Manage Jenkins页面上的“管理插件”链接,选择“可用”选项卡,然后在搜索字段中输入“ testcafe”。 选中我们插件旁边的框,然后点击其下方的“不重新启动安装”按钮。
步骤3.安装所需的Node软件包 (Step 3. Install the required Node packages)
Add the following build step to your Jenkins project:
将以下构建步骤添加到您的Jenkins项目中:
npm i testcafe testcafe-reporter-jenkinsThis command installs the main testcafe library, as well as the testcafe-reporter-jenkins package. The latter is needed to generate Jenkins-friendly JUnit format reports.
此命令将安装主要的testcafe库以及testcafe-reporter-jenkins软件包。 后者是生成Jenkins友好的JUnit格式报告所必需的。
步骤4.配置测试 (Step 4. Configure the tests)
You can configure your tests via:
您可以通过以下方式配置测试:
- the JavaScript/TypeScript API JavaScript / TypeScript API
the .testcaferc.json configuration file
.testcaferc.json 配置文件
The last option provides an easy, declarative way to define your test settings. You can store this file in the same folder as your tests. Below is the configuration used in this tutorial:
最后一个选项提供了一种简单的声明式方法来定义您的测试设置。 您可以将此文件存储在与测试相同的文件夹中。 以下是本教程中使用的配置:
{
    "browsers": [
        "chromium:headless:emulation:device=iPhone 4",
        "chromium:headless:emulation:device=iPad Mini",
        "chromium:headless"
    ],
    "src": "test/e2e/**/*",
    "screenshots": {
        "takeOnFails": true,
        "fullPage": true
    },
    "videoPath": "videos",
    "reporter": {
        "name": "jenkins",
        "output": "report.xml"
    },
    "appCommand": "node server.js"
}
The Browser array contains the list of browsers TestCafe will use to run our test. The TestCafe browser syntax allows us to specify the mobile devices we want Chromium to emulate.
Browser数组包含TestCafe将用于运行测试的浏览器列表。 TestCafe浏览器语法允许我们指定希望Chromium模拟的移动设备。
The name property of the reporter object is set as jenkins, which ensures that the reports generated by TestCafe can be properly parsed by the server.
报告程序对象的name属性设置为jenkins ,以确保服务器可以正确解析TestCafe生成的报告。
If you decide not to use a config file, be sure to manually set the report format when you launch the tests as follows:
如果您决定不使用配置文件,请确保在启动测试时手动设置报告格式,如下所示:
testcafe chrome test.js -r jenkins:report.xmlOtherwise, simply run the following command:
否则,只需运行以下命令:
npx testcafe步骤5.配置报告器 (Step 5. Configure the reporter)
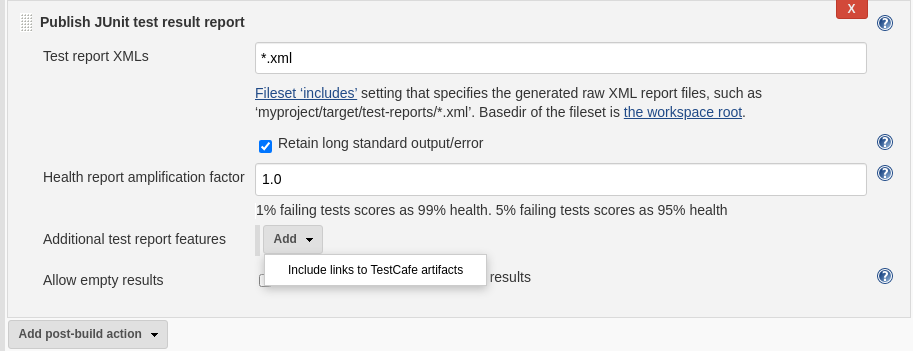
Turn on the JUnit reporter plugin: add the “Publish JUnit test result report” post-build action. To display screenshots and videos alongside your test results, select the “Include links to TestCafe artifacts” option from the “Additional test report features” drop-down menu.
打开JUnit报告程序插件:添加“发布JUnit测试结果报告” 构建后操作 。 要在测试结果旁边显示屏幕截图和视频,请从“其他测试报告功能”下拉菜单中选择“包括TestCafe工件的链接”选项。
Important: Remember to check the “Retain long standard output/error” box. Otherwise, the reporter plugin will automatically truncate the URLs of your videos and screenshots.
重要提示:请记住选中“保留较长的标准输出/错误”框。 否则,记者插件将自动截断视频和屏幕截图的网址。
步骤6.运行构建 (Step 6. Run the build)
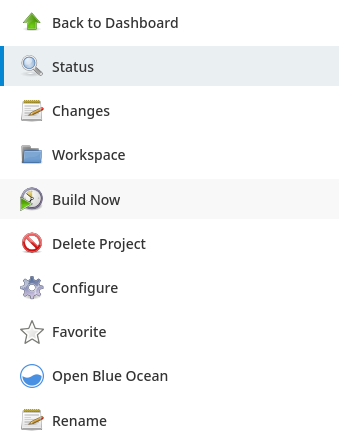
Save the changes to your project and click the “Build now” button on the project page:
将更改保存到您的项目中,然后在项目页面上单击“立即构建”按钮:
查看结果 (Review the results)
After the tests are completed, click the following link on the build page to view the results:
测试完成后,单击构建页面上的以下链接以查看结果:

You will see links to screenshots and videos taken during the test.
您将看到测试期间拍摄的屏幕截图和视频的链接。
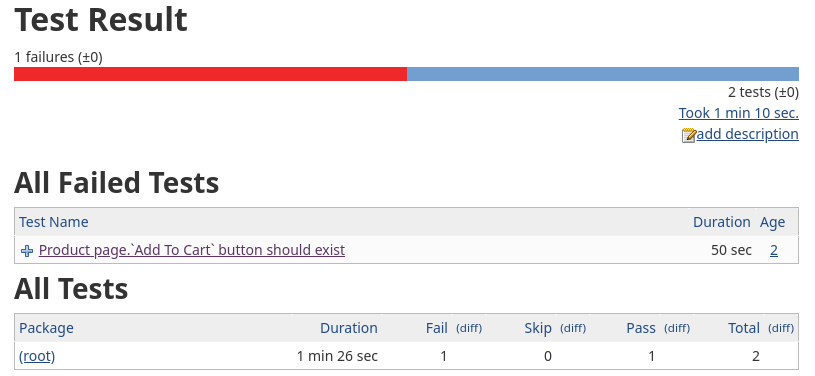
These artifacts instantly indicate if the Cart button is present on the page.
这些工件立即指示页面上是否存在购物车按钮。
Jenkins管道集成 (Jenkins Pipeline integration)
If you do not wish to use the Jenkins GUI to launch these tests, you can always use the Jenkins Pipeline. It lets you declaratively configure your CI/CD setup via a Jenkinsfile — a text file checked into the project’s source control repository. The following is a sample Jenkinsfile to be used with TestCafe:
如果您不希望使用Jenkins GUI来启动这些测试,则可以始终使用Jenkins Pipeline 。 它使您可以通过Jenkinsfile声明性地配置CI / CD设置,该文件是签入到项目的源代码控制存储库中的文本文件。 以下是与TestCafe一起使用的示例Jenkinsfile:
pipeline {
    agent anystages {
        stage('Run E2E tests') {
            steps {
                sh 'npm install'
                sh 'npm run test-e2e'
            }
            post {
                always {
                          junit keepLongStdio: true,
                          testDataPublishers: [[$class: 'TestCafePublisher']],
                          testResults: '*.xml'
                }
            }
        }
    }
}
Note: The test-e2e npm script in this example launches TestCafe. As mentioned earlier in this topic, be sure to manually set the reporter option. For more information on the TestCafe CLI, see the following help topic: Command Line Interface.
注意:此示例中的test-e2e npm脚本启动TestCafe。 如本主题前面所述,请确保手动设置报告程序选项。 有关TestCafe CLI的更多信息,请参见以下帮助主题: 命令行界面 。
If you enjoyed this guide and would like more tips on debugging, please see the following blog articles: How to Debug Tests in TestCafe: Quick Guide and How to speed up debugging in TestCafe: Tips and Tricks.
如果您喜欢本指南,并且想了解更多调试技巧,请参阅以下博客文章: 如何在TestCafe中调试测试:快速指南和如何在TestCafe中加快调试的技巧和窍门 。
Originally published at https://devexpress.github.io.
最初发布在 https://devexpress.github.io 。
翻译自: https://medium.com/@DXTestCafe/introducing-the-testcafe-jenkins-plugin-ef9fdcf1a396
jenkins插件介绍


 5867
5867

 被折叠的 条评论
为什么被折叠?
被折叠的 条评论
为什么被折叠?
 到【灌水乐园】发言


