


next.js 多级路由
如何在Next.js中实现和使用路由 (How to implement and use routes in Next.js)
Hello everyone! Around one month ago I wanted to start building SSR and SEO Friendly Websites using React and started looking for a nice tutorial for Next.js — One of the best available tools — of this purpose. But I couldn’t find one. So I decided to create one of my own, which turned into this article.
大家好! 大约一个月前,我想开始使用React来构建SSR和SEO友好网站,并开始为此目的寻找Next.js(一种最好的可用工具)的不错的教程。 但是我找不到。 因此,我决定创建自己的一个,这变成了本文。
为什么选择SSR? (Why SSR?)
I don’t want to dive deep into the basic comparisons of SSR and CSR but in summary, we’re covering some different and concepts of SSR web applications.
我不想深入研究SSR和CSR的基本比较,但总而言之,我们将介绍SSR Web应用程序的一些不同概念。
SSR — server-side rendering — and CSR — client-side rendering — are both types of rendering your pages for your clients and customers. In CSR, the server sends a blank HTML file to the client and the responsibility of filling it with JS files is on the client’s browser’s shoulders. When you create a React application with CRA, or your boilerplate and deploy it on the server, you create a CSR web application! So, if you open your page source in the browser, you find your div with root id EMPTY!
SSR (服务器端渲染)和CSR (客户端渲染)都是为客户和客户渲染页面的两种类型。 在CSR中,服务器将空白的 HTML文件发送给客户端,并且用JS文件填充该文件的责任在客户端的浏览器上。 当您使用CRA或样板创建React应用程序并将其部署在服务器上时,您将创建一个CSR Web应用程序! 因此,如果您在浏览器中打开页面源,则会找到根ID为EMPTY的 div!
But in SSR web applications, you will render your HTML file on your server, then send it to the client browser. This approach has two benefits:
但是在SSR Web应用程序中,您将在服务器上呈现HTML文件,然后将其发送到客户端浏览器。 这种方法有两个好处:
1. Faster page loading and better experience for clients (The horrible blank loading page!). It’s faster because your servers are a lot more powerful than most of your clients!
1.更快的页面加载和更好的客户体验(可怕的空白加载页面!)。 因为您的服务器比大多数客户端功能强大得多,所以速度更快!
2. It’s SEO friendly and google crawlers have everything in Page Source.
2.它是SEO友好的,并且Google搜寻器在Page Source中具有所有功能。
You can read about CSR and SSR in the great article of Alex Grigoryan here in The Benefits of Server Side Rendering Over Client Side Rendering!
您可以在Alex Grigoryan的精彩文章中阅读有关CSR和SSR的内容,该文章来自服务器渲染与客户端渲染的好处!
为什么选择Next.js? (Why Next.js?)
Honestly, you can create your SSR React Web Application without using any framework or tools. But it’s so hard and complex and you have to spend a lot of time to fix its bugs! There are some tools that can help you to overcome mentioned challenges like Razzle, After JS, Next JS, and Gatsby. But the most powerful and featured framework is Next.js!
老实说,您可以在不使用任何框架或工具的情况下创建SSR React Web应用程序。 但是它是如此的困难和复杂,您必须花费很多时间来修复其错误! 有一些工具可以帮助您克服提到的挑战,例如Razzle,After JS,Next JS和Gatsby。 但是功能最强大,功能最强大的框架是Next.js!
Here are some of Next.js’s benefits:
以下是Next.js的一些优点:
1. Zero Config: Like CRA, you can use Next easily without diving into webpack and babel configurations.
1.零配置:与CRA一样,您可以轻松使用Next,而无需深入研究webpack和babel配置。
2. Built-in CSS libraries: So you want to use CSS-in-JS or SCSS? Don’t worry! Next provides them for you.
2.内置CSS库:您想使用CSS-in-JS还是SCSS? 不用担心 接下来为您提供它们。
3. Powerful in pre-rendering.
3.强大的预渲染功能。
4. Easy and simple configuration
4.简易配置
5. Hot reloading: Develop, save, and see your changes instantly!
5.热重装:立即开发,保存并查看您的更改!
So, why recreate the wheel? Let’s start using Next.js!
那么,为什么要重新制造轮子呢? 让我们开始使用Next.js!
先决条件 (Prerequisites)
If you want to understand everything in this article (and the next articles), you should have a good understanding and experience in React. Obviously, you should have a great understanding of JavaScript, HTML, and CSS too. I’m using functional programming and it’ll be good if you will be familiar with functional components and React Hooks. You can read about hooks in my 2 articles:
如果您想了解本文(以及下一篇文章)中的所有内容,那么您应该对React有很好的理解和经验。 显然,您也应该对JavaScript,HTML和CSS也有很好的了解。 我正在使用函数式编程,如果您熟悉函数式组件和React Hooks会很好。 您可以在我的2篇文章中了解有关钩子的信息:
React Hooks for beginners, Sweet and a little complex
React Hooks: How to use useEffect()
And you should have Nodejs and Node package manager or yarn installed on your machine.
并且您应该在计算机上安装Nodejs和Node包管理器或yarn。
Repo Link: https://github.com/hosseinAMD/next-playground
回购链接: https : //github.com/hosseinAMD/next-playground
创建我们的Next.js项目 (Creating our Next.js project)
Like CRA, you have a very simple way to create your application with Next.js. open your bash and type this command:
像CRA一样,您有一种非常简单的方法来使用Next.js创建应用程序。 打开bash并键入以下命令:
npx create-next-app [your-project-name]or
要么
yarn create next-app [your-project-name]At the beginning of the installation, you will be asked to choose a template and you can choose the basic starter template.
在安装开始时,将要求您选择一个模板,然后可以选择基本的入门模板。
Finally, you can run your project in development mode by typing in your project directory:
最后,您可以通过在项目目录中键入以下内容以开发模式运行项目:
yarn devnpm run dev静态路由 (Static Routing)
Routing system in Next.js is different from what you have been used to in React by react-router. Routing is directory-based and there is no need to type any code to create your routes. If you look up in your project root, you can find a folder named “pages”. The routing of your application is completely related to this folder and files inside it.
Next.js中的路由系统不同于您在React-router中使用的路由系统。 路由是基于目录的 ,无需键入任何代码即可创建路由。 如果在项目根目录中查找,则可以找到一个名为“ pages”的文件夹。 应用程序的路由与该文件夹及其中的文件完全相关。
The “index.js” file in this folder is your “/” route. So, if you open your browser and type http://localhost:3000 you will see the index.js contents. Consider that we want to create a “/about” route in our application. Simply create a new file in “pages” directory named “about” and create a functional component like this in it:
此文件夹中的“ index.js”文件是您的“ /”路由。 因此,如果打开浏览器并输入http:// localhost:3000,您将看到index.js的内容。 考虑我们要在应用程序中创建“ / about”路线。 只需在名为“ about”的“ pages”目录中创建一个新文件,并在其中创建如下功能组件:
Tip: There is no need to import React. Next.js will import it for you!
提示:无需导入React。 Next.js将为您导入!
And now open http://localhost:3000/about in your browser and you can see your about page rendering nice and our routing works perfectly. If you want to create a route like “/contact/map” for example, you can easily create a directory named “contact” and then a “map.js” file!
现在,在浏览器中打开http:// localhost:3000 / about ,您可以看到您的About页面呈现效果很好,并且我们的路由工作也很完美。 例如,如果要创建“ / contact / map”之类的路线,则可以轻松创建一个名为“ contact”的目录,然后再创建一个“ map.js”文件!
在路线之间导航 (Navigating between routes)
In Next.js we don’t have any NavLink components to navigate between our routes. And we should not use <a> tag because this will refresh your page completely and you can’t use high performance or the benefits of React’s Virtual DOM! So how do we navigate between our routes in a smooth and modern way?
在Next.js中,我们没有任何NavLink组件可在我们的路线之间导航。 而且我们不应该使用<a>标签,因为这将完全刷新您的页面,并且您不能使用高性能或React的Virtual DOM的优势! 那么,我们如何以一种流畅而现代的方式在路线之间导航呢?
Next.js has a nice API called “next/link” which you can import “Link” from this API and wrap everything you want with it to act as a link for you. First, you should import Link and then wrap your <a> tag with it. Required property of this component is “href”. Let’s create a link to our about page in index.js:
Next.js有一个很好的API,称为“ next / link” ,您可以从该API导入“ Link” ,并用它包装所有想要的内容,以充当您的链接。 首先,您应该导入Link,然后用它包装<a>标记。 该组件的必需属性是“ href”。 让我们在index.js中创建一个指向About页面的链接:
And if we test it:
如果我们对其进行测试:

Awesome! We created some routes and navigated between them perfectly!
太棒了! 我们创建了一些路线,并在它们之间完美导航!
动态路由 (Dynamic Routing)
But what if you have an array of cities and you want to show a description for every city in your app? How do we implement a dynamic routing in our Next.js application? Dynamic routing in Next is very simple too! If you wrap your file name with [ ], its behavior will be like “:var” in react-router. For example, if you create a directory named “cities” and inside it create a file named “[city].js”, you can type anything instead of city in your route and your [city].js component will be shown.This approach works for folders too.
但是,如果您有多个城市,并且想要在应用程序中显示每个城市的描述怎么办? 我们如何在Next.js应用程序中实现动态路由? Next中的动态路由也非常简单! 如果用[]包装文件名,则其行为将类似于react-router中的“:var” 。 例如,如果您创建一个名为“ cities”的目录,并在其中创建一个名为“ [city] .js”的文件 ,则可以在路径中键入任何内容而不是city,这将显示[city] .js组件。这种方法也适用于文件夹。
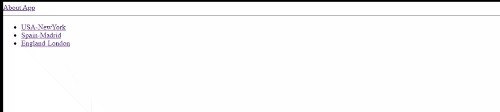
Let’s test it. Consider we have an array of country and cities in our index.js:
让我们测试一下。 考虑一下我们的index.js中有一系列国家和城市:
We want to show a simple sentence like “City is placed in Country” when we click on every city. Create a directory named “[country]” and a file “[city].js” inside it. Our city component can be like this:
当我们单击每个城市时,我们希望显示一个简单的句子,例如“城市位于国家/地区” 。 在其中创建一个名为“ [country]”的目录和一个文件“ [city] .js” 。 我们的城市部分可以像这样:
We can access the values of our query parameters in our route by useRouter hook, imported from “next/router”. useRouter returns an object of your current route in the location bar and you can access its variables easily!
我们可以通过useRouter钩子(从“ next / router”导入)访问路由中查询参数的值。 useRouter在位置栏中返回当前路线的对象,您可以轻松访问其变量!
Now we should change our index.js to be able to navigate to our dynamic route:
现在,我们应该更改index.js以便能够导航到我们的动态路线:
Awesome! But if you open your developer tools and look into your inspect tab, you see that all of the codes are changing. This is the bad behavior of <a> tag! To avoid this happening in dynamic routing you should pass your route template in “href” property, and the exact route in “as” property. So, change your index.js file like this:
太棒了! 但是,如果打开开发人员工具并查看检查选项卡,则会看到所有代码都在更改。 这是<a>标记的不良行为! 为了避免在动态路由中发生这种情况,您应该在“ href”属性中传递您的路由模板,并在“ as”属性中传递确切的路由。 因此,像这样更改index.js文件:
Let’s test it:
让我们测试一下:
Awesome! Everything is working great.
太棒了! 一切都很好。
Tip: you can create an “index.js” file in your directories so you will have your nested routes root page too. For example you can create “index.js” in your [country] folder so the http://localhost:3000/italy is a valid route too and renders your “index.js” file’s content.
提示:您可以在目录中创建一个“ index.js”文件,这样您也将拥有嵌套的路由根页面。 例如,您可以在[country]文件夹中创建“ index.js”,因此http:// localhost:3000 / italy也是有效的路由,并呈现“ index.js”文件的内容。
最后的话 (Final Words)
We successfully implemented static and dynamic routing in our first Next.js application. The routing system is the first and most important concept of Next applications.
我们在第一个Next.js应用程序中成功实现了静态和动态路由。 路由系统是Next应用程序的第一个也是最重要的概念。
In the following articles we will dive into more complex concepts of Next.js. Feel free to contact me at “hossein.ahmadi98@outlook.com” or contribute to our playground repository!
在以下文章中,我们将深入探讨Next.js的更复杂概念。 请随时通过“ hossein.ahmadi98@outlook.com”与我联系,或者为我们的游乐场资料库做出贡献!
翻译自: https://codeburst.io/next-js-tutorial-static-and-dynamic-routing-fba70e26359a
next.js 多级路由


 5644
5644


 被折叠的 条评论
为什么被折叠?
被折叠的 条评论
为什么被折叠?
 到【灌水乐园】发言


