


react api
Exploring Google Fit API with Google OAuth-2 Authentication with React Hooks in a fun Javascript side project.
在一个有趣的Javascript侧项目中探索带有React Hooks的Google OAuth-2身份验证的Google Fit API。
Want to pick your react hook and API integration skills up a notch? The following project: Fit Me Up! is a boredom brainchild that utilizes the above-mentioned technologies at its core and I have elucidated on what all did I learn throughout the development of this project!
是否想提高自己的React能力和API集成技能? 以下项目: 适合我! 是一个无聊的创意,他利用了上述技术作为核心,在此项目的整个开发过程中,我已经阐明了我学到了什么!
什么是“适合我”,谁可以使用? 🤔 (What is Fit Me Up and who can use it? 🤔)
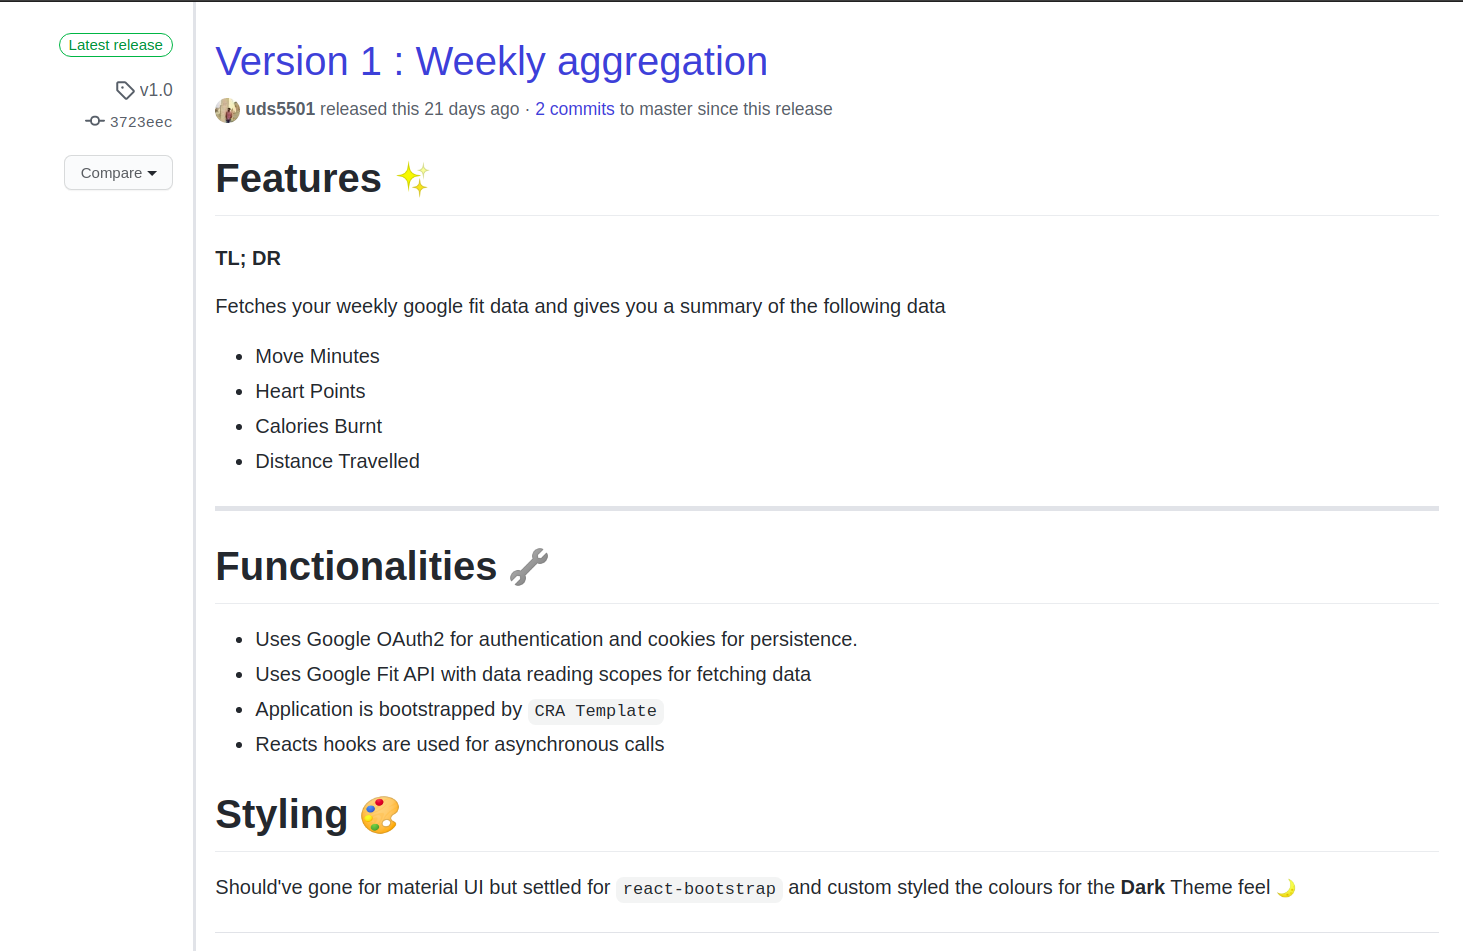
It’s a mini visualization dashboard which fetches your weekly google fit data and gives you a summary of the following points
这是一个微型可视化仪表板,可获取您的每周Google Fit数据并为您提供以下几点的摘要
- Move Minutes 移动分钟
- Heart Points 心点
- Calories Burnt 卡路里消耗
- Distance Travelled 行驶距离
Here’s the online demo!
这是在线演示 !
To give a meaningful result, you must have a Google Fit app installed in your android app / you must allow your android watch to track your location details, only then these data points will actually be recorded and you will be accessing it in the Fit Me Up dashboard by logging into your google account.
为了提供有意义的结果,您必须在android应用中安装一个Google Fit应用/您必须允许您的android手表跟踪您的位置详细信息,然后才能实际记录这些数据点,然后您才能在Fit Me中访问它通过登录到您的Google帐户来启动信息中心。
什么是技术堆栈? 💻 (What is the Tech Stack? 💻)
- Google Fit and Google OAuth2 APIs Google Fit和Google OAuth2 API
- CRA Template CRA模板
- React Hooks React钩
- Universal Cookies 通用饼干
相关项目链接🔗 (Relevant Project Links 🔗)
Don’t want to read all the good points and wanna jump straight to the project? No issues. Here are the relevant links you might find helpful:
不想阅读所有优点并想直接进入该项目吗? 没有问题。 以下是您可能会有所帮助的相关链接:
Github Repository: https://github.com/uds5501/fitmeup-oauth-visualizer
Github存储库: https : //github.com/uds5501/fitmeup-oauth-visualizer
Live Demo: http://fitmeup.netlify.com/
现场演示: http : //fitmeup.netlify.com/
实施细节✨ (Implementation Details✨)
Wow, you are still here! Okay, in that case, lemme give you the good stuff. The important takeaways are listed below and I will be covering the one by one:-
哇,你还在这里! 好吧,在那种情况下,lemme会给您带来好东西。 以下是重要的要点,我将一一介绍:
- Integrating Google OAuth 2 with React Hooks 将Google OAuth 2与React Hooks集成
- Using Cookies to persist the authentication 使用Cookies保持身份验证
- Fetching week-long data from Google Fit. 从Google Fit中获取为期一周的数据。
So let’s now move on to these implementations one by one (PS: the charting details will buff up this post and I really don’t want to clutter a lot into this one, so let’s focus on the workflow of how the data is passed around and processed into your app)
因此,让我们现在一个接一个地进行这些实现(PS:图表详细信息将使这篇文章感到困惑,我真的不想在这篇文章中花太多篇幅,所以让我们集中讨论数据如何传递的工作流程。并处理到您的应用中)
将Google OAuth 2与React Hooks集成 (Integrating Google OAuth 2 with React Hooks 👨🏫)
Fit Me Up is a visualization dashboard, so it surely needs data to visualize. Now, I need data of a specific user to fetch from Google Fit API. To point that specific user, I need his credentials and access token, so how do we get that?The answer is simple, authentication.
Fit Me Up是一个可视化仪表板,因此它肯定需要数据才能可视化。 现在,我需要特定用户的数据才能从Google Fit API中获取。 要指出该特定用户,我需要他的凭据和访问令牌,那么我们如何获得呢?答案很简单,身份验证。
I utilized react-google-login npm package to streamline my authentication process. All I needed to do here was set a react-state which stores whether my user has logged in or not and the access token. In our application, this access token is of paramount importance and happens to be the very reason why we are implementing the authentication in the first place, the get this access token.
我利用了react-google-login npm软件包可简化我的身份验证过程。 我在这里需要做的就是设置一个React状态,该状态存储我的用户是否已登录以及访问令牌 。 在我们的应用程序中,此访问令牌至关重要,而这恰恰是我们首先实现身份验证的原因,即获取此访问令牌。
To use the react-google-login, all I did was create two login and logout handlers, define the scope of the information I will be asking from the users and that’s it!
要使用react-google-login,我要做的就是创建两个登录和注销处理程序,定义要向用户询问的信息范围,仅此而已!
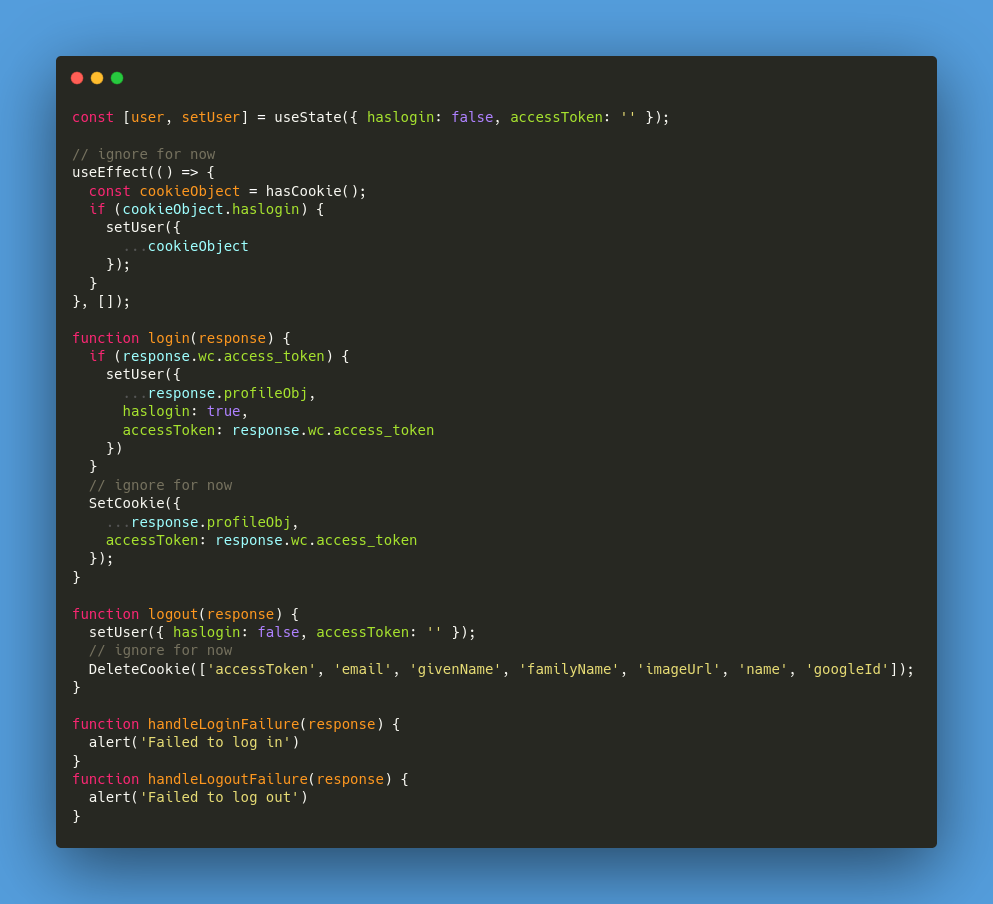
The useEffect, SetCookie and DeleteCookie should be ignored for now, apart from that, login and logout functions handle their respective roles and the other two functions handle the Failure in login and logout. During login, I am setting my user state to store the information from response and set haslogin to true.
暂时应该忽略useEffect,SetCookie和DeleteCookie,除此之外,登录和注销功能处理各自的角色,其他两个功能处理登录和注销失败。 登录期间,我将用户状态设置为存储来自响应的信息,并将haslogin设置为true。
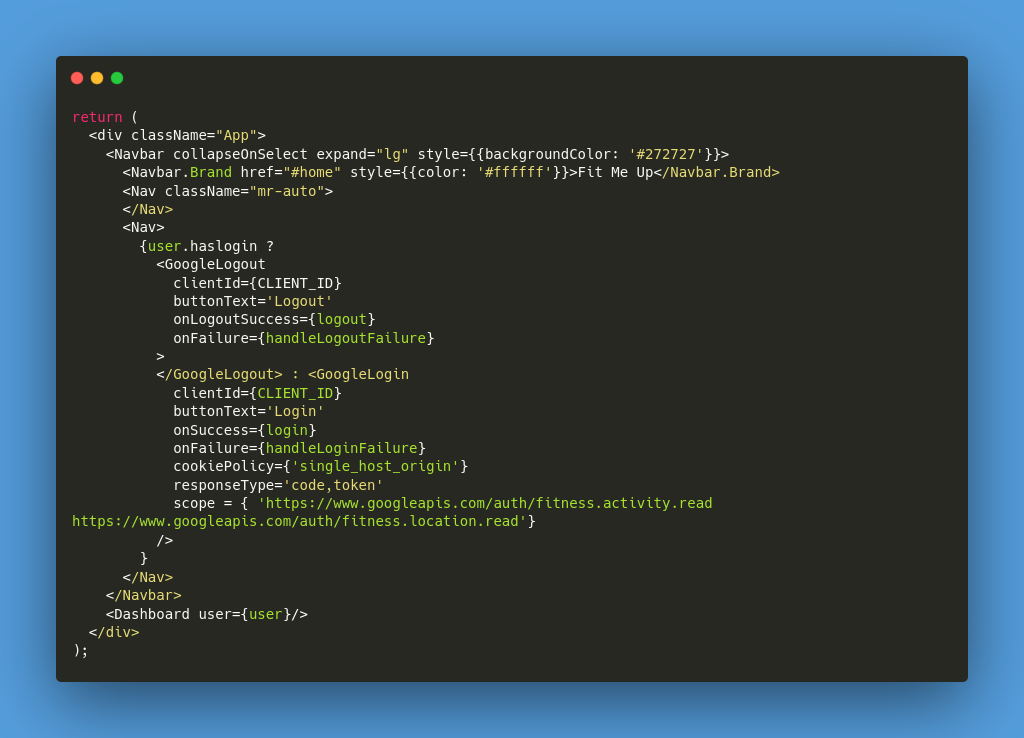
The image above specifies how the GoogleLogin and GoogleLogout were utilized to achieve our authentication button. In the GoogleLogin button, you will have to put in a CLIENT_ID (from your google OAuth2 dashboard) and specify the scope of information you want apart from the normal details of the user.
上图指定了如何使用GoogleLogin和GoogleLogout实现我们的身份验证按钮。 在GoogleLogin按钮中,您将必须输入CLIENT_ID(来自google OAuth2信息中心),并指定所需信息的范围( 除了用户的常规详细信息外)。
使用Cookies保持身份验证🍪 (Using Cookies to persist the authentication 🍪)
Yippee! You complete the authentication, your user is logged in, now you hit refresh to celebrate but wait, why is it showing “Login”, didn’t I just log in?
pp! 您完成身份验证后,您的用户已登录,现在单击“刷新”进行庆祝,但是请稍等,为什么它显示“ Login”(登录),我不是刚刚登录吗?
A refresh means your app will reload, which simply means that you just lost all your data and hence you lost the access token, so… you gotta login again and again whenever you hit refresh or your token expires. Tedious, right?
刷新意味着您的应用程序将重新加载,这仅意味着您刚刚丢失了所有数据,因此丢失了访问令牌,所以……只要您单击刷新或令牌过期,就必须一次又一次登录。 乏味吧?
To fix this, we need to store the user authentication details somewhere permanent, Database? sounds like an overkill. How about the browser’s local storage or Cookies? I went with cookies and let me tell you why.
要解决此问题,我们需要将用户身份验证详细信息存储在永久的数据库中? 听起来太过分了。 浏览器的本地存储或Cookies如何? 我拿了饼干,让我告诉你为什么。
顺便问一下,为什么要使用Cookie? (By the way, why cookies?)
Cookies are made exactly for this purpose, to store the user details so that user doesn’t have to re-identify itself and the app can serve him/her relevant information. Also, as a 🍒cherry on top, you can set the cookies to expire after a certain time. Now note that your access token will expire in 60 minutes, so let’s make sure our stored user data expires in 60 minutes too! This can be achieved via Cookies quite easily.
Cookie正是为此目的而制作的,用于存储用户详细信息,以便用户不必重新标识自己,并且应用程序可以为他/她提供相关信息。 另外,作为顶部的“樱桃”,您可以将Cookie设置为在特定时间后过期。 现在请注意,您的访问令牌将在60分钟后过期 ,因此,请确保我们存储的用户数据也将在60分钟后过期! 通过Cookies可以很容易地做到这一点。

I used universal-cookie to handle the cookie implementation part. The SetCookie function saves cookies for multiple user fields which we get on authentication. Delete Cookie function deletes them while the hasCookie() function reads the user information on each app reload so that we can determine whether a user had logged in or not.
我使用通用cookie处理cookie实现部分。 SetCookie函数为我们通过身份验证的多个用户字段保存cookie。 删除Cookie函数会在hasCookie()函数读取每次重新加载应用程序的用户信息时删除它们,以便我们确定用户是否已登录。
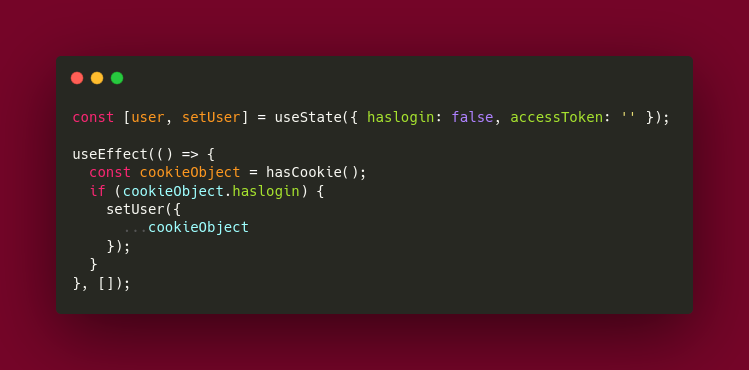
This implementation in your base app makes sure that on each reloads, your app doesn’t revert back to an unauthenticated state.
基本应用程序中的此实现可确保在每次重新加载时,您的应用程序都不会恢复为未经身份验证的状态。
从Google Fit中获取为期一周的数据🏃♀️ (Fetching week-long data from Google Fit 🏃♀️)
Now, our app is stable in terms of reloads, so let’s move on to the next part which is fetching the data from Google Fit Servers. They have an amazing REST API and you can read up its documentation right here.
现在,我们的应用程序在重新加载方面很稳定,因此让我们继续进行下一部分,该部分将从Google Fit Server中获取数据。 它们具有出色的REST API,您可以在此处阅读其文档。
In an HTTP request, there are headers and a request body which specifies what data do we exactly want from the serving endpoint. For that, I implemented the following helpers to get me a header and request body on the go.
在HTTP请求中,有标头和请求主体,用于指定我们到底要从服务端点获取什么数据。 为此,我实现了以下帮助程序,以便为我提供标题和随时随地的请求正文。
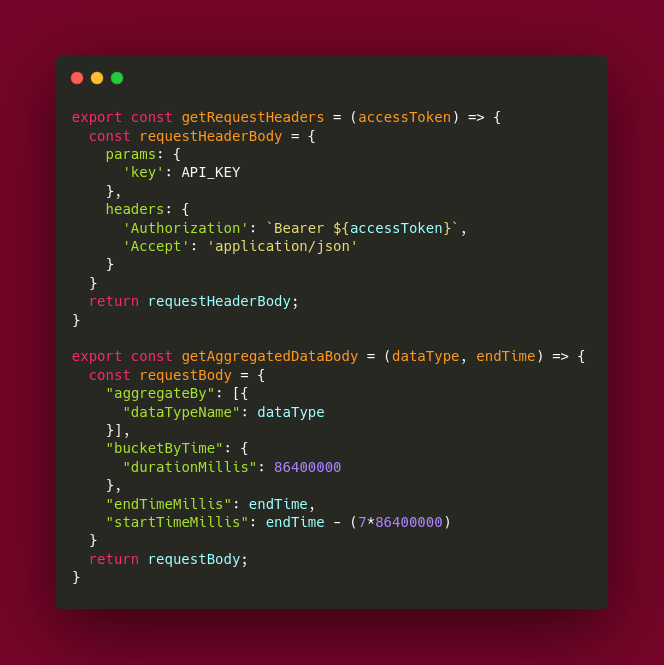
An important thing to note about the request body, I am planning to request information for 7 days, and I want the data of a particular day to be kept in a particular bucket. For that, I am specifying in my request that I want the data “bucketByTime” and that too into durations of 86400000 milliseconds (24 hours)
关于请求正文的重要注意事项,我计划请求7天的信息,并且希望将特定日期的数据保存在特定存储桶中。 为此,我在请求中指定了我想要数据“ bucketByTime”,并且该数据的持续时间也为86400000毫秒(24小时)
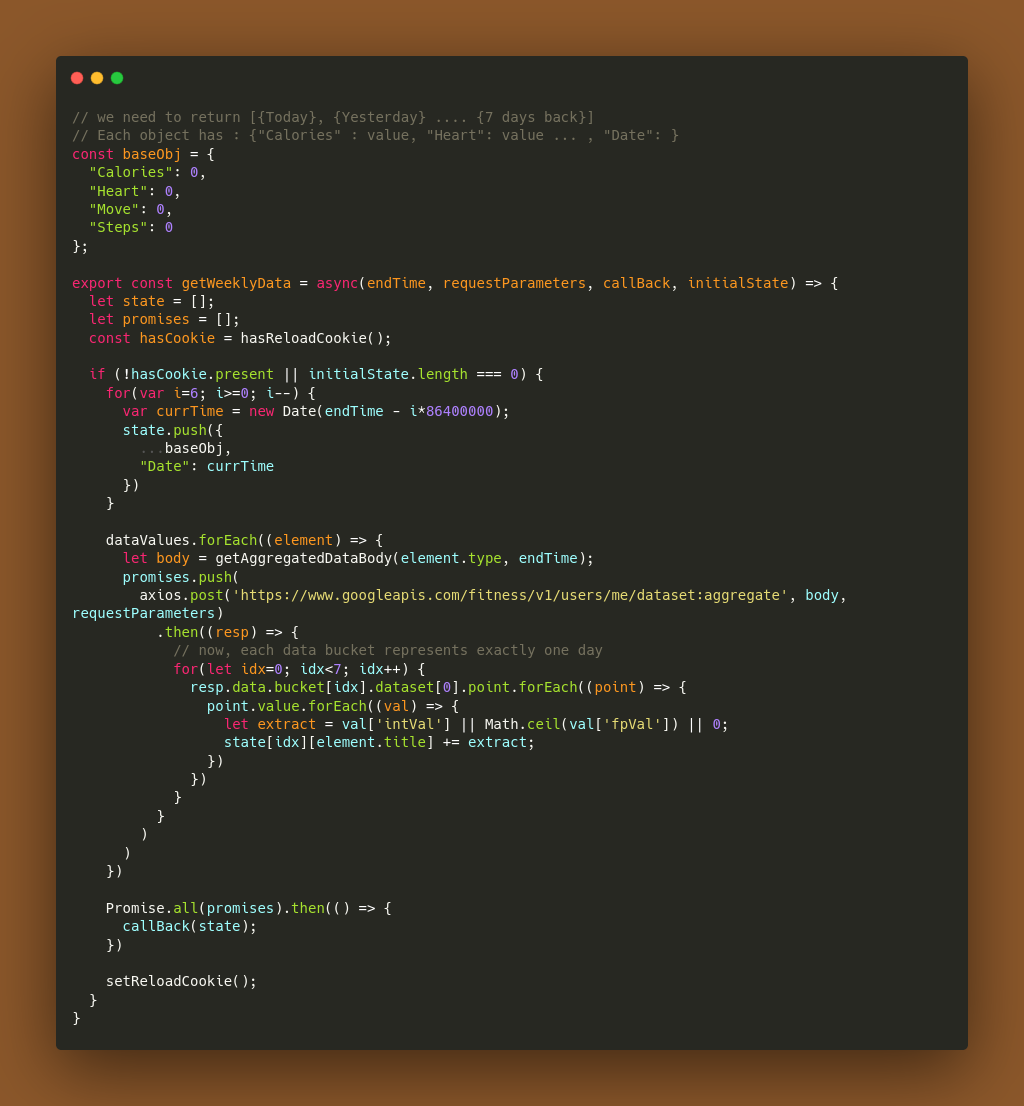
We are using the 4 data calls precisely to store the 4 data points I want to display. Now, each such call is made asynchronously utilizing our classic axios .then() patterns. Here I want to draw your attention to certain important questions one must ask in this implementation.
我们正使用这4个数据调用来精确存储我要显示的4个数据点。 现在,每个这样的调用都是使用我们经典的axios .then ()模式异步进行的。 在这里,我想提请您注意在此实现中必须问的某些重要问题。
Cookie在这里做什么? 🔁 (What are cookies doing here? 🔁)
I am using a state (let’s say Dashboard state) which will store all this processed data inside the app. Now, your request body will change every millisecond (due to your current time being changed on each reload), so your response body will be changing every millisecond too, this will mean your Dashboard state is never the same and the application will ask to auto-refresh itself every millisecond and will be stuck in an infinite reload.
我正在使用一种状态(例如仪表板状态),该状态将在应用程序内部存储所有已处理的数据。 现在,您的请求正文将每毫秒更改一次 (由于每次重新加载时您的当前时间都会更改),因此您的响应正文也将每毫秒更改一次,这意味着您的仪表板状态永远不会相同,并且应用程序会要求自动-每毫秒刷新一次,并将陷入无限的重载中。
To tackle this, I am using a cookie which stores when was the last time we fetched these details from the API and we won’t keep fetching them again until the cookie expires.
为了解决这个问题,我使用了一个cookie,该cookie存储了我们上次从API中获取这些详细信息的时间,并且直到cookie过期之前,我们都不会继续获取它们。
This solves your infinite Dashboard reload problem.
这解决了您无限的仪表板重新加载问题。
那边的回调(状态)是什么? 🤯 (What is that callback(state) over there? 🤯)
Callback() functions are a charm.Suppose you have to change your parent component’s state according to the properties of certain data in your child component, then how would you do that?Voila, use callback functions. Let me show you what I did here.
Callback()函数很吸引人,假设您必须根据子组件中某些数据的属性来更改父组件的状态,那么您该怎么做呢? 让我告诉你我在这里做了什么。
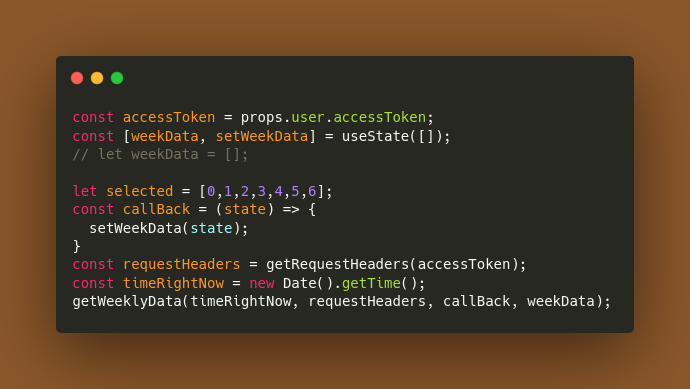
This is what’s happening when your parent function loads, what it says is set any array passed into the function named “state” should be set as weekData state, and we pass this callBack function into the getWeeklyData function which is a utility function.
这是在加载父函数时发生的事情,它说的是将传递给名为“ state”的函数的任何数组设置为weekData状态,并将此callBack函数传递给作为实用程序函数的getWeeklyData函数。
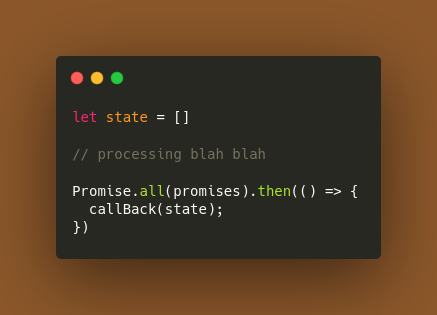
Now once all the processing is done, and all the promises are resolved, we call our callBack() function and set the Dashboard state to this newly processed array.This, my friend, is the beauty of the callback() functions.
现在所有的处理完成并且所有的诺言都解决了之后,我们调用callBack()函数并将Dashboard状态设置为这个新处理的数组。我的朋友,这就是callback()函数的优点。
数据处理工作流程的总结⏳ (Conclusion of data processing workflow ⏳)
I know, I know, it was long and descriptive, but really that was the entire point, to make it long and descriptive! This was the core of how data is fetched and passed around between utility functions and main components!You can look up the code in the Github Repository link given above and it’s descriptive enough to show how it all fits in the actual application.
我知道,我知道这是冗长而具有描述性的,但实际上,要使它冗长且具有描述性,这就是重点! 这是如何在实用程序功能和主要组件之间获取和传递数据的核心!您可以在上面给出的Github存储库链接中查找代码,它的描述性足以说明它们如何适合实际应用。
资源资源 (Resources)
翻译自: https://medium.com/swlh/react-hooks-with-google-fit-api-a-perfect-javascript-marriage-7351d869a37a
react api


 2703
2703

 被折叠的 条评论
为什么被折叠?
被折叠的 条评论
为什么被折叠?
 到【灌水乐园】发言


