


On one of my previous projects, our goal was to have one application that can be used in-house to produce multiple, differently branded end-products with similar (or mostly the same) functionalities.
在我以前的项目之一中,我们的目标是拥有一个可以在内部使用的应用程序,以生产具有相似(或几乎相同)功能的多种不同品牌的最终产品。
The solution needed to be able to:
解决方案需要能够:
- apply different styles/theme per brand 针对每个品牌应用不同的样式/主题
- cater for content differences 迎合内容差异
- cater for layout/structural and behaviour differences between brands — this may feel like a too big ask for a white label app but usually, it’s just a matter of time when the product folks will require that and having a way to enable this in a sensible way is a big win 迎合品牌之间的布局/结构和行为差异-听起来似乎对白色标签应用程序的要求过大,但是通常,产品人们需要它并有一种合理的方法来实现这一点只是时间问题方式是一个巨大的胜利
- produce multiple products ideally without a need to make custom code replacements or custom code generation at build time 理想情况下可以生产多种产品,而无需在构建时进行自定义代码替换或自定义代码生成
In this post, I’ll describe the approach we took to build multiple different versions of a React app from one codebase.
在本文中,我将介绍我们从一个代码库构建React应用程序的多个不同版本的方法。
研究 (Research)
Creating white-label applications with ReactJS is not a new topic. There are multiple approaches and blog posts out there describing solutions ranging from runtime theming, through build-time theming to writing custom app generators.
用ReactJS创建带有白标签的应用程序不是一个新话题。 有多种方法,博客文章描述了从运行时 主题到构建时主题再到编写自定义应用程序生成器的解决方案 。
Our challenge appeared to be very similar to the one Walmart had. I found their blog post a very interesting and inspiring read. Even though their approach is more fitted to larger companies and bigger apps than ours, some of the underlying principles stay the same.
我们的挑战似乎与沃尔玛所面临的挑战非常相似。 我发现他们的博客文章非常有趣且启发人心。 尽管他们的方法比我们的方法更适合大型公司和更大的应用程序,但其中一些基本原则保持不变。
None of these examples was enough to suit our requirements though, so once I figured out a (yet another) way to do it, I decided to share it.
这些示例都不足以满足我们的要求,因此,一旦我找到了另一种方法,便决定共享它。
一个办法 (A solution)
My solution was based on the Webpack’s resolve.modules setting. It allowed us to have modules resolved at build time without providing a specific path to them in the imports. It also enabled us to have a default fallback location for modules that didn’t need to be customised for some brands.
我的解决方案是基于的WebPack的resolve.modules设置。 它使我们能够在构建时解析模块,而无需在导入中提供指向它们的特定路径。 它还使我们能够为不需要为某些品牌定制的模块提供默认的备用位置。
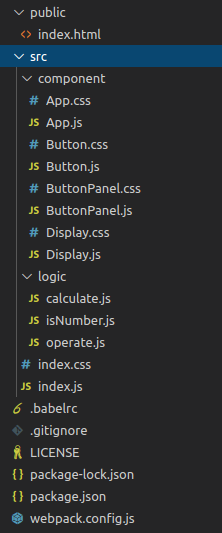
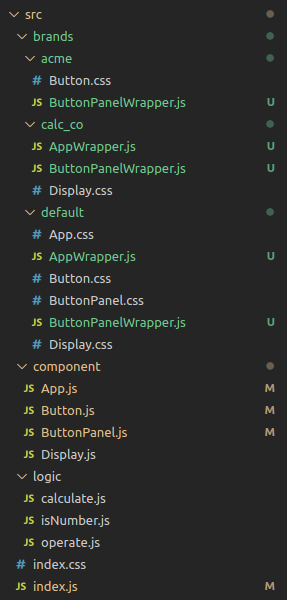
#1 Base projectAs the base for the working demo, I’m going to use one of the example React projects (the calculator) with removed react-scripts and combined with a minimalistic Webpack and Babel configuration for simplicity. With that, we get a project with the following structure as the starting point:
#1基础项目作为工作演示的基础,我将使用示例示例React项目( 计算器 )之一,其中删除了react-scripts,并结合了简约的Webpack和Babel配置以简化操作。 这样,我们得到一个具有以下结构的项目作为起点:
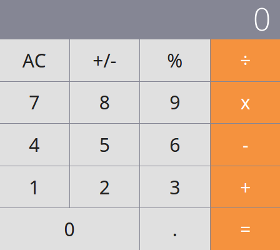
and when you run npm run build you get an app that looks like that:
当您运行npm run build您会得到一个看起来像这样的应用程序:
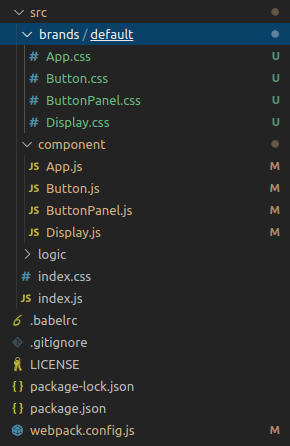
#2 Introduce resolve.modules Let’s add the brands folder:
#2介绍 resolve.modules 让我们添加brands文件夹:
and make the following changes to the code (the diff ignores the moved CSS files for brevity):
并对代码进行以下更改(为简洁起见,diff忽略了移动CSS文件):
At this point what we get is exactly the same app just with a bit confusing folder structure ;) What happened is that we no longer use relative paths to include the CSS files and let Webpack resolve them as modules at build time. Let’s leverage that in the next step.
此时,我们得到的是完全相同的应用程序,只是文件夹结构有些混乱;)发生的事情是,我们不再使用相对路径来包含CSS文件,而让Webpack在构建时将它们解析为模块。 让我们在下一步中利用它。
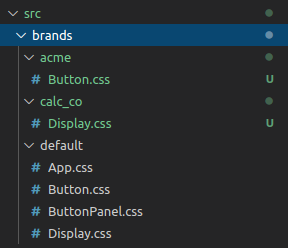
#3 Add more brandsLet’s add acme and calc_co as new brands and customise the buttons and display respectively for each.
#3添加更多品牌我们将acme和calc_co添加为新品牌,并分别自定义按钮和显示。
We’ll also need to update the webpack.config.js as follows:
我们还需要按如下所示更新webpack.config.js :
The thing to note in this step is that neither acme or calc_co have a full set of files. Thanks to the default fallback mechanism, they don’t need to. We told Webpack to first look for modules for the brand defined in the APP_BRAND environmental variable, then in the default fallback location and then, if it still didn’t find the module, it means it’s an external one so it will look for in the node_modules.
在此步骤中要注意的是, acme或calc_co都没有完整的文件集。 借助默认的后备机制,他们不需要这样做。 我们告诉Webpack首先寻找在APP_BRAND环境变量中定义的品牌的模块,然后在默认的后备位置,然后,如果仍然找不到该模块,则意味着它是一个外部模块,因此它将在node_modules 。
Now we can build the app targeting specific brand with APP_BRAND={brand_name} npm run build to get the following:
现在,我们可以使用APP_BRAND={brand_name} npm run build针对特定品牌的应用,以获取以下信息:
We can apply different styling to the brands. Cool, but that was just one of many requirements. Let’s get into some more interesting stuff next.
我们可以对品牌应用不同的样式。 很酷,但这只是众多要求之一。 接下来让我们来看一些更有趣的东西。
#4 Support structural & content differencesIn order to further differentiate the brands, apart from the styling, we introduced, what we called, wrapper objects (yes, naming is hard ;)). Their purpose is to enable structural and content differences between brands while avoiding code duplication (or keeping it to a minimum). The idea is that the main business logic and rendering stay in the top-level components (not brand specific), but these components are parameterised via props so that it’s possible for them to look or behave differently depending on these parameters. We found it to be a clean way of keeping the brand-specific code reasonable in size and contained within the folder of the given brand.
#4支持结构和内容差异为了进一步区分品牌,除了样式外,我们还引入了包装对象(是的,命名很困难;)。 他们的目的是使品牌之间的结构和内容有所不同,同时避免代码重复(或将其保持在最低限度)。 这个想法是,主要业务逻辑和渲染保留在顶级组件中(而不是特定于品牌),但是这些组件是通过props参数化的,因此根据这些参数,它们可能具有不同的外观或行为。 我们发现这是一种使特定品牌的代码保持合理大小且包含在给定品牌文件夹中的一种干净方法。
Here’s an example:
这是一个例子:
Here’s how I parameterised the main components:
这是我参数化主要组件的方式:
For the wrapper components to take effect you need to import them instead of the main components. Example from the index.js:
为了使包装器组件生效,您需要导入它们而不是主要组件。 来自index.js示例:
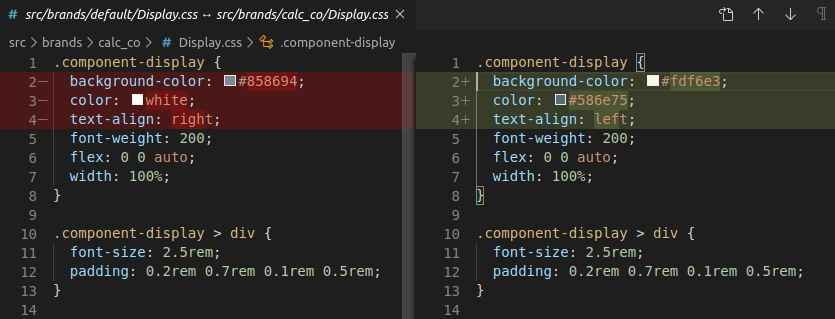
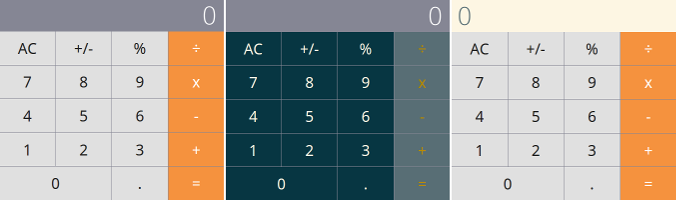
I used the AppWrapper to place the calculator display at the bottom for the Calc Co brand:
我使用AppWrapper将计算器显示屏放在Calc Co品牌的底部:

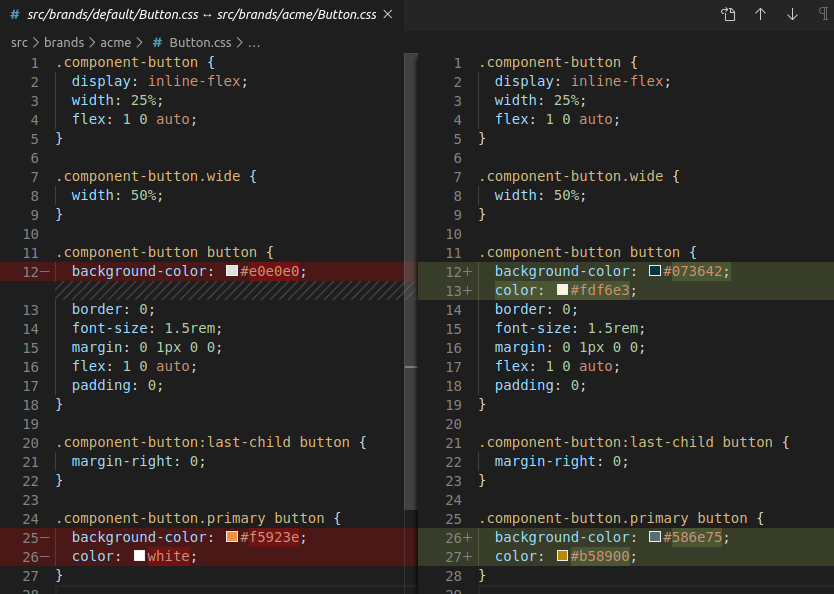
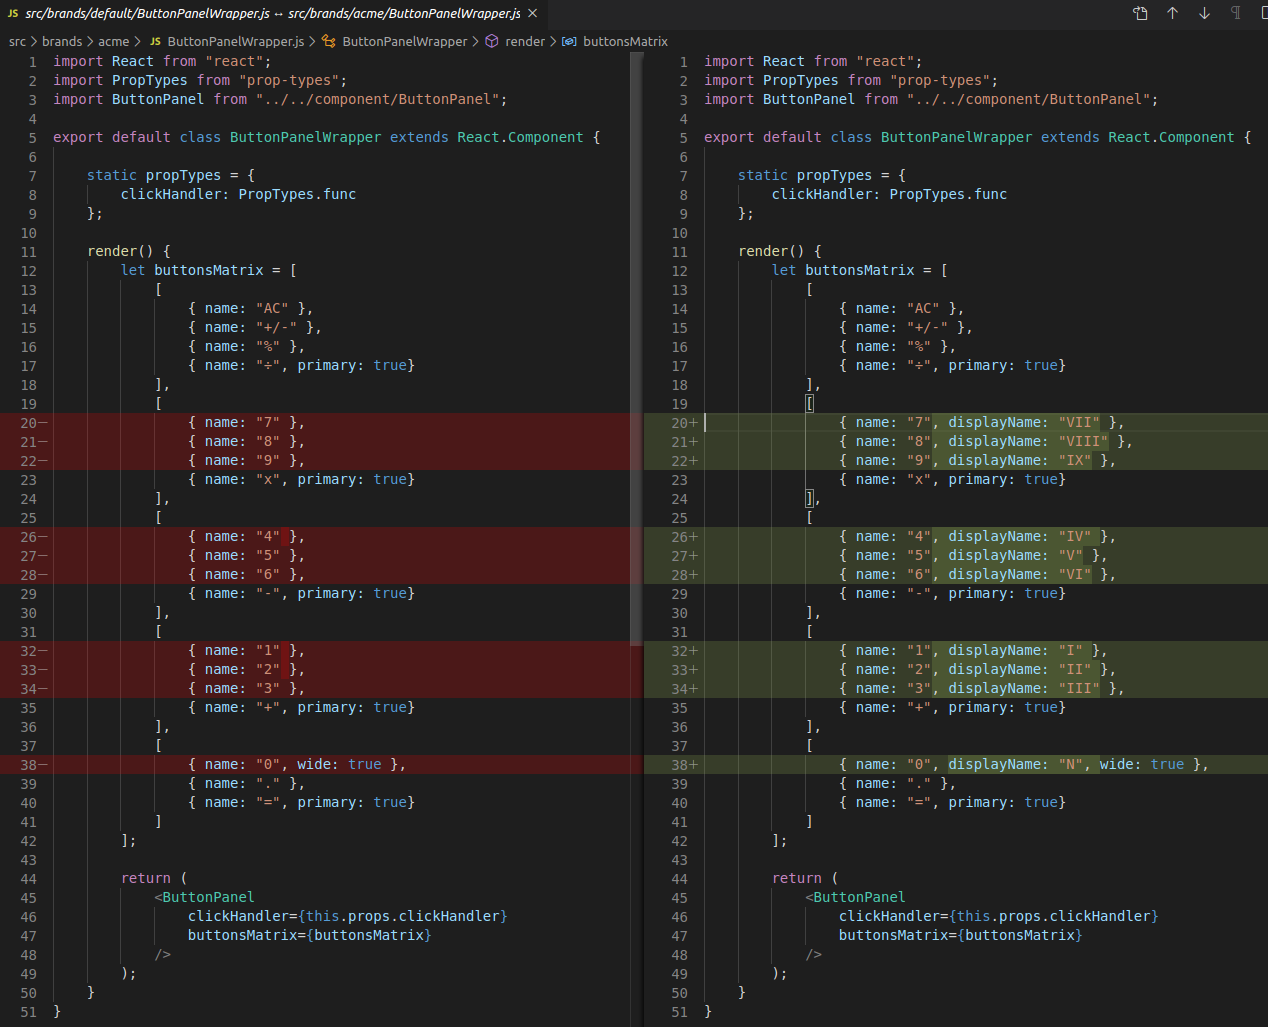
I used roman numbers for the Acme buttons:
我为Acme按钮使用了罗马数字:
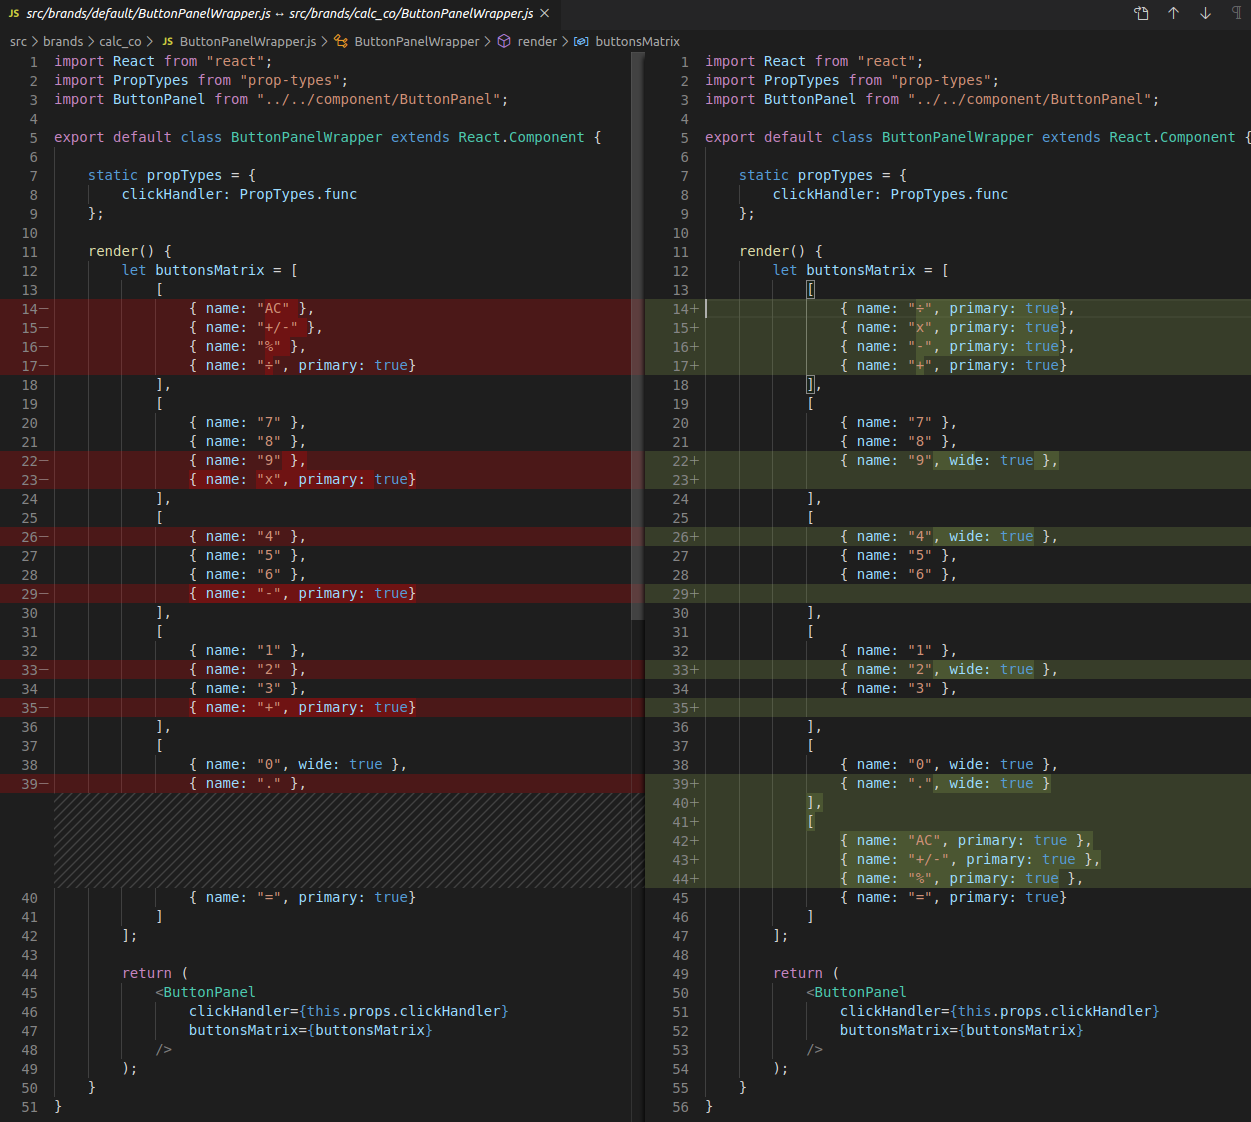
I fished off with totally customised button layout for the Calc Co:
我为Calc Co选择了完全自定义的按钮布局:
The end results are as below:
最终结果如下:
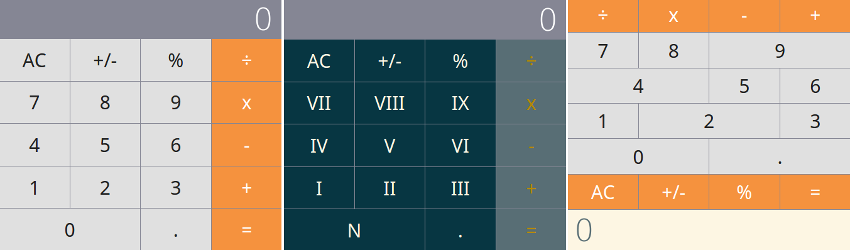
As you can see, using this approach, you can get significantly different apps with not much additional code. Once you have the main components parameterised, you can easily build apps with various combinations of them.
如您所见,使用这种方法,无需太多额外代码即可获得截然不同的应用程序。 一旦对主要组件进行了参数设置,就可以轻松地使用它们的各种组合来构建应用程序。
You can view the live end-products here: default, acme, calc_co.
您可以在此处查看实时最终产品: default , acme , calc_co 。
生产解决方案 (Productionising the solution)
IDE featuresThis kind of custom module resolution may confuse some IDEs as they might not be aware of the location of the branded modules.Here’s how to give a hint to VS Code intellisense via jsconfig.json as an example:
IDE功能这种自定义模块解析可能会使某些IDE困惑,因为它们可能不知道品牌模块的位置。以下是通过jsconfig.json提示VS Code intellisense的方法:
With jsconfig there’s no option to make it dynamic and make it handle other brands, unfortunately, but even having VS Code to look into the default one is a plus.If you happen to use TypeScript, there’s a way to make it better though (see below).
不幸的是,使用jsconfig并没有使其动态化并使其能够处理其他品牌的选项,但是即使让VS Code查看默认值也是一个加分。如果您碰巧使用TypeScript,有一种方法可以使它更好(请参见下面)。
Using TypeScriptIf you use TypeScript, you can use the same compilerOptions in your tsconfig.jsonas with the above jsconfig.json. See the TS docs for details.
使用打字稿如果你使用打字稿,您可以使用相同的compilerOptions在tsconfig.json与上述jsconfig.json 。 有关详细信息,请参见TS文档 。
Although there’s no official support for a tsconfig.js, there’s an npm package which enables you to have dynamic TypeScript config which would suit this use case well as you’ll be able to reference the process.env.APP_BRAND in it.
尽管tsconfig.js 尚无官方支持 ,但有一个npm软件包 ,使您能够拥有适合此使用情况的动态TypeScript配置,因为您可以在其中引用process.env.APP_BRAND 。
Using BabelWith the babel-plugin-module-resolver and using JavaScript configuration file, you can configure the custom brands paths as follows:
使用Babel通过babel-plugin-module-resolver并使用JavaScript配置文件 ,您可以按以下方式配置自定义品牌路径:
Using ESLintYou can make ESLint rely either on your Babel config (eslint-import-resolver-babel-module), TypeScript config (eslint-import-resolver-typescript) or Webpack config (eslint-import-resolver-webpack). There are options for any of your project setup ;)
使用ESLint您可以使ESLint依赖于Babel配置( eslint-import-resolver-babel-module ),TypeScript配置( eslint-import-resolver- typescript)或Webpack配置( eslint-import-resolver-webpack )。 您可以为任何项目设置提供选项;)
Improved CSS handlingOne could argue that it isn’t great that I copied whole CSS files in order to customise just a couple of colours. They would be correct. One way of improving that would be to use Sass and have shared files with the styles which would use Sass variables. These files could import the variables and these imports could rely on the same mechanism as described above. The only thing you would need to have brand-specific, in this case, would be the definitions of the variables.
改进CSS处理有人可能会说复制整个CSS文件以仅自定义几种颜色并不是很好。 他们是正确的。 一种改进方法是使用Sass并使用Sass变量来共享具有样式的文件。 这些文件可以导入变量,并且这些导入可以依赖于如上所述的相同机制。 在这种情况下,您唯一需要具有品牌特定性的就是变量的定义。
进一步改进 (Further improvements)
One thing which is not great with the described solution is that, when you look at the imports themselves, it may be hard to know which import is an external module and which one is your own branded one.The solution to this could be using the resolve.alias setting instead of the described resolve.module. The problem with resolve.alias is that currently it only accepts string values, so there’s no way to achieve the default fallback behaviour.The good news is that Webpack starting from version 5 (currently in beta) will support multiple values for the aliases as an array.
所描述的解决方案不好的一件事是,当您查看导入本身时,可能很难知道哪个导入是外部模块,哪个导入是您自己的品牌模块。对此的解决方案可以使用resolve.alias设置,而不是所描述的resolve.module 。 resolve.alias的问题在于,目前它仅接受字符串值,因此无法实现默认的后备行为。好消息是,从版本5(当前为Beta)开始的Webpack将支持别名的多个值。数组。
Another way of improving that could be using tsconfig-paths-webpack-plugin, if you use TypeScript, and, instead of specifying module resolution in webpack.config.js, rely on paths defined in your tsconfig.json as they support multiple values for aliases. I haven’t tried that one yet though.
改善这种的另一种方式,可以使用tsconfig路径-的WebPack-插件 ,如果你使用打字稿,和,而不是指定模块分辨率webpack.config.js ,依赖于你定义的路径tsconfig.json ,因为他们支持多个值别名。 我还没有尝试过。
结论 (Conclusion)
So now you know how to leverage Webpack’s resolve.module in order to have a white labelled React application and build multiple differently branded products from one codebase. I understand it’s just yet another way of achieving that but, hopefully, someone with similar requirements will find it useful.
所以,现在你知道如何利用的WebPack的resolve.module为了有一个白色的标签作出React的应用程序和构建多种不同品牌的产品,从一个代码库。 我了解这只是实现此目标的另一种方式,但是希望有类似要求的人会发现它很有用。
The source code of the example project I created is available on GitHub. You can also view the live end-products here: default, acme, calc_co.
我创建的示例项目的源代码可在GitHub上找到 。 您还可以在此处查看实时最终产品: default , acme , calc_co 。
翻译自: https://medium.com/swlh/white-label-web-app-with-reactjs-and-webpack-bb3a94a83fe6


 788
788


 被折叠的 条评论
为什么被折叠?
被折叠的 条评论
为什么被折叠?
 到【灌水乐园】发言


