


普元部署包部署找不到构建
Practical machine learning used to be hard — and still is in some specialized areas. Average machine learning tasks are getting easier by the day, and also automated to a degree. Today we’ll explore just how easy it is to create and deploy a fully automated machine learning platform in 50 lines of code.
实用的机器学习曾经很难-仍然在某些专业领域。 日常的平均机器学习任务变得越来越容易,并且在一定程度上实现了自动化。 今天,我们将探讨用50行代码创建和部署全自动机器学习平台有多么容易。
Before we get started, let me make a bold disclaimer first. The solution you’re about to see works only for classification tasks, although we’d need only a couple of minor changes for regression tasks. There are some things that could be improved, such as logging, and you’re free to further work on the code on your own.
在开始之前,让我先大胆地声明。 您将要看到的解决方案仅适用于分类任务,尽管对于回归任务我们只需要进行一些小改动。 有一些可以改进的地方,例如日志记录,您可以自由地自行处理代码。
Also, we’ll deploy the solution as a REST API. Why? Because we want other tech professionals (non-data-scientists) to be able to use our AutoML tool without breaking a sweat.
另外,我们将解决方案部署为REST API。 为什么? 因为我们希望其他技术专业人员(非数据科学家)能够使用我们的AutoML工具而不会费劲 。
Down below is a list of requirements for using this solution:
下面是使用此解决方案的要求的列表:
Prepared dataset — dataset must be in a machine-learning-ready format, so do the proper data preparation first. Our data is stored as CSV.
准备的数据集 -数据集必须采用机器学习就绪的格式,因此请首先进行适当的数据准备。 我们的数据存储为CSV。
Knowing how to make a POST request — either from tools like Postman or from any programming language (we’ll cover that).
知道如何发出POST请求 -通过诸如Postman之类的工具或任何编程语言(我们将对此进行介绍)。
Okay, so without much ado, let’s get started!
好吧,事不宜迟,让我们开始吧!
数据集的收集和准备 (Dataset gathering and preparation)
We’ll use the Iris dataset for this simple example. The dataset consists of various flower measurements and the target variable which indicates the flower species.
在此简单示例中,我们将使用Iris数据集 。 数据集包括各种花卉测量值和指示花卉种类的目标变量。
It’s a perfect dataset for demonstration purposes because we don’t want to spend much time cleaning the data. If you’re following along, download the dataset from the provided link and store it somewhere. I have it in a separate folder where the Python scripts will eventually be stored.
这是用于演示的理想数据集,因为我们不想花很多时间清理数据。 如果要继续,请从提供的链接下载数据集并将其存储在某处。 我将其放置在一个单独的文件夹中,最终将在其中存储Python脚本。
Now we have the dataset ready and there are no preparation requirements. Let’s get to the fun part now.
现在我们已经准备好数据集,并且没有准备要求。 现在让我们开始有趣的部分。
编写AutoML脚本 (Coding the AutoML script)
This is where the fun begins. Inside the directory where your dataset is located (hopefully a new, empty directory) create a Python file and name it as you wish. I’ve named mine automl.py.
这就是乐趣的开始。 在数据集所在的目录内(希望是一个新的空目录),创建一个Python文件并根据需要命名。 我已将其命名为automl.py 。
Before we get started with the coding, I would just like to mention that the logic behind this solution is based on the PyCaret library, and this post particularly. PyCaret is an amazing library for machine learning and you should definitely learn more about it. You can start here:
在我们开始之前与编码,我只想一提的是该解决方案背后的逻辑是基于PyCaret库,以及这个职位特别。 PyCaret是一个很棒的机器学习库,您绝对应该了解更多。 您可以从这里开始:
Classification with PyCaret: A better machine learning library
Inside automl.py file we’ll import Pandas library and everything from the PyCaret classification module:
在automl.py文件中,我们将导入Pandas库以及PyCaret分类模块中的所有内容:
import pandas as pd
from pycaret.classification import *
Next, we’ll declare an AutoML class with a couple of fields: a path to the CSV data file, target column name, and the name of the metric we want to optimize for (such as accuracy, recall…). We’ll also declare a custom field for storing information about the best model:
接下来,我们将声明一个AutoML类,其中包含几个字段:CSV数据文件的路径,目标列名称以及我们要优化的指标名称(例如准确性,召回率……)。 我们还将声明一个自定义字段,用于存储有关最佳模型的信息:
class AutoML:
    def __init__(self, path_to_data: str, target_column: str, metric):
        self.df = pd.read_csv(path_to_data)
        self.target_column = target_column
        self.metric = metric
        self.best_model = None
Great! We can now declare a function below the __init__ that handles all the machine learning logic. I’ve called mine fit(), but feel free to change it if you wish. This function has the following tasks:
大! 现在,我们可以在__init__下面声明一个函数,该函数可以处理所有机器学习逻辑。 我已经将其称为mine fit() ,但是如果您愿意,可以随时进行更改。 该功能具有以下任务:
- Perform the initial setup 执行初始设置
- Find the best 5 algorithms 找到最好的5种算法
- Tune the hyperparameters of these 5 algorithms 调整这5种算法的超参数
- Perform bagging 执行装袋
- Perform blending 执行混合
- Perform stacking 执行堆叠
- Find the best overall model for the specified metric 查找指定指标的最佳整体模型
- Save the model to a file 将模型保存到文件
Sounds like a lot of logic to write, but it’s only 10 lines of code:
听起来很多逻辑都要编写,但是只有10行代码:
def fit(self):
    clf = setup(data=self.df, target=self.target_column, session_id=42, html=False, silent=True, verbose=False)    top5_models = compare_models(n_select=5)    tuned_top5_models = [tune_model(model) for model in top5_models]

    bagged_tuned_top5_models = [ensemble_model(model, method=’Bagging’) for model in tuned_top5_models]    blended = blend_models(estimator_list=top5_models)    stacked = stack_models(estimator_list=top5_models[1:], meta_model=top5_models[0])    best_model = automl(optimize=self.metric)
    self.best_model = best_model    save_model(best_model, ‘best_model’)
And that’s it for this file. Let’s proceed with API development.
就是这个文件。 让我们继续进行API开发。
编写REST API (Coding the REST API)
We’ve got the machine learning portion covered, and now it’s time to make this logic accessible for other software developers. Python makes this step stupidly easy, as we can easily build a simple REST API with libraries like Flask.
我们已经涵盖了机器学习部分,现在是时候让其他软件开发人员可以访问此逻辑了。 Python使这一步骤变得异常简单,因为我们可以使用Flask之类的库轻松构建一个简单的REST API。
Before starting, create a new Python file called app.py. Let’s now import Flask alongisde with our automl.py and perform the basic setup:
在开始之前,请创建一个名为app.py的新Python文件。 现在,让我们与automl.py一起导入Flask和automl.py并执行基本设置:
from flask import Flask, jsonify, request
from flask_restful import Api, Resource
from automl import AutoMLapp = Flask(__name__)
app.config[‘JSON_SORT_KEYS’] = False
api = Api(app)
Great! We’re now ready to handle requests sent from users. To do so, we’ll declare a class which inherits from flask_restful.Resource. Inside we can have various methods, named as the type of API call. We’ll name ours post(), as we’ll be making a POST request.
大! 现在,我们准备处理用户发送的请求。 为此,我们将声明一个从flask_restful.Resource继承的类。 在内部,我们可以有各种方法,称为API调用的类型。 我们将命名为post() ,因为我们将进行POST请求。
Inside this method, we’ll need to capture the JSON data provided by the user when making the call. The metric parameter is optional and is set to Accuracy if not specified. Remember, we’ll pass the values of these parameters to an instance of AutoML class.
在此方法内部,我们需要在进行调用时捕获用户提供的JSON数据。 metric参数是可选的,如果未指定,则设置为Accuracy 。 记住,我们将这些参数的值传递给AutoML类的实例。
Now we’re able to call the AutoML.fit() method and return the results back to the user. Here’s the code for this class:
现在,我们可以调用AutoML.fit()方法并将结果返回给用户。 这是此类的代码:
class Optimize(Resource):
    @staticmethod
    def post():
        posted_data = request.get_json()
        path_to_data = posted_data[‘path_to_data’]
        target_column = posted_data[‘target_column’]
        try: metric = posted_data[‘metric’]
        except KeyError: metric = ‘Accuracy’        auto_ml = AutoML(path_to_data=path_to_data, target_column=target_column, metric=metric)
        try:
            auto_ml.fit()
            return jsonify({ ‘Message’: ‘Success’, ‘BestModel’: str(auto_ml.best_model) })
        except Exception as e:
            return jsonify({ ‘Message’: str(e) })
And finally, we need to connect our Optimize class to some actual endpoint and make app.py executable. Here’s how:
最后,我们需要将Optimize类连接到某个实际端点,并使app.py可执行。 这是如何做:
api.add_resource(Optimize, ‘/optimize’)if __name__ == ‘__main__’:
    app.run(host=’0.0.0.0', port=9000)
And that’s it — that’s the entire code of the fully automated machine learning pipeline for classification tasks!
就这样-这就是用于分类任务的全自动机器学习管道的全部代码!
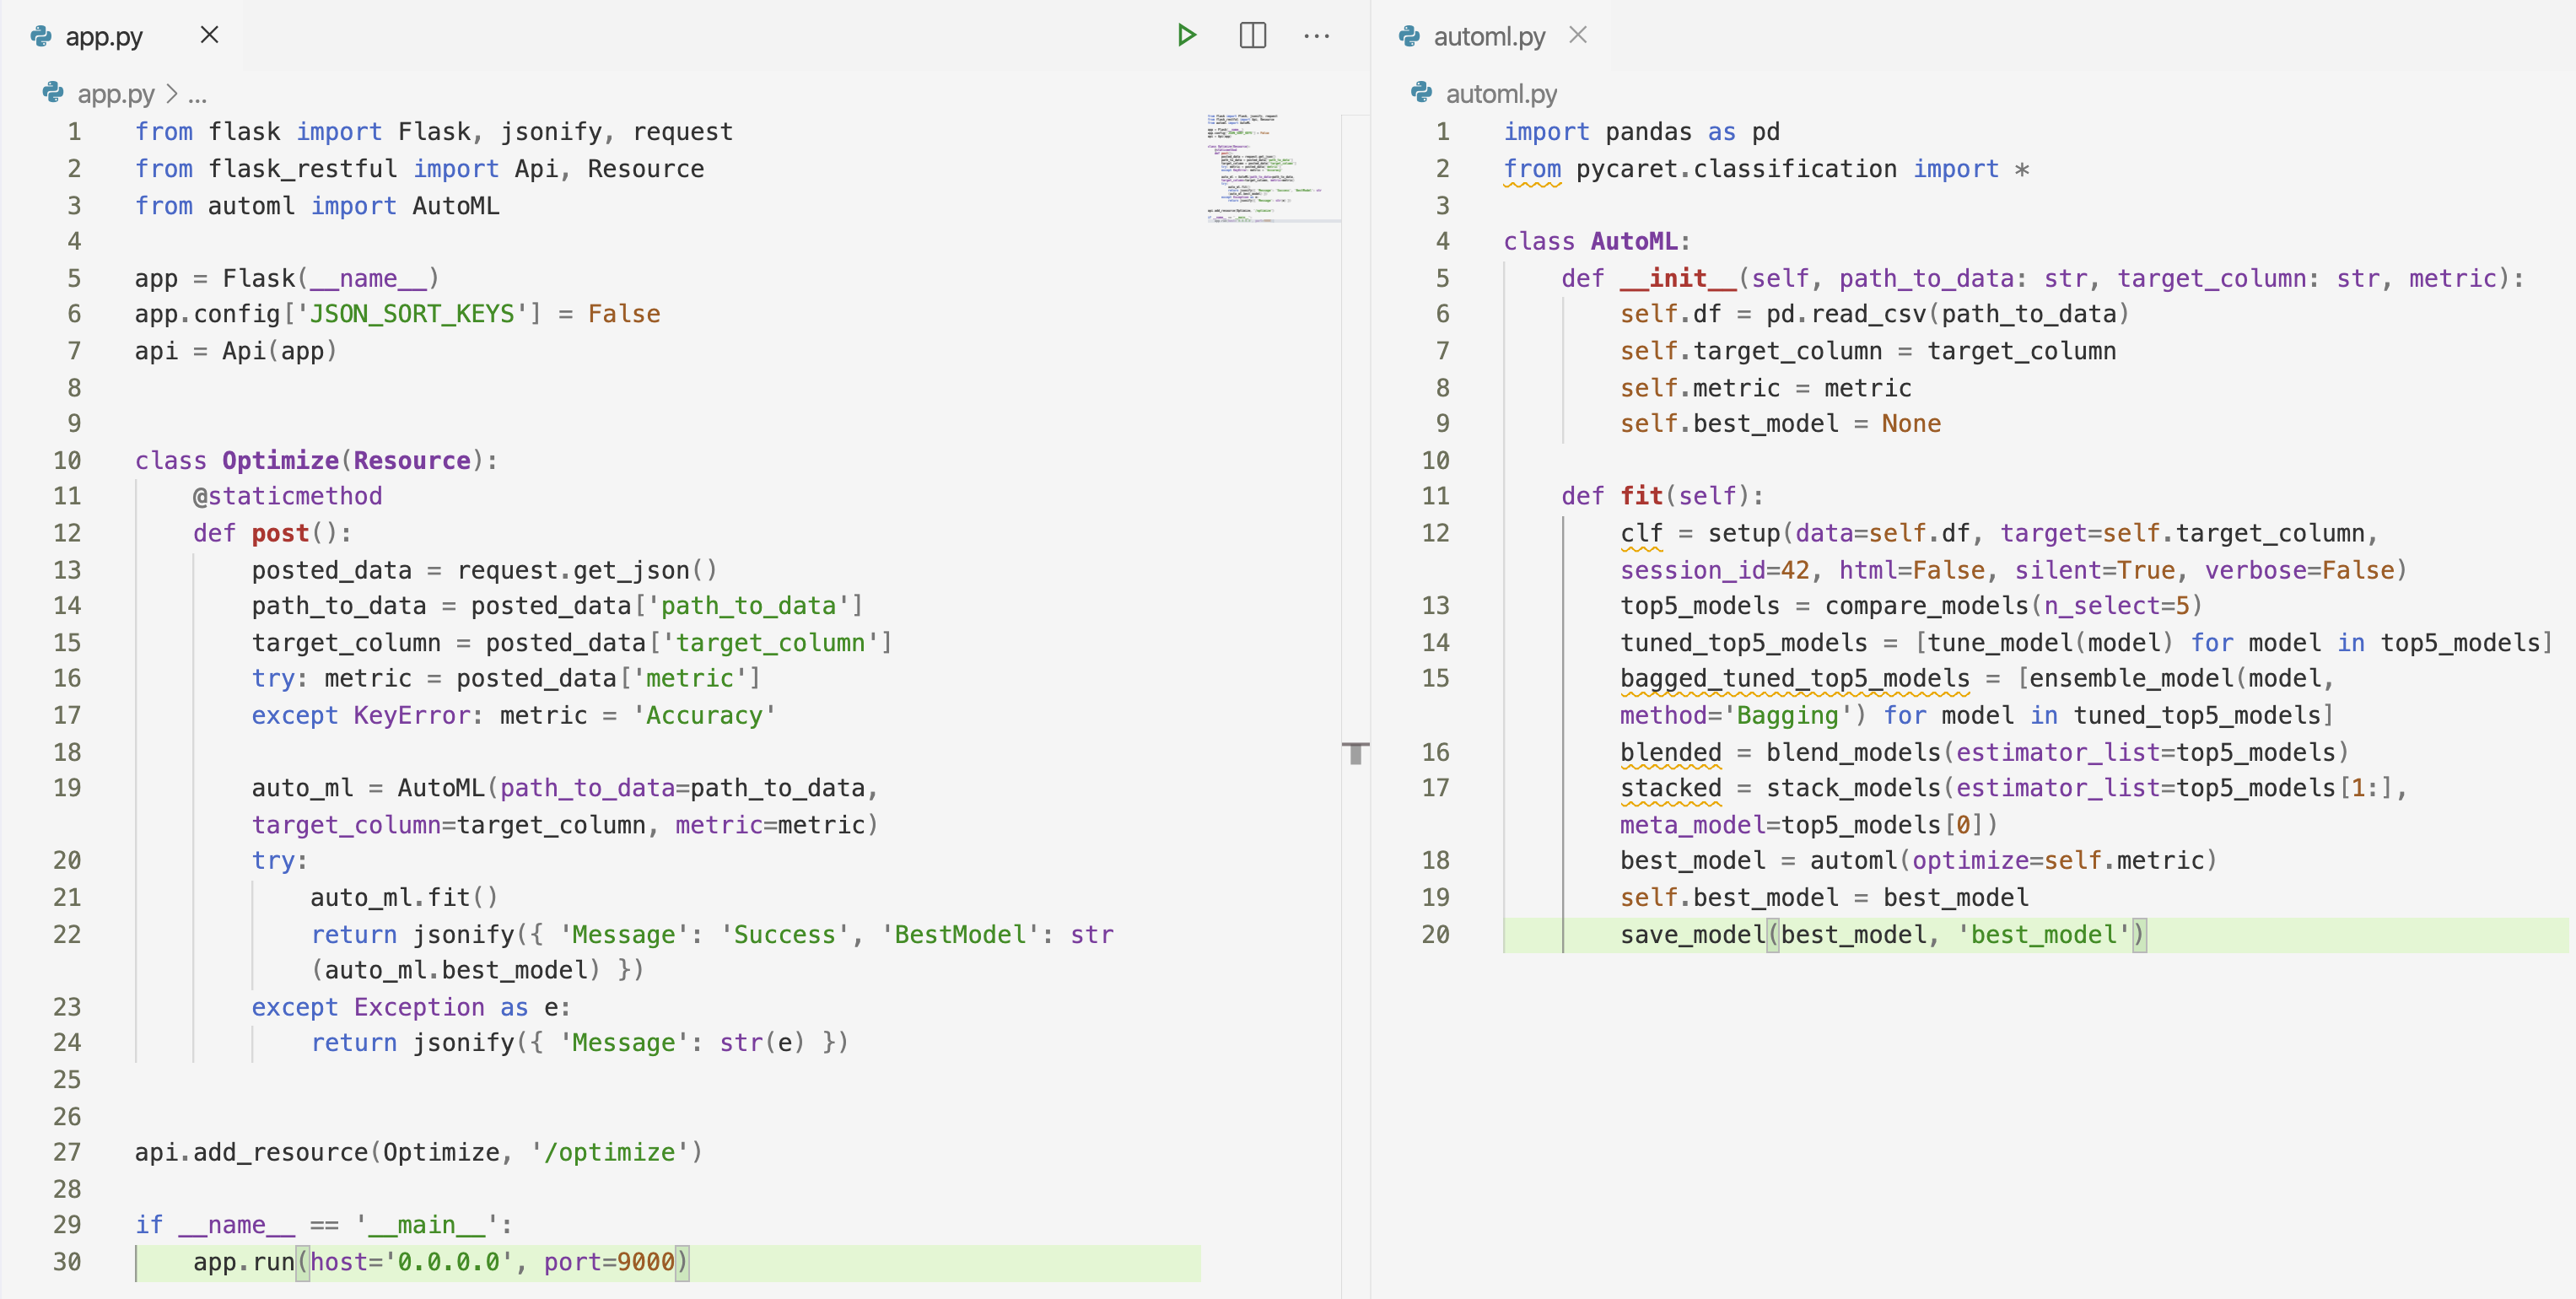
Here’s the code recap, just in case you got stuck somewhere:
这是代码摘要,以防万一您卡在某个地方:
That all we need to do. Let’s test the thing now.
这就是我们需要做的。 让我们现在测试一下。
测试中 (Testing)
We can use applications like Postman to test if our API is working properly. But before, we need to run the app.py file. To do so, open up the Terminal/CMD window and go to the location of app.py. Execute the following:
我们可以使用Postman之类的应用程序来测试我们的API是否正常工作。 但是在此之前,我们需要运行app.py文件。 为此,请打开“终端/ CMD”窗口,然后转到app.py的位置。 执行以下命令:
python app.pyYou should see something like this pop up:
您应该会看到类似这样的弹出窗口:

We can open up the Postman now, change the call type to POST, enter the URL, and JSON parameters with their respective values:
我们现在可以打开邮递员 ,将呼叫类型更改为POST,输入URL和JSON参数及其各自的值:
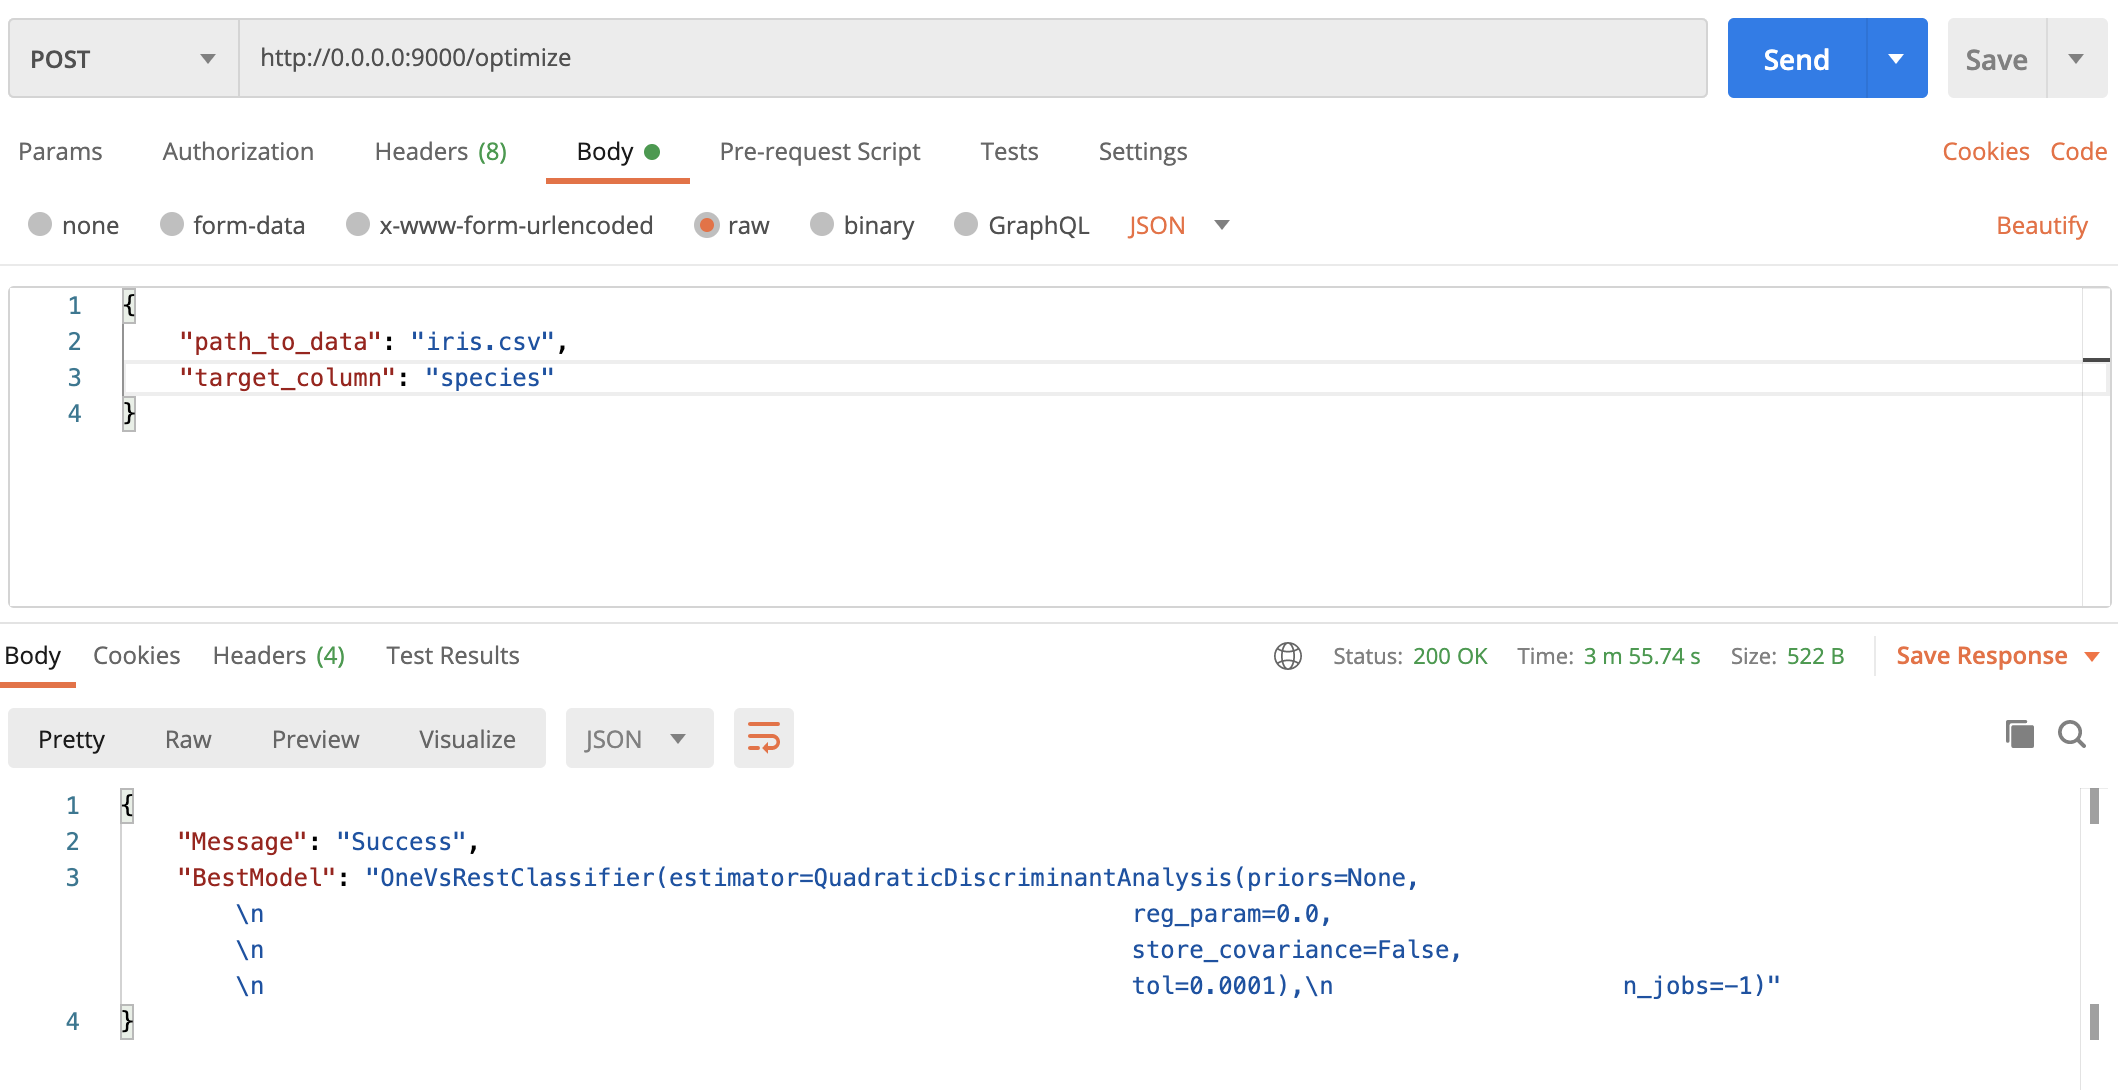
The process took around 4 minutes on my machine even for this simple dataset, but that’s the price of training and optimizing multiple machine learning models. And yeah, once executed you’ll get the best model saved to your PC, so you’re able to make new predictions right away.
即使对于这个简单的数据集,该过程在我的机器上也花费了大约4分钟,但这就是训练和优化多个机器学习模型的代价。 是的,一旦执行,您就会将最佳模型保存到您的PC,因此您可以立即做出新的预测。
And that’s pretty much it. Let’s wrap things up in the next section.
就是这样。 让我们在下一节中总结一下。
你走之前 (Before you go)
Don’t consider yourself to be a machine learning expert if you’ve managed to follow along. This article wasn't meant for machine learning experts, but for regular software developers wanting to implement machine learning in their projects.
如果您能够成功跟随,那就不要认为自己是机器学习专家。 本文并非针对机器学习专家,而是针对希望在其项目中实施机器学习的常规软件开发人员。
I hope you see just how easy it is to fully automate machine learning tasks. If you need something more specific, this maybe won’t be enough for you. For the majority of simpler tasks, this code will suit you fine. Data preparation is still the king — so that’s where you’ll be spending most of the time. Machine learning is easy, at least for most of the tasks.
我希望您看到完全自动化机器学习任务有多么容易。 如果您需要更具体的内容,可能对您来说还不够。 对于大多数较简单的任务,此代码适合您。 数据准备仍然是最主要的-因此,这是您大部分时间要花费的时间。 机器学习很容易,至少对于大多数任务而言都是如此。
翻译自: https://towardsdatascience.com/lets-build-deploy-automl-solution-in-5-minutes-4e5683635caf
普元部署包部署找不到构建


 269
269


 被折叠的 条评论
为什么被折叠?
被折叠的 条评论
为什么被折叠?
 到【灌水乐园】发言


