


介绍 (Introduction)
In the previous part — see link below — we created the logic to encrypt and decrypt messages. Yet, it felt a bit rough and lonely. It all happened within our IDE. But it does not need to be that way. By wrapping up our code with a nice interface, it will make our piece of software more interactive and user friendly. We worked on the back-end, now let’s see how we can do some magic on the front-end.
在上一部分(请参阅下面的链接)中,我们创建了加密和解密消息的逻辑。 但是,这感觉有点粗糙和孤独。 这一切都发生在我们的IDE中。 但这不是必须的。 通过使用美观的界面包装我们的代码,它将使我们的软件更具交互性和用户友好性。 我们在后端工作,现在让我们看看如何在前端做一些魔术。
In case you’ve missed Part 1, see the link below, but don’t forget to come back to Part 2:
如果您错过了第1部分,请参阅下面的链接,但不要忘记回到第2部分:
进入GUI (Enters GUI)
Graphical User Interface, or commonly known as GUI, is the front-end. This is what users interact with. It can be pretty, or ugly, clunky or smooth, minimalist or heavy.
图形用户界面(通常称为GUI)是前端。 这是用户与之交互的东西。 它可以是漂亮或丑陋,笨拙或光滑,极简或沉重的。
In this part we will focus on a simple interface, using a standard GUI Python library Tkinter. It will be built step by step to explain the logic, then rearranged at the end. Let’s get started.
在这一部分中,我们将使用标准的GUI Python库Tkinter专注于一个简单的界面。 它将逐步构建以解释其逻辑,然后在最后进行重新排列。 让我们开始吧。
初始窗口 (Initial window)
Code review line by line
代码逐行审核
LINE 1: We import Tkinter and will later refer to it as ‘tk’, a convention.
第1行 :我们导入Tkinter,以后将其称为“ tk”(惯例)。
LINE 3: We initialize our Tkinter window, naming it root, also a commonly-used convention. The result looks like this.
第3行 :我们初始化Tkinter窗口,将其命名为root ,这也是一种常用约定。 结果看起来像这样。

LINE 4: Setting up a title for our window.
第4行 :为我们的窗口设置标题。
LINE 5: Defining the minimum size for our window, this means the user will not be able to change the size below a width of 300 and a height of 230. That’s a size in pixels.
第5行 :为我们的窗口定义了最小尺寸,这意味着用户将无法在300的宽度和230的高度以下更改该尺寸。该尺寸以像素为单位。
LINE 7: We create our Canvas. Canvas is a widget of Tkinter. This will contain our widgets, think buttons, entry field, from our interface. As arguments, we specify our root as Tk instance, and we set the window size. When generated, the window will open with that size.
第7行 :创建画布。 画布是Tkinter的一个小部件。 这将包含我们界面中的小部件,思考按钮,输入字段。 作为参数,我们将根指定为Tk实例,并设置窗口大小。 生成后,窗口将以该大小打开。
LINE 8: Using .pack() on a widget will organize it as a block, and place it within the parent widget, the root.
第8行 :在小部件上使用.pack()会将其组织为一个块,并将其放在父小部件(即根)中。
LINE 10: By using .mainloop(), we initiate an infinite loop to run our window. It will remain active, listening (‘waiting’) for an event, processing it. The window will remain active as long as it’s not closed (or encounters an error).
第十行 :通过使用.mainloop(),我们启动一个无限循环来运行我们的窗口。 它将保持活动状态,监听(“等待”)事件,对其进行处理。 只要窗口没有关闭(或遇到错误),它将保持活动状态。
The final result from those first lines:
这些第一行的最终结果是:

添加小部件 (Adding Widgets)
While a minimalist look can be good, the example above is probably extreme. Let’s add some widgets to make it more interesting.
虽然极简主义外观可能不错,但上面的示例可能是极端的。 让我们添加一些小部件使其更有趣。
Code review line by line
代码逐行检查
This is an improvement from the code snippet above, hence explanations on lines from the previous snippets will be skipped.
这是对上面代码段的改进,因此将跳过对先前代码段的解释。
LINE 10: We create the widget entry1, an entry field (‘input field’), and tie it to root.
第10行:我们创建小部件entry1和一个输入字段(“输入字段”),并将其绑定到root 。
LINE 11: We use .create_window() on our existing canvas1, set size parameters of the entry field and link it to entry1 via the window argument.
第11行 :我们在现有的canvas1上使用.create_window(),设置输入字段的大小参数,然后通过window参数将其链接到entry1 。
LINE 13–14: We create the widget label1, a field which will be holding/showing some text. As for entry1, we tie it to root and set dimensions.
第13–14行:我们创建了小部件label1 ,该字段将保留/显示一些文本。 对于entry1,我们将其绑定到根并设置尺寸。
LINE 16–17: We create the widget button1, a button which will submit our entry. The argument ‘text’ defines the text to show on the button. As for entry1 and label1, we tie it to root and set dimensions.
第16-17行:我们创建了小部件button1 ,该按钮将提交我们的条目。 参数'text'定义要在按钮上显示的文本。 至于entry1和label1,我们将其绑定到根并设置尺寸。
LINE 19: This will help us for the next few lines of code. We create v and assign it to a string variable, StringVar(). This will help us to track changes, widgets like RadioButton will require this to function properly.
第19行:这将有助于我们接下来的几行代码。 我们创建v并将其分配给字符串变量StringVar()。 这将帮助我们跟踪更改,诸如RadioButton之类的小部件将要求此功能正常运行。
LINE 20: We set up the v variable to ‘e’. Why? Read on!
第20行 :将v变量设置为“ e”。 为什么? 继续阅读!
LINE 22–24: We create a radio button, tie it to root, name it ‘Encrypt’, link it to the set it as value ‘e’, and link it to string variable v. As for previous widgets, we tie it to root, and set dimensions.
LINE 22–24 :我们创建一个单选按钮,将其绑定到root ,将其命名为“ Encrypt”,将其链接到设置为值“ e”,并将其链接到字符串变量v。对于先前的小部件,我们将其绑定根 ,并设置尺寸。
LINE 26: Same as for lines 22–24, except we name it ‘Decrypt’ and set ‘d’ as value.
第26行 :与第22-24行相同,除了我们将其命名为“解密”并将“ d”设置为值。
So what? By using the v StringVar, we can define which radio button will be selected when the window is first generated. In our case, we have set v to be ‘e’ (line 20) and within our radio buttons, we defined the value of the encrypt button to be ‘e’. Those are thus tied, and ‘encrypt’ will appear checked upon generating the window.
所以呢? 通过使用v StringVar,我们可以定义在第一次生成窗口时将选择哪个单选按钮。 在我们的例子中,我们将v设置为“ e”(第20行),并在单选按钮中将加密按钮的值定义为“ e”。 这样就绑在一起了,并且在生成窗口时“加密”将显示为选中状态。
Update on the look of our window:
更新我们的窗口外观:
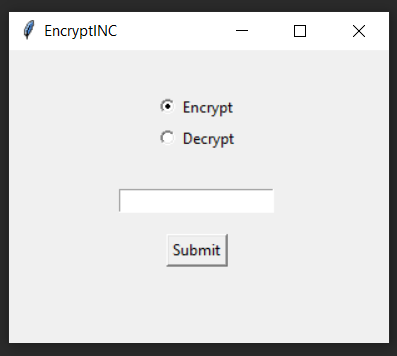
An improvement. But it’s only visual for now, we’ll have to link it with our encryption/decryption code to make it functional.
一种提升。 但这只是目前的视觉效果,我们必须将其与我们的加密/解密代码链接以使其起作用。
缩小前端和后端之间的差距 (Bridging The Gap Between Front and Back-End)
We’re moving a step further with a new addition to our code, hence explanations on lines from the previous snippets will be skipped.
我们将对代码进行新的添加,从而进一步向前迈进了一步,因此,将跳过对先前代码片段的解释。
LINE 1: Define a function, which will get user inputs and treat them accordingly.
第1行 :定义一个函数,该函数将获取用户输入并进行相应处理。
LINE 2: We get the value from the entry field entry1 and store it as x1.
第2行 :我们从输入字段entry1中获取值并将其存储为x1 。
LINE 3: Defining choice and assigning to the value we get from the v StringVar.
第3行 :定义选择并分配给我们从v StringVar获得的值。
LINE 5:-6 If choice is equal to ‘e’, the code on line 6 is executed. When the user selects the radio button ‘encrypt’, the value of v will be ‘e’.
5:-6行如果选择等于'e',则执行6行代码。 当用户选择单选按钮“加密”时, v的值为“ e”。
The ‘text’ attributed for label1 is set to the returned value from our code_message() function discussed in Part 1, which takes the user input x1 as an argument. As a reminder it looked like that:
为label1赋予的'text'设置为第1部分中讨论的code_message()函数的返回值,该函数将用户输入x1作为参数。 提醒一下,它看起来像这样:
LINE 8–9: The ‘else’ from our if statement, in this case, the user selected the ‘decrypt’ radio button. The function used is decode_message() which takes the user input x1 as an argument. As a reminder it looked like that:
第8–9行 :if语句中的“ else”,在这种情况下,用户选择了“ decrypt”单选按钮。 使用的函数是decode_message(),它将用户输入x1作为参数。 提醒一下,它看起来像这样:
LINE 20: This is where the magic happens. Within our button widget, we use the argument command and assign it to our function getResult. Any time the button will be clicked, the action will be to start the getResult. Using command now brings the widget to life, while previously it could be clicked but without any event taking place.
LINE 20:这就是魔术发生的地方。 在按钮小部件内,我们使用arguments 命令并将其分配给函数getResult 。 每当单击该按钮时,操作就是启动getResult。 现在,使用命令可以使小部件栩栩如生,而以前可以单击它,但不会发生任何事件。
绑在一起 (Tying It All Together)
Now that we’ve built the foundations of our Tkinter interface, increment it with widgets then linked our button to a function, let’s see the big picture.
现在,我们已经建立了Tkinter界面的基础,使用小部件对其进行递增,然后将按钮链接至功能,让我们看一看。
Code review line by line
代码逐行检查
LINE 1–43: You will have recognized what was discussed in Part 1.
LINE 1–43 :您将认识到第1部分中讨论的内容。
LINE 46: We wrap the GUI code in a function called GUI, it makes it cleaner, easier to debug and read. In GUI we have a nested function, getResult, then the code to instantiate and build our Tkinter window.
LINE 46 :我们将GUI代码包装在一个称为GUI的函数中,它使它更干净,更易于调试和读取。 在GUI中,我们有一个嵌套函数getResult ,然后是要实例化并构建我们的Tkinter窗口的代码。
LINE 83: We call the GUI function.
LINE 83 :我们称为GUI函数。
The final results:
最终结果:


Well done, you did it !
做得好,您做到了!
Tkinter的替代品 (Alternatives to Tkinter)
Although Tkinter is well supported and documented, you might want to try your skills on another GUI tool. Here are a few alternatives:
尽管Tkinter得到了很好的支持和记录,但是您可能想在其他GUI工具上尝试一下自己的技能。 这里有一些选择:
- PyQt, PyQt,
- Flexx, Flexx,
- Pyforms, 梨形
结论 (Conclusion)
Quite a journey through the Tkinter-land. We saw how to build a canvas, populate it with widgets then tie functions to get results.
穿越Tkinter土地相当一段旅程。 我们看到了如何构建画布,如何用小部件填充画布,然后绑定函数以获取结果。
Mini-projects can give you confidence, and help you grow both your problem-solving and programming skills. It’s important to focus on projects that matter to you, let your mind wander a bit and you’ll soon find other ideas to bring to life. Start small, and build up 💪.
小型项目可以给您信心,并帮助您提高解决问题和编程的能力。 重要的是要专注于对您而言重要的项目,让您的思维漂移一下,然后您很快就会发现其他可以实现的想法。 从小处开始,然后积累💪。
Thank you for reading!
感谢您的阅读!


 6万+
6万+

 被折叠的 条评论
为什么被折叠?
被折叠的 条评论
为什么被折叠?
 到【灌水乐园】发言


