


django框架drf
在我以前的博客中,我解释了什么是REST API以及如何使用Django Rest Framework创建简单的REST API。
In this blog, I am explaining how to create a CRUD functionality with Django REST Framework. Let’s get started.
在此博客中,我将解释如何使用Django REST Framework创建CRUD功能。 让我们开始吧。
Creating a new Django Project and Initial setup for DRF
为DRF创建新的Django项目和初始设置
Initially let’s create a simple Django Application. I am creating a new Django project named drf. After creating, I am just migrating and running the server.
首先,让我们创建一个简单的Django应用程序。 我正在创建一个名为drf的新Django项目。 创建之后,我只是在迁移并运行服务器。
$ django-admin startproject drf
$ cd drf
$ python3 manage.py migrate
$ python3 manage.py runserver
Now let’s install the Django Rest Framework.
现在,让我们安装Django Rest Framework 。
$ pip3 install djangorestframework markdown django-filterThe command installs Django Rest Framework for your project. Now I am just adding the rest framework app to our installed app. Don’t forget to do this part since it might bring you to error while running.
该命令将为您的项目安装Django Rest Framework。 现在,我只是将其余框架应用程序添加到我们已安装的应用程序中。 不要忘记执行此部分,因为它可能会在运行时使您出错。
drf/settings.py
drf/settings.py
INSTALLED_APPS = [
    'django.contrib.admin',
    'django.contrib.auth',
    'django.contrib.contenttypes',
    'django.contrib.sessions',
    'django.contrib.messages',
    'django.contrib.staticfiles',    'rest_framework',  # make Sure to add this line
]
Now we have successfully initialized our Django app. Now let's start creating our model.
现在,我们已经成功初始化了Django应用。 现在开始创建模型。
2. Creating a new Django app and Model.
2. 创建一个新的Django应用和模型。
In this section, I am creating a new Django app named employee to store all the employee details.
在本部分中,我将创建一个名为employee的新Django应用程序以存储所有员工详细信息。
$ python3 manage.py startapp employeeAs usual, this command will create a new app in our project. After creating the app register or add it to the Installed Apps section.
像往常一样,此命令将在我们的项目中创建一个新应用。 创建应用程序注册后,或将其添加到“已安装的应用程序”部分。
drf/settings.py
drf/settings.py
INSTALLED_APPS = [
    'django.contrib.admin',
    'django.contrib.auth',
    'django.contrib.contenttypes',
    'django.contrib.sessions',
    'django.contrib.messages',
    'django.contrib.staticfiles',
    'rest_framework',
    'student',    'employee' # Make Sure you add this line]
Now let’s create our model. I am creating a model with the following attributes.
现在让我们创建模型。 我正在创建具有以下属性的模型。
employee/models.py
employee/models.py
from django.db import models# Create your models here.
class Employee(models.Model):
    emplyee_regNo = models.TextField(unique=True)
    emplyee_name = models.TextField()
    employee_email = models.TextField()
    employee_mobile = models.TextField(null=True)
    created_at = models.DateTimeField(auto_now=True)
After creating just execute these two commands where the first command creates a migration file in our app and the next one makes the changes in the database.
创建后,只需执行以下两个命令,第一个命令将在我们的应用程序中创建一个迁移文件,而下一个命令将在数据库中进行更改。
$ python3 manage.py makemigrations
$ python3 manage.py migrate
So we have successfully set our initial setup and model. Now let’s start creating our APIs.
因此,我们已经成功设置了初始设置和模型。 现在让我们开始创建我们的API。
3. Create API View
3.创建API视图
To perform CRUD API, DRF provides us some generic classes such as createAPIView, updateAPIView, listAPIView, destroyAPIView and so on.
为了执行CRUD API,DRF为我们提供了一些通用类,例如createAPIView , updateAPIView , listAPIView , destroyAPIView等。
In DRF, the Create API view helps us to add or insert values to the database.
在DRF中,“创建API”视图可帮助我们向数据库中添加或插入值。
CreateAPIView in DRF is a create-only API end-point. It supports only post request.
DRF中的CreateAPIView是仅创建API的端点。 它仅支持post请求。
To perform create operation, I am creating two files in my app(serializer.py and api.py ). If you have any doubt about why we are creating this, have a look at my previous blog.
为了执行创建操作,我正在我的应用程序中创建两个文件( serializer.py和api.py )。 如果您对我们为什么要创建它有任何疑问,请查看我以前的博客 。
employee/serializer.py
employee/serializer.py
from rest_framework import  serializers
from .models import Employeeclass EmployeeSerializer(serializers.ModelSerializer):
    class Meta:
        model = Employee
        fields = '__all__'
To use Create API view, we should use a generic class named CreateAPIView.
要使用Create API视图,我们应该使用一个名为CreateAPIView的通用类。
employee/api.py
employee/api.py
from rest_framework import generics
from rest_framework.response import Response
from .serializer import EmployeeSerializer
from .models import Employeeclass EmployeeCreateApi(generics.CreateAPIView):
    queryset = Employee.objects.all()
    serializer_class = EmployeeSerializer
Now I am just creating a file named urls.py in my employee app and mapping the API endpoint to a URL.
现在,我只是在employee应用程序中创建一个名为urls.py的文件,并将API终结点映射到URL。
employee/urls.py
employee/urls.py
from django.urls import path
from .api import EmployeeCreateApiurlpatterns = [    path('api/create',EmployeeCreateApi.as_view()),]
Since I haven’t included the employee/urls.py in the project level urls.py, I am doing it now.
由于我没有在项目级别urls.py包含employee/urls.py ,所以我现在正在做。
drf/urls.py
drf/urls.py
from django.conf.urls import url
from django.urls import path, include
from django.contrib import adminurlpatterns = [
url(r'^admin/', admin.site.urls),
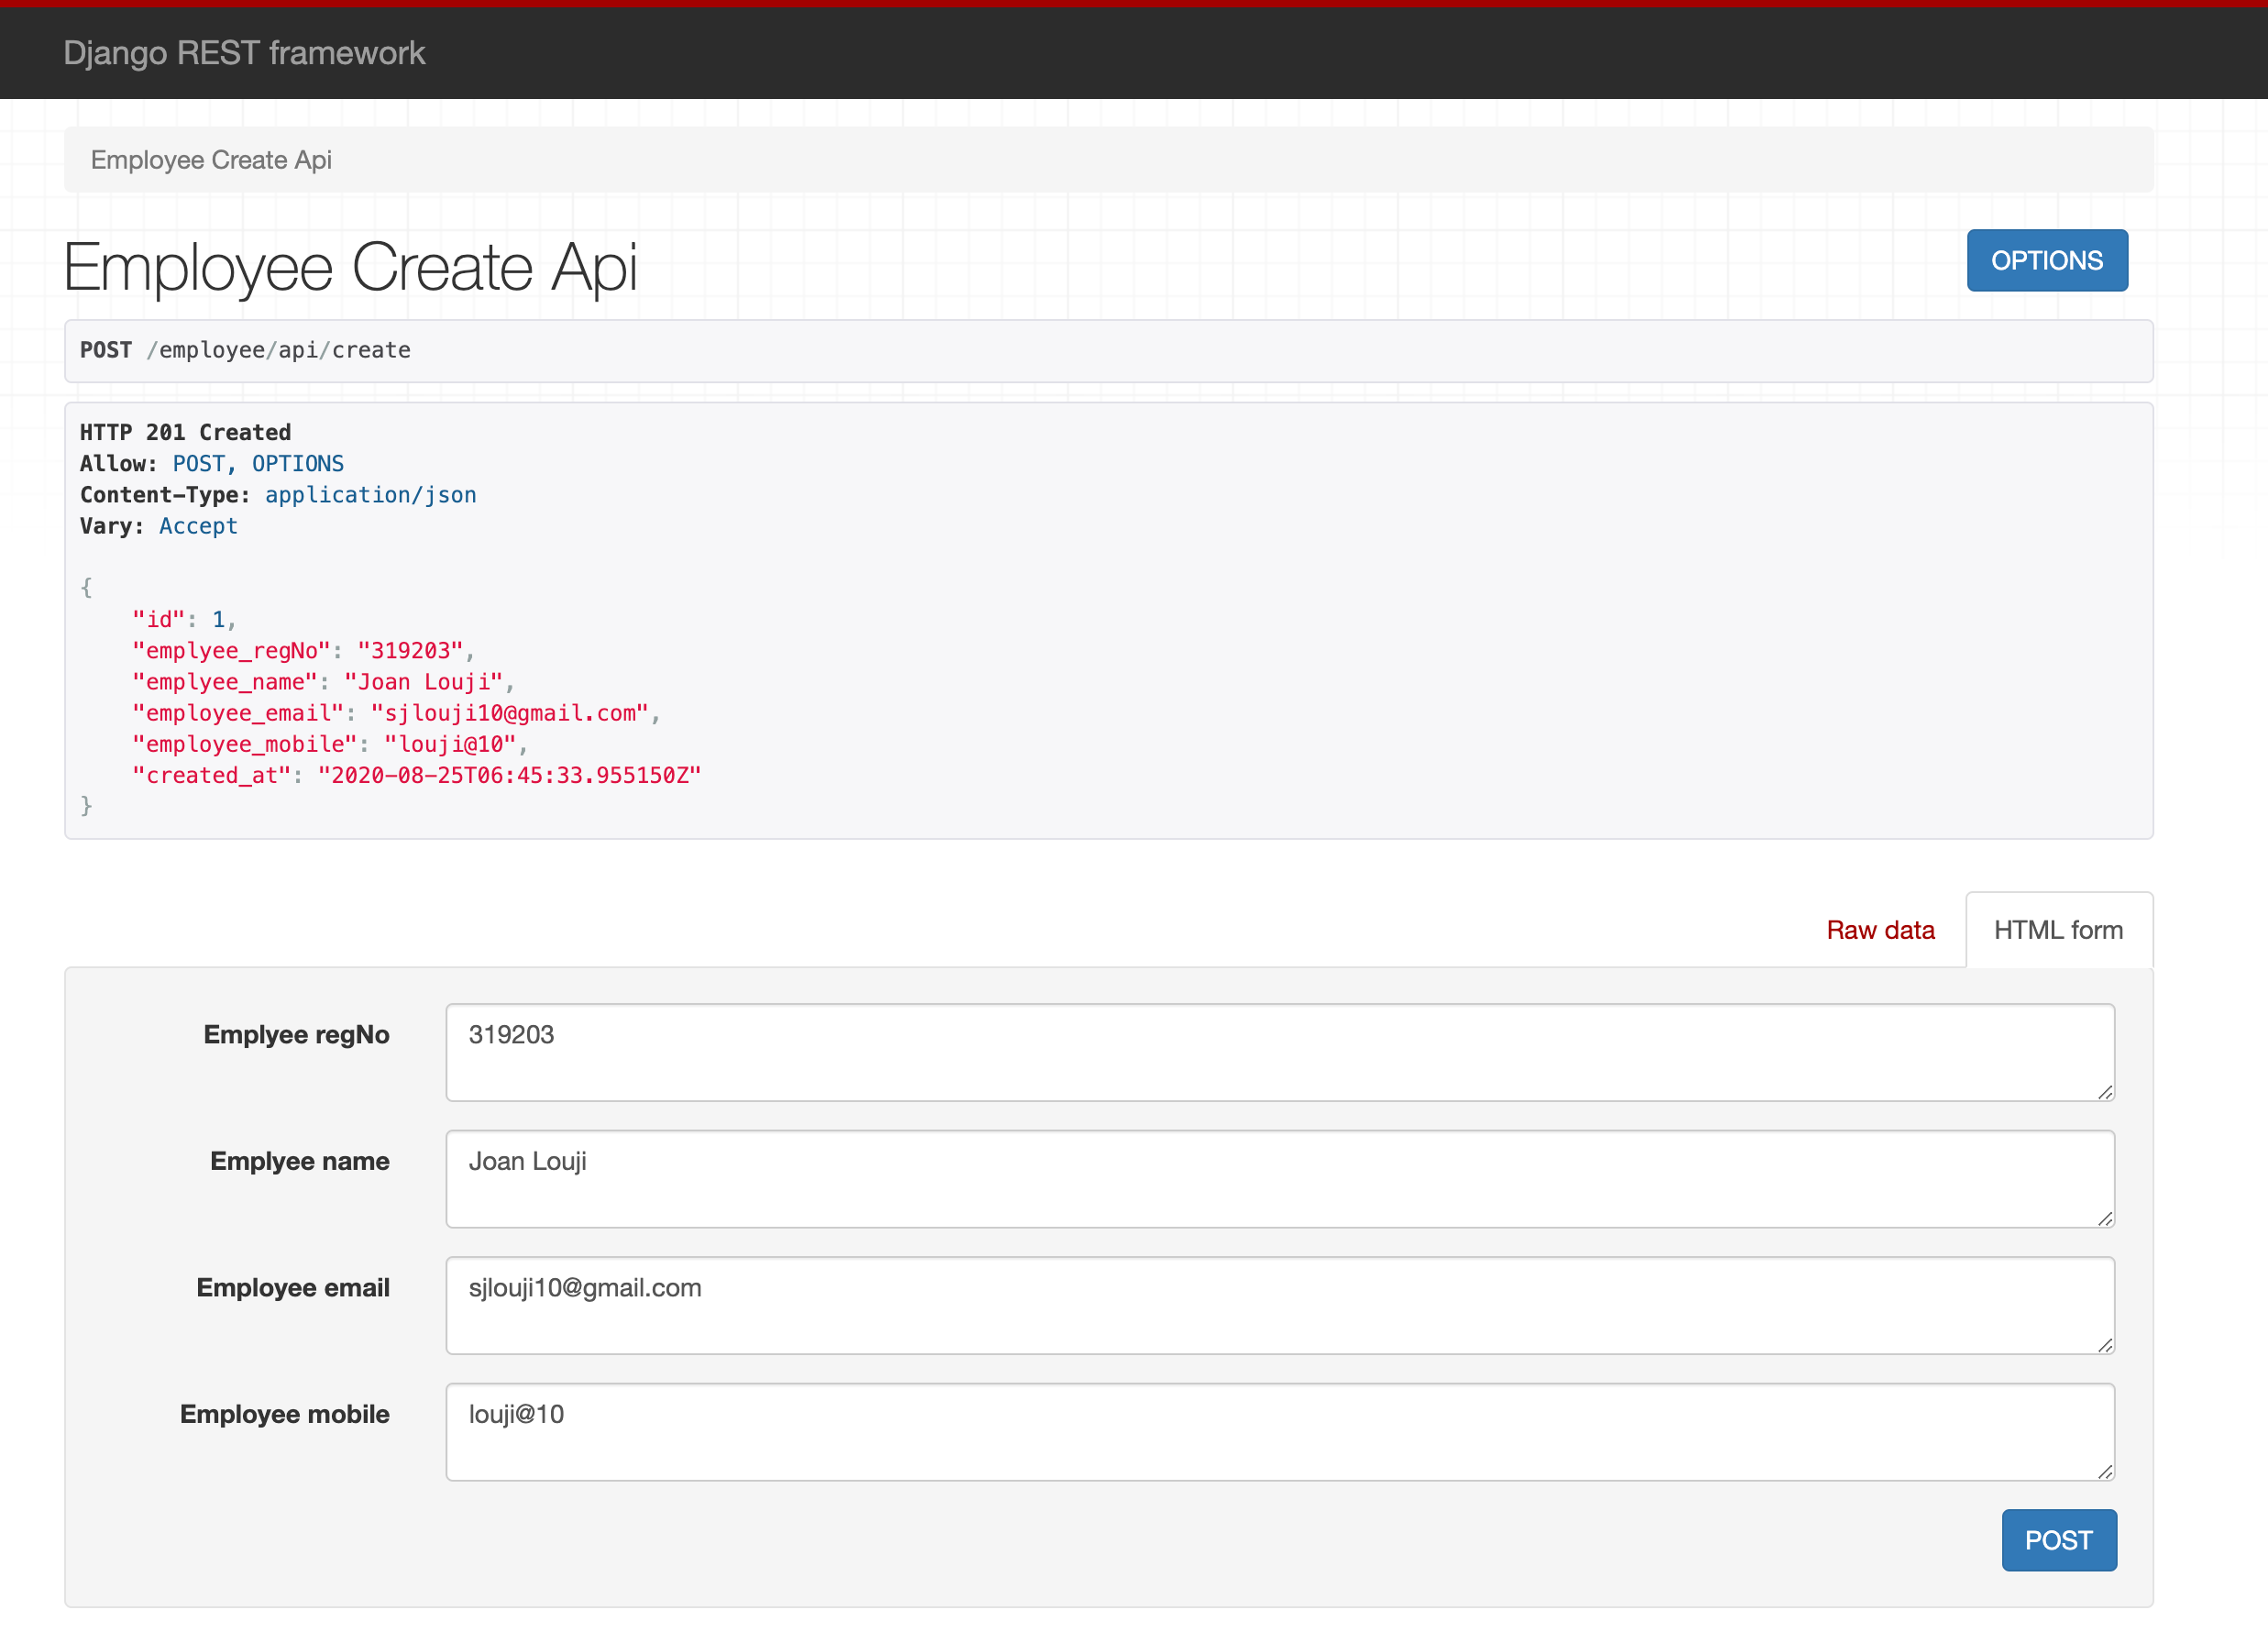
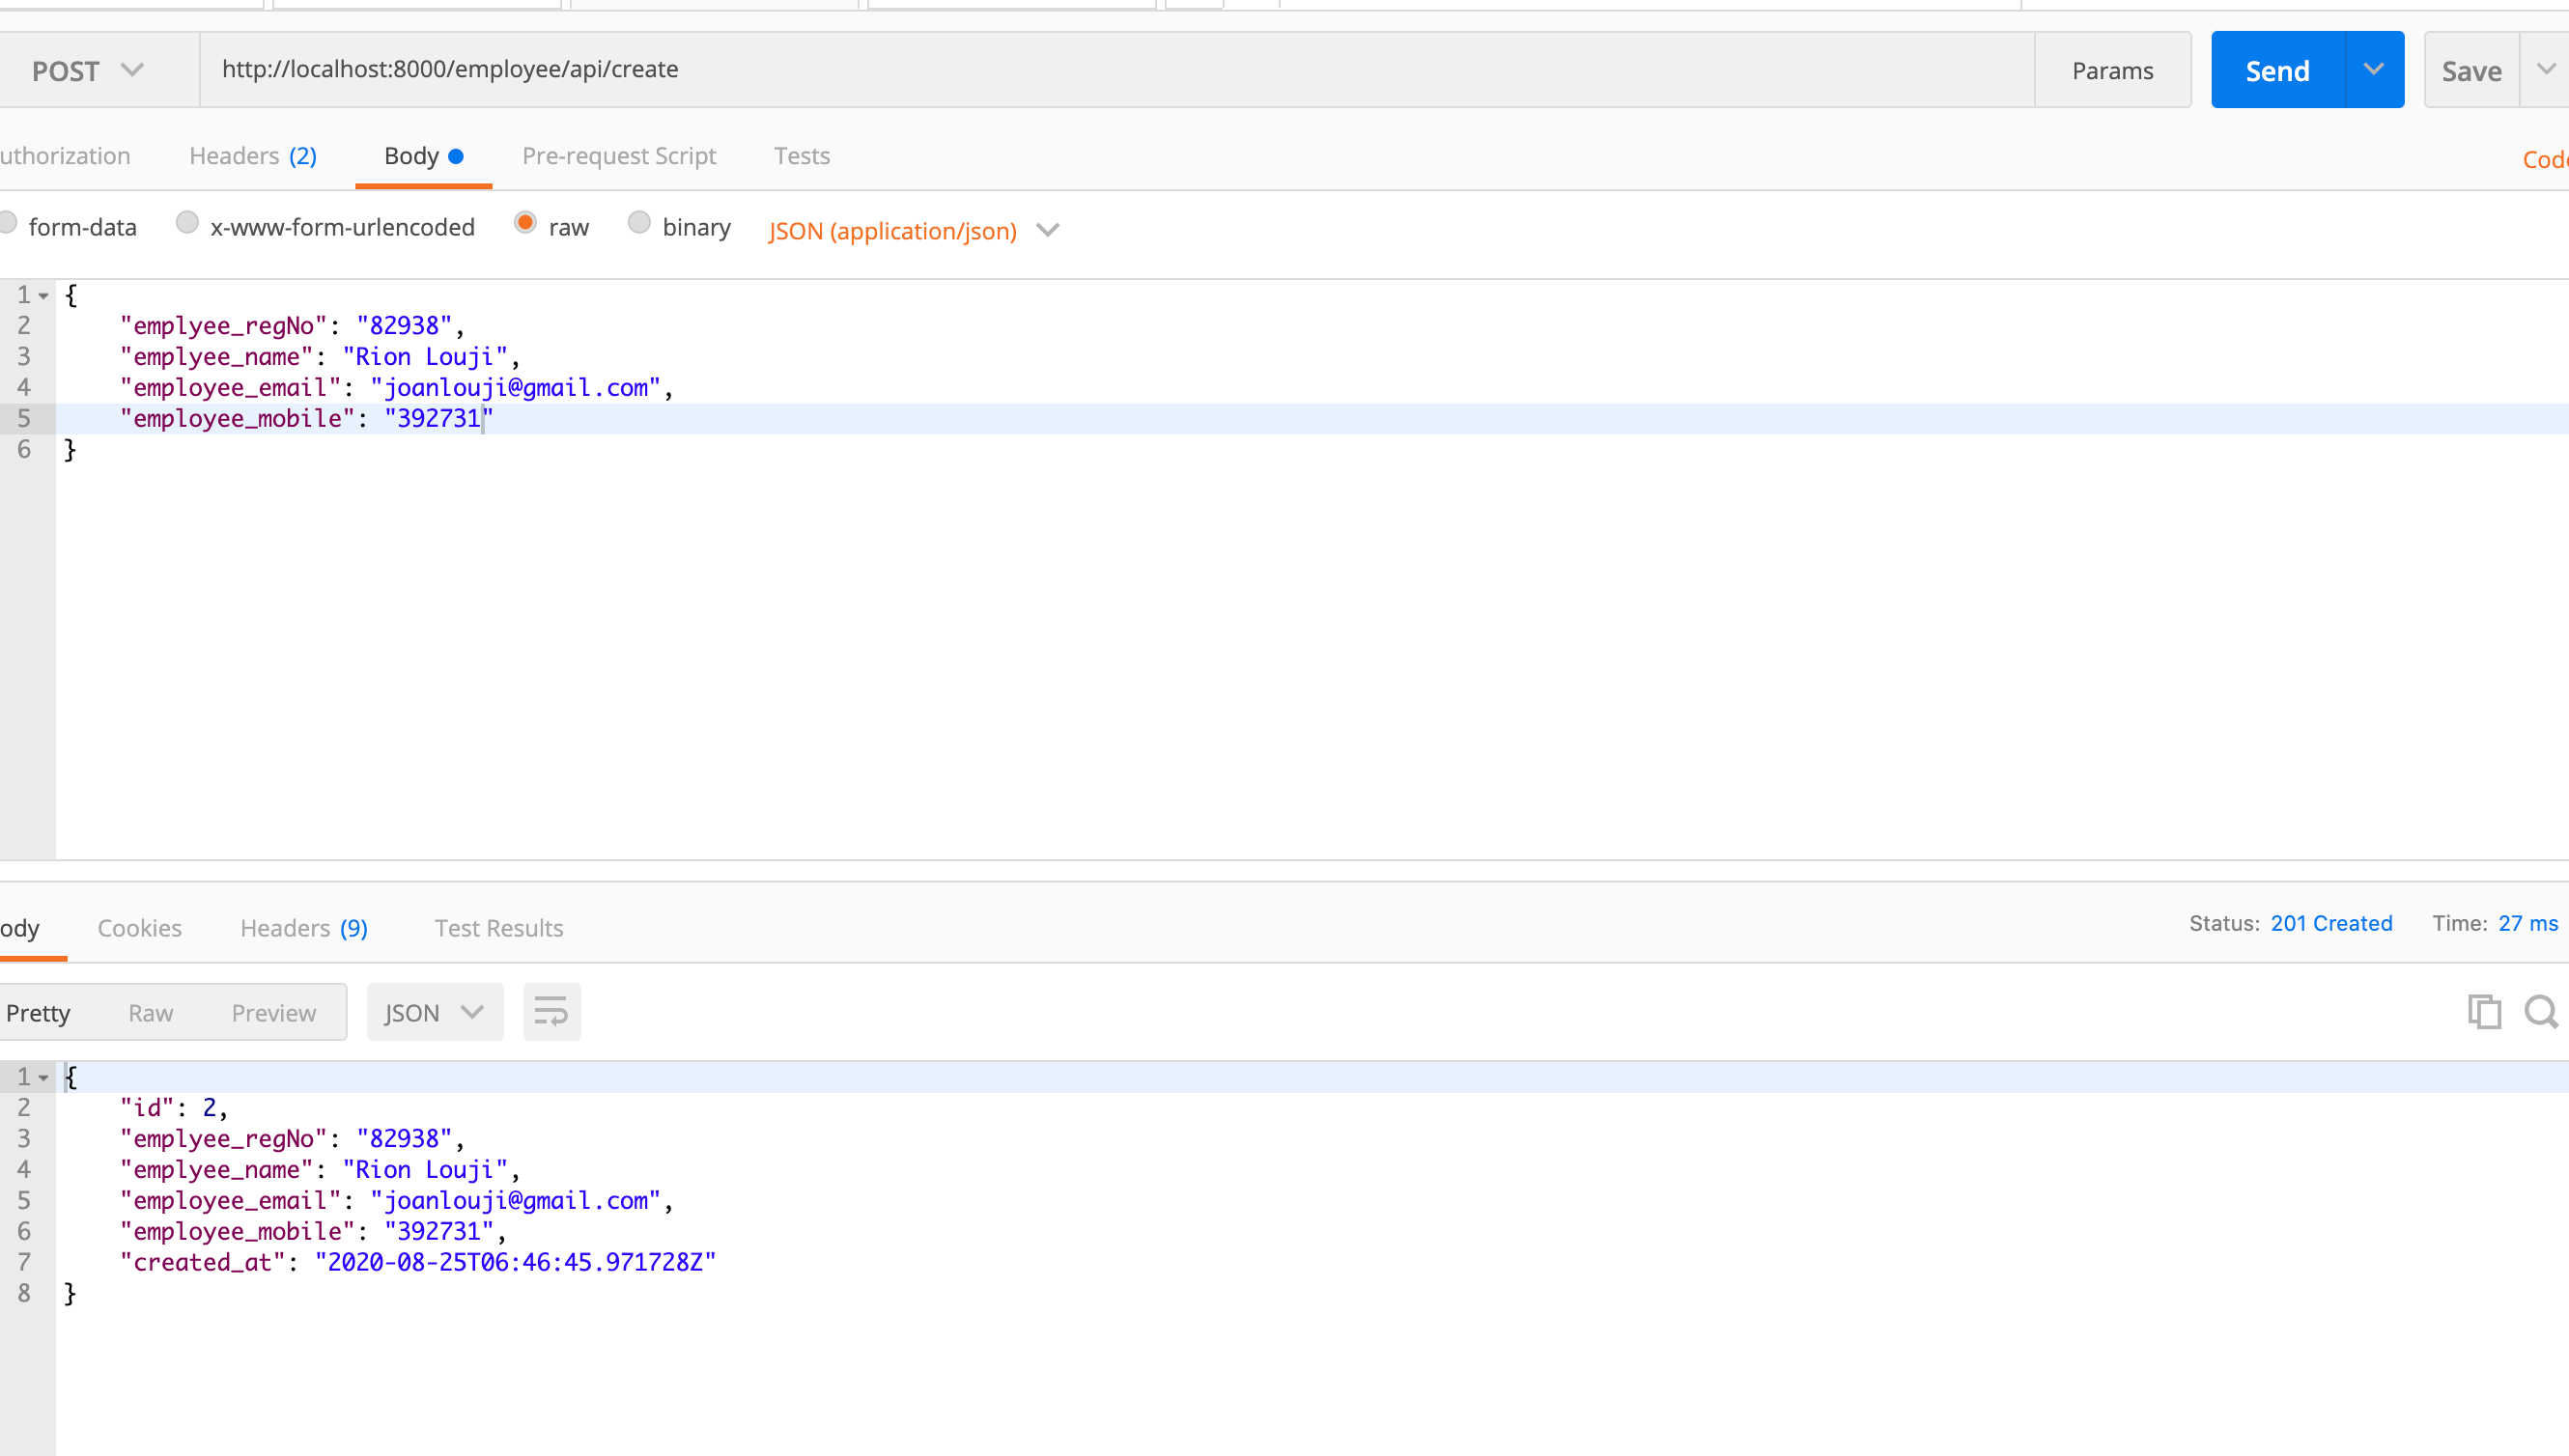
path('student/', include('student.urls')), path('employee/', include('employee.urls')),]Now everything must be fine to add an Employee detail via API when you visit the URL http://localhost:8000/employee/api/create.
现在,当您访问URL http:// localhost:8000 / employee / api / create时,一切都可以通过API添加Employee详细信息。
4. List API view
4. 列出API视图
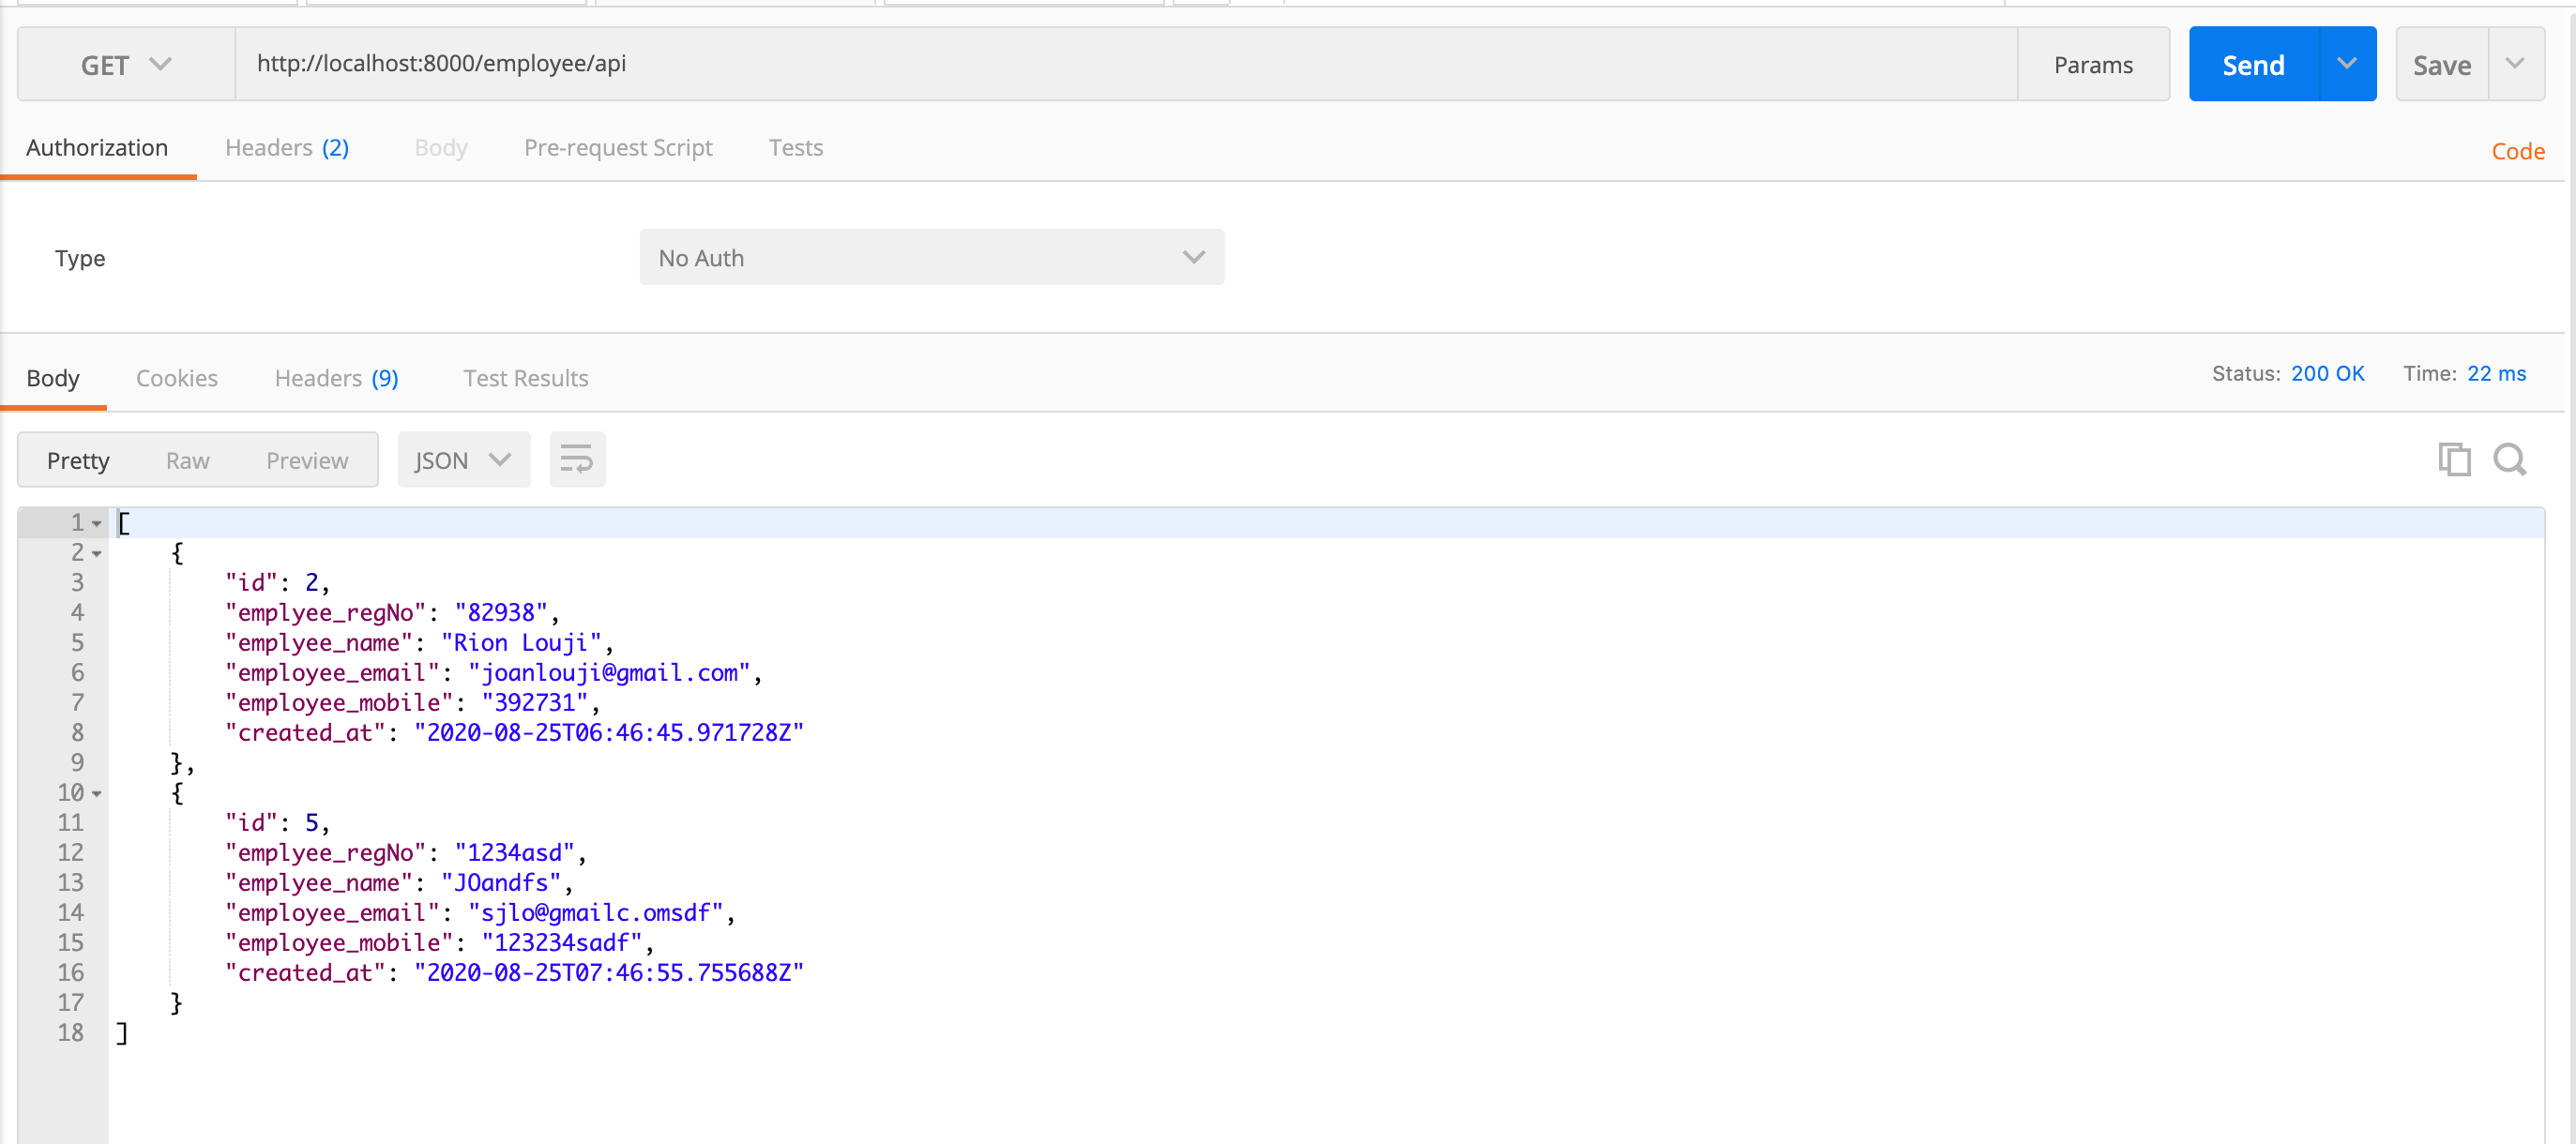
Now let’s do the same for retrieving all the employee details from the database. To perform this, I am using List API View. This API view supports only get request.
现在,我们从数据库中检索所有员工详细信息。 为此,我使用列表API视图。 此API视图仅支持get请求。
So now let’s start creating our view. Since we have created our serializer class in the previous section, we need not create it again. We can use the same serializer here also.
现在开始创建视图。 由于我们在上一节中创建了序列化程序类,因此无需再次创建它。 我们也可以在这里使用相同的序列化器。
employee/api.py
employee/api.py
class EmployeeApi(generics.ListAPIView):
    queryset = Employee.objects.all()
    serializer_class = EmployeeSerializer
Once done, just map this API endpoint to our URL.
完成后,只需将此API端点映射到我们的URL。
employee/urls.py
employee/urls.py
from django.urls import path
from .api import EmployeeCreateApi, EmployeeApiurlpatterns = [ path('api',EmployeeApi.as_view()), path('api/create',EmployeeCreateApi.as_view()),
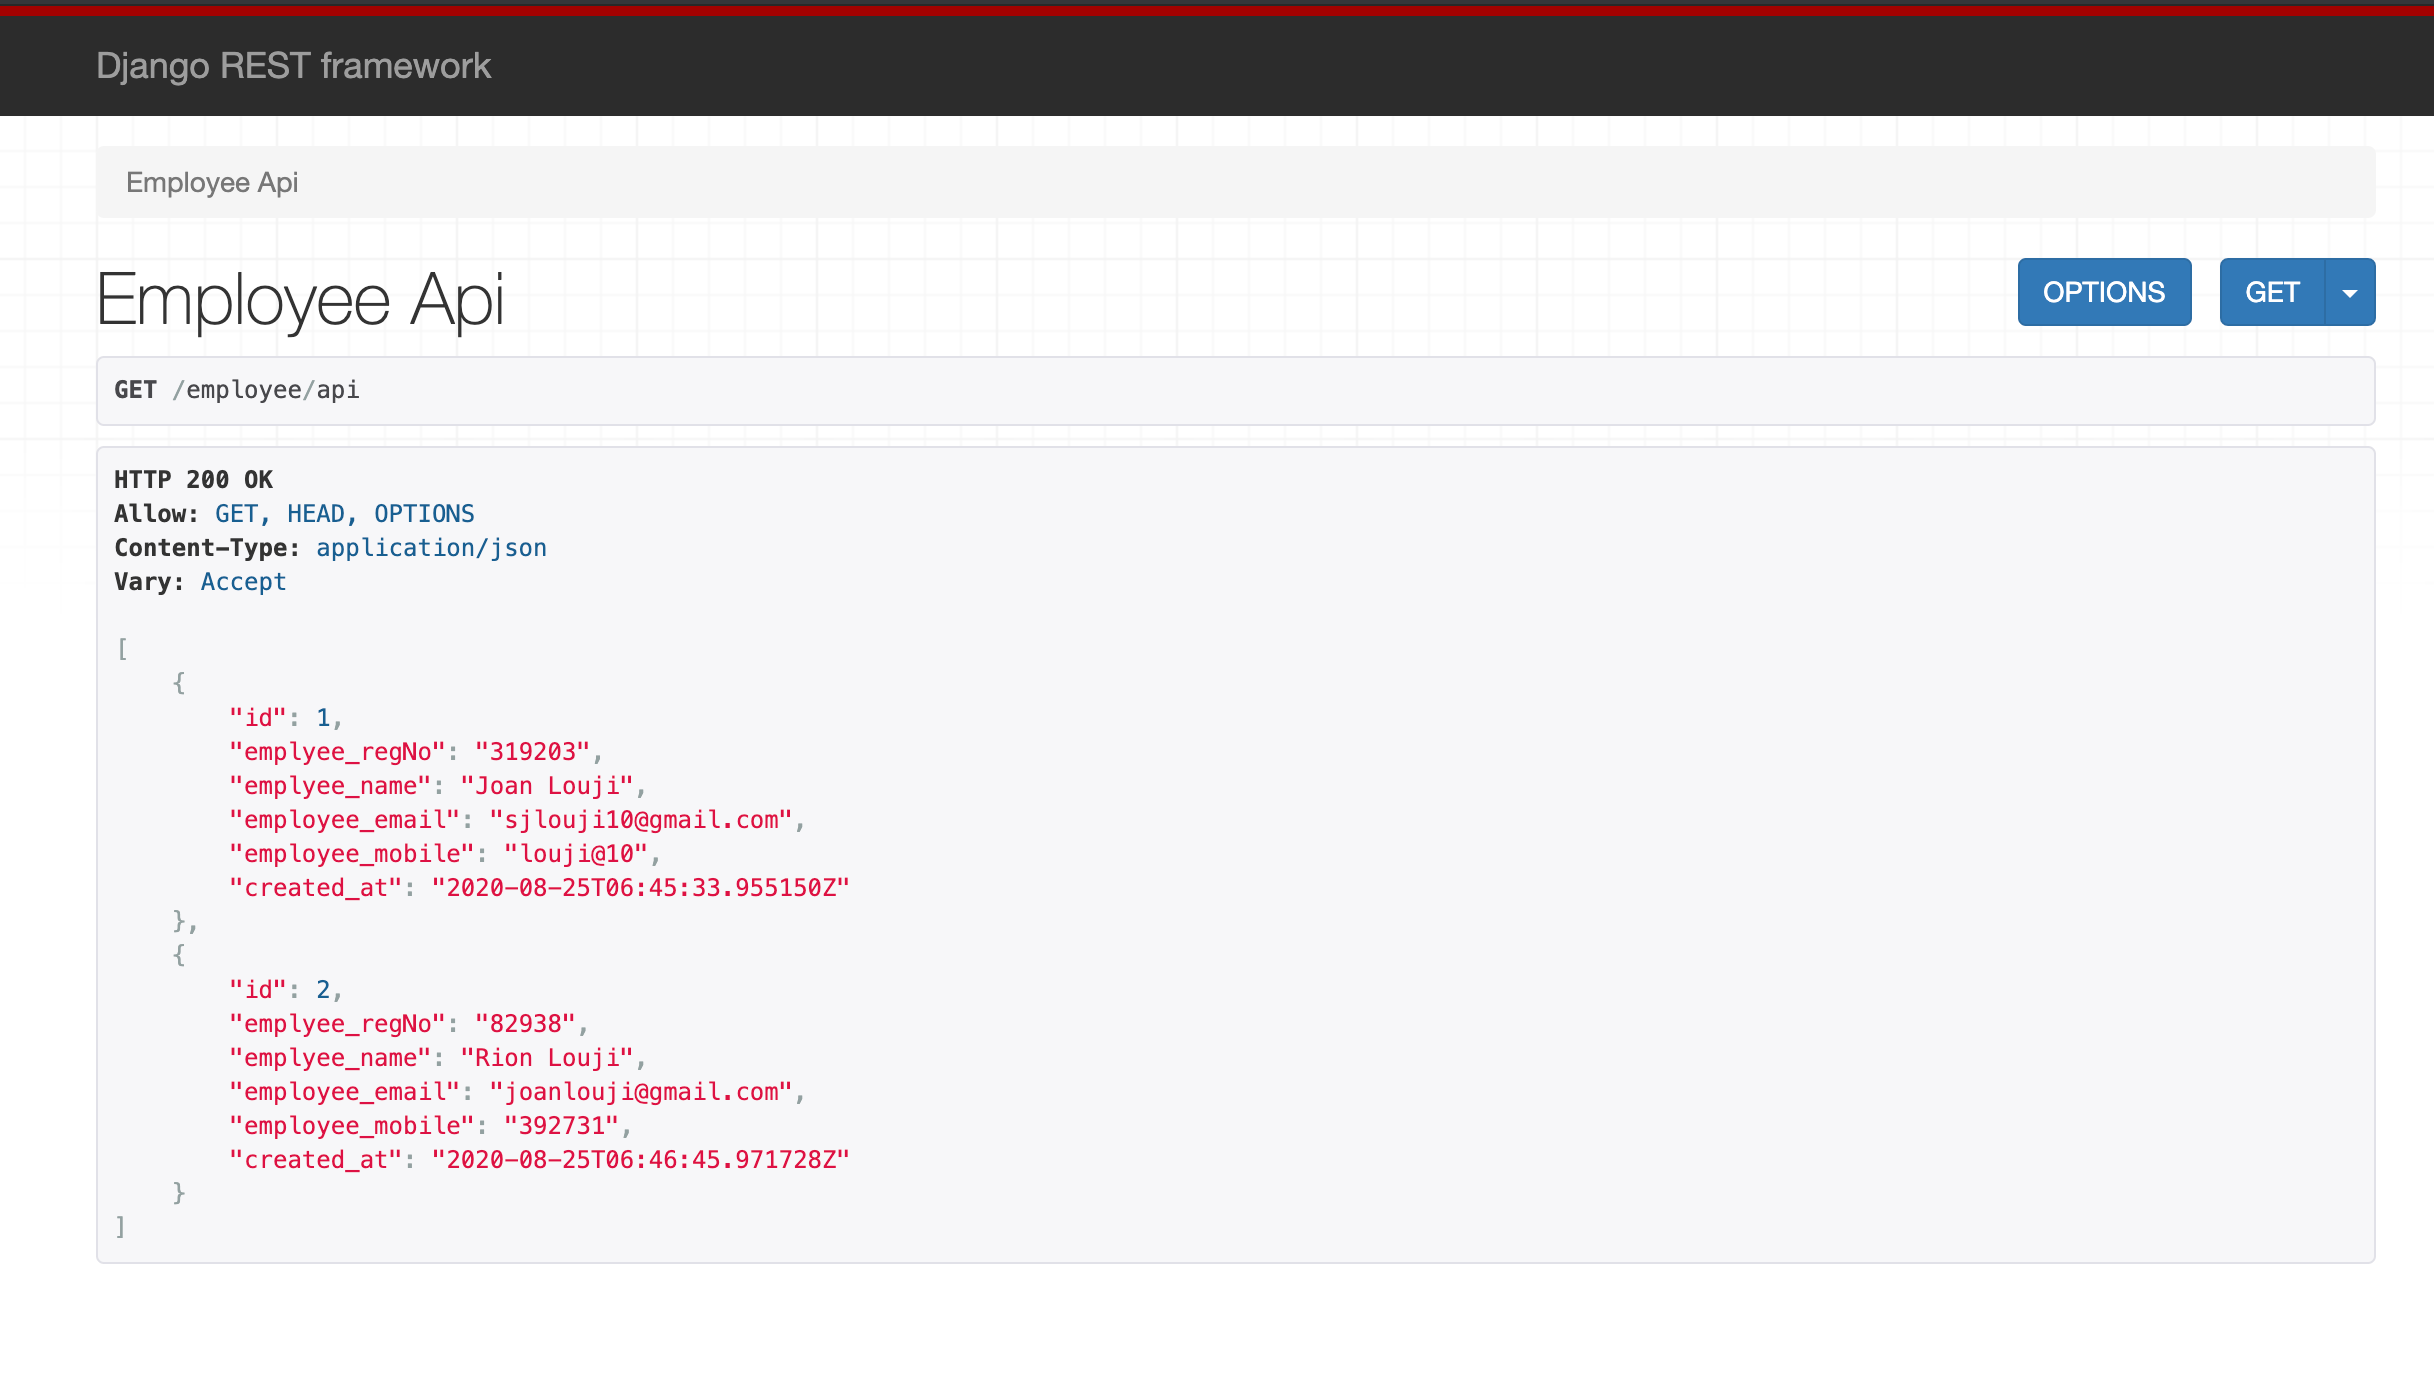
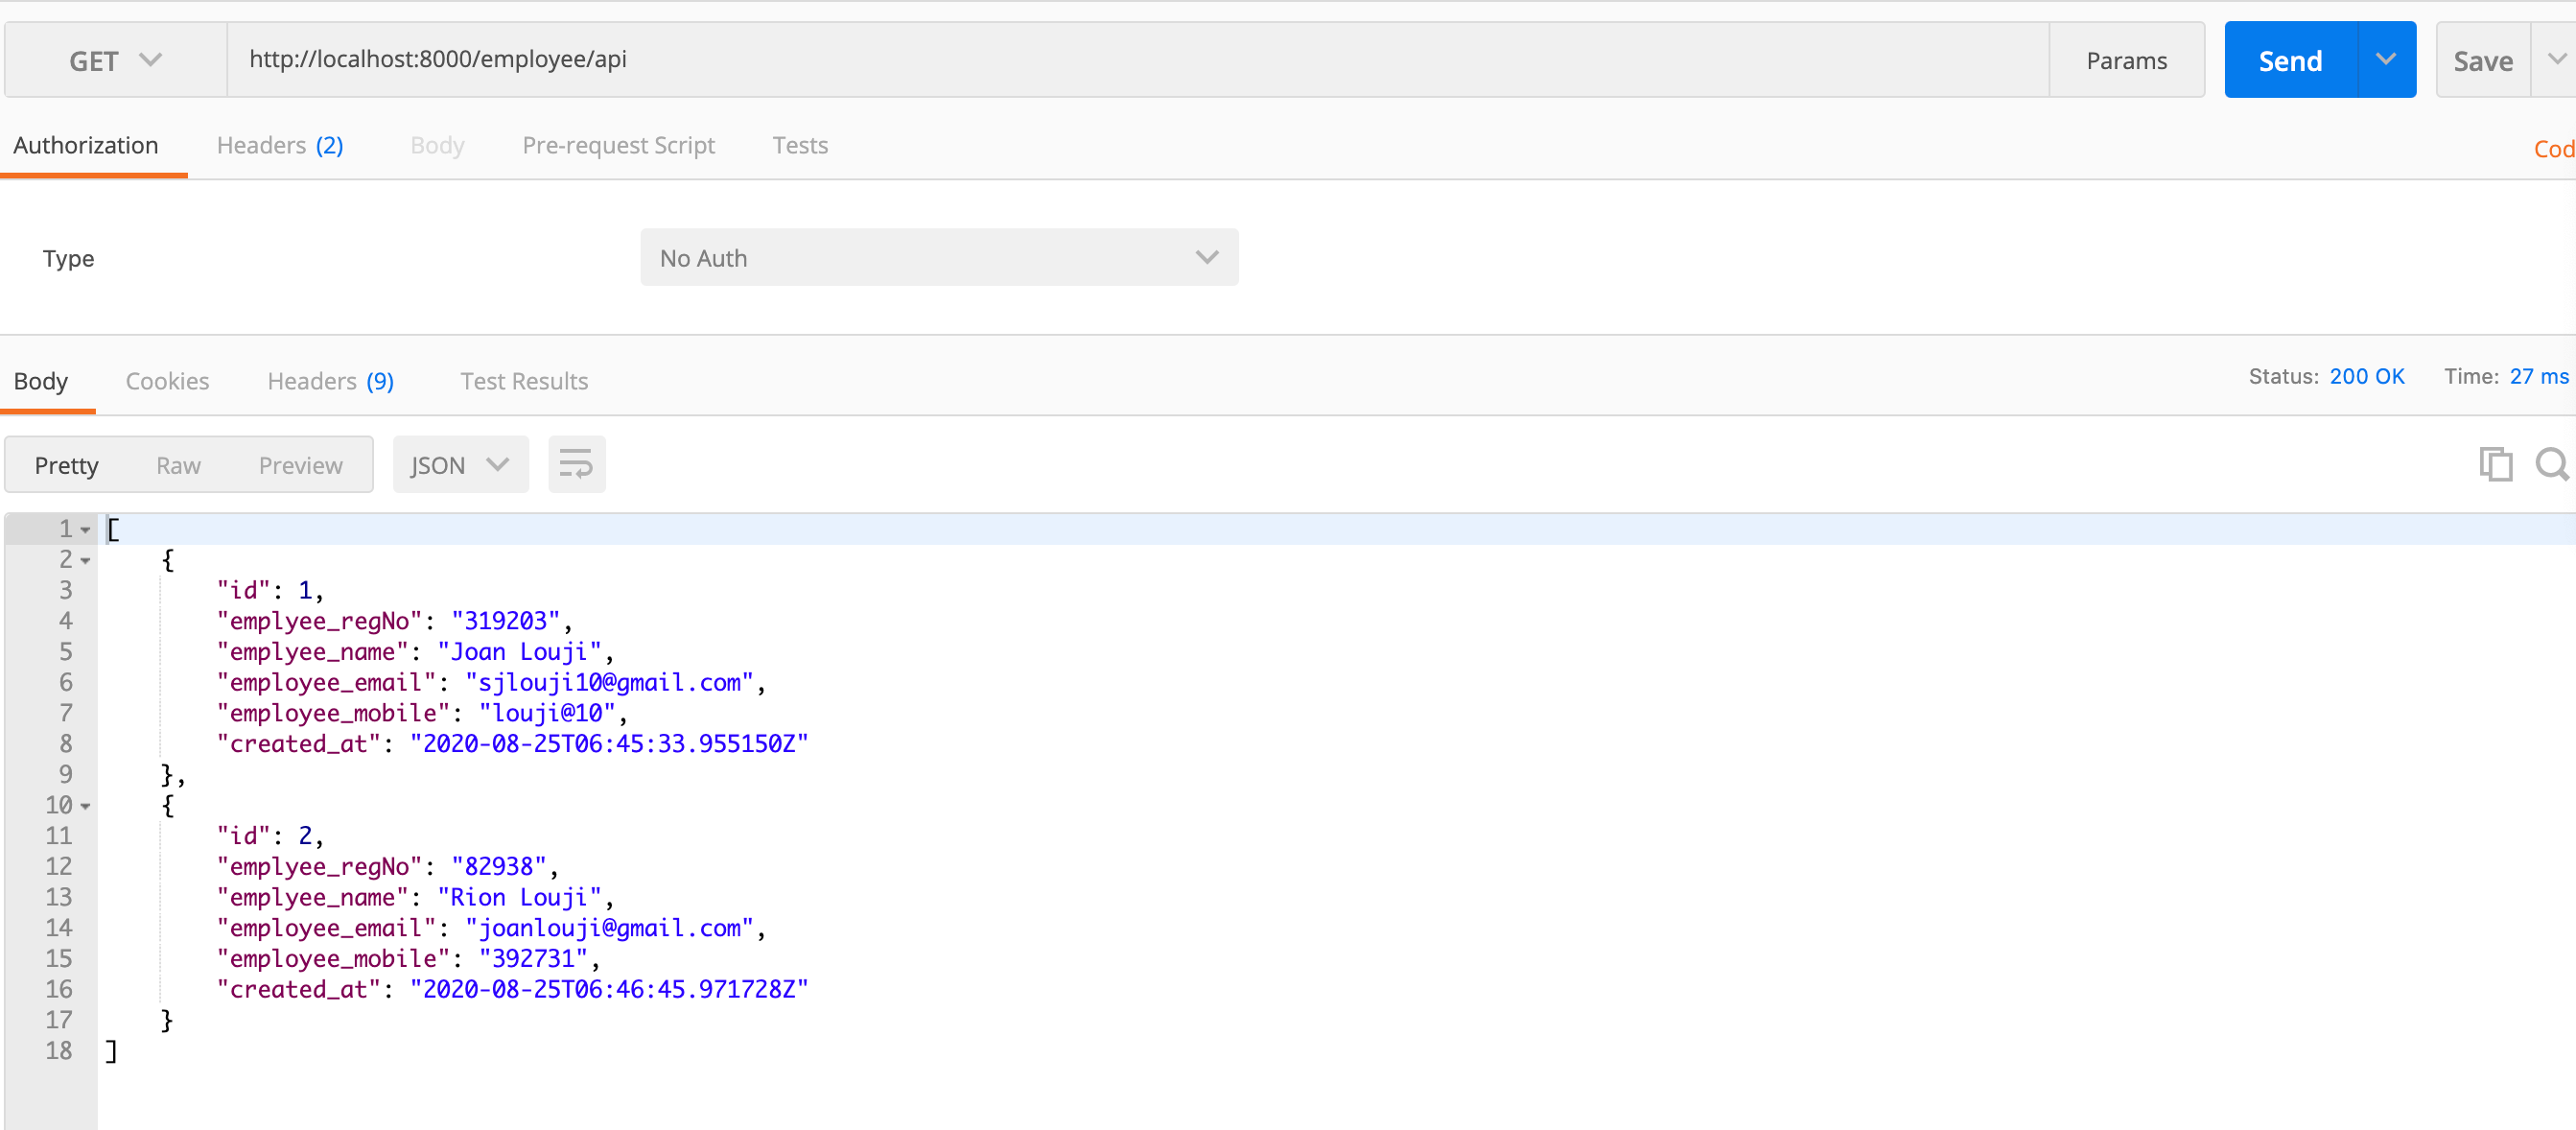
]Now you can see all the employee details once the URL http://localhost:8000/employee/api has been snapped.
现在,一旦URL http://localhost:8000/employee/api被捕捉,您就可以看到所有员工详细信息。
5. Update API View
5. 更新API视图
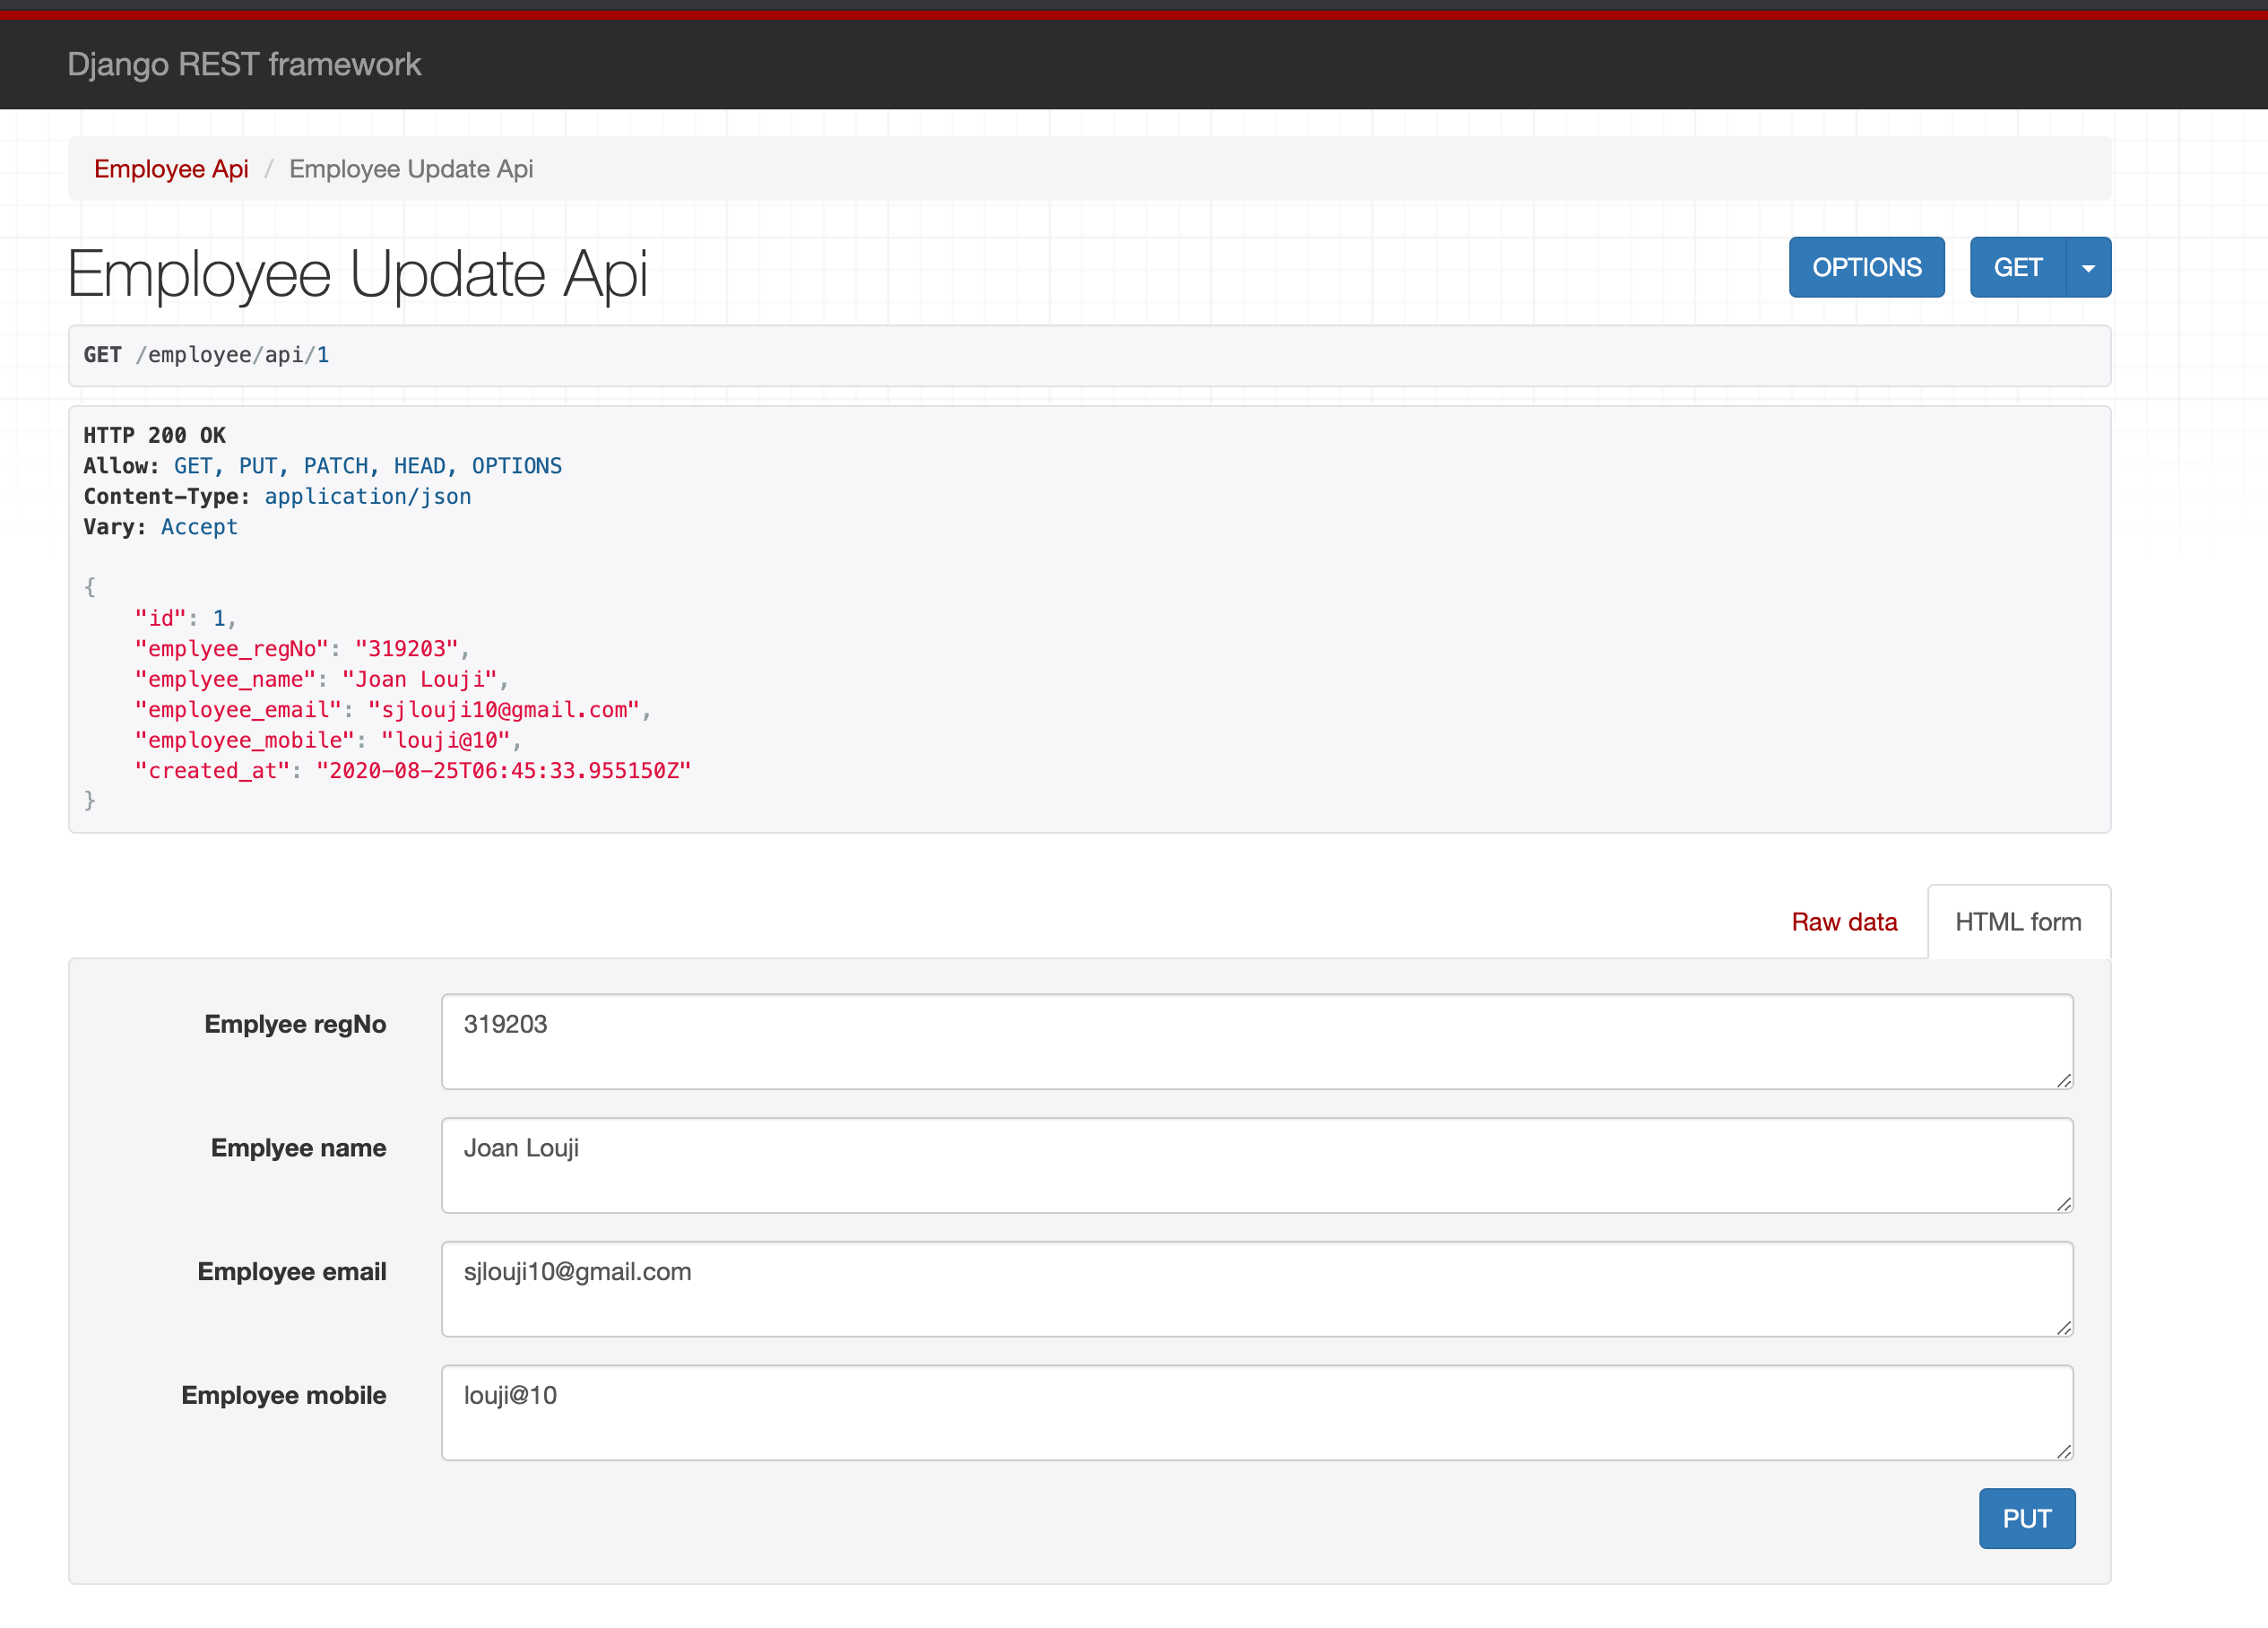
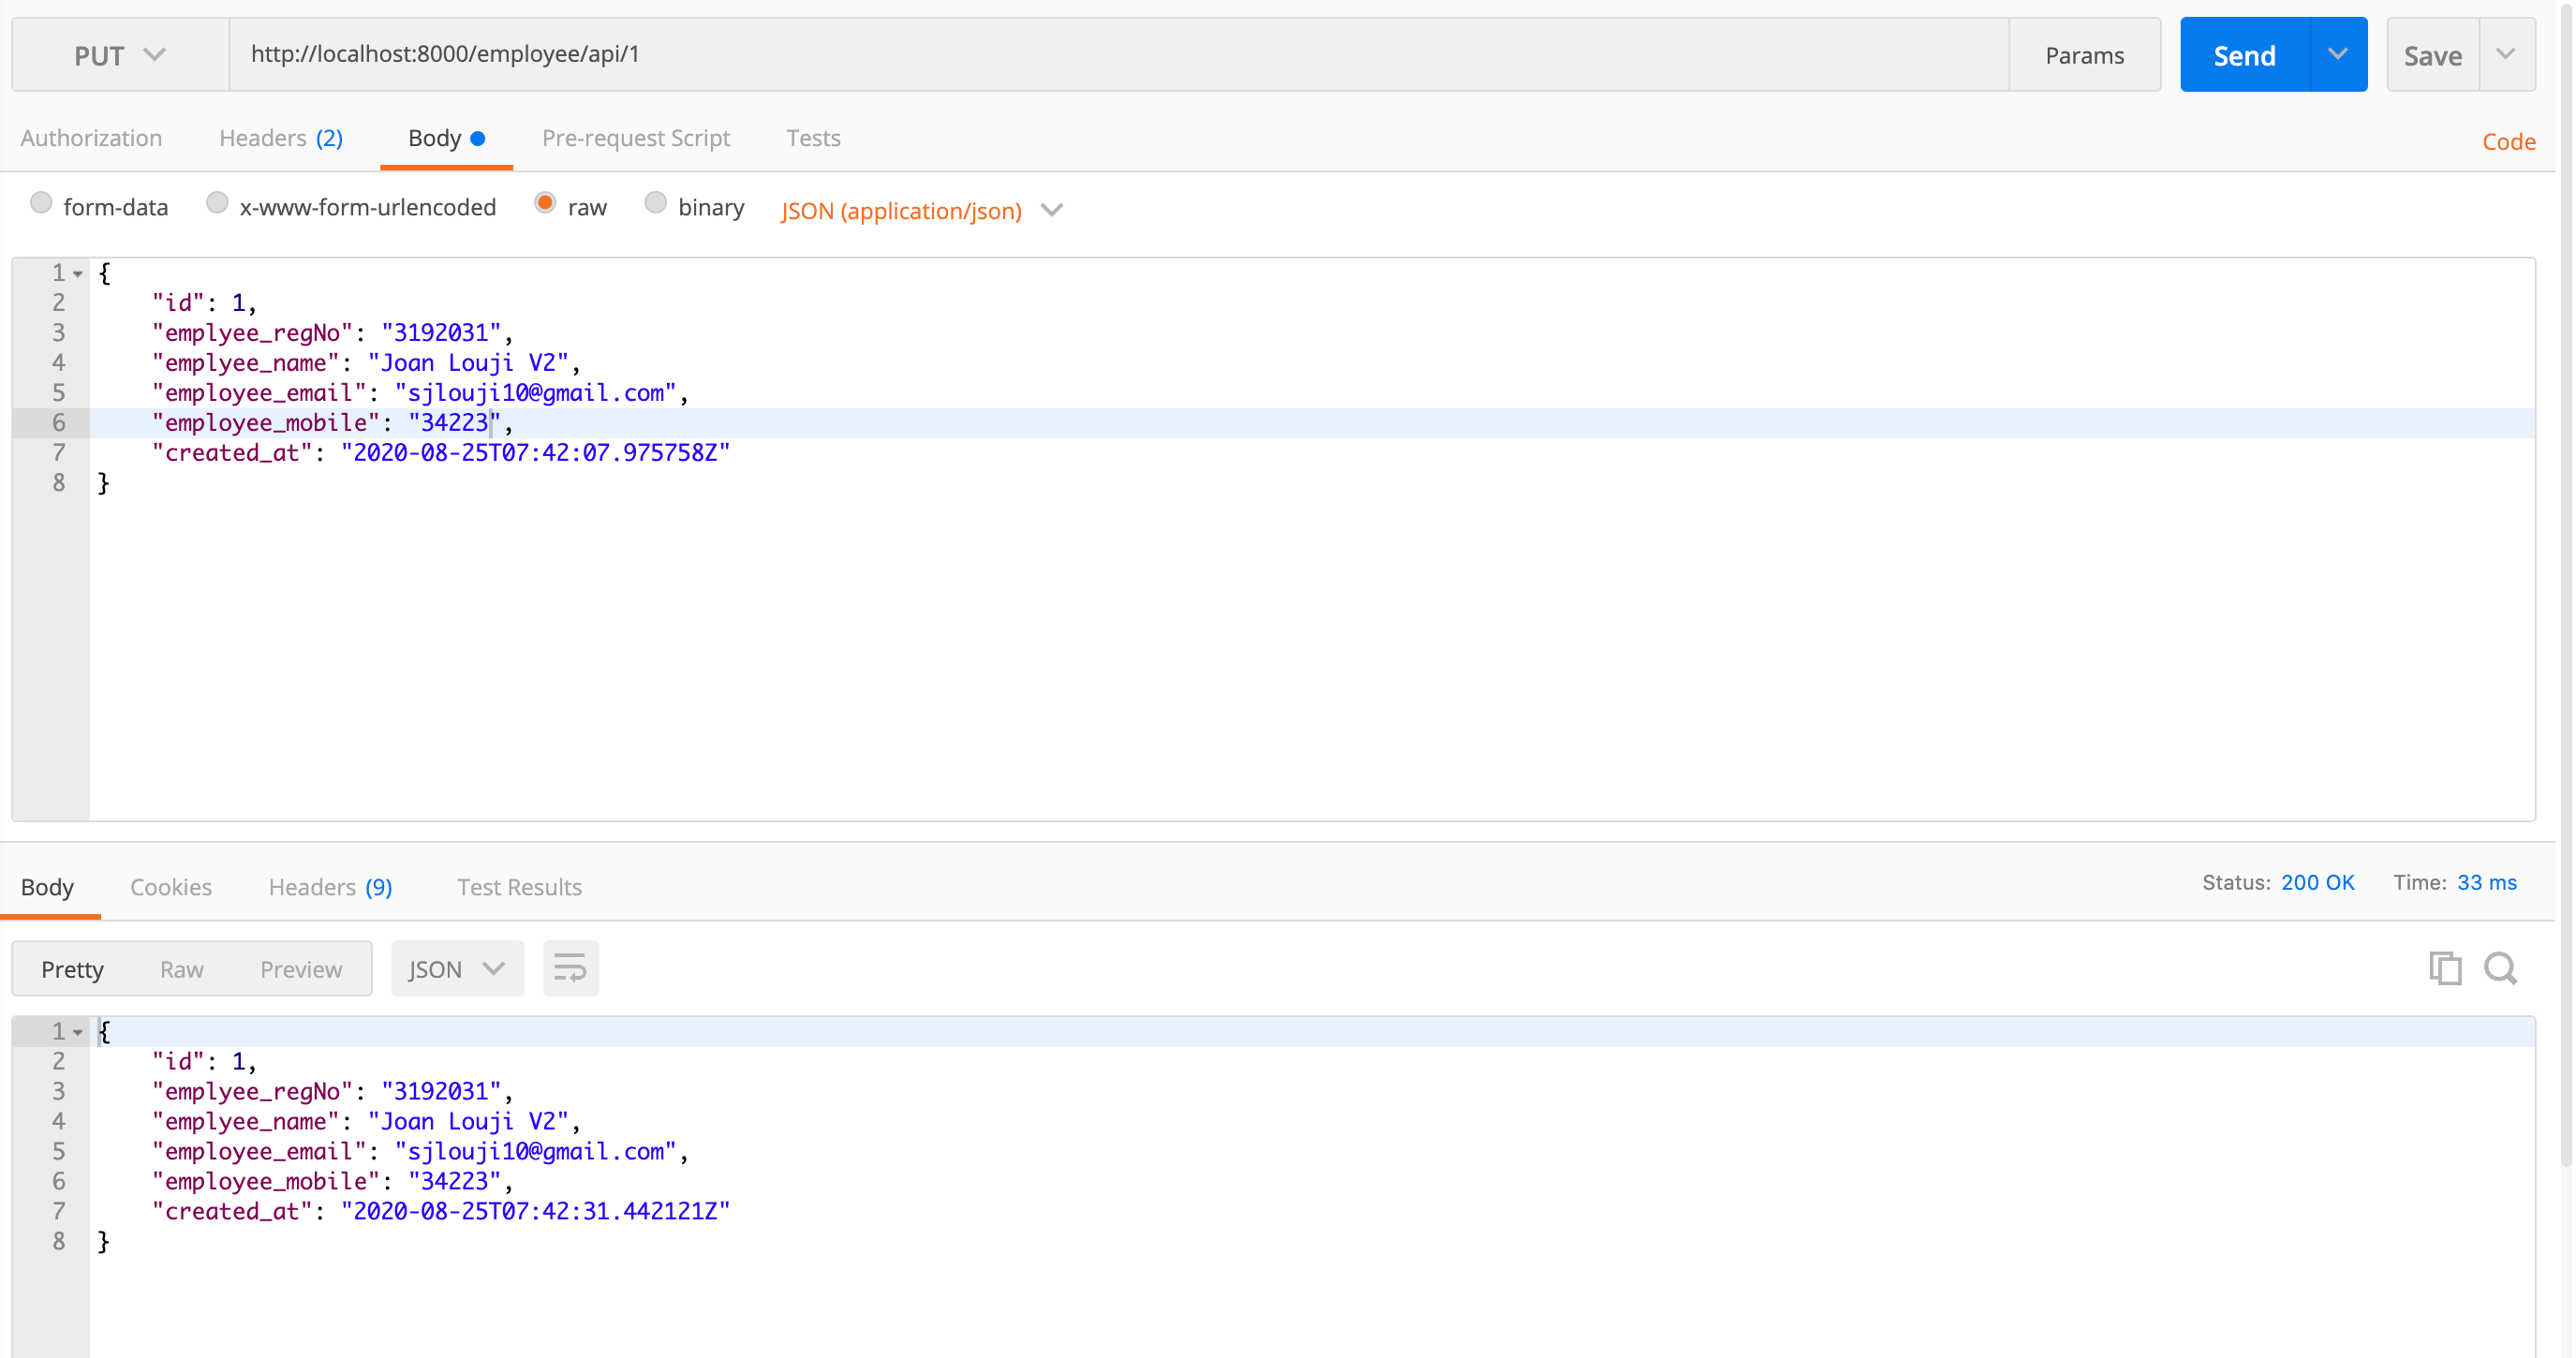
Updating can be performed simply by replacing, the ListAPIView with RetriveUpdateAPIView. This API view supports both get, put, and patch requests.
可以简单地通过用RetriveUpdateAPIView替换ListAPIView来执行更新。 该API视图支持get , put和patch请求。
employee/api.py
employee/api.py
class EmployeeUpdateApi(generics.RetrieveUpdateAPIView):
    queryset = Employee.objects.all()
    serializer_class = EmployeeSerializer
The tricky thing here is that you should include the employee id in the URL. To achieve that, you can use <int: pk>.
棘手的是,您应该在URL中包含员工ID。 为此,可以使用<int:pk>。
employee/urls.py
employee/urls.py
from django.urls import path
from .api import EmployeeCreateApi, EmployeeApi, EmployeeUpdateApiurlpatterns = [
    path('api',EmployeeApi.as_view()),
    path('api/create',EmployeeCreateApi.as_view()),    path('api/<int:pk>',EmployeeUpdateApi.as_view()),]
If you make a put or patch request to http://localhost:8000/employee/api/<your _employee_id>, you can update employee details in the database.
如果您向http:// localhost:8000 / employee / api / <您的_employee_id>发出了put或patch请求,则可以更新数据库中的员工详细信息。
6. Delete API view:
6. 删除API视图:
At last, the Delete View. To perform this, DRF provides us DestroyAPIView. This API view provides us only delete request.
最后,删除视图。 为此,DRF向我们提供了DestroyAPIView 。 此API视图仅向我们提供delete请求。
employee/api.py
employee/api.py
class EmployeeDeleteApi(generics.DestroyAPIView):
    queryset = Employee.objects.all()
    serializer_class = EmployeeSerializer
After creating your view, just do the same as what you did for the update API view. Create another URL with id included in the route.
创建视图后,只需执行与更新API视图相同的操作即可。 创建另一个包含ID的URL。
employee/urls.py
employee/urls.py
from django.urls import path
from .api import EmployeeCreateApi, EmployeeApi, EmployeeUpdateApi, EmployeeDeleteApiurlpatterns = [
    path('api',EmployeeApi.as_view()),
    path('api/create',EmployeeCreateApi.as_view()),
    path('api/<int:pk>',EmployeeUpdateApi.as_view()),path('api/<int:pk>/delete',EmployeeDeleteApi.as_view()),
]
Once you call the delete API URL (http://localhost:8000/employee/api/<your _employee_id>/delete), it will automatically delete the particular employee details.
调用删除API URL( http:// localhost:8000 / employee / api / <您的_employee_id> / delete )后,它将自动删除特定的员工详细信息。


If you have a problem with creating and installing DRF, do visit my previous blog.
In my next blog, I will be explaining how to protect every API route and home to perform JWT auth with Django rest Framework. Stay Connected.
在我的下一个博客中,我将解释如何保护每个API路由和主目录,以使用Django rest Framework执行JWT身份验证。 保持联系。
Feel free to contact me for any queries.
如有任何疑问,请随时与我联系。
Email: sjlouji10@gmail.com
电子邮件:sjlouji10@gmail.com
Linkedin: https://www.linkedin.com/in/sjlouji/
Linkedin: https : //www.linkedin.com/in/sjlouji/
Complete Code can be found on my Github: https://github.com/sjlouji/Django---DRF-basic-Rest-API-.git
完整的代码可以在我的Github上找到: https : //github.com/sjlouji/Django---DRF-basic-Rest-API-.git
Happy coding…
编码愉快!
翻译自: https://medium.com/swlh/django-rest-framework-crud-with-drf-9a8756095c73
django框架drf


 324
324

 被折叠的 条评论
为什么被折叠?
被折叠的 条评论
为什么被折叠?
 到【灌水乐园】发言


