


 该博客介绍了一个开源项目,它允许用户通过低代码平台来开发具有自定义字段的CRM系统。文章详细讲解了如何借助这些平台实现这一目标,为开发者提供了使用Java、Python、Android、MySQL和MyBatis等技术的低代码开发指南。
开源 自定义字段 crm
The proliferation of low-code and no-code technologies during the last several years has been profound. Across the globe, more and more people that don’t possess traditional computer science backgrounds or coding experience are able to ideate and implement software projects. In many cases this happens without them writing a single line of code.
在过去的几年中,低码和无码技术的发展是深远的。 在全球范围内,越来越多的不具备传统计算机科学背景或编码经验的人能够构思和实施软件项目。 在许多情况下,如果他们没有编写一行代码,就会发生这种情况。
There are countless custom software tools that can get developed to best enable productivity within specific use-cases. Unfortunately, developing such tools rarely justifies the budget for hiring engineers to do “from scratch” builds or even top-shelf SaaS subscriptions.
可以开发出无数种定制软件工具,以最大程度地提高特定用例内的生产率。 不幸的是,开发此类工具很少能为雇用工程师“从头开始”构建乃至顶级SaaS订阅提供合理的预算。
It’s in this realm that the low-code and no-code platforms provide so much value; for the “citizen developer” that often spearheads internal business app projects to drive efficiencies within their organizations.
在这个领域中,低代码和无代码平台提供了如此多的价值; 经常领导内部业务应用程序项目以提高组织效率的“公民开发人员”。
使用低代码平台构建自定义CRM (Building a Custom CRM using Low-code Platforms)
In this tutorial we’re going to look at how to build a custom CRM using 2 popular low-code development platforms; Retool and 8base. This will not only give you a great understanding of how Retool can connect to and work with a GraphQL API, but also demonstrate how quickly you can develop a powerful business application using little to no code!
在本教程中,我们将研究如何使用2种流行的低代码开发平台来构建自定义CRM。 重新安装和8base 。 这不仅可以让您更好地了解Retool如何连接到GraphQL API并与之一起使用,而且还可以证明您使用极少的代码甚至没有代码就可以快速开发出功能强大的业务应用程序!
To get started, you’re going to need create an account on Retool and 8base. Both services offer free tiers and trials that will be 100% sufficient for completing this tutorial.
首先,您需要在Retool和8base上创建一个帐户。 两种服务均提供免费套餐和免费试用版,足以完成本教程,并且100%足够。
As the title of this article suggests, we’re going to be building a custom CRM that lets a user move deals through a simple sales funnel. We’ll take it step by step, so let’s get going!
就像本文的标题所暗示的那样,我们将构建一个定制的CRM,使用户可以通过一个简单的销售漏斗转移交易。 我们将逐步进行,让我们开始吧!
建立自定义CRM数据模型和GraphQL API (Building a Custom CRM Data-model and GraphQL API)
We’re going to start by taking care of the backend of our app before moving into the frontend. This is because Retool has a great custom CRM template that we’ll be able to retro-fit to our backend once it’s set up.
我们将首先处理应用程序的后端,然后再转到前端。 这是因为Retool具有出色的自定义CRM模板,我们可以在设置好后端后对其进行改装。
There are a number of resources available for how to setup an 8base workspace. If you’re unfamiliar, completing steps 1 and 2 of their Quick Start will get you off to the races.
有许多资源可用于设置8base工作区。 如果您不熟悉,请完成其快速入门的第1步和第2步,即可开始比赛。
That said, we’re going to start off the in Data Builder of your workspace. It’s here that we’re going to be able to visually construct our application’s data-model using no-code.
那就是说,我们将从您工作区的Data Builder开始。 在这里,我们将能够使用无代码直观地构建应用程序的数据模型。
For this CRM tutorial, we’re going to be adding two tables to our workspace; Deals and TouchPoints. Go on ahead and create both of these two tables using the suggested names. By clicking the “+ Add Table” button, you’ll be prompted to input the table name.
对于本CRM教程,我们将向工作区中添加两个表。 交易和接触点 。 继续并使用建议的名称创建这两个表。 点击“ +添加表格”按钮,将提示您输入表格名称。
Once the tables are added, we’re going to go ahead and start adding fields to them. Think of table fields like cells in a spreadsheet that are within a specific column. Every field needs a name and a type and can have some optional settings specified. Let’s start with the TouchPoints table since it’s going to be pretty simple.
添加表格后,我们将继续向其添加字段。 可以将表格字段想像成电子表格中特定列中的单元格。 每个字段都需要一个名称和类型,并且可以指定一些可选设置。 让我们从TouchPoints表开始,因为它非常简单。
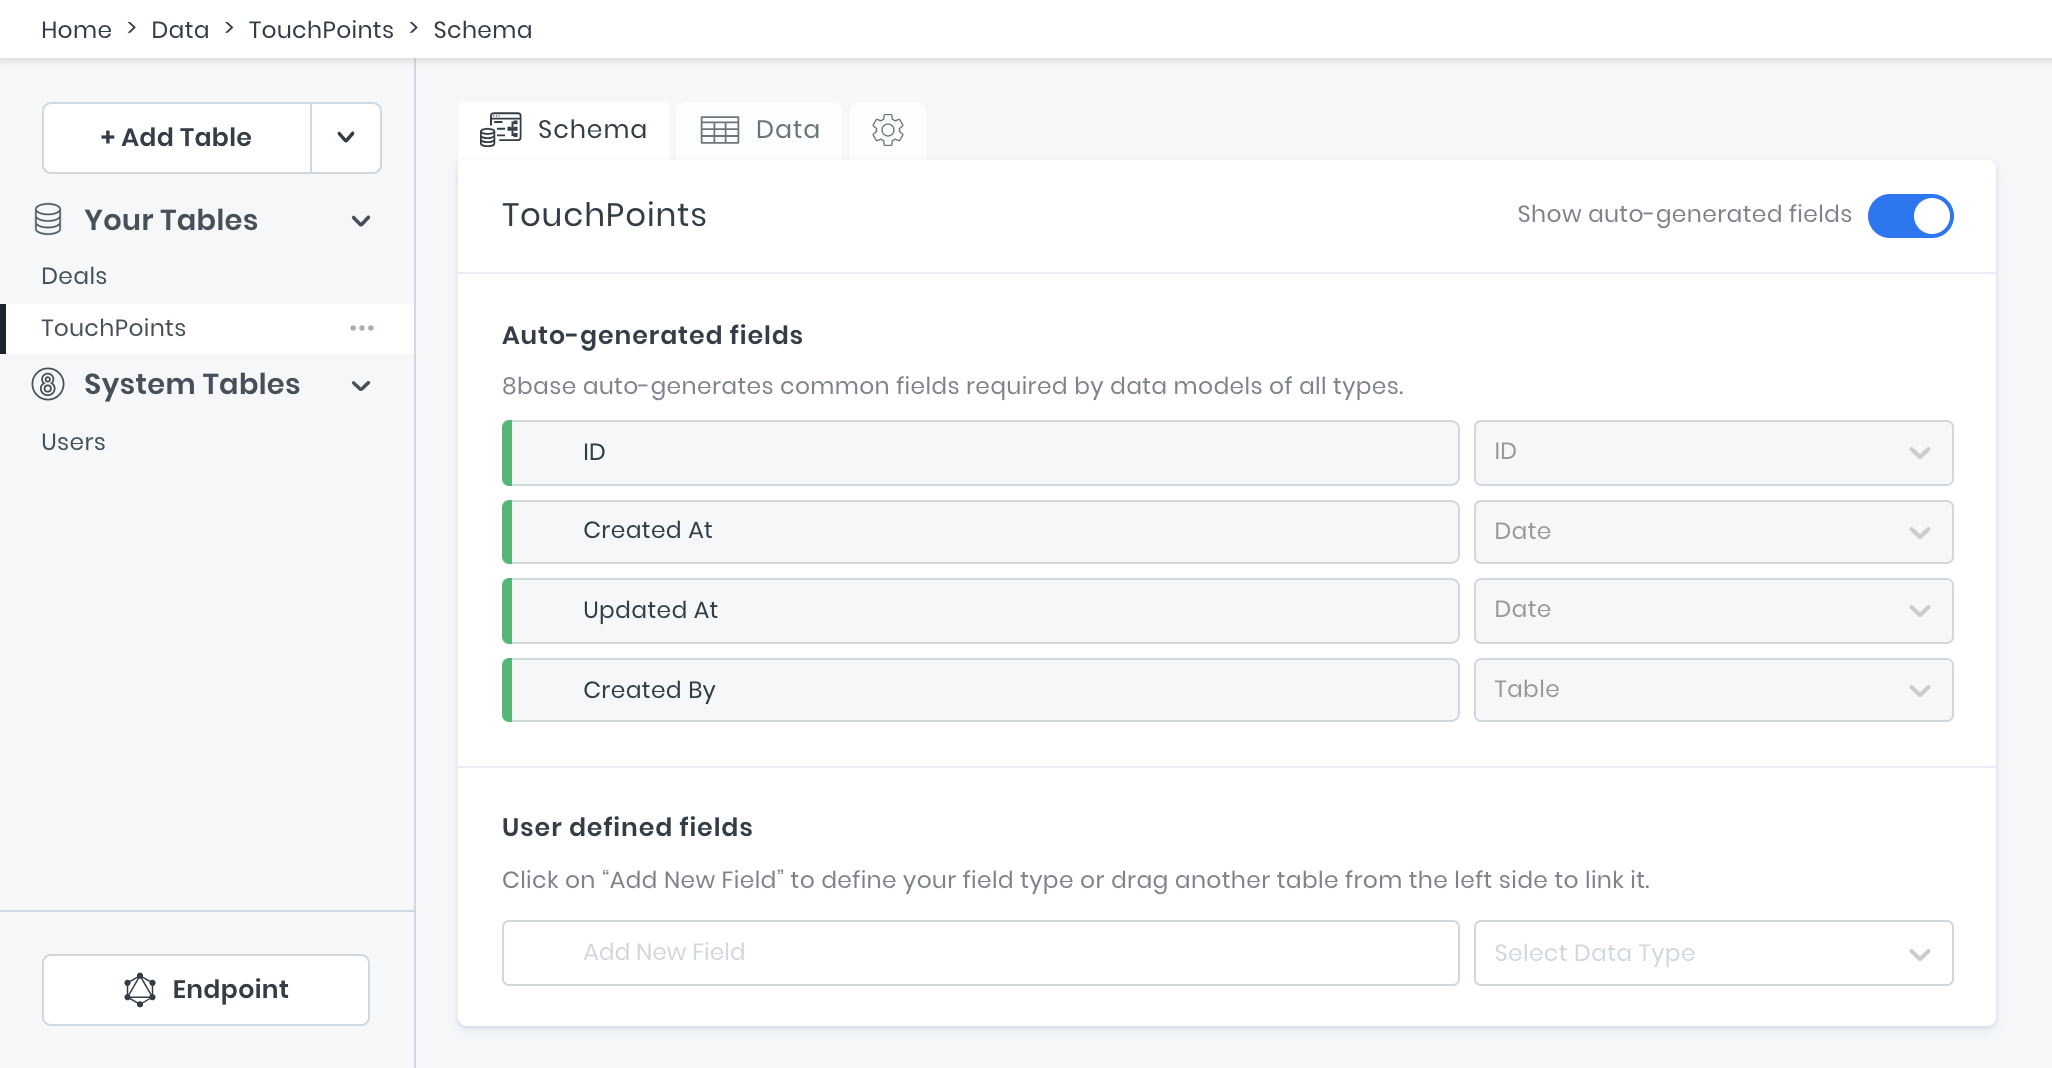
On the TouchPoints table, add a field to its schema called “ContactMedium” and set they field type as a Switch. In the field settings, set the format to Custom and then specify “Phone”, “Email”, and “In-person” as the options. These options specify the all possible values that this field will allow to be saved.
在TouchPoints表上,向其架构中添加一个名为“ ContactMedium”的字段,并将其字段类型设置为Switch 。 在字段设置中,将格式设置为“ 自定义” ,然后指定“电话”,“电子邮件”和“面对面”作为选项。 这些选项指定此字段允许保存的所有可能的值。
Lastly, check the Mandatory checkbox and select “Phone” as the default value since we will always require this field on a TouchPoint. With all these changes, your ContactMedium field and settings should look like the image below.
最后,选中“ 强制”复选框,然后选择“电话”作为默认值,因为我们将始终在TouchPoint上要求此字段。 经过所有这些更改,您的ContactMedium字段和设置应如下图所示。

After that, we’re going to have to build a relationship between the Deals and TouchPoints table. This is because many TouchPoints can happen during the life of a Deal, and we’re going to want a has_many relationship to model that.
之后,我们将必须在Deals和TouchPoints表之间建立关系。 这是因为在Deal的生命周期内可能会发生许多TouchPoint ,而我们将需要has_many关系来对其建模。
All you’re going to need to do is drag the Deals table over the TouchPoints table’s schema and drop it into the “Add New Field” input. This will wire up most of what’s needed automatically. What you’ll want to set manually are the following items.
您需要做的就是将“ 交易”表拖到TouchPoints表的架构上,并将其拖放到“添加新字段”输入中。 这将自动连接大部分需求。 您需要手动设置以下各项。
Name the relationship “Deal” on the TouchPoints schema.
在TouchPoints架构上将关系命名为“交易”。
Confirm that Allow multiple TouchPoints per Deal is checked in the relationship settings and not Allow multiple Deals per TouchPoint.
确认在关系设置中选中了“ 每个交易允许多个接触点”,而不是“ 每个接触点不允许多个交易” 。
Check the Deal field is Mandatory validation.
检查交易字段是否为强制验证。
Nice work so far! We’re going to speed it up now since you’ve already learned how to create tables, add fields, and build relationships between tables.
到目前为止工作很好! 由于您已经学习了如何创建表,添加字段以及在表之间建立关系,因此我们现在将使其加快速度。
Our Deals table is going to be storing much more information. It’s serving as the main record in our CRM. Click over into its schema and try to add the following fields with the right types and settings!
我们的Deals表将存储更多信息。 它是我们CRM中的主要记录。 单击进入其架构,然后尝试使用正确的类型和设置添加以下字段!
Deals Table
交易表
email (type = Text, Field Size = 30, Mandatory = true)
电子邮件 (类型=文本,字段大小= 30,必填= true)
stage (type = Switch, Format = Custom, Options = lead/opportunity/customer, Mandatory = true, Default Value = lead)
阶段 (类型=切换,格式=自定义,选项=潜在客户/机会/客户,强制性= true,默认值=潜在客户)
amount (type = Number, Decimal places = 2)
数量 (类型=数字,小数位= 2)
deal_name (type = Text, Field Size = 100, Mandatory = true)
deal_name (类型=文本,字段大小= 100,必填= true)
department (type = Text, Field Size = 100)
部门 (类型=文本,字段大小= 100)
phoneNumber (type = Text, Field Size = 12)
phoneNumber (类型=文本,字段大小= 12)
TouchPoints (type = Table)
接触点 (类型=表格)
At this point, our data model is set up and our API is actually ready to use! Just for fun, let’s go ahead and add our first deal to the database using the GraphQL API.
至此,我们的数据模型已经建立,我们的API实际上已经可以使用了! 只是为了好玩,让我们继续使用GraphQL API将我们的第一笔交易添加到数据库中。
Move over into the workspace API Explorer. This is a great environment for writing and testing your GraphQL queries, mutations, and subscriptions. However, you can always use another GraphQL client if you want, like GraphiQL or Postman. That said, if you set your tables up correctly, go ahead and run the following mutation to add a deal that already has 2 touch points.
移到工作区API Explorer中 。 这是用于编写和测试GraphQL查询,变异和订阅的绝佳环境。 但是,如果需要,您始终可以使用另一个GraphQL客户端,例如GraphiQL或Postman。 也就是说,如果您正确设置了表格,请继续执行以下变体以添加已经具有2个接触点的交易。
mutation {
  dealCreate(
    data: {
      deal_name: "Big opportunity at Big.co"
      department: "Marketing"
      email: "jake@big.co"
      amount: 100000.00
      stage: "lead"
      touchPoints: {
        create: [{ contactMedium: "Phone" }, { contactMedium: "Email" }]
      }
    }
  ) {
    id
    deal_name
    createdAt
  }
}
Since the API Explorer is embedded in the 8base console, it’s able to handle authentication for you. That said, to allow our Retool frontend to talk to 8base, we’re going to generate an API Token and assign it the necessary role.
由于API Explorer已嵌入8base控制台,因此可以为您处理身份验证。 就是说,为了允许我们的Retool前端与8base进行通信,我们将生成一个API令牌并为其分配必要的角色。
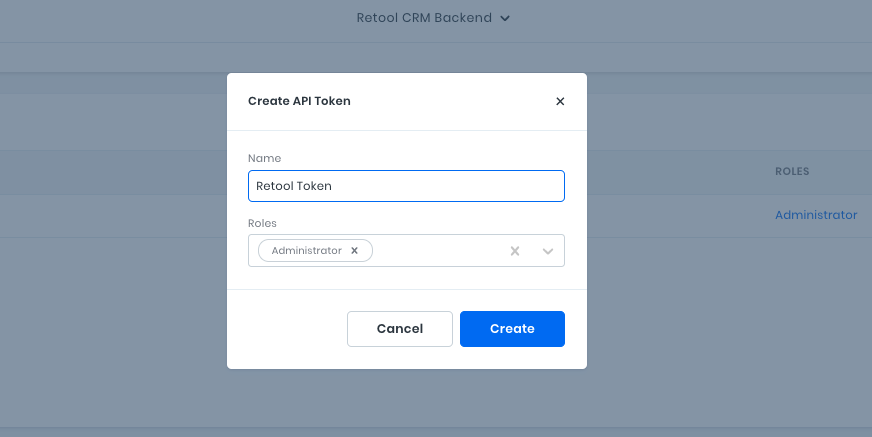
Navigate to Settings > API Tokens and click the plus button. Name the token whatever you like, however make sure that you assign it the Administrator role! This will allow the Retool full access to our workspace tables.
导航到“设置”>“ API令牌” ,然后单击加号按钮。 随意命名该令牌,但是请确保将其分配为管理员角色! 这将使Retool可以完全访问我们的工作空间表。
Copy and paste the token value somewhere safe once you create it! It’s only visible once.
创建令牌值后,将其复制并粘贴到安全的地方! 只能看到一次。
Awesome! Our backend for the application is set up. It’s not time to go ahead and retrofit our frontend CRM template.
太棒了! 设置了我们的应用程序后端。 现在不是时候继续改进我们的前端CRM模板了。
使用GraphQL资源和自定义CRM模板设置Retool (Setting up Retool with a GraphQL Resource and Custom CRM template)
Retool allows you to connect to a crazy number of data-sources — both APIs and databases. Since 8base exposes a GraphQL endpoint, we’re first going to be adding a GraphQL Resource to our account.
Retool使您可以连接到大量的数据源-API和数据库。 由于8base公开了GraphQL端点,因此我们首先将GraphQL资源添加到我们的帐户中。
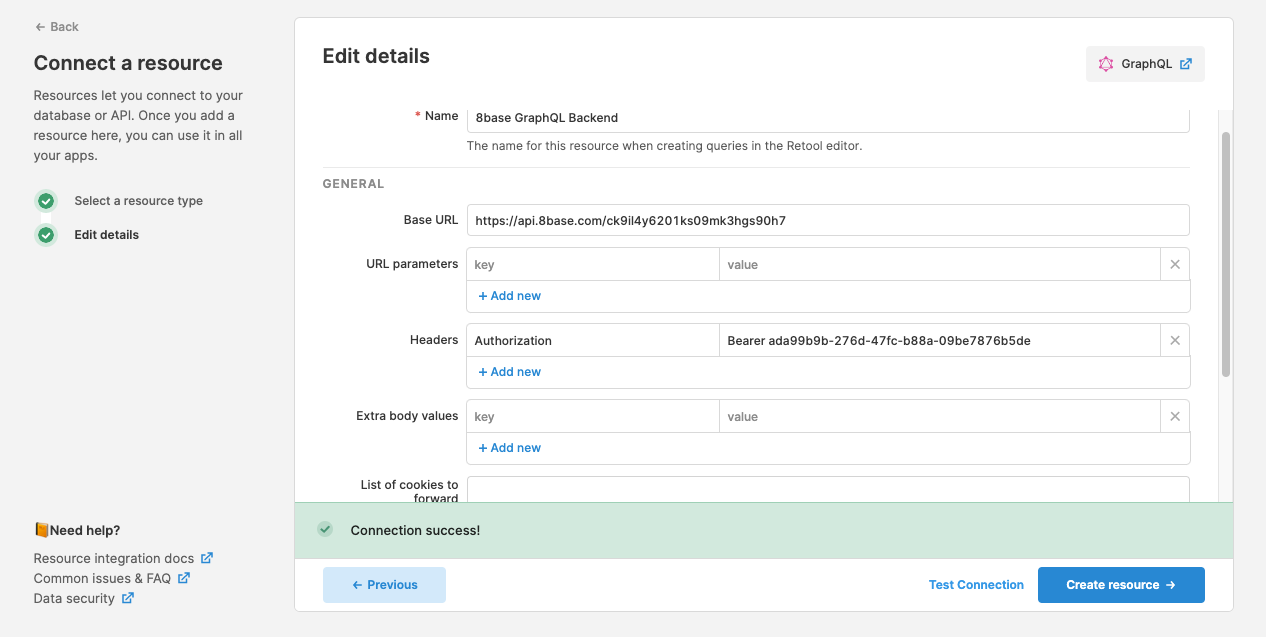
Starting at the home screen of your Retool account, move to the Resources tab and click on the Create New button. You’re going to then scroll down to the APIS section and select the GraphQL option. Once open, it will prompt you for some information that we’ll add from our 8base workspace.
从Retool帐户的主屏幕开始,移至“ 资源”选项卡,然后单击“ 新建”按钮。 然后,您将向下滚动到APIS部分并选择GraphQL选项。 打开后,它将提示您输入一些我们将从8base工作区中添加的信息。
Name — “8base GraphQL Backend”
名称 -“ 8base GraphQL后端”
Base URL — “YOUR_8BASE_WORKSPACE_ENDPOINT”
基本URL - “YOUR_8BASE_WORKSPACE_ENDPOINT”
Headers — key = “Authorization”, value = “Bearer YOUR_API_TOKEN”
头 -键=“授权”,值=“承载YOUR_API_TOKEN”
The 8base workspace endpoint can be found in the Settings page of your workspace as Endpoint URL. Go ahead and replace YOUR_8BASE_WORKSPACE_ENDPOINT with it, as well as YOUR_API_TOKEN with the token you generated earlier. Once set, you can test click Test Connection to make sure everything works and the create the resource!
可以在工作区的“设置”页面中将8base工作区端点作为Endpoint URL找到 。 来吧,更换YOUR_8BASE_WORKSPACE_ENDPOINT它,以及YOUR_API_TOKEN与先前生成的令牌。 设置完成后,您可以单击测试连接以进行测试 ,以确保一切正常并创建资源!
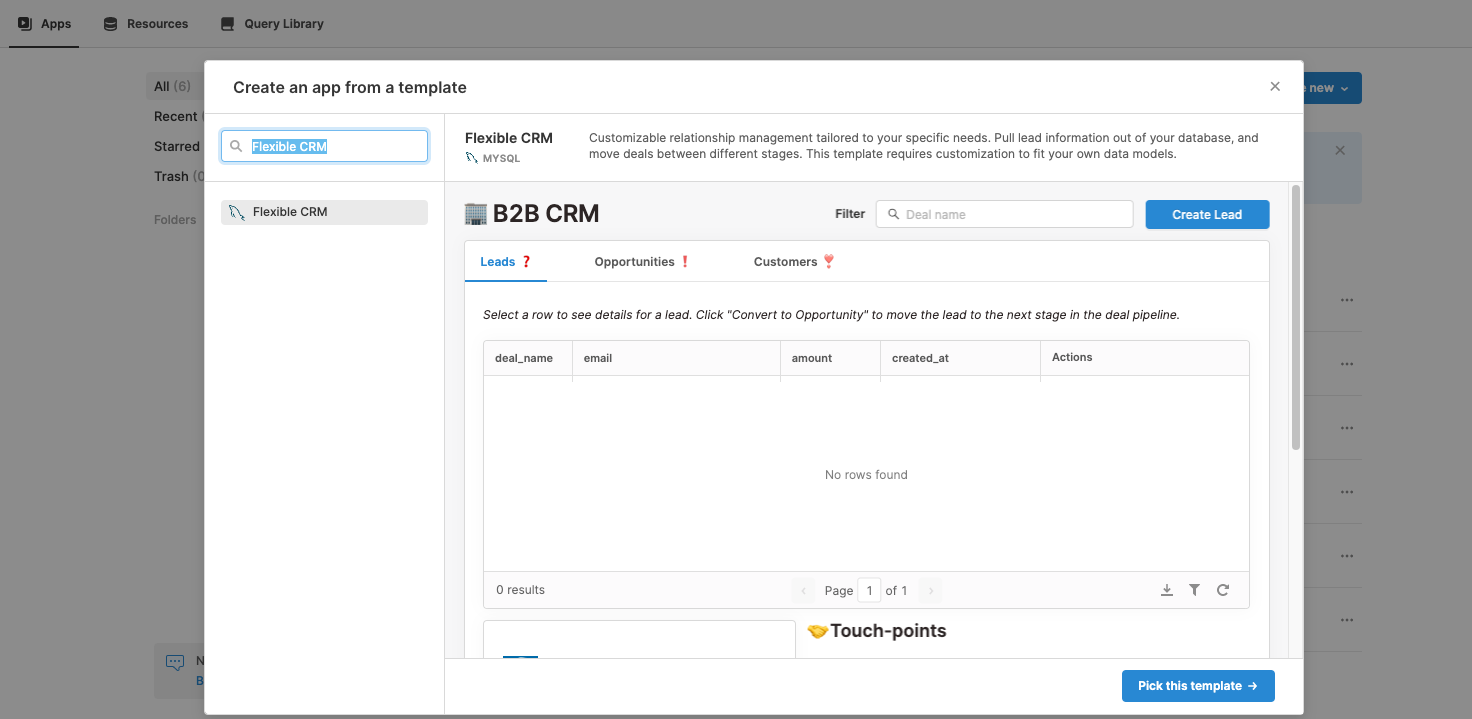
Now lets move back to the Apps tab of your Retool account and create a new app. From the dropdown, select Create from template and the search for “Flexible CRM”. Pick the template with a MySQL database once it pops up! Name it something like “My Custom CRM” and create the app.
现在,让我们返回到Retool帐户的“ 应用程序”标签,然后创建一个新应用程序。 从下拉列表中,选择“ 从模板创建”,然后搜索“ Flexible CRM”。 弹出时,请选择带有MySQL数据库的模板! 将其命名为“ My Custom CRM”,然后创建应用。
What you’re likely seeing now is a CRM interface and a bunch of error messages. That’s fine! The template expects there to be a direct connection to a MySQL database, though we’re going to need to do some retro fitting in order to make it work with the GraphQL API that we set up. So to start, lets update our Queries.
您现在可能会看到的是CRM界面和一堆错误消息。 没关系! 该模板希望直接连接到MySQL数据库,尽管我们将需要进行一些改进以使其与我们设置的GraphQL API配合使用。 首先,让我们更新查询 。
潜在客户查询 (leads Query)
The leads query is going to fetch all our deals from the API, taking into consideration what stage we’re looking at as well as whether any filter has been typed in. So in the bottom left of the screen under Queries click on leads. Set the resource as 8base GraphQL Backend and update the query input with the following code snippet.
Leads查询将从API获取所有交易,同时考虑到我们正在考虑的阶段以及是否已键入任何过滤器。因此,在屏幕左下角Queries下,单击Leads 。 将资源设置为8base GraphQL Backend并使用以下代码段更新查询输入。
query($stage: String!, $name: String!) {
  dealsList(
    filter: {
      AND: [{ stage: { equals: $stage } }, { deal_name: { contains: $name } }]
    }
  ) {
    items {
      id
      stage
      email
      amount
      deal_name
      createdAt
      updatedAt
    }
  }
}Since the arguments $name and $stage are specified in the query, Retool automatically generates variable inputs below the query so that we can specify their values. Additionally, almost every component in Retool is accessible from the global scope. This allows us to access data properties from other components. Therefore, we can access the current stage value by setting it to {{ buttongroup1.value }} and the name value from the search component’s value, {{ nameInput.value }}.
由于在查询中指定了参数$ name和$ stage,Retool会在查询下方自动生成变量输入,以便我们可以指定它们的值。 此外,Retool中的几乎每个组件都可以从全局范围访问。 这使我们可以从其他组件访问数据属性。 因此,我们可以通过将当前阶段的值设置为{{ buttongroup1.value } }并从搜索组件的值{{ nameInput.value }}获取名称值来访问它。

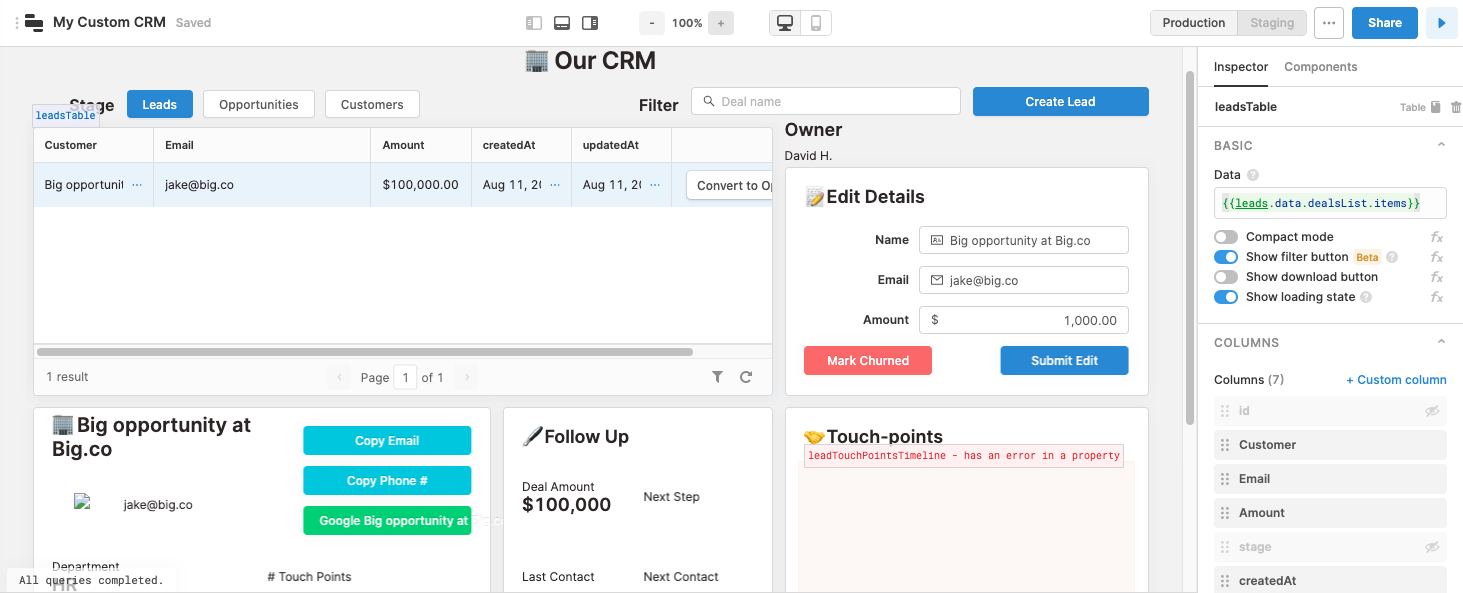
Once our leads query is updated we’re going to want to make sure our table is accessing the response! Click on the table component and in the Inspector on the right side of the screen update the Data input to {{leads.data.dealsList.items}}, which is the nested structure of our query response. Once updated, that first deal that we created should populate your table!
潜在客户查询更新后,我们将要确保我们的表正在访问响应! 单击表组件,然后在屏幕右侧的检查器中将“ 数据输入”更新为{{leads.data.dealsList.items}} ,这是我们查询响应的嵌套结构。 更新后,我们创建的第一笔交易将填充您的表格!
touch_points查询 (touch_points Query)
Lets now update our touch_points query. Select the 8base GraphQL Backend resource and then paste in the following query.
现在让我们更新touch_points查询。 选择8base GraphQL后端资源,然后粘贴在以下查询中。
query($dealId: ID!) {
  touchPointsList(filter: { deal: { id: { equals: $dealId } } }) {
    items {
      id
      createdAt
      contactMedium
    }
  }
}
This query will fetch a list of TouchPoints associated with a specific deal. That said, we need to pass it a deal ID… how do we get that?
该查询将获取与特定交易相关的TouchPoints列表。 也就是说,我们需要向其传递交易ID…我们如何获得该ID?
The Retool table component has a cool feature which is that it makes available the data from currently selected row. We’ll be accessing this value in a number of our components. However, in the touch_points query it gets set as {{ leadsTable.selectedRow.data.id }} in the dealId value.
Retool表组件具有一个很酷的功能,那就是它可以使当前选定行中的数据可用。 我们将在许多组件中访问此值。 但是,在touch_points查询中,它在dealId值中设置为{{ leadsTable.selectedRow.data.id }} 。
After saving the query, click over to the touch points component and once again lets update its settings. In the Items input, we’re going to want to update the javascript function. Essentially, we want to create an array of text values that represent the touch points that have occurred.
保存查询后,单击鼠标到接触点组件,然后再次更新其设置。 在项目输入中,我们将要更新javascript函数。 本质上,我们要创建一个文本值数组,以表示已发生的接触点。
If you’re not familiar with javascript, don’t worry about it. Go ahead and copy the following snippet into the Items input.
如果您不熟悉javascript,请不必担心。 继续,并将以下代码段复制到Items输入中。
{{ touch_points.data.touchPointsList.items.map(touchPoint => new Date(touchPoint.createdAt).toDateString() + ‘: ‘ + touchPoint.contactMedium }}
{{ touch_points.data.touchPointsList.items.map(touchPoint => new Date(touchPoint.createdAt).toDateString() + ': ' + touchPoint.contactMedium }}

Nice work! At this point, I think you’re getting the hang of Retool. So lets speed it up and breeze through the next four queries.
干得好! 在这一点上,我认为您正在掌握Retool。 因此,让我们加快速度并轻松完成接下来的四个查询。
create_lead变异 (create_lead Mutation)
Resource: “ 8base GraphQL Backend”
资源:“ 8base GraphQL后端”
Query:
查询:
mutation(
  $phoneNumber: String!
  $department: String!
  $deal_name: String!
  $email: String!
  $amount: Float!
) {
  dealCreate(
    data: {
      phoneNumber: $phoneNumber
      department: $department
      deal_name: $deal_name
      amount: $amount
      email: $email
      stage: "lead"
    }
  ) {
    id
  }
}
Variables:
变量:
amount =
{{ parseInt(newDealAmount.value) }}数量=
{{ parseInt(newDealAmount.value) }}department =
{{ newDealDepartment.value }}部门=
{{ newDealDepartment.value }}phoneNumber =
{{ newDealPhone.value }}phoneNumber =
{{ newDealPhone.value }}deal_name =
{{ newDealName.value }}deal_name =
{{ newDealName.value }}email =
{{ newDealEmail.value }}电子邮件=
{{ newDealEmail.value }}
upgrade_deal变异 (upgrade_deal Mutation)
Resource: “8base GraphQL Backend”
资源: “ 8base GraphQL后端”
Query:
查询:
mutation($stage: String!, $id: ID!) {
  dealUpdate(data: { id: $id, stage: $stage }) {
    id
    stage
    email
    amount
    deal_name
  }
}
Variables:
变量:
stage =
{{ leadsTable.selectedRow.data.stage === ‘lead’ ? ‘opportunity’ : ‘customer’}}阶段=
{{ leadsTable.selectedRow.data.stage === 'lead' ? 'opportunity' : 'customer'}}{{ leadsTable.selectedRow.data.stage === 'lead' ? 'opportunity' : 'customer'}}id =
{{ leadsTable.selectedRow.data.id }}id =
{{ leadsTable.selectedRow.data.id }}
After this Query Runs:
此查询运行后:
- Remove “opportunities” 删除“机会”
downgrade_deal变异 (downgrade_deal Mutation)
Resource: “8base GraphQL Backend”
资源: “ 8base GraphQL后端”
Query:
查询:
mutation($stage: String!, $id: ID!) {
  dealUpdate(data: { id: $id, stage: $stage }) {
    id
    stage
    email
    amount
    deal_name
  }
}
Variables:
变量:
stage =
{{ leadsTable.selectedRow.data.stage === ‘opportunity’ ? ‘lead’ : ‘opportunity’}}阶段=
{{ leadsTable.selectedRow.data.stage === 'opportunity' ? 'lead' : 'opportunity'}}{{ leadsTable.selectedRow.data.stage === 'opportunity' ? 'lead' : 'opportunity'}}id =
{{ leadsTable.selectedRow.data.id }}id =
{{ leadsTable.selectedRow.data.id }}
After this Query Runs:
此查询运行后:
- Remove “opportunities” 删除“机会”
set_details查询 (set_details Query)
Resource: “8base GraphQL Backend”
资源:“ 8base GraphQL后端”
Query:
查询:
mutation($email: String, $name: String, $amount: Float, $id: ID!) {
  dealUpdate(
    data: { id: $id, email: $email, amount: $amount, deal_name: $name }
  ) {
    id
    email
    amount
    deal_name
  }
}
Variables:
变量:
id =
{{ leadsTable.selectedRow.data.id }}id =
{{ leadsTable.selectedRow.data.id }}amount =
{{ textinput6.value }}数量=
{{ textinput6.value }}email =
{{ textinput7.value }}电子邮件=
{{ textinput7.value }}name =
{{ textinput8.value }}名称=
{{ textinput8.value }}
After this Query Runs:
此查询运行后:
- Remove “opportunities” 删除“机会”
更新自定义CRM组件 (Updating the Custom CRM components)
If you’re still here, you’re a trooper! We getting close to the finish line, so hang in there!
如果您还在这里,您就是士兵! 我们离终点线越来越近,所以挂在那里!
After updating all of our GraphQL queries, we also need to update our Retool components so that they are reading from the correct data values. So lets run through them one by one and knock it out.
更新完所有GraphQL查询后,我们还需要更新Retool组件,以便它们从正确的数据值中读取。 因此,让我们一个接一个地运行它们并将其淘汰。
图像成分 (Image component)
The image1 component dynamically generates a random image when given a seed value. Go ahead and update its Image URL value to be https://picsum.photos/id/{{ leadsTable.selectedRow.data.amount % 500 }}/200/200.
给定种子值时, image1组件会动态生成随机图像。 继续并将其图像URL值更新为https://picsum.photos/id/{{ leadsTable.selectedRow.data.amount % 500 }}/200/200 .
接触点数 (Touch Points count)
The text13 component counts how many touch points have been made. We can easily display this by updating its Value to:
text13组件计算已创建的接触点数。 通过将其值更新为:
\# Touch Points#### {{touch_points.data.touchPointsList.items.length}}上次联络日期 (Last contact date)
For the text14 component, we’re showing the date of the last touch point. This gets accessed from our touch points data and formatted using MomentJS.
对于text14组件,我们显示的是最后一个接触点的日期。 这可以从我们的接触点数据访问并使用MomentJS进行格式化。
Last Contact#### {{ moment(touch_points.data.touchPointsList.items[0].createdAt).format(‘MM/DD/YY’)}}下一步和下一步联系 (Next Step and Next Contact)
These next two components ( text15, text16) simply suggest the next step by suggesting a different contact medium than was used for the last touch point be made a week after.
接下来的两个组件( text15 , text16 )只是通过建议与一周后用于最后一个触摸点的接触介质不同的接触介质来建议下一步。
Next Contact#### {{ moment(touch_points.data.touchPointsList.items[0].createdAt).add(moment.duration(1, ‘week’)).format(‘MM/DD/YY’)}}Next Step#### {{ touch_points.data.touchPointsList.items[0].contactMedium === ‘email’ ? ‘Phone Call’ : touch_points.data.touchPointsList.items[0].contactMedium === ‘phone’ ? ‘Book Meeting’: ‘Send Email’ }}测试自定义CRM (Testing the Custom CRM)
You did it! Go ahead and press the play button in the top left of the editor. You can now start creating, editing, and performing other operations on your deals.
你做到了! 继续并按编辑器左上方的播放按钮。 您现在可以开始在交易中创建,编辑和执行其他操作。
Most importantly though, you can also start customizing your CRM to be whatever you want it to be. The skills you learned in this tutorial are the basics for building business apps using Retool and 8base, both of which have tons more useful features to help you conquer worthwhile projects!
不过,最重要的是,您还可以开始将CRM定制为自己想要的样子。 您在本教程中学到的技能是使用Retool和8base构建业务应用程序的基础,它们都具有大量有用的功能来帮助您征服有价值的项目!
I hope you found this tutorial helpful! Feel free to reach out with questions and comments.
希望本教程对您有所帮助! 随时提出问题和意见。
Originally published at https://www.8base.com.
最初发布在 https://www.8base.com上 。
翻译自: https://medium.com/@sebscholl/hot-to-develop-a-custom-crm-using-only-low-code-platforms-67da41bbe9b1
开源 自定义字段 crm


 684
684

 被折叠的 条评论
为什么被折叠?
被折叠的 条评论
为什么被折叠?
 到【灌水乐园】发言


