


In this article, we’re going to see how to use Redux in your React application. We won’t focus on setting up your React application itself as I already wrote an article on it (include link).
在本文中,我们将了解如何在您的React应用程序中使用Redux。 因为我已经写了一篇文章(包括链接),所以我们不会专注于自己设置React应用程序。
什么是Redux,为什么要使用它 (What is Redux and why use it)
Here’s the definition of Redux: a state management tool for your application. In other words, Redux allows you to define one global store for your application. And every component can have access to that one store.
这是Redux的定义:您的应用程序的状态管理工具。 换句话说,Redux允许您为应用程序定义一个全局存储 。 而且每个组件都可以访问该商店。
This concept is different from what you do with React. In fact, in React, every component has its internal state with no need for an external library.
这个概念与您使用React所做的不同。 实际上,在React中,每个组件都有其内部状态,而无需外部库。
So you would ask me: why do I need an external library to manage the state? Won’t it bring more confusion? To some extent, this can be true. I too would have asked the same question :-).
所以你会问我: 为什么我需要一个外部库来管理状态? 会不会带来更多的混乱? 在某种程度上,这可能是正确的。 我也会问同样的问题:-)。
However, managing all these React internal states can be cumbersome. As you want to pass props to children components and vice versa (or sometimes children of children components). This is where Redux shines.
但是,管理所有这些React内部状态可能很麻烦。 您想将道具传递给子组件,反之亦然(或有时将子组件的子组件)传递给子组件。 这就是Redux闪耀的地方 。
在Redux中,有一个事实来源:商店 (In Redux, there is one source of truth: the store)
In Redux, your state is managed by one global store. And each component can have access to it, regardless of its relationship with the parent component.
在Redux中,您的状态由一个全局商店管理。 每个组件都可以访问它,而不管其与父组件的关系如何。
There are other advantages to using Redux:
使用Redux还有其他优点:
- It’s not specific to React. You can use it with other frameworks like Angular or Vue.js. 它不是特定于React的。 您可以将其与Angular或Vue.js等其他框架一起使用。
- It makes it easier to manage your application state, hence your application simply. I have tried to build applications in plain React. But using Redux is such an alleviation. 它使管理您的应用程序状态变得更加容易,从而简化了您的应用程序。 我试图在普通的React中构建应用程序。 但是使用Redux是一种缓解。
- Having one state makes your application predictable, allowing you to implement login features. In this case, the source-of-truth (your data) lies in only one place: the store. 具有一种状态可使您的应用程序可预测,从而允许您实现登录功能。 在这种情况下,事实真相(您的数据)仅位于一个位置:商店。
Redux如何工作 (How Redux Works)
As said, Redux allows you to have one global store that handles the state of your application. And every component can have access to that store.
如前所述,Redux允许您拥有一个全局存储来处理应用程序的状态。 每个组件都可以访问该商店。
Three building blocks make this ‘magic’ work:
三个构建块使此“神奇”的工作:
- The store 店铺
- The actions 行动
- The reducers 减速器
Let’s look at the roles of every one of these:
让我们看一下其中每个角色:
店铺 (The store)
The store holds your application’s state. Like a cloud out there, or the sun, that each person (component) can see (have access to).
商店保存您应用程序的状态。 就像外面的云彩或太阳一样,每个人(组件)都可以看到(可以访问)。
动作 (Actions)
Actions are the only way to update your Redux store (changing information). And you update your store via the store.dispatch() function. Here’s an example of an action in Redux:
操作是更新Redux存储(更改信息)的唯一方法。 然后,您通过store.dispatch()函数更新商店。 这是Redux中的操作示例:
{
type: 'ADD_TASK',
text: "Do some coding at 8pm",
}
Note: an action will have a “type” property. This is how your store can be changed. Also, actions are mostly not just sent. They come from what we call action creators. Action creators are functions that help you create actions and send them. Like this one:
注意:动作将具有“类型”属性。 这是可以更改商店的方式。 另外,动作大多不只是发送。 他们来自我们所谓的行动创造者。 动作创建者是可以帮助您创建动作并将其发送的功能。 像这个:
function addTask(task){return {type: ADD_TASK,task: task}
// or simply
return {
type: ADD_TASK,
task}
Actions describe in general “what happened”. In our addTask example, we can say this happened:
行动通常描述“发生了什么”。 在我们的addTask示例中,我们可以说发生了这种情况:
“A user wants to add a new task (type: ADD_TASK), with a text (task property)”.
“ 用户想添加带有文本(任务属性)的新任务(类型:ADD_TASK) ”。
Reducers
减速器
Reducers are functions that update your store, depending on the actions that were sent. When you use the dispatch function to dispatch an action, you are sending the information to the reducer.
减速器是根据发送的操作来更新商店的功能 。 使用分派功能分派操作时,会将信息发送给减速器。
The reducer will take that information, and do something, depending on the type property of that action.
减速器将获取该信息并执行某些操作,具体取决于该操作的type属性。
A rule of thumb of a reducer is:
减速器的经验法则是:
A function that accepts 2 things: an action and the previous state. It then returns a new state depending on the action type property.
接受两件事的功能:动作和先前状态。 然后,根据操作类型属性返回新状态。
If you understand this, things become crystal clear when you look at the reducer example I have set up for you ( see below).
如果您理解了这一点,那么当您查看我为您设置的减速器示例时,事情就会变得清晰起来(请参阅下文)。
Let’s say we want to add a new task to our Redux store. We can do this with the reducer following this logic:
假设我们要向Redux存储添加新任务。 我们可以按照以下逻辑用reducer做到这一点:
- We first initialize our default store. So we create a new file called reducer.js and put this first line of code: 我们首先初始化默认存储。 因此,我们创建了一个名为reducer.js的新文件,并将此代码放在第一行:
const defaultStore = {
tasks: [],
}
This will be your default store.
这将是您的默认商店。
We then define our reducer (let’s call it taskReducer)
然后,我们定义我们的减速器(我们称它为taskReducer)
const taskReducer = (store = defaultStore, action) => {// Rest of the function}This function is our reducer. You will write it right below the default store. Let me explain to you what is happening there:
此功能是我们的减速器。 您将在默认存储的正下方写入它。 让我向您解释那里发生了什么:
- This reducer takes two parameters: the action, and the store. 减速器采用两个参数:操作和存储。
It then returns a new state, depending on the type of that action.
然后,根据该操作的类型,返回新状态。
Here’s now the taskReducer:
现在是taskReducer:
const taskReducer = (action, store = defaultStore) => {switch(action.type){
case 'ADD_TASK':
// do somethingdefault:return store}
In the taskReducer function, we are using the switch statement to make our evaluation. We want to check the value of the action’s type (action.type) and do something if it’s the case.
在taskReducer函数中,我们使用switch语句进行评估。 我们要检查动作类型的值(action.type) 并根据实际情况采取措施。
Let’s continue with our function. We will now do something when the action we receive has a type of ‘ADD_TASK’. In this case, we want to add the task to our tasks array in the store.
让我们继续我们的功能。 现在,当收到的动作类型为“ ADD_TASK”时,我们将执行某些操作。 在这种情况下,我们要将任务添加到商店中的task数组中。
const taskReducer = (action, store = defaultStore) => {switch(action.type){
case 'ADD_TASK':
// adding the task to our storereturn
[...state,
 tasks: tasks.concat(action.task)]default:return store}
Inside the switch statement, we have a case of ‘ADD_TASK’. If the value of action.type equals to ‘ADD_TASK’, it will return the new state with the added task appended.
在switch语句中,我们有一个'ADD_TASK'的情况。 如果action.type的值等于'ADD_TASK',它将返回新状态并附加已添加的任务。
The return statement will trigger an update to the state.
return语句将触发状态更新。
Notice that we copied the previous state before appending the task. This is a Redux convention. You want to copy the previous state before you add or remove an element from that state.
请注意,我们在追加任务之前复制了先前的状态。 这是Redux约定。 您想要复制先前的状态,然后再从该状态添加或删除元素。
该应用程序侦听您的Redux存储中的任何更改并自行更新 (The app listens to any change in your Redux store and updates itself)
Any component that gets connected to one part or the entire store will re-render once it notices a change in the store.
一旦注意到商店中的变化,连接到一部分或整个商店的任何组件都将重新渲染。
This feature is powerful as it helps you define which component can have access to your state and how that component would re-render with the new information from that state.
此功能非常强大,因为它可以帮助您定义哪个组件可以访问您的状态,以及如何使用该状态下的新信息重新呈现该组件。
练习:真正的应用程序实施 (Exercice: Real app implementation)
In this section, you are going to build our first Redux store using React. After explaining to you how Redux works, let’s see it in action!
在本部分中,您将使用React构建我们的第一个Redux商店。 向您解释了Redux的工作原理之后,让我们看看它的实际作用!
1.创建您的React应用程序 (1. Create your react application)
The first step is to create a React application (a simple to-do-list). I’m using VS Code but you can stick to your favorite code editor. Open your terminal and type:
第一步是创建一个React应用程序(一个简单的待办事项列表)。 我正在使用VS Code,但是您可以坚持使用自己喜欢的代码编辑器。 打开您的终端并输入:
create-react-app react-with-reduxThis commands creates your React application in a folder called react-with-redux.
此命令在名为react-with-redux的文件夹中创建您的React应用程序。
Open that folder with your code editor. (cd react-with-redux). We can now go to the next step, which is installing Redux.
使用代码编辑器打开该文件夹。 (cd react-with-redux)。 现在,我们可以继续下一步,即安装Redux。
2.在React中安装Redux (2. Installing Redux in React)
First, you need to install Redux in your app. Run the command:
首先,您需要在应用程序中安装Redux 。 运行命令:
npm install reduxIn the second step, you need to install React-Redux. This package allows your React component to have access to the store.
在第二步中,您需要安装React-Redux 。 这个包允许您的React组件可以访问商店。
npm install react-redux3.创建商店 (3. Creating the store)
After installing the redux dependencies, we can create our store. You do this in your index.js file in the src folder.
安装redux依赖关系后,我们可以创建商店。 您可以在src文件夹中的index.js文件中执行此操作。
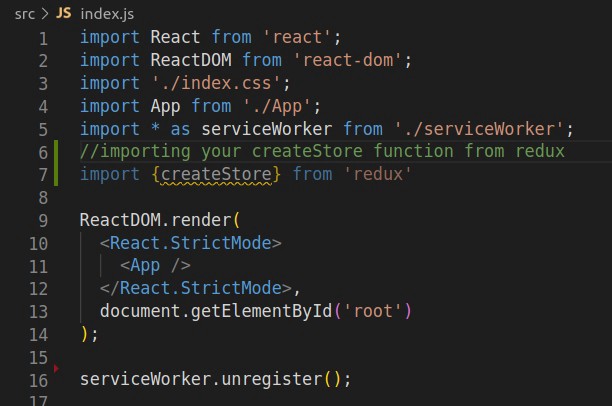
First, we import the createStore function from ‘redux’ (line 7 in the screenshot). This function creates the Redux store that holds the state. Remember, there should be one store in your application.
首先,我们从“ redux”(屏幕截图中的第7行)导入createStore函数。 该函数创建保存状态的Redux存储。 请记住,您的应用程序中应该有一家商店 。
Then we create our reducer file. In your src folder, create a ‘reducers’ folder. Inside that new folder, create a new file called ‘reducer.js’.
然后我们创建我们的reducer文件。 在您的src文件夹中,创建一个“ reducers”文件夹。 在该新文件夹中,创建一个名为'reducer.js'的新文件。
This file will be our reducer for the application:
该文件将成为我们针对该应用程序的简化程序:

Now let’s create our store, in index.js. We have to import our reducer and use the createStore function to create our store.
现在,让我们在index.js中创建商店。 我们必须导入我们的reducer并使用createStore函数来创建我们的商店。
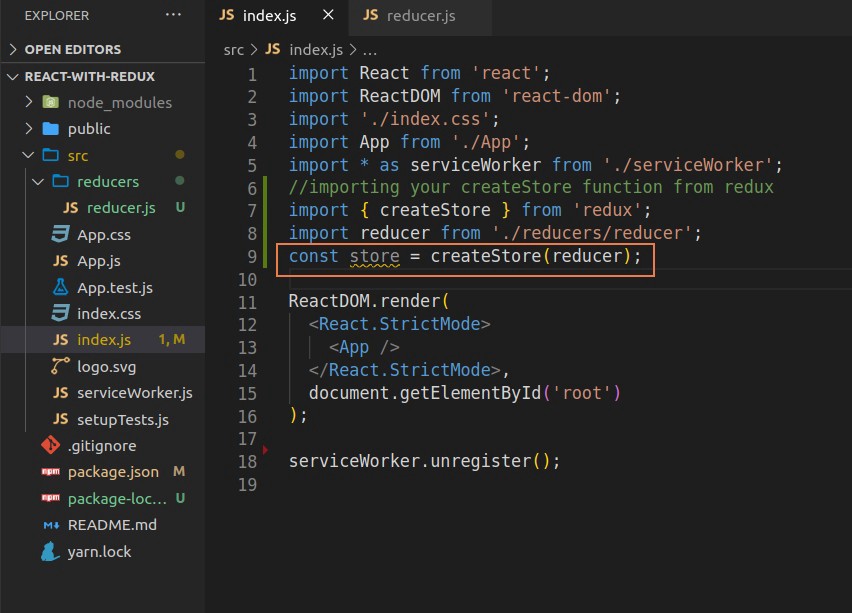
Our store is ready. We can move to the next step which is to connect the redux store to our React application.
我们的商店已经准备好了。 我们可以转到下一步,将redux存储连接到我们的React应用程序。
To do so, we need to import the Provider component from our react-redux package. We then wrap it to our App component. The Provider makes the Redux store available to any component:
为此,我们需要从react-redux包中导入Provider组件。 然后,将其包装到我们的App组件中。 Provider使Redux存储可用于任何组件:
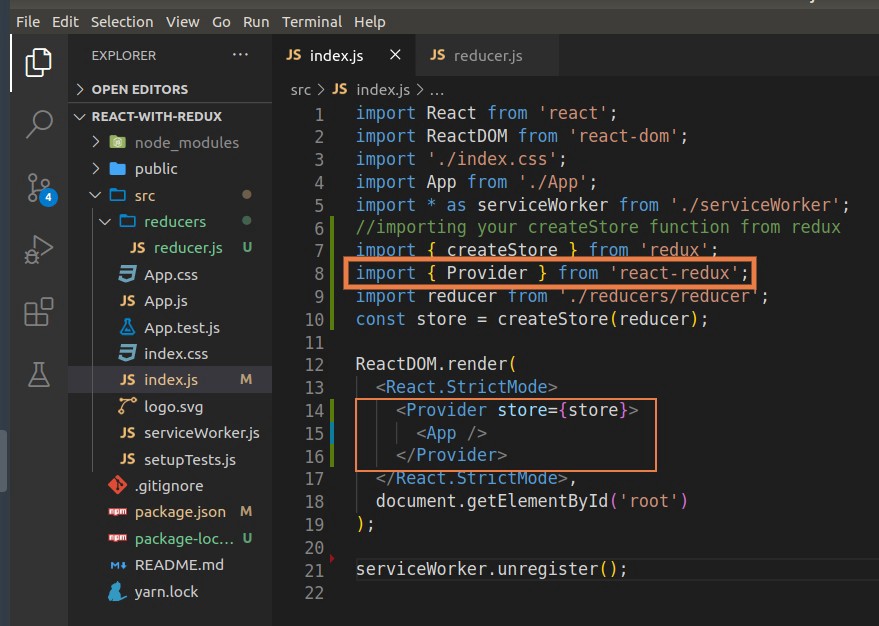
Now our React app is connected with the store! However, there is something left which is: how can a specific component have access to the store?
现在我们的React应用已与商店连接! 但是,剩下的就是:特定组件如何访问商店?
Because connecting the whole React app to the store doesn’t mean every component “sees” it.
因为将整个React应用程序连接到商店并不意味着每个组件都能“看到”它。
You need to define which component can have access to the store and which one cannot. For that you need two functions:
您需要定义哪些组件可以访问商店,哪些不能。 为此,您需要两个功能:
- mapStateToProps mapStateToProps
- mapDispatchToProps mapDispatchToProps
使用mapStateToProps来访问redux存储 (Using mapStateToProps to have access to the redux store)
mapStateToProps allows your component to have access to the state. As the function name indicates, it maps the state to the props of that component. Let’s see it in action:
mapStateToProps允许您的组件访问状态。 就像函数名称所示,它将状态映射到该组件的props。 让我们看看它的作用:

The mapStateToProps function takes the store (state) and maps it to a property (appState). That way, we can have access to it (step 2).
mapStateToProps函数采用存储(状态)并将其映射到属性(appState)。 这样,我们就可以访问它(步骤2)。
Notice we are using the connect function. This will help you ‘connect’ your App component to the redux store.
注意,我们正在使用connect函数。 这将帮助您将App组件“连接”到Redux存储。
Also, we use destructuring in our App to have access to the appState property.
另外,我们在应用程序中使用解构来访问appState属性。
This is now the “state” of your App component. And your component will re-render every time the state changes.
现在,这就是您的App组件的“状态”。 每次状态更改时,您的组件都会重新渲染。
Now can we change the state from our App component? The answer is yes, through another function we call mapDispatchToProps.
现在我们可以从App组件更改状态了吗? 答案是肯定的,通过另一个函数我们称为mapDispatchToProps 。
使用mapDispatchToProps更改Redux存储 (Using mapDispatchToProps to change the redux store)
We create a function mapDispatchToProps to handle the store updates. Remember, we have to use the dispatch function for that:
我们创建一个函数mapDispatchToProps来处理商店更新。 记住,我们必须为此使用调度功能:
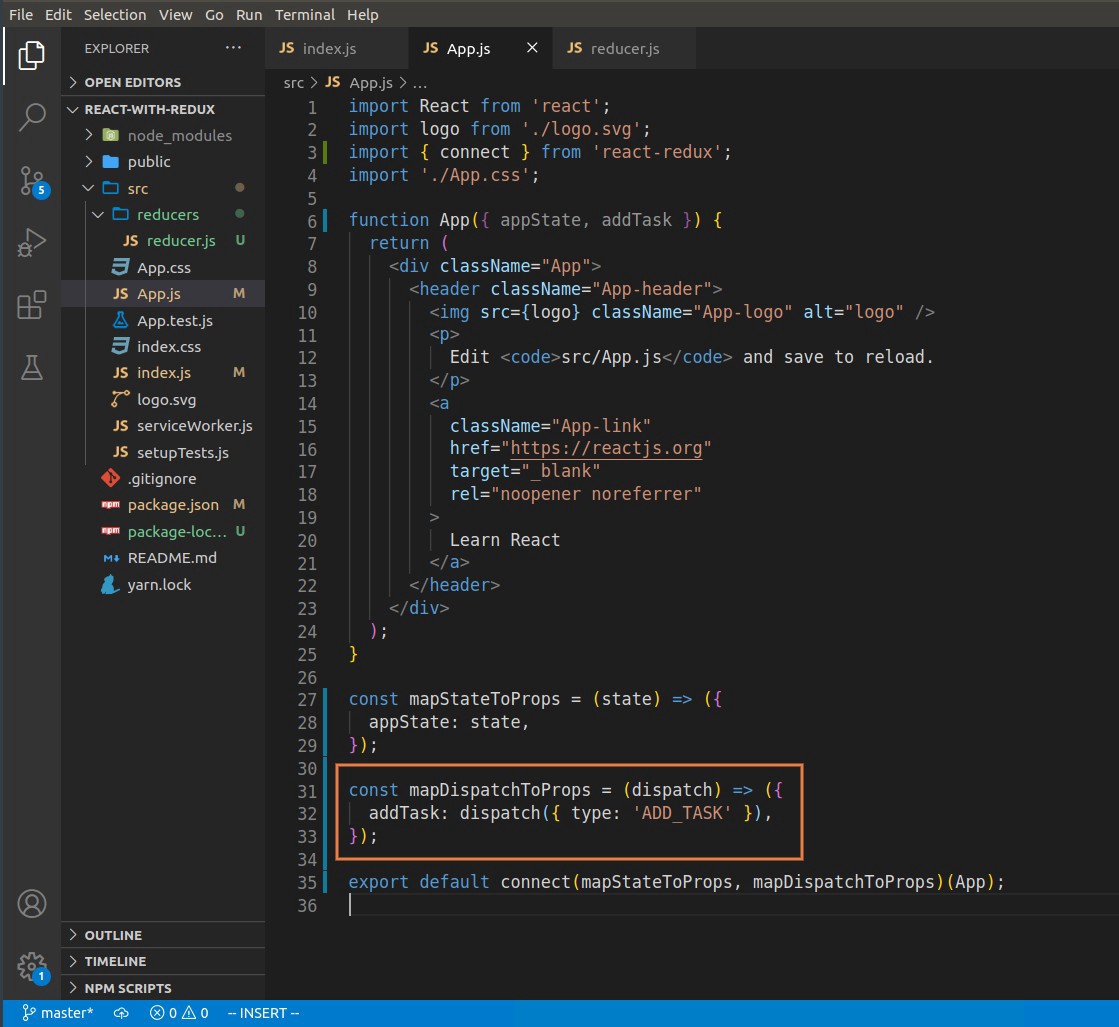
This function takes a dispatch param and returns an object where a function (addTask) is mapped to the state. We can access that state using destructuring in App component.
该函数接受一个派发参数,并返回一个将函数( addTask )映射到状态的对象。 我们可以使用App组件中的解构来访问该状态。
What’s more convenient though would be to use a separate file and define action creators inside. That way, we can handle the adding task operation better. In actions.js (new file), let’s define our first action:
不过,更方便的是使用单独的文件并在其中定义动作创建者。 这样,我们可以更好地处理添加任务操作。 在actions.js (新文件)中,让我们定义第一个动作:

We get back to our App.js component and import that function to use it in our mapDispatchToProps function:
我们回到App.js组件并导入该函数以在mapDispatchToProps函数中使用它:
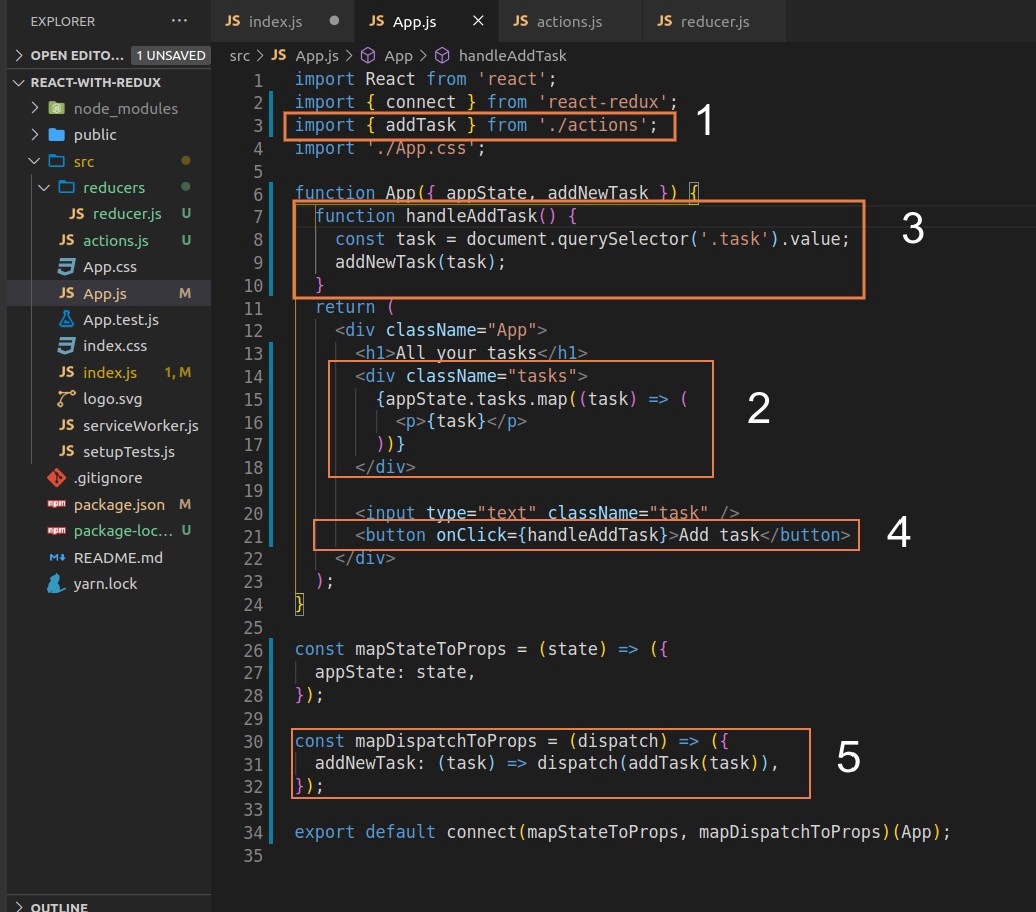
Here’s what’s happening:
这是正在发生的事情:
(1) We import the addTask action creator from actions.js
(1)我们从actions.js导入addTask动作创建者
(2) We remove the default content of App.js and replace it with a list of tasks available in our store. For that, we use the map function to return a paragraph for each task added to our app.
(2)我们删除App.js的默认内容,并将其替换为商店中可用任务的列表。 为此,我们使用map函数为添加到应用程序中的每个任务返回一个段落。
(3) & (4) We define a handleTask function that will query whatever is in the input text and call the addNewTask function.
(3)和(4)我们定义了handleTask函数,该函数将查询输入文本中的内容并调用addNewTask函数。
(5) The addNewTask function is used in mapDispatchToProps as a way of dispatching the task using the addTask function.
(5)addNewTask函数在mapDispatchToProps用作调度使用addTask功能的任务的方式。
This will in return send an action to our reducer with the type ‘ADD_TASK’
作为回报,这将向我们的减速器发送类型为“ ADD_TASK”的动作
在我们的减速器中处理商店更新 (Handling the store update in our reducer)
The store update happens in our reducer. For that, we need to use a switch statement to check the different values of the action type.
商店更新发生在我们的减速器中。 为此,我们需要使用switch语句来检查动作类型的不同值。
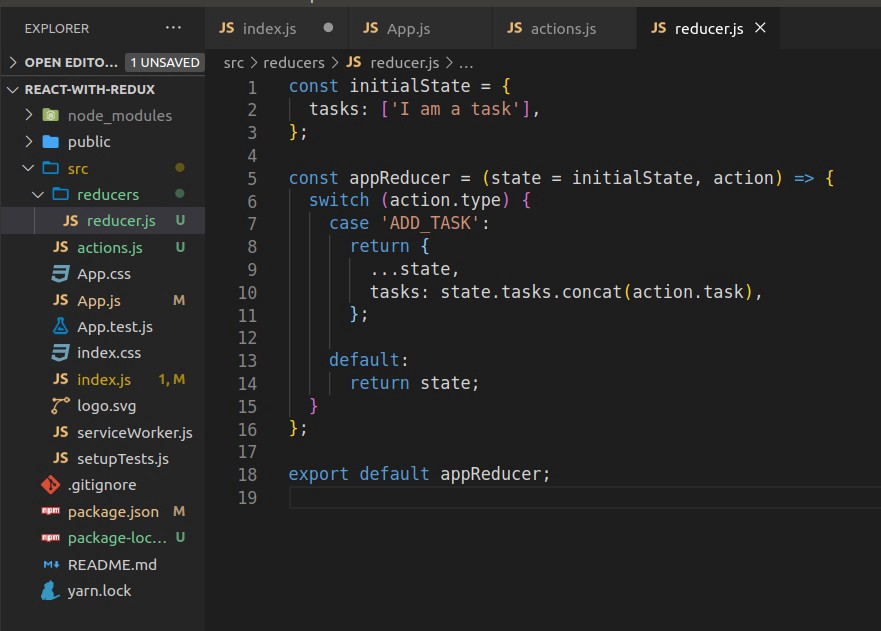
In this case, I added a default task to the initial state. Notice the appReducer is receiving an action and returns a new state in all cases.
在这种情况下,我将默认任务添加到了初始状态。 请注意,appReducer正在接收操作并在所有情况下都返回新状态。
If the action type is ‘ADD_TASK’, we return a copy of the previous state to keep everything as before, and only update the part we want. In this case, it’s the tasks property. Using the concatenation, we append the new task to the tasks array.
如果动作类型为“ ADD_TASK”,我们将返回先前状态的副本,以使所有内容保持不变,并且仅更新所需的零件。 在这种情况下,它是task属性。 使用串联,我们将新任务附加到任务数组。
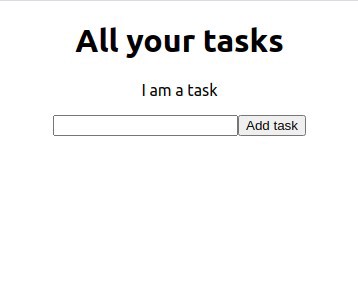
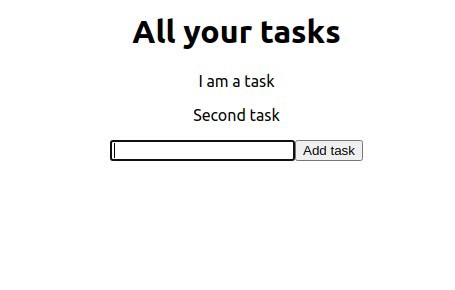
If we now try to add a new task from to our application, we have it added to our store and the app updates as well:
如果现在尝试向应用程序中添加新任务,我们会将其添加到商店中,并且应用程序也会更新:
That’s it! You created your first React & Redux app. Redux can be challenging to understand and use. However, it offers powerful features and that’s the reason why you should learn it. For more clarification, take a look at its official documentation.
而已! 您创建了第一个React&Redux应用程序。 Redux可能难以理解和使用。 但是,它提供了强大的功能,这就是为什么您应该学习它的原因。 有关更多说明,请参阅其官方文档 。
翻译自: https://medium.com/swlh/how-to-use-redux-with-react-a-step-by-step-guide-1cca75c6397a


 2万+
2万+

 被折叠的 条评论
为什么被折叠?
被折叠的 条评论
为什么被折叠?
 到【灌水乐园】发言


