


一,Fork-Join
1,定义:
Fork-Join框架:就是在必要的情况下,将一个大任务,进行拆分(fork)成若干个小任务(拆到不能再拆时),再将一个个的小任务运算的结果进行join汇总。
2,,Fork-Join体现了分而治之。什么是分而治之?
规模为N的问题, 当N < 阈值,直接解决。当 N > 阈值, 将N分解为k个小规模子问题,子问题互相独立,与原问题形式相同。将子问题的解合并得到原问题大的解。
3,工作密取(workStealing)
4,Fork-Join实战
4.1,Fork/Join的同步调用同时演示返回值结果: 统计整型数组中所有元素的和
/**
* 产生整型数组工具类*/
public classMakeArray {//数组长度
public static final int ARRAY_LENGTH = 4000;public static int[] makeArray(){//new一个随机数发生器
Random rd = newRandom();int[] result = new int[ARRAY_LENGTH];for (int i = 0; i < ARRAY_LENGTH;i++){//用随机数填充数组
result[i] = rd.nextInt(ARRAY_LENGTH*3);
}returnresult;
}
}
/**
* 使用Fork-Join框架进行计算*/
public classSumArray {private static class SumTask extends RecursiveTask{private final static int THRESHOLD = MakeArray.ARRAY_LENGTH/10;private int[] src;//要实际应用的数组
private int fromIndex;//开始统计的下标
private int toIndex;//统计到哪里结束的下标
public SumTask(int[] src,int fromIndex,inttoIndex){this.src =src;this.fromIndex =fromIndex;this.toIndex =toIndex;
}
@OverrideprotectedInteger compute() {if(toIndex - fromIndex
Thread.sleep(1);
}catch(InterruptedException e) {
e.printStackTrace();
}
count= count +src[i];
}returncount;
}else{//fromIndex ..... mid....... toIndex。这里我们自己定义的算法:大于阈值就平均分为两部分
int mid = (fromIndex + toIndex)/2;
SumTask left= newSumTask(src,fromIndex,mid);
SumTask right= newSumTask(src,mid,toIndex);
invokeAll(left,right);return left.join() +right.join();
}
}
}public static voidmain(String[] args) {
ForkJoinPool pool= newForkJoinPool();int[] src =MakeArray.makeArray();
SumTask innerFind= new SumTask(src,0,src.length-1);long start =System.currentTimeMillis();
pool.invoke(innerFind);//同步调用
System.out.println("Task is Running.......");
System.out.println("the count is"+ innerFind.join()+"spend time:"+(System.currentTimeMillis()-start)+"ms");
}/**
* 注意:
* 对于这种简单的相加操作,其实单线程处理的速度更快。
* 使用forkjoin后,使用多线程进行处理。由于需要线程间的切换(上下文切换),导致forkjoin的处理方式花的时间更多。
* 所以使用forkjoin一定要注意场合。
* 这也是redis虽然使用单进程单线程模式,但是处理能力非常强的原因,就是因为redis处理的数据比较简单(String)。
* 并且使用单线程处理避免了进程间的切换。*/}
4.2,Fork/Join的异步调用同时演示不要求返回值:遍历指定目录(含子目录),寻找指定类型文件
/**
* 遍历指定目录(含子目录),找寻指定类型文件
* 不需要返回值的的Fork/Join*/
public classFindDirsFiles extends RecursiveAction{//当前任务需要搜寻的目录
privateFile path;publicFindDirsFiles(File path){this.path =path;
}
@Overrideprotected voidcompute() {
List subTasks = new ArrayList<>();
File[] files= path.listFiles();//拿到目录下文件
if (files != null){for(File file : files){if(file.isDirectory()){//对每一个子目录都新建一个子任务
subTasks.add(newFindDirsFiles(file));
}else{//遇到文件,检查
if (file.getAbsolutePath().endsWith("txt")){
System.out.println("文件:"+file.getAbsolutePath());
}
}
}if (!subTasks.isEmpty()){for(FindDirsFiles subTask:invokeAll(subTasks)){//上面的invlkeAll():用来递交子任务
subTask.join();//等待子任务
}
}
}
}public static voidmain(String[] args) {try{//用一个ForkJoinPool 实例调度总任务
ForkJoinPool pool = newForkJoinPool();
FindDirsFiles task= new FindDirsFiles(new File("D:\\yishang"));
pool.execute(task);
System.out.println("task is running........");//主线程做一些自己的事情
try{
Thread.sleep(1);
}catch(InterruptedException e) {
e.printStackTrace();
}int otherWork = 0;for (int i = 0; i<100;i++){
otherWork= otherWork +i;
}
System.out.println("main Thread done sth ....., otherWork ="+otherWork);
task.join();//阻塞方法,
System.out.println("task end");
}catch(Exception e){
e.printStackTrace();
}
}
}
二,CountDownLatch:计数器
1,方法:
latch.countDown():调用该方法,计数器的数量减一
latch.await():调用该方法,如果计数器的数量没有减为0,那么就该方法会阻塞,知道计数器的数量为0才继续执行后面的代码
2,示例代码:当初始化工作完成以后,才执行业务逻辑代码
/**
* 演示CountDownLatch,有5个初始化的线程,6个扣除点。
* 扣除完毕以后,主线程和业务线程才能继续自己的工作*/
public classUseCountDownLatch {static CountDownLatch latch = new CountDownLatch(6);/**
* 初始化线程*/
private static classInitThread implements Runnable{
@Overridepublic voidrun() {
System.out.println("InitThread_"+Thread.currentThread().getId()+
"ready init work .......");
latch.countDown();//初始化线程完成工作了//初始化线程调用了countDown()以后,还是可以继续走自己的逻辑的
for (int i = 0; i < 2; i++) {
System.out.println("InitThread_"+Thread.currentThread().getId()+
".....continue to its work");
}
}
}/**
* 业务线程
* 等所有的初始化线程的初始化工作做完了,业务线程才能执行*/
private static classBusiThread implements Runnable{
@Overridepublic voidrun() {try{//业务线程阻塞,直到countDown减为0,才往下执行
latch.await();//阻塞方法
} catch(InterruptedException e) {
e.printStackTrace();
}for (int i = 0; i < 2; i++) {
System.out.println("BusiThread_"+Thread.currentThread().getId()+
"do business");
}
}
}public static voidmain(String[] args)throws InterruptedException {//单独的初始化线程,初始化分为2,需要扣减2次
new Thread(newRunnable() {
@Overridepublic voidrun() {try{
Thread.sleep(1);
}catch(InterruptedException e) {
e.printStackTrace();
}
System.out.println("Thread_"+Thread.currentThread().getId()+"ready init work step 1st....");
latch.countDown();//每完成一步初始化工作,扣减一次
System.out.println("begin step 2nd.......");try{
Thread.sleep(1);
}catch(InterruptedException e) {
e.printStackTrace();
}
System.out.println("Thread_"+Thread.currentThread().getId()+"ready init work step 2nd....");
latch.countDown();//每完成一步初始化工作,扣减一次
}
}).start();new Thread(newBusiThread()).start();for (int i = 0; i < 4; i++) {
Thread thread= new Thread(newInitThread());
thread.start();
}//主线程阻塞,必须等countDown减为0,才往下执行
latch.await();
System.out.println("main do its work .........");
}
}
三,CyclicBarrier:栅栏
1,方法:
barrier.await():等所有线程执行到该方法时,才能继续向前执行。否则,一直阻塞在这里
2,示例代码:
/**
* 演示:CyclicBarrier,当所有的线程都来到了barrier.await();线程才继续往下执行。不然就一直阻塞在这个方法前
* 可以类比人员到指定的集合场地,然后在一起出发的场景。比如出去旅游,等所有的人都来到集合地点,然后大家才一起出发。*/
public classUseCyslicBarrier {private static CyclicBarrier barrier = new CyclicBarrier(5);//工作线程
private static classSubThread implements Runnable{
@Overridepublic voidrun() {long id =Thread.currentThread().getId();//为了模拟真实环境,每个线程到达barrier.await()方法的时间不一样。随即决定工作线程是否睡眠
Random random = newRandom();try{if(random.nextBoolean()){
Thread.sleep(1000+id);
System.out.println("Thread_"+id+"在来的路上堵车了,堵车时间"+(1000+id)+"ms");
}
System.out.println("Thread_"+id+"在来的路上没有堵车,提前到达集合地点,然后在集合地点等待其他人员....");//当5个线程都执行到了这个地方,然后所有的线程继续往下执行。
barrier.await();
Thread.sleep(1000+id);
System.out.println("Thread_"+id+"开始上车");
}catch(Exception e){
e.printStackTrace();
}
}
}public static voidmain(String[] args) {for (int i = 0; i < 5; i++) {
Thread thread= new Thread(newSubThread());
thread.start();
}
}
}
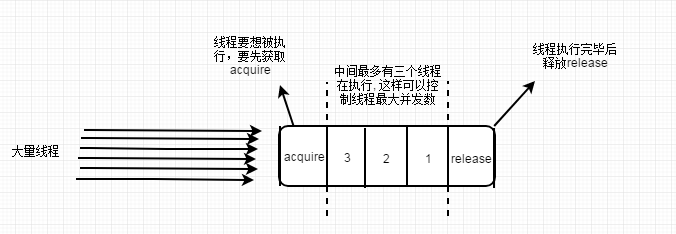
四,Semaphore:信号灯(控制并发执行的线程个数)
1,方法:
sp.acquire():获得信号灯
sp.release():释放信号灯
2,图示理解:
3,示例代码:
/**
* 信号灯:控制并发执行的线程个数*/
public classSemaphoreTest {public static voidmain(String[] args) {//最多运行3个线程并发执行
final Semaphore sp=new Semaphore(3);
Runnable runnable=newRunnable() {
@Overridepublic voidrun() {try{
sp.acquire();//获得信号灯
} catch(InterruptedException e) {
e.printStackTrace();
}
System.out.println("线程"+Thread.currentThread().getName()+"进入,还有"+(3-sp.availablePermits())+"个线程");try{
Thread.sleep(1000);
}catch(InterruptedException e) {
e.printStackTrace();
}
System.out.println("线程"+Thread.currentThread().getName()+"离开,还有"+(3-sp.availablePermits())+"个线程");//释放信号灯
sp.release();
}
};//开启20个线程
for (int i = 0; i < 20; i++) {
Thread thread= newThread(runnable);
thread.start();
}
}
}
五,Exchanger(两个线程之间做数据交换)
1,方法:
exchanger.exchange(data):该方法一直阻塞到另外一个线程过来交换数据
2,示例代码:
public classExchangerTest {public static voidmain(String[] args) {
final Exchanger exchanger= newExchanger();//线程1
new Thread(newRunnable() {
@Overridepublic voidrun() {try{
String data1= "aaa";
System.out.println("线程"+Thread.currentThread().getName()+":当前的数据是"+data1+
",该线程正在准备把"+data1+"换出去");
String data2=(String) exchanger.exchange(data1);
System.out.println("线程"+Thread.currentThread().getName()+
"换回的数据为"+data2);
}catch(InterruptedException e){
}
}
}).start();//线程二
new Thread(newRunnable() {
@Overridepublic voidrun() {try{
Thread.sleep(new Random().nextInt(3000));
String data1= "bbb";
System.out.println("线程"+Thread.currentThread().getName()+":当前的数据是"+data1+
",该线程正在准备把"+data1+"换出去");
String data2=(String) exchanger.exchange(data1);
System.out.println("线程"+Thread.currentThread().getName()+
"换回的数据为"+data2);
}catch(InterruptedException e){
}
}
}).start();
}
}


 1286
1286


 被折叠的 条评论
为什么被折叠?
被折叠的 条评论
为什么被折叠?
 到【灌水乐园】发言


