


一、Drawable
在Android系统张,图形图像的绘制需要在画布上进行操作和处理,但是绘制需要了解很多细节以及可能要进行一些复杂的处理,因此系统提供了一个被称之为Drawable的类来进行绘制处理。通过这个类可以减少我们的绘制工作和使用成本,同时系统也提供了众多的Drawable的派生类比如单色、图形、位图、裁剪、动画等等来完成一些常见的绘制需求。Drawable是一个抽象的可绘制类。他主要是提供了一个可绘制的区域bound属性以及一个draw成员函数,不同的派生类通过重载draw函数的实现而产生不同的绘制结果。如下是Drawable的加载流程。

从Resource.getDrawable会判断是否.xml结尾,不是的话走6,7步,如果从xml中读取,需要
getResource.getDrawable -> ResourceImpl.loadDrawableForCookie -> Drawable.createFromXml -> drawableInflater.inflateFromXmlForDensity -> drawable.inflate(Resources r, XmlPullParser parser, AttributeSet attrs, Resources.Theme theme)
Resources的作用是将整个过程进行了封装、同时实现了资源的缓存。因此,为了更加直白的了解加载过程,以上步骤我们可以精简如下:
Drawable.createFromXml -> drawableInflater.inflateFromXmlForDensity -> drawable.inflate(Resources r, XmlPullParser parser, AttributeSet attrs, Resources.Theme theme)
注意:Drawable和drawable,前者是类,后者是类的实例,同样drawableInflater也是类的实例。
二、流程分析和方法解析
Drawable.createFromXml是静态调用,实际上整个过程是XmlPull的解析。最终,会调用到createFromXmlInnerForDensity
@NonNull
public static Drawable createFromXmlForDensity(@NonNull Resources r,
@NonNull XmlPullParser parser, int density, @Nullable Theme theme)
throws XmlPullParserException, IOException {
AttributeSet attrs = Xml.asAttributeSet(parser);
int type;
//noinspection StatementWithEmptyBody
while ((type=parser.next()) != XmlPullParser.START_TAG
&& type != XmlPullParser.END_DOCUMENT) {
// Empty loop.
}
if (type != XmlPullParser.START_TAG) {
throw new XmlPullParserException("No start tag found");
}
Drawable drawable = createFromXmlInnerForDensity(r, parser, attrs, density, theme);
if (drawable == null) {
throw new RuntimeException("Unknown initial tag: " + parser.getName());
}
return drawable;
}
@NonNull
static Drawable createFromXmlInnerForDensity(@NonNull Resources r,
@NonNull XmlPullParser parser, @NonNull AttributeSet attrs, int density,
@Nullable Theme theme) throws XmlPullParserException, IOException {
//通过Resources里面的getDrawableInflater得到DrawableInflater的实例
return r.getDrawableInflater().inflateFromXmlForDensity(parser.getName(), parser, attrs,
density, theme);
}
drawableInflater.inflateFromXmlForDensity 方法用来加载Drawable资源,如果不是我们自定义的Drawable类,逻辑流程通常如下解析:
@NonNull
public Drawable inflateFromXml(@NonNull String name, @NonNull XmlPullParser parser,
@NonNull AttributeSet attrs, @Nullable Theme theme)
throws XmlPullParserException, IOException {
if (name.equals("drawable")) { //无意义的drawable
name = attrs.getAttributeValue(null, "class");
if (name == null) {
throw new InflateException(" tag must specify class attribute");
}
}
Drawable drawable = inflateFromTag(name); //解析处Drawable的实例
if (drawable == null) {
drawable = inflateFromClass(name);
}
drawable.inflate(mRes, parser, attrs, theme);
//得到drawable实例,通过drawable.inflate去实现属性的解析
return drawable; //返回实例
}
inflateFromTag源码如下:
@NonNull
@SuppressWarnings("deprecation")
private Drawable inflateFromTag(@NonNull String name) {
switch (name) {
case "selector":
return new StateListDrawable();
case "animated-selector":
return new AnimatedStateListDrawable();
case "level-list":
return new LevelListDrawable();
case "layer-list":
return new LayerDrawable();
case "transition":
return new TransitionDrawable();
case "ripple":
return new RippleDrawable();
case "color":
return new ColorDrawable();
case "shape":
return new GradientDrawable();
case "vector":
return new VectorDrawable();
case "animated-vector":
return new AnimatedVectorDrawable();
case "scale":
return new ScaleDrawable();
case "clip":
return new ClipDrawable();
case "rotate":
return new RotateDrawable();
case "animated-rotate":
return new AnimatedRotateDrawable();
case "animation-list":
return new AnimationDrawable();
case "inset":
return new InsetDrawable();
case "bitmap":
return new BitmapDrawable();
case "nine-patch":
return new NinePatchDrawable();
default:
return null;
}
}
那么drawable.inflate方法是如何实现的?
Drawable本身是抽象类,根据不同实现去解析属性,我们以ShapeDrawable为例,一般的通过TypeArray解析当前节点的属性,如果存在子元素继续遍历。
@Override
public void inflate(Resources r, XmlPullParser parser, AttributeSet attrs, Theme theme)
throws XmlPullParserException, IOException {
super.inflate(r, parser, attrs, theme);
final TypedArray a = obtainAttributes(r, theme, attrs, R.styleable.ShapeDrawable);
updateStateFromTypedArray(a);
a.recycle();
int type;
final int outerDepth = parser.getDepth();
while ((type = parser.next()) != XmlPullParser.END_DOCUMENT
&& (type != XmlPullParser.END_TAG || parser.getDepth() > outerDepth)) {
if (type != XmlPullParser.START_TAG) {
continue;
}
final String name = parser.getName();
// 解析子节点
if (!inflateTag(name, r, parser, attrs)) {
android.util.Log.w("drawable", "Unknown element: " + name +
" for ShapeDrawable " + this);
}
}
// Update local properties.
updateLocalState();
}
三、实现自定义Drawable类的加载
通常我们说的自定义drawable是自定义xml文件,如果实现一种可以复用并且Android系统中没有内置的Drawable,此外实现多个布局文件的引用,当然你可以说完全可以将代码自定义到静态方法中,实现多次引用也是可以,不过我们按照Android的建议,图形化的对象尽量以xml形式呈现。
下面,我们定义一个形状如下的Drawable:
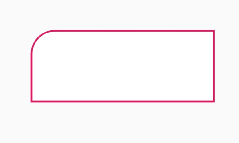

3.1、原理分析
那么,要实现“自定义Drawable类的加载”需求,比如要进行技术可行性分析,那我们的依据是什么呢?
在DrawableInflater中,除了通过inflateFromTag优先解析Drawable之外,我们发现同样提供了inflateFromClass,通过这种方式我们同样可以得到Drawable子类的实例。
Drawable drawable = inflateFromTag(name); //解析处Drawable的实例
if (drawable == null) {
drawable = inflateFromClass(name);
}
inflateFromClass的实现如下:
@NonNull
private Drawable inflateFromClass(@NonNull String className) {
try {
Constructor extends Drawable> constructor;
synchronized (CONSTRUCTOR_MAP) {
constructor = CONSTRUCTOR_MAP.get(className);
if (constructor == null) {
//通过ClassLoader加载Drawable类,然后转为Drawable类
final Class extends Drawable> clazz =
mClassLoader.loadClass(className).asSubclass(Drawable.class);
constructor = clazz.getConstructor();
CONSTRUCTOR_MAP.put(className, constructor);
}
}
return constructor.newInstance(); //创建Drawable实例
} catch (Exception e) {
//省略
}
return null;
}
注意:我们通过ClassLoader去加载类,那么还要注意一个事情就是混淆,混淆时我们必须注意我们自定义的Drawable类不能被混淆,否则无法加载。
-keepclassmembers class * extends android.graphics.drawable.Drawable{
public void *(android.view.View);
}
3.2、代码实例
[1]定义图形
首先,我们需要定义一个Shape图形,在Android系统中,实现圆角圆弧最好的方式是通过Path实现。
public class RadiusBorderShape extends Shape {
private Path mPath;
@ColorInt
private int color; //边框颜色
private float strokeWidth; //线宽
private float[] radius; //各个角的radius
@ColorInt
private int backgroundColor; //背景填充颜色
public void setColor(@ColorInt int color) {
this.color = color;
}
public void setRadius(float[] radius) {
if(radius==null || radius.length<4){
this.radius = new float[4];
}else{
this.radius = radius;
}
for (int i=0;i
float v = this.radius[i];
if(v<0) {
this.radius[i] = 0f;
}
}
}
public void setStrokeWidth(float strokeWidth) {
if(strokeWidth<0) {
strokeWidth = 0;
}
this.strokeWidth = strokeWidth;
}
public RadiusBorderShape(){
mPath = new Path();
this.strokeWidth = 5f;
this.color = Color.RED;
this.backgroundColor = Color.GREEN;
this.radius = new float[]{5f,0f,20f,30f};
}
@Override
public void draw(Canvas canvas, Paint paint) {
Paint.Style old_style = paint.getStyle();
int old_color = paint.getColor();
float old_strokeWidth = paint.getStrokeWidth();
paint.setStrokeWidth(this.strokeWidth);
int backgroundId = canvas.save();
canvas.translate(strokeWidth,strokeWidth);
drawBackground(canvas, paint);
drawBorder(canvas, paint);
canvas.restoreToCount(backgroundId);
paint.setStyle(old_style);
paint.setColor(old_color);
paint.setStrokeWidth(old_strokeWidth);
}
private void drawBorder(Canvas canvas, Paint paint) {
paint.setStyle(Paint.Style.STROKE);
paint.setColor(this.color);
canvas.scale(1, 1);
canvas.drawPath(mPath, paint);
}
private void drawBackground(Canvas canvas, Paint paint) {
final Path.FillType fillType = mPath.getFillType();
int borderId = canvas.save();
paint.setStyle(Paint.Style.FILL);
paint.setColor(this.backgroundColor);
if(this.backgroundColor!=Color.TRANSPARENT){
mPath.setFillType(Path.FillType.WINDING); //填充,兼容低版本无法填充的问题
}
canvas.drawPath(mPath, paint);
canvas.restoreToCount(borderId);
mPath.setFillType(fillType);//还原
}
@Override
protected void onResize(float width, float height) {
super.onResize(width, height);
float w = width - strokeWidth*2; //减去左右侧的线宽
float h = height - strokeWidth*2; //减去上下侧的线宽
mPath.reset();
if(w<=0 && h<=0){
return;
}
float leftTopThresold = radius[0];
mPath.moveTo(0,leftTopThresold);
//从180度处顺时针旋转,增量90度
mPath.arcTo(new RectF(0,0,leftTopThresold,leftTopThresold), 180f, 90f);
float rightTopThresold = radius[1];
mPath.lineTo(w-rightTopThresold,0);
mPath.arcTo(new RectF(w-rightTopThresold,0,w,rightTopThresold), 270f, 90f);
float rightBottomThresold = radius[2];
mPath.lineTo(w,h-rightBottomThresold);
mPath.arcTo(new RectF(w-rightBottomThresold,h-rightBottomThresold,w,h), 0f, 90f);
float leftBottomThresold = radius[3];
mPath.lineTo(leftBottomThresold,h);
mPath.arcTo(new RectF(0,h-leftBottomThresold,leftBottomThresold,h), 90f, 90f);
mPath.lineTo(0,leftTopThresold);
mPath.close();
}
@Override
public Shape clone() throws CloneNotSupportedException {
final RadiusBorderShape shape = (RadiusBorderShape) super.clone();
shape.mPath = new Path(mPath);
shape.radius = radius;
shape.strokeWidth = strokeWidth;
shape.color = color;
return shape;
}
public void setBackgroundColor(int backgroundColor) {
this.backgroundColor = backgroundColor;
}
}
在这个类中,最终要的2个方法是onResize和draw方法,shape.onResize在Drawable中会被drawable.onBoundsChanged调用,从而实现Drawable大小的监听。
[2]定义Drawable
public class RadiusRectDrawable extends ShapeDrawable {
private int backgroundColor;
private RadiusBorderShape shape;
@Override
public void inflate(Resources r, XmlPullParser parser, AttributeSet attrs, Resources.Theme theme) throws XmlPullParserException, IOException {
TypedArray array = RadiusRectDrawable.obtainAttributes(r, theme, attrs, R.styleable.RadiusRectDrawable);
if(array==null) return;
backgroundColor = array.getColor(R.styleable.RadiusRectDrawable_backgroundColor, Color.TRANSPARENT);
array.recycle();
super.inflate(r, parser, attrs, theme);
}
//低版本api兼容
@Override
public void inflate(@NonNull Resources r, @NonNull XmlPullParser parser, @NonNull AttributeSet attrs) throws XmlPullParserException, IOException {
TypedArray array = RadiusRectDrawable.obtainAttributes(r, null, attrs, R.styleable.RadiusRectDrawable);
if(array==null) return;
backgroundColor = array.getColor(R.styleable.RadiusRectDrawable_backgroundColor, Color.TRANSPARENT);
array.recycle();
super.inflate(r, parser, attrs);
}
@Override
protected boolean inflateTag(String name, Resources r, XmlPullParser parser, AttributeSet attrs) {
if("RadiusBorderShape".equals(name)){
TypedArray array = r.obtainAttributes(attrs, R.styleable.RadiusRectDrawable);
int lineColor = array.getColor(R.styleable.RadiusRectDrawable_lineColor, Color.TRANSPARENT);
float lineWidth = array.getFloat(R.styleable.RadiusRectDrawable_lineWidth, 0f);
float leftTopRadius = array.getDimensionPixelSize(R.styleable.RadiusRectDrawable_leftTop_radius, 0);
float leftBottomRadius = array.getDimensionPixelSize(R.styleable.RadiusRectDrawable_leftBottom_radius, 0);
float rightTopRadius = array.getDimensionPixelSize(R.styleable.RadiusRectDrawable_rightTop_radius, 0);
float rightBottomRadius = array.getDimensionPixelSize(R.styleable.RadiusRectDrawable_rightBottom_radius, 0);
if(shape==null){
shape = new RadiusBorderShape();
}
shape.setColor(lineColor);
shape.setStrokeWidth(lineWidth);
shape.setRadius(new float[]{leftTopRadius,rightTopRadius,rightBottomRadius,leftBottomRadius});
shape.setBackgroundColor(backgroundColor);
if(shape!=getShape()){
setShape(shape);
}
array.recycle();
return true;
}
else{
return super.inflateTag(name, r, parser, attrs);
}
}
protected static @NonNull TypedArray obtainAttributes(@NonNull Resources res,
@Nullable Resources.Theme theme, @NonNull AttributeSet set, @NonNull int[] attrs) {
if (theme == null) {
return res.obtainAttributes(set, attrs);
}
return theme.obtainStyledAttributes(set, attrs, 0, 0);
}
}
这个就是我们自己定义的Drawable类,当然,自定义往往需要自定义属性。
[3]定义drwable文件
自定义drawble的xml文件,安装惯例应该在drawable资源文件夹下,但是我们的编译器表现的有些不友好,要求sdk版本大于24(android 7.0)才行。

从ResourcesImpl.loadDrawableForCookie加载逻辑来看,文件加载主要通过2种方式,文件读取的核心代码如下:
if (file.endsWith(".xml")) {
final XmlResourceParser rp = loadXmlResourceParser(
file, id, value.assetCookie, "drawable");
dr = Drawable.createFromXmlForDensity(wrapper, rp, density, null);
rp.close();
} else {
final InputStream is = mAssets.openNonAsset(
value.assetCookie, file, AssetManager.ACCESS_STREAMING);
AssetInputStream ais = (AssetInputStream) is;
dr = decodeImageDrawable(ais, wrapper, value);
}
一般代码实际上可以通过loadXmlResourceParser或者mAssets.openNonAsset加载,前者加载xml文件内置资源,后者加载图片文件内置资源。通过loadXmlResourceParser加载文件,最后一个参数制定的是drawable,但是从loadXmlResourceParser源码中并未使用第四个参数(篇幅有限,ResourcesImpl源码自行查看),也就是说,加载资源时并没有对资源文件所在目录进行校验。
因此说,编译器会校验类型,但运行时不会校验。这样我们可以将xml文件放置到非drawable目录,可以是Assets文件夹中,同样也可以是xml资源文件夹下。我们这里将定义文件放置到xml资源目录即可。
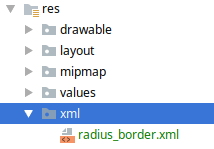
源码内容如下:
xmlns:android="http://schemas.android.com/apk/res/android"
xmlns:app="http://schemas.android.com/apk/res-auto"
app:backgroundColor="@color/white"
>
app:lineColor="@color/colorAccent"
app:lineWidth="5.5"
app:leftTop_radius="50dip"
app:leftBottom_radius="0dip"
app:rightTop_radius="0dip"
app:rightBottom_radius="0dip"
/>
[4]加载并使用
事实上由于编译工具的要求sdk api大于24才可以使用,因此,我们android:background="@xml/radius_border"显然存在问题,除非我们自行实现LayoutInfater.Factory2,通过自定义的方式去拦截和解析,但是由于篇幅问题,这里我们通过一般代码加载。
public class ResourceUtils {
private static final HashMap> CONSTRUCTOR_MAP =
new HashMap<>();
private Context context;
private ResourceUtils(Context context){
this.context = context;
}
public Context getContext() {
return context;
}
//加载drawable
public static Drawable getDrawable(Context context, int xmlShapeId){
try {
ResourceUtils resourceUtils = new ResourceUtils(context);
return resourceUtils.parseDrawable(xmlShapeId);
}catch (Exception e){
e.printStackTrace();
}
return null;
}
private Drawable parseDrawable(int xmlId) { //R.xml.radius_border)
Drawable drawable = null;
try{
if(Build.VERSION.SDK_INT<24) {
drawable = parseDrawableFromClass(xmlId);
}
if(drawable!=null){
return drawable;
}
Context context = getContext();
Resources resources = context.getResources();
XmlResourceParser xmlParse = resources.getXml(xmlId);
if(Build.VERSION.SDK_INT>=21) {
drawable = Drawable.createFromXml(resources, xmlParse, context.getTheme());
}else{
drawable = Drawable.createFromXml(resources, xmlParse);
}
xmlParse.close();
}catch (Exception e){
e.printStackTrace();
}
return drawable;
}
private Drawable parseDrawableFromClass(int xmlId){
Drawable drawable = null;
try {
Context context = getContext();
Resources resources = context.getResources();
XmlResourceParser xmlParse = resources.getXml(xmlId);
AttributeSet attrs = Xml.asAttributeSet(xmlParse);
int type;
while ((type = xmlParse.next()) != XmlPullParser.START_TAG
&& type != XmlPullParser.END_DOCUMENT) {
}
if (type != XmlPullParser.START_TAG) {
throw new XmlPullParserException("No start tag found");
}
drawable = inflateFromClass(xmlParse.getName());
if(drawable==null) return null;
if (Build.VERSION.SDK_INT >= 21) {
drawable.inflate(resources, xmlParse, attrs, context.getTheme());
} else {
drawable.inflate(resources, xmlParse, attrs);
}
}catch (Exception e){
e.printStackTrace();
}
return drawable;
}
@NonNull
private Drawable inflateFromClass(@NonNull String className) {
try {
Constructor extends Drawable> constructor;
synchronized (CONSTRUCTOR_MAP) {
constructor = CONSTRUCTOR_MAP.get(className);
if (constructor == null) {
//通过ClassLoader加载Drawable类,然后转为Drawable类
final Class extends Drawable> clazz =
getClass().getClassLoader().loadClass(className).asSubclass(Drawable.class);
constructor = clazz.getConstructor();
CONSTRUCTOR_MAP.put(className, constructor);
}
}
return constructor.newInstance(); //创建Drawable实例
} catch (Exception e) {
//省略
}
return null;
}
}
当然,用法我们以ImageView为例
Drawable drawable = ResourceUtils.getDrawable(mContext,R.xml.radius_border);
myImageView.setBackgroundDrawable(drawable);
四、总结
我们通过这种方式成功实现了自定义Drawable的加载,DrawableInflater作为加载引擎和路由,我们应该充分利用这种关系,作为Inflater,同样LayoutInflater.Factory值得我们去实践。
附录:
1)LayoutInflater.Factory2加载机制请参阅如下链接:
https://my.oschina.net/ososchina/blog/405904
2)DrawableInflater请参阅如下链接:
https://github.com/aosp-mirror/platform_frameworks_base/blob/master/graphics/java/android/graphics/drawable/DrawableInflater.java


 931
931


 被折叠的 条评论
为什么被折叠?
被折叠的 条评论
为什么被折叠?
 到【灌水乐园】发言


