


一:阅读理解task_struct数据结构
为了管理进程,操作系统必须对每个进程所做的事情进行清楚的描述,为此,操作系统使用数据结构来代表处理不同的实体,这个数据结构就是通常所说的进程描述符或进程控制块,在Linux中,task_struct其实就是通常所说的PCB。
进程在TASK_RUNNING下是可运行的,但它有没有运行取决于它有没有获得cpu的控制权,即这个进程有没有在cpu上实际的执行
进程的标示pid
程序创建的进程具有父子关系,在编程时往往需要引用这样的父子关系。进程描述符中有几个域用来表示这样的关系
二:分析fork函数对应的内核处理过程do_fork
通过do_fork来创建进程的过程是,fork() -> sys_clone() -> do_fork() -> dup_task_struct() -> copy_process() -> copy_thread() -> ret_from_fork()。代码如下:
long do_fork(unsigned long clone_flags,
unsigned long stack_start,
unsigned long stack_size,
int __user *parent_tidptr,
int __user *child_tidptr)
{
struct task_struct *p;
int trace = 0;
long nr;
// ...
// 复制进程描述符,返回创建的task_struct的指针
p = copy_process(clone_flags, stack_start, stack_size,
child_tidptr, NULL, trace);
if (!IS_ERR(p)) {
struct completion vfork;
struct pid *pid;
trace_sched_process_fork(current, p);
// 取出task结构体内的pid
pid = get_task_pid(p, PIDTYPE_PID);
nr = pid_vnr(pid);
if (clone_flags & CLONE_PARENT_SETTID)
put_user(nr, parent_tidptr);
// 如果使用的是vfork,那么必须采用某种完成机制,确保父进程后运行
if (clone_flags & CLONE_VFORK) {
p->vfork_done = &vfork;
init_completion(&vfork);
get_task_struct(p);
}
// 将子进程添加到调度器的队列,使得子进程有机会获得CPU
wake_up_new_task(p);
// ...
// 如果设置了 CLONE_VFORK 则将父进程插入等待队列,并挂起父进程直到子进程释放自己的内存空间
// 保证子进程优先于父进程运行
if (clone_flags & CLONE_VFORK) {
if (!wait_for_vfork_done(p, &vfork))
ptrace_event_pid(PTRACE_EVENT_VFORK_DONE, pid);
}
put_pid(pid);
} else {
nr = PTR_ERR(p);
}
return nr;
}
三:使用gdb跟踪分析一个fork系统调用内核处理函数do_fork
1.新进程是从哪里开始执行的?为什么从哪里能顺利执行下去?
函数copy_process中的copy_thread()
int copy_thread(unsigned long clone_flags, unsigned long sp,
unsigned long arg, struct task_struct *p)
{
...
*childregs = *current_pt_regs();
childregs->ax = 0;
if (sp)
childregs->sp = sp;
p->thread.ip = (unsigned long) ret_from_fork;
...
}
2.执行起点与内核堆栈如何保证一致?
在ret_from_fork之前,也就是在copy_thread()函数中:*childregs = *current_pt_regs();
该句将父进程的regs参数赋值到子进程的内核堆栈,*childregs的类型为pt_regs,里面存放了SAVE ALL中压入栈的参数。故在之后的RESTORE ALL中能顺利执行下去。
四:理解编译链接的过程和ELF可执行文件格式
编译链接过程:
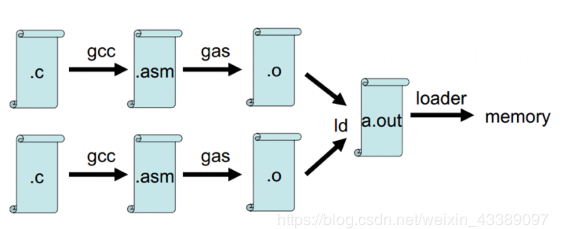
流程图:(execve–> do——execve –> search_binary_handle –> load_binary)

五:编程使用exec*库函数加载一个可执行文件
第一步:先编辑一个hello.c
第二步:生成预处理文件hello.cpp(预处理负责把include的文件包含进来及宏替换等工作)
第三步:编译成汇编代码hello.s
第四步:编译成目标代码,得到二进制文件hello.o
第五步:链接成可执行文件hello,(它是二进制文件)
第六步:运行一下./hello
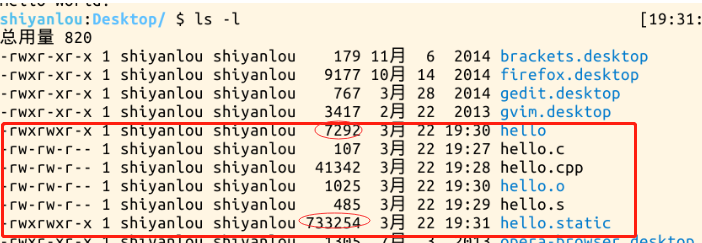
我们分别进行静态编译和动态编译,发现hello.static (733254)比 hello (7292)大的多。
六:使用gdb跟踪分析一个execve系统调用内核处理函数do_execve
1.设置断点
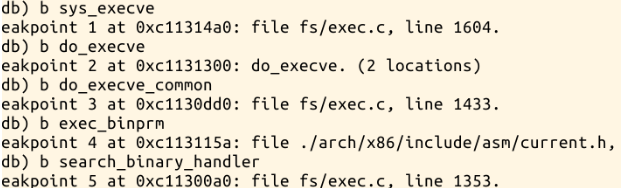
2.中断情况
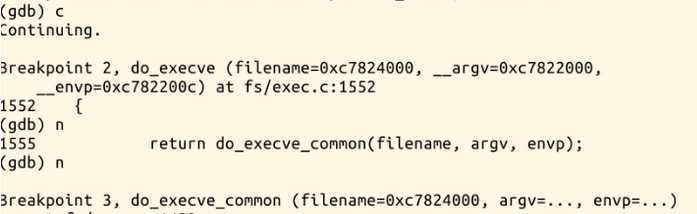
int do_execve(struct filename *filename,
const char __user *const __user *__argv,
const char __user *const __user *__envp)
{
struct user_arg_ptr argv = { .ptr.native = __argv };
struct user_arg_ptr envp = { .ptr.native = __envp };
//调用do_execve_common
return do_execve_common(filename, argv, envp);
}
七:特别关注新的可执行程序是从哪里开始执行的?
新的可执行程序通过修改内核堆栈eip作为新程序的起点,从new_ip开始执行后start_thread把返回到用户态的位置从int 0x80的下一条指令变成新加载的可执行文件的入口位置。
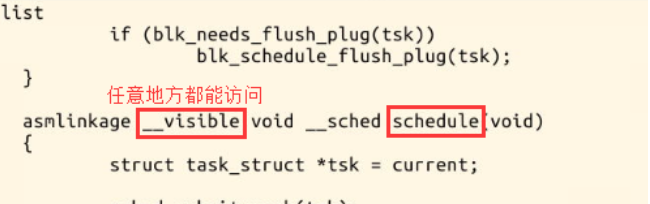
八:理解Linux系统中进程调度的时机
中断处理过程(包括时钟中断、I/O中断、系统调用和异常)中,直接调用schedule(),或者返回用户态时根据need_resched标记调用schedule() 内核线程可以直接调用schedule()进行进程切换,也可以在中断处理过程中进行调度,也就是说内核线程作为一类的特殊的进程可以主动调度,也可以被动调度;用户态进程无法实现主动调度,仅能通过陷入内核态后的某个时机点进行调度,即在中断处理过程中进行调度。
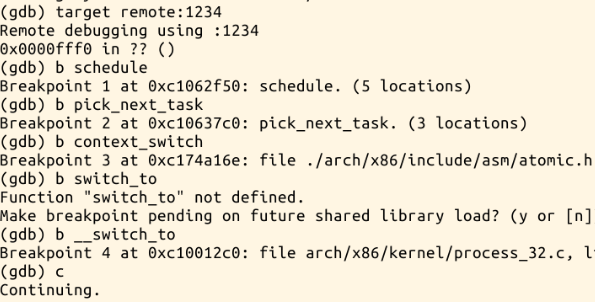
九:使用gdb跟踪分析一个schedule()函数
首先设几个断点分别是schedule,pick_next_task,context_switch,__switch_to
十:分析switch_to中的汇编代码
asm volatile("pushfl\n\t" /* 保存当前进程的标志位 */
"pushl %%ebp\n\t" /* 保存当前进程的堆栈基址EBP */
"movl %%esp,%[prev_sp]\n\t" /* 保存当前栈顶ESP */
"movl %[next_sp],%%esp\n\t" /* 把下一个进程的栈顶放到esp寄存器中,完成了内核堆栈的切换,从此往下压栈都是在next进程的内核堆栈中。 */
"movl $1f,%[prev_ip]\n\t" /* 保存当前进程的EIP */
"pushl %[next_ip]\n\t" /* 把下一个进程的起点EIP压入堆栈 */
__switch_canary
"jmp __switch_to\n" /* 因为是函数所以是jmp,通过寄存器传递参数,寄存器是prev-a,next-d,当函数执行结束ret时因为没有压栈当前eip,所以需要使用之前压栈的eip,就是pop出next_ip。 */
"1:\t" /* 认为next进程开始执行。 */
"popl %%ebp\n\t" /* restore EBP */
"popfl\n" /* restore flags */
/* output parameters 因为处于中断上下文,在内核中
prev_sp是内核堆栈栈顶
prev_ip是当前进程的eip */
: [prev_sp] "=m" (prev->thread.sp),
[prev_ip] "=m" (prev->thread.ip), //[prev_ip]是标号
"=a" (last),
/* clobbered output registers: */
"=b" (ebx), "=c" (ecx), "=d" (edx),
"=S" (esi), "=D" (edi)
__switch_canary_oparam
/* input parameters:
next_sp下一个进程的内核堆栈的栈顶
next_ip下一个进程执行的起点,一般是$1f,对于新创建的子进程是ret_from_fork*/
: [next_sp] "m" (next->thread.sp),
[next_ip] "m" (next->thread.ip),
/* regparm parameters for __switch_to(): */
[prev] "a" (prev),
[next] "d" (next)
__switch_canary_iparam
: /* reloaded segment registers */
"memory");
} while (0)
switch_to实现了进程之间的真正切换:
首先在当前进程prev的内核栈中保存esi,edi及ebp寄存器的内容。
然后将prev的内核堆栈指针ebp存入prev->thread.esp中。
把将要运行进程next的内核栈指针next->thread.esp置入esp寄存器中
将popl指令所在的地址保存在prev->thread.eip中,这个地址就是prev下一次被调度
通过jmp指令(而不是call指令)转入一个函数__switch_to()
恢复next上次被调离时推进堆栈的内容。从现在开始,next进程就成为当前进程而真正开始执行
标签:可执行文件,__,struct,next,内核,进程,prev,加载
来源: https://www.cnblogs.com/chashuiweiliang/p/10602131.html


 2202
2202


 被折叠的 条评论
为什么被折叠?
被折叠的 条评论
为什么被折叠?
 到【灌水乐园】发言


