


8种机械键盘轴体对比
本人程序员,要买一个写代码的键盘,请问红轴和茶轴怎么选?
众所周知,opencv是个强大的开源的图像处理库,要想完成term project,缺它不可,所以找了个时间,简单玩了一下
Group member
郑俊,何轩利,刘小飞,段曹辉
android studio配置opencv
运行OpenCV-3.1.0-android-sdk中自带的例子
自己动手写的opencv小例子(将拍摄的图片灰度化)
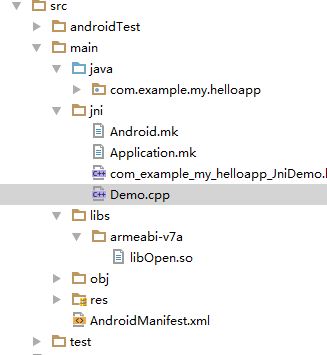
目录结构
Android.mk1
2
3
4
5
6
7
8
9
10
11
12
13
14
15
16
17
18
19
20
21
22
23
24LOCAL_PATH := $(call my-dir)
include $(CLEAR_VARS)
OpenCV_INSTALL_MODULES := on
OpenCV_CAMERA_MODULES := off
#采用的是静态链接方式
OPENCV_LIB_TYPE :=STATIC
ifeq ("$(wildcard $(OPENCV_MK_PATH))","")
include D:/OpenCV-3.1.0-android-sdk/OpenCV-android-sdk/sdk/native/jni/OpenCV.mk
else
include $(OPENCV_MK_PATH)
endif
#编译c++生成的库
LOCAL_MODULE := Open
#实现核心功能的C++源文件
LOCAL_SRC_FILES := Demo.cpp
LOCAL_LDLIBS += -lm -llog
include $(BUILD_SHARED_LIBRARY)
Application.mk1
2
3
4APP_STL := gnustl_static
APP_CPPFLAGS := -frtti -fexceptions
APP_ABI := armeabi-v7a
APP_PLATFORM := android-8
JniDemo.java1
2
3
4
5
6
7
8public class{
static {
System.loadLibrary("Open");
}
public static native int[] gray(int[] buf, int w, int h);
}
##利用javah生成.h文件1javah -d ../jni -jni com.example.my.helloapp.JniDemo
##生成的com_example_my_helloapp_JniDemo.h文件1
2
3
4
5
6
7
8
9
10
11
12
13
14
15
16
17
18
19
20
21/* DO NOT EDIT THIS FILE - it is machine generated */
/* Header for class com_example_my_helloapp_JniDemo */
#ifndef _Included_com_example_my_helloapp_JniDemo
#define _Included_com_example_my_helloapp_JniDemo
#ifdef __cplusplus
extern "C" {
#endif
/*
* Class: com_example_my_helloapp_JniDemo
* Method: gray
* Signature: ([III)[I
*/
JNIEXPORT jintArray JNICALL Java_com_example_my_helloapp_JniDemo_gray
(JNIEnv *, jclass, jintArray, jint, jint);
#ifdef __cplusplus
}
#endif
#endif
编写实现cpp文件1
2
3
4
5
6
7
8
9
10
11
12
13
14
15
16
17
18
19
20
21
22
23
24
25
26
27
28
29
30
31
32
33
34
35
36
37
38
39
40
41
42
43
44
45//
// Created by Administrator on 2016/5/30.
//
#include "com_example_my_helloapp_JniDemo.h"
#include
#include
#include
using namespace cv;
extern "C" {
JNIEXPORT jintArray JNICALL Java_com_example_my_helloapp_JniDemo_gray(
JNIEnv *env, jclass obj, jintArray buf, int w, int h);
JNIEXPORT jintArray JNICALL Java_com_example_my_helloapp_JniDemo_gray(
JNIEnv *env, jclass obj, jintArray buf, int w, int h) {
jint *cbuf;
cbuf = env->GetIntArrayElements(buf, JNI_FALSE );
if (cbuf == NULL) {
return 0;
}
Mat imgData(h, w, CV_8UC4, (unsigned char *) cbuf);
uchar* ptr = imgData.ptr(0);
for(int i = 0; i < w*h; i ++){
//计算公式:Y(亮度) = 0.299*R + 0.587*G + 0.114*B
//对于一个int四字节,其彩色值存储方式为:BGRA
int grayScale = (int)(ptr[4*i+2]*0.299 + ptr[4*i+1]*0.587 + ptr[4*i+0]*0.114);
ptr[4*i+1] = grayScale;
ptr[4*i+2] = grayScale;
ptr[4*i+0] = grayScale;
}
int size = w * h;
jintArray result = env->NewIntArray(size);
env->SetIntArrayRegion(result, 0, size, cbuf);
env->ReleaseIntArrayElements(buf, cbuf, 0);
return result;
}
}
app目录下的build.gradle1
2
3
4
5
6
7
8
9
10
11
12
13
14
15
16
17
18
19
20
21
22
23
24
25
26
27
28
29
30
31
32
33
34
35
36
37
38
39
40
41
42
43
44
45
46
47
48
49
50
51
52
53
54
55
56
57
58
59
60
61
62
63apply plugin: 'com.android.application'
android {
compileSdkVersion 23
buildToolsVersion "23.0.3"
defaultConfig {
applicationId "com.example.my.helloapp"
minSdkVersion 15
targetSdkVersion 23
versionCode 1
versionName "1.0"
}
buildTypes {
release {
minifyEnabled false
proguardFiles getDefaultProguardFile('proguard-android.txt'), 'proguard-rules.pro'
}
}
sourceSets.main.jni.srcDirs = []
//禁止自带的ndk功能
sourceSets.main.jniLibs.srcDirs = ['src/main/libs','src/main/jniLibs']
//重定向so目录为src/main/libs和src/main/jniLibs,原来为src/main/jniLibs
task ndkBuild(type: Exec, description: 'Compile JNI source with NDK') {
Properties properties = new Properties()
properties.load(project.rootProject.file('local.properties').newDataInputStream())
def ndkDir = properties.getProperty('ndk.dir')
if (org.apache.tools.ant.taskdefs.condition.Os.isFamily(org.apache.tools.ant.taskdefs.condition.Os.FAMILY_WINDOWS)) {
commandLine "$ndkDir/ndk-build.cmd", '-C', file('src/main/jni').absolutePath
} else {
commandLine "$ndkDir/ndk-build", '-C', file('src/main/jni').absolutePath
}
}
tasks.withType(JavaCompile) {
compileTask -> compileTask.dependsOn ndkBuild
}
task ndkClean(type: Exec, description: 'Clean NDK Binaries') {
Properties properties = new Properties()
properties.load(project.rootProject.file('local.properties').newDataInputStream())
def ndkDir = properties.getProperty('ndk.dir')
if (org.apache.tools.ant.taskdefs.condition.Os.isFamily(org.apache.tools.ant.taskdefs.condition.Os.FAMILY_WINDOWS)) {
commandLine "$ndkDir/ndk-build.cmd",'clean', '-C', file('src/main/jni').absolutePath
} else {
commandLine "$ndkDir/ndk-build",'clean', '-C', file('src/main/jni').absolutePath
}
}
clean.dependsOn 'ndkClean'
}
dependencies {
compile fileTree(include: ['*.jar'], dir: 'libs')
testCompile 'junit:junit:4.12'
compile 'com.android.support:appcompat-v7:23.3.0'
compile 'com.android.support:design:23.3.0'
compile 'com.android.support:support-v4:23.3.0'
compile project(':openCVLibrary310')
}
进行ndk build可以在src/main/libs下发现生成的libOpen.so文件
测试,将拍摄的照片灰度化1
2
3
4
5
6
7// 灰度化图像
int w = bitmap.getWidth(), h = bitmap.getHeight();
int[] pix = new int[w * h];
bitmap.getPixels(pix, 0, w, 0, 0, w, h);
int [] resultPixes=JniDemo.gray(pix,w,h);
Bitmap result = Bitmap.createBitmap(w,h, Bitmap.Config.RGB_565);
result.setPixels(resultPixes, 0, w, 0, 0,w, h);
程序运行截图
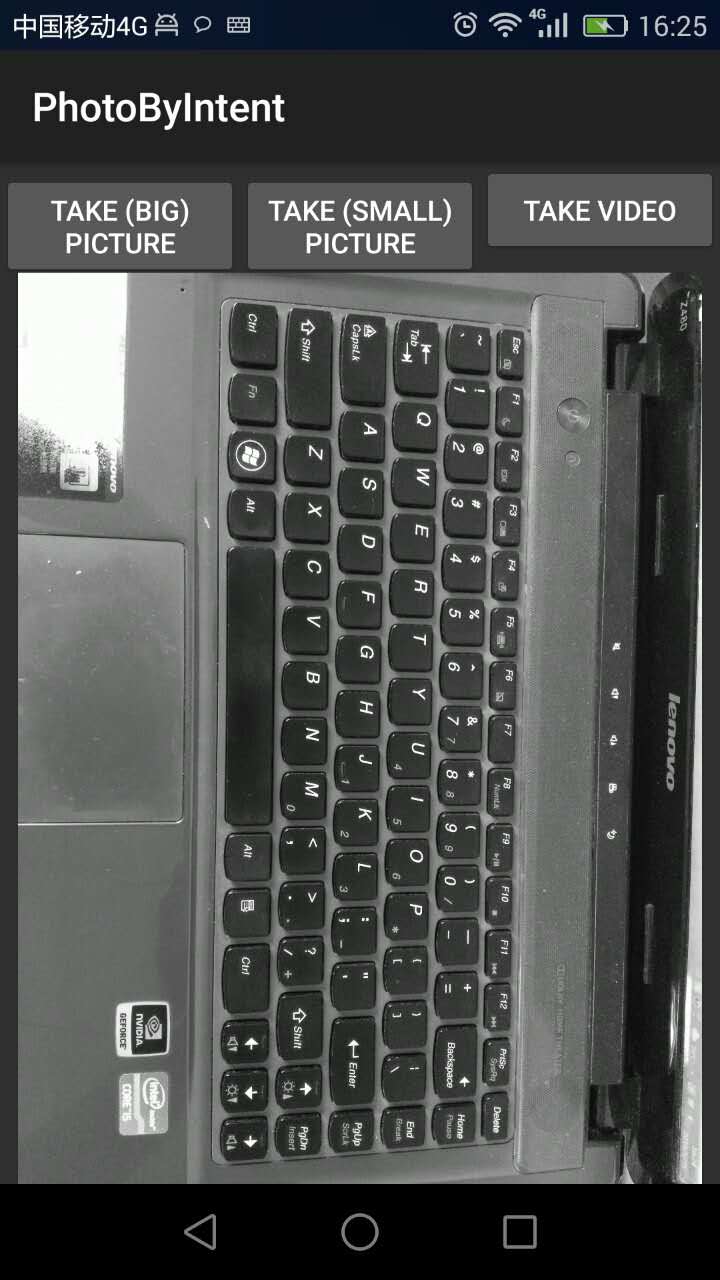
opencv很强大,接下来还是赶紧熟悉它的api吧。。。


 771
771


 被折叠的 条评论
为什么被折叠?
被折叠的 条评论
为什么被折叠?
 到【灌水乐园】发言


