
style="@style/layout_full"
android:orientation="vertical">
style="@style/layout_vertical"
android:layout_weight="1"
android:orientation="horizontal">
style="@style/layout_horizontal"
android:background="#aa0000"
android:layout_weight="1"/>
style="@style/layout_horizontal"
android:background="#00aa00"
android:layout_weight="4"/>
style="@style/layout_horizontal"
android:background="#0000aa"
android:layout_weight="3"/>
style="@style/layout_horizontal"
android:background="#aaaaaa"
android:layout_weight="2"/>
style="@style/layout_vertical"
android:layout_weight="2"
android:orientation="vertical">
style="@style/layout_vertical"
android:background="#ffffff"
android:layout_weight="4"/>
style="@style/layout_vertical"
android:background="#aa0000"
android:layout_weight="3"/>
style="@style/layout_vertical"
android:background="#00aa00"
android:layout_weight="2"/>
style="@style/layout_vertical"
android:background="#0000aa"
android:layout_weight="1"/>

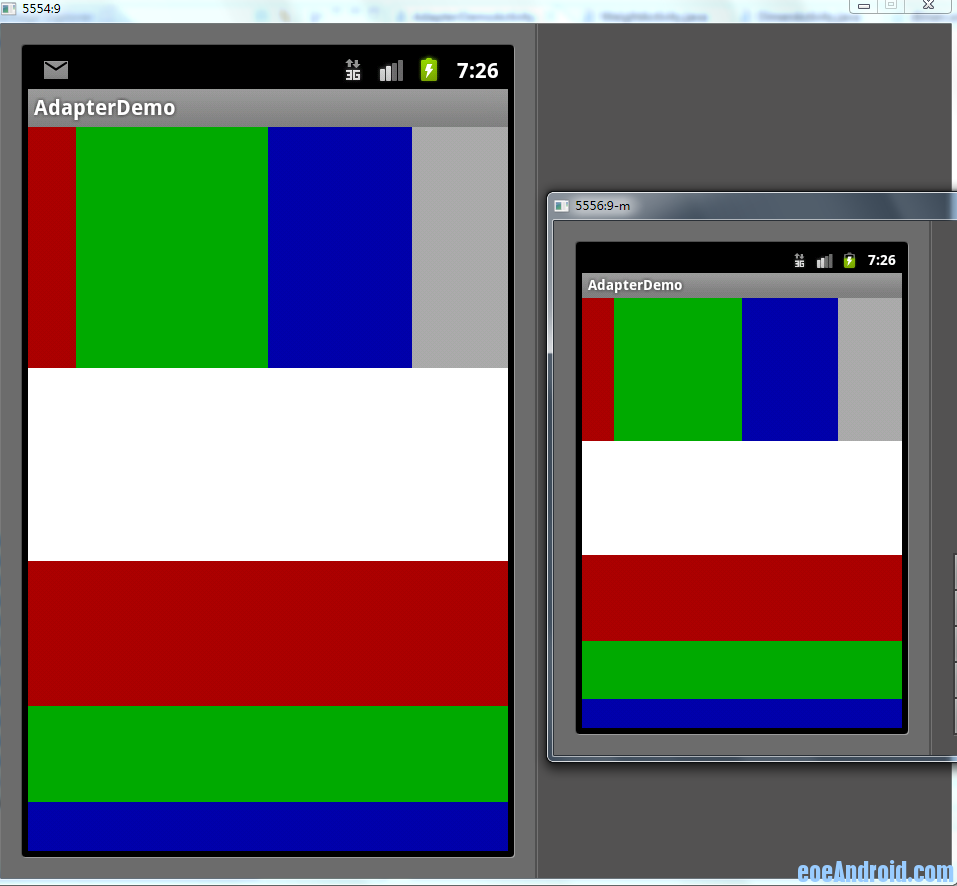
整个界面布局看起来非常直观,只是嵌套的逻辑要自己理下。显示效果如下图,其中左面一个是480x800的界面,右面的是320x480的界面(后面的图也如此),可以看出显示比例和代码中完全一致,我就不多说了,大家对照下就能看出来了。
二、自定义尺寸法
这个是我自己想出来的方法,可能是个比较笨的方法,所以没有多少人提过用这种方法解决自适应的问题。虽然这个方法缺点也很多,但有时候也是个不错的方法。
先看下面这张图
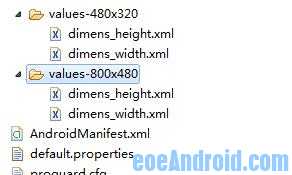
可以看到我定义了两套尺寸文件,我们可以看下其中一个文件

6px12px
18px24px
30px36px
42px48px
54px60px
66px72px
78px84px
90px96px
102px108px
114px120px
126px132px
138px144px
150px156px
162px168px
174px180px
186px192px
198px204px
210px216px
222px228px
234px240px
246px252px
258px264px
270px276px
282px288px
294px300px
306px312px
318px324px
330px336px
342px348px
354px360px
366px372px
378px384px
390px396px
402px408px
414px420px
426px432px
438px444px
450px456px
462px468px
474px480px

这个是values-480x320文件夹下dimens_height.xml文件中的代码,我把整个高度分成了80等分,这是因为大部分屏幕的宽度或高度都是80的整数倍(个别特殊的除外),不同的等分在不同的分辨率中设定不同的尺寸值。
由于每一套界面都要写一套,所以有些同学可能觉着不太好,不过这个写起来比较简单,而且以后也不用改,所以有时候也可以考虑用一下!
再看我Demo的布局代码(dimen_layout.xml)

android:layout_width="fill_parent"
android:layout_height="fill_parent"
android:orientation="vertical">
android:layout_width="@dimen/width_76_80"
android:layout_height="@dimen/height_10_80"
android:background="#ffcccc"
android:layout_margin="@dimen/width_2_80"/>
android:layout_width="fill_parent"
android:layout_height="fill_parent">
android:layout_width="@dimen/width_30_80"
android:layout_height="@dimen/height_50_80"
android:background="#ccccff"
android:layout_margin="@dimen/height_5_80"/>
android:layout_width="fill_parent"
android:layout_height="fill_parent"
android:orientation="vertical">
android:layout_width="@dimen/width_30_80"
android:layout_height="@dimen/height_5_80"
android:background="#ccffcc"
android:layout_marginBottom="@dimen/height_1_80"
android:text="5"/>
android:layout_width="@dimen/width_30_80"
android:layout_height="@dimen/height_10_80"
android:background="#ccffcc"
android:layout_marginBottom="@dimen/height_1_80"
android:text="10"/>
android:layout_width="@dimen/width_30_80"
android:layout_height="@dimen/height_15_80"
android:background="#ccffcc"
android:layout_marginBottom="@dimen/height_1_80"
android:text="15"/>
android:layout_width="@dimen/width_30_80"
android:layout_height="@dimen/height_20_80"
android:background="#ccffcc"
android:text="20"/>

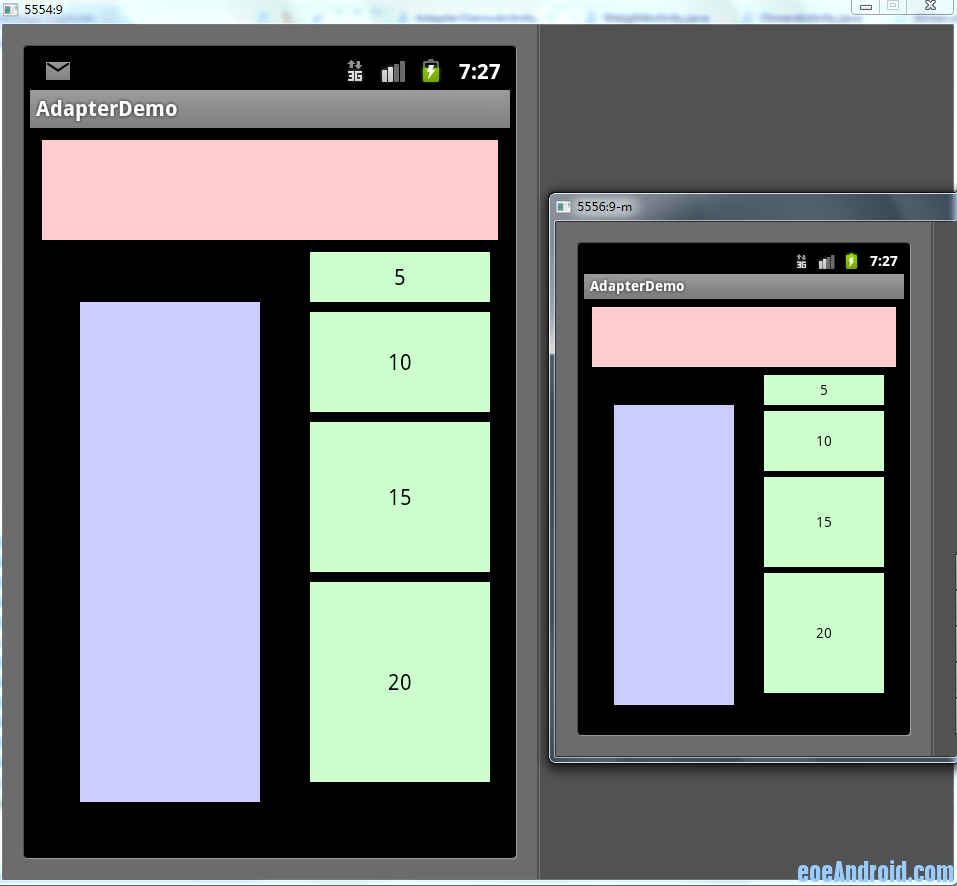
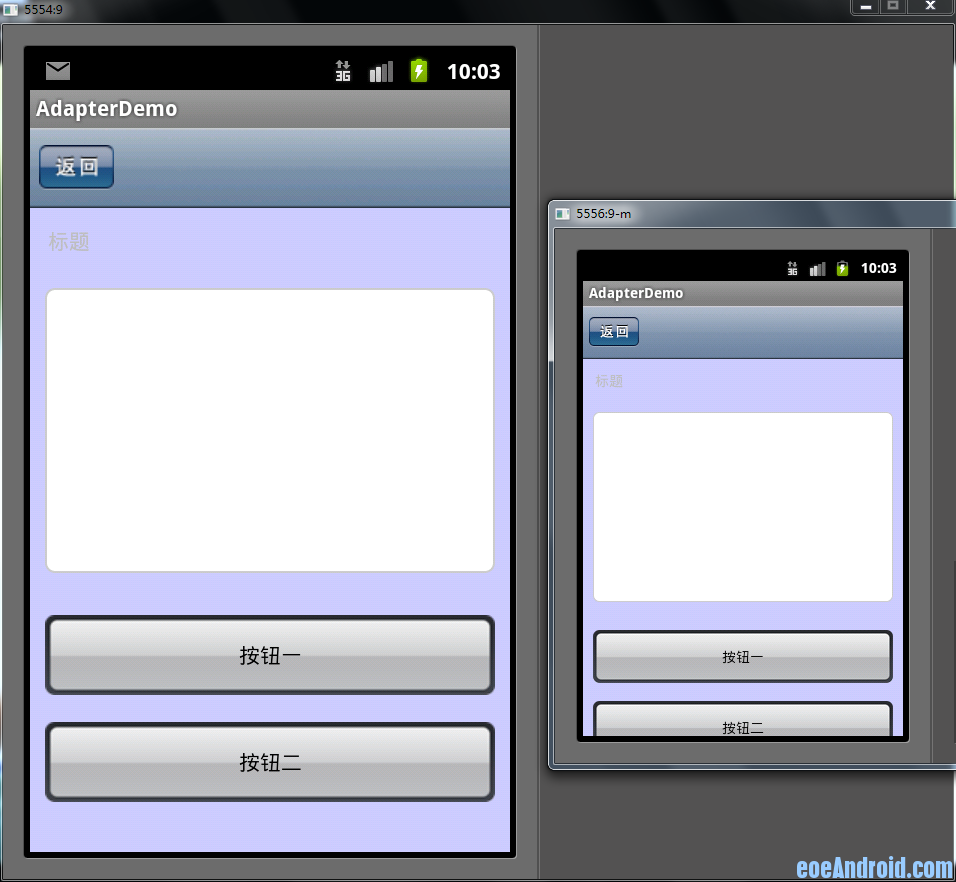
以上是我写的统一的布局代码,来看下在两个不同分辨率的模拟器上的显示效果吧(大家注意我的代码中有margin这样的值也用到了自定义尺寸,如果这个margin使用layout_weight来控制的话,无疑要多嵌套一层线性布局,所以说没有一个方法是十全十美的,这第2个方法有时候用起来反而还要方便一些)
三、在java代码中设置宽高度
也许很多人会反对这种方法,因为即使是官方也是推荐使用xml的方式写布局。不过我们在这不会像Swing那样写那么多麻烦的布局代码,因为我们只是在代码中重新设定控件的宽高度而已,其他属性依然是交给xml布局文件的。这个方法其实是我跟同事偷学来的,虽然我不赞成这样的方法,但他确确实实也是解决屏幕自适应问题的方案之一,而且它没我想象的那么复杂,其实很简单。
首先我们要做的是获取当前屏幕的宽高度,因为这个在后面要用到
我们可以写两个静态变量用来保存当前屏幕的宽高度:
public class Constant {
public static int displayWidth; //屏幕宽度
public static int displayHeight; //屏幕高度
}
然后在第一个Activity启动的时候,获取这两个值
DisplayMetrics displayMetrics = new DisplayMetrics();
getWindowManager().getDefaultDisplay().getMetrics(displayMetrics);
Constant.displayWidth = displayMetrics.widthPixels;
Constant.displayHeight = displayMetrics.heightPixels;
布局代码我们可以全都统一写成wrap-content,其实写成什么都无所谓,因为这个值只是暂时的

android:orientation="vertical"
android:layout_width="fill_parent"
android:layout_height="fill_parent">
android:id="@+id/btn1"
android:layout_width="wrap_content"
android:layout_height="wrap_content"
android:background="#ffcccc"
android:text="aaaaaaaa"/>
android:id="@+id/btn2"
android:layout_width="wrap_content"
android:layout_height="wrap_content"
android:background="#ccffcc"
android:text="bbbbbbbbb"/>
android:id="@+id/btn3"
android:layout_width="wrap_content"
android:layout_height="wrap_content"
android:background="#ccccff"
android:text="ccccccccc"/>
android:id="@+id/btn4"
android:layout_width="wrap_content"
android:layout_height="wrap_content"
android:background="#ffffcc"
android:text="dddddddddddddddddd"/>

最后我们在Activity的onCreate方法里这么做

// 第一个按钮,宽度100%,高度10%
LinearLayout.LayoutParams params = new LinearLayout.LayoutParams(
LayoutParams.FILL_PARENT,
(int) (Constant.displayHeight * 0.1f + 0.5f));
btn1.setLayoutParams(params);
// 第二个按钮,宽度100%,高度30%
LinearLayout.LayoutParams params2 = new LinearLayout.LayoutParams(
LayoutParams.FILL_PARENT,
(int) (Constant.displayHeight * 0.3f + 0.5f));
btn2.setLayoutParams(params2);
// 第三个按钮,宽度50%,高度20%
LinearLayout.LayoutParams params3 = new LinearLayout.LayoutParams(
(int) (Constant.displayWidth * 0.5f + 0.5f),
(int) (Constant.displayHeight * 0.2f + 0.5f));
btn3.setLayoutParams(params3);
// 第三个按钮,宽度70%,高度填满剩下的空间
LinearLayout.LayoutParams params4 = new LinearLayout.LayoutParams(
(int) (Constant.displayWidth * 0.7f + 0.5f),
LayoutParams.FILL_PARENT);
btn4.setLayoutParams(params4);

大家可以看到其实代码并不复杂,都能看得懂
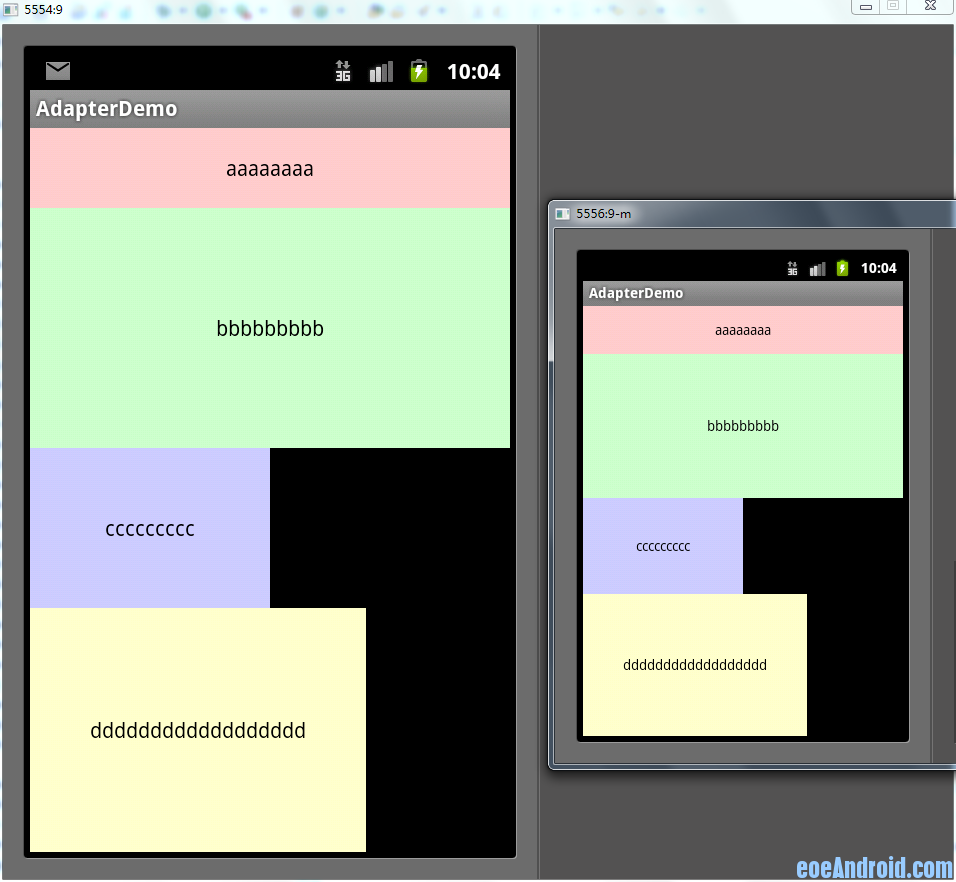
下面是效果显示图
四、多布局
做为最后的方法,也是最后一个才会考虑的方法,那就是为不同的尺寸界面单独写布局。不到万不得已不要用这个方法,相信不少人和我一样都被逼着用过这个方法吧。需要说明的是,横竖屏切换使用不同布局也是用这个方法解决的;代码我就不上了,给大家看两张图吧,一个是同1个布局的,一个是写了多布局的,大家一看就明白了
补充一下,写多个布局的时候,配置文件一定要加上这段配置代码,不然有时可能会出问题
android:normalScreens="true" android:anyDensity="true" />

五、其他
以上说的都是多个屏幕显示相同内容需要考虑的问题,还有一种是在不同的屏幕上显示内容不同的情况,其实这个问题我们往往是用滚动视图来解决的,也就是ScrowView;需要注意的是ScrowView中使用layout_weight是无效的,既然使用ScrowView了,就把它里面的控件的大小都设成固定的吧。
此外关于图片的自适应问题,主要是2点,一个是9patch图,这个东西大家都要学会去做,不难;不过有些编译器在识别9patch图时会出这样那样的bug,像我的Eclipse就不认这个,而同一个9patch图在别的电脑上却是没问题的,
第二个要说的是我曾经被困扰的一个问题,对于480x800 和 480x854这两个尺寸,他们显示同一个图片时,总有一个会拉伸(如果9patch可以解决的还好)。其实当初困扰我的是,这两个尺寸都是hdpi的,以为无法给这两个屏幕做不同的图片。后来无意中发现,图片可以和布局一样分多个尺寸的,而不仅仅是根据密度分,也就是说你可以写这样的文件夹drawable-hdpi-800x480和drawable-hdpi-854x480,在它们里面放不同的图片,这样图片也能自适应了。


 239
239


 被折叠的 条评论
为什么被折叠?


