


由于这段时间比较忙, 所以写博文的时间也挤了很长时间才完成, 希望大家能够原谅, 后面我也会陆续的更新, 直到控件都讲完, 好了废话少说, 现在让我们来看今天的内容.
1.UITableview常用属性
UITableView 的样式
enum UITableViewStyle : Int {
    case Plain // 平铺样式
    case Grouped // 分组样式
}
UITableView 添加或者删除 Cell 时的动画
enum UITableViewRowAnimation : Int {
    case Fade // 淡入淡出
    case Right // 从右添加
    case Left // 从左添加
    case Top // 从上添加
    case Bottom // 从底部添加
    case None // 没有动画
    case Middle // 从中间添加
    case Automatic // 随机添加
}
UITableView 滚动时指定的位置
enum UITableViewScrollPosition : Int {
    case None // 不指定
    case Top // 指定上面
    case Middle // 指定中间
    case Bottom // 指定底部
}
UITableView 分割线的样式
enum UITableViewCellSeparatorStyle : Int {
    case None // 没有分割线
    case SingleLine // 单行分割线
    case SingleLineEtched // 多行分割线融合
}
UITableView 属性
// 1.设置 UITableView 的位置以及Style
init(frame: CGRect, style: UITableViewStyle)
var style: UITableViewStyle { get }
// 2.设置数据源对象
unowned(unsafe) var dataSource: UITableViewDataSource?
// 3.设置代理对象
unowned(unsafe) var delegate: UITableViewDelegate?
// 4.设置 Cell 的行高
var rowHeight: CGFloat
// 5.设置 Cell 的标题高度
var sectionHeaderHeight: CGFloat
// 6.设置 Cell 的页尾高度
var sectionFooterHeight: CGFloat
// 7.设置估计的 Cell 的行高
var estimatedRowHeight: CGFloat
// 8.设置估计的 Cell 的标题行高
var estimatedSectionHeaderHeight: CGFloat
// 9.设置估计的 Cell 的页尾行高
var estimatedSectionFooterHeight: CGFloat
// 10.设置 Cell 与 Cell 之间的分割线位置
var separatorInset: UIEdgeInsets
// 11.设置 UITableView 的背景 View 对象
var backgroundView: UIView?
2.常用数据源方法
要使用数据源方法(DataSoucre方法), 首先我们需要遵守 UITableView 的数据源方法(UITableViewDataSoucre)协议, 这个我们在例子中会讲到
常用数据源方法
// 1.该方法是用来设置 TableView 有多少行 Cell
    func tableView(tableView: UITableView, numberOfRowsInSection section: Int) -> Int

// 2.该方法是用来设置 TableView 每一行 Cell 的详细内容
    func tableView(tableView: UITableView, cellForRowAtIndexPath indexPath: NSIndexPath) -> UITableViewCell

// 3.该方法是用来设置 TableView 有多少组 Cell
    optional func numberOfSectionsInTableView(tableView: UITableView) -> Int

// 4.该方法是用来设置每一组 Cell 的标题内容
        optional func tableView(tableView: UITableView, titleForHeaderInSection section: Int) -> String?

// 5.该方法是用来设置每一组 Cell 的页尾内容
        optional func tableView(tableView: UITableView, titleForFooterInSection section: Int) -> String?

// 6.该方法使用来设置 TableView 左滑快捷
    optional func tableView(tableView: UITableView, commitEditingStyle editingStyle: UITableViewCellEditingStyle, forRowAtIndexPath indexPath: NSIndexPath)

// 7.该方法是用来设置 TableView 是否可以拖拽到其他行数, 只要写了该方法, 默认打开
    optional func tableView(tableView: UITableView, moveRowAtIndexPath sourceIndexPath: NSIndexPath, toIndexPath destinationIndexPath: NSIndexPath)
PS: 以上的1, 2方法是必须得实现的, 否则 UITableView 不会有任何数据, 并且会报错.
常用代理方法
// 1.该方法是用来设置每一行 Cell 的高度
    optional func tableView(tableView: UITableView, heightForRowAtIndexPath indexPath: NSIndexPath) -> CGFloat

// 2.该方法是用来设置 Cell 标题内容的高度(如果该方法使用了, 那么在自定义 TableView 的sectionHeaderHeight属性就会被覆盖)
    optional func tableView(tableView: UITableView, heightForHeaderInSection section: Int) -> CGFloat

// 3.该方法是用来设置 Cell 页尾内容的高度(如果该方法使用了, 那么在自定义 TableView 的sectionFooterHeight属性就会被覆盖)
    optional func tableView(tableView: UITableView, heightForFooterInSection section: Int) -> CGFloat

// 4.该方法是用来设置 TableView 左滑快捷按钮的内容以及详细操作
    optional func tableView(tableView: UITableView, titleForDeleteConfirmationButtonForRowAtIndexPath indexPath: NSIndexPath) -> String!

// 5.该方法是用来设置 TableView 每一行 Cell 的编辑模式, 如果不设置, 默认都是删除
    optional func tableView(tableView: UITableView, editingStyleForRowAtIndexPath indexPath: NSIndexPath) -> UITableViewCellEditingStyle
常用的代理方法和数据源方法大概就这么多, 如果有兴趣去研究其他方法的同学可以自行去研究, 这样子会让自己的记忆更加深入.
3.代码演示
遵守代理协议和数据源协议
class ViewController: UIViewController, UITableViewDelegate, UITableViewDataSource {}自定义 UITableView
    func myTableView() {
        // 1.设置 TableView 的 frame 和 style
        var tableView: UITableView = UITableView(frame: self.view.frame, style: UITableViewStyle.Plain)

        // 2.设置 TableView 的背景色
        tableView.backgroundColor = UIColor(red: 0.0, green: 127.0, blue: 127.0, alpha: 1.0)

        // 3.设置 TableView 的代理对象
        tableView.delegate = self

        // 4.设置 TableView 的数据源对象
        tableView.dataSource = self

        // 5.设置 TableView 每一行 Cell 的高度
        tableView.rowHeight = 44

        // 6.设置 TableView 每一行 Cell 页头的行高
        tableView.sectionHeaderHeight = 50

        // 7.设置 TableView 每一行 Cell 页尾的行高
        tableView.sectionFooterHeight = 50

        // 8.设置 TableView 每一行 Cell 的估计行高
        tableView.estimatedRowHeight = 100

        // 9.设置 TableView 每一行 Cell 的页头估计行高
        tableView.estimatedSectionHeaderHeight = 50

        // 10.设置 TableView 每一行 Cell 的页尾估计行高
        tableView.estimatedSectionFooterHeight = 50

        // 11.设置 TableView 每一行 Cell 之间分割线位置(分别是: 上, 左, 下, 右)
        tableView.separatorInset = UIEdgeInsetsMake(0, 50, 0, 50)

        // 12.设置 TableView 每一行 Cell 之间分割线的颜色
        tableView.separatorColor = UIColor.redColor()

        // 13.设置 TableView 每一行 Cell 之间的分割效果(暂无方法, 目前只是用来实例化)
        tableView.separatorEffect = UIVisualEffect()

        // 14.设置 TableView 每一行 Cell 之间的分割线样式(默认是 SingleLine 样式)
        tableView.separatorStyle = UITableViewCellSeparatorStyle.SingleLine

        // 15.设置 TableView 的背景 View 对象
        tableView.backgroundView = UIView()

        // 16.设置 TableView 的编辑模式是否开启, 并且是否使用动画效果
        tableView.setEditing(true, animated: true)
        // 17.添加到 self.view 上
        self.view.addSubview(tableView)
    }
实现代理方法和数据源方法
// 1.该方法是用来设置 TableView 有多少组 Cell
func numberOfSectionsInTableView(tableView: UITableView) -> Int {
return 2
}
// 2.该方法是用来设置 TableView 有多少行 Cell
func tableView(tableView: UITableView, numberOfRowsInSection section: Int) -> Int {
return 2
}
// 3.该方法是用来设置 TableView 每一行 Cell 的详细内容
func tableView(tableView: UITableView, cellForRowAtIndexPath indexPath: NSIndexPath) -> UITableViewCell {
let cell = UITableViewCell()
cell.backgroundColor = UIColor.blueColor()
return cell
}
// 4.该方法是用来设置 TableView 每一行 Cell 的标题内容
func tableView(tableView: UITableView, titleForHeaderInSection section: Int) -> String? {
return "我是页头"
}
// 5.该方法是用来设置 TableView 每一行 Cell 的页尾内容
func tableView(tableView: UITableView, titleForFooterInSection section: Int) -> String? {
return "我是页尾"
}
// 6.该方法是用来设置 TableView 每一行 Cell 的高度, 一旦这里设置了, 那么在自定义里的 rowHeight 属性就会被覆盖
func tableView(tableView: UITableView, heightForRowAtIndexPath indexPath: NSIndexPath) -> CGFloat {
return 100
}
// 7.该方法是用来响应 TableVIewCell 被点击的事件
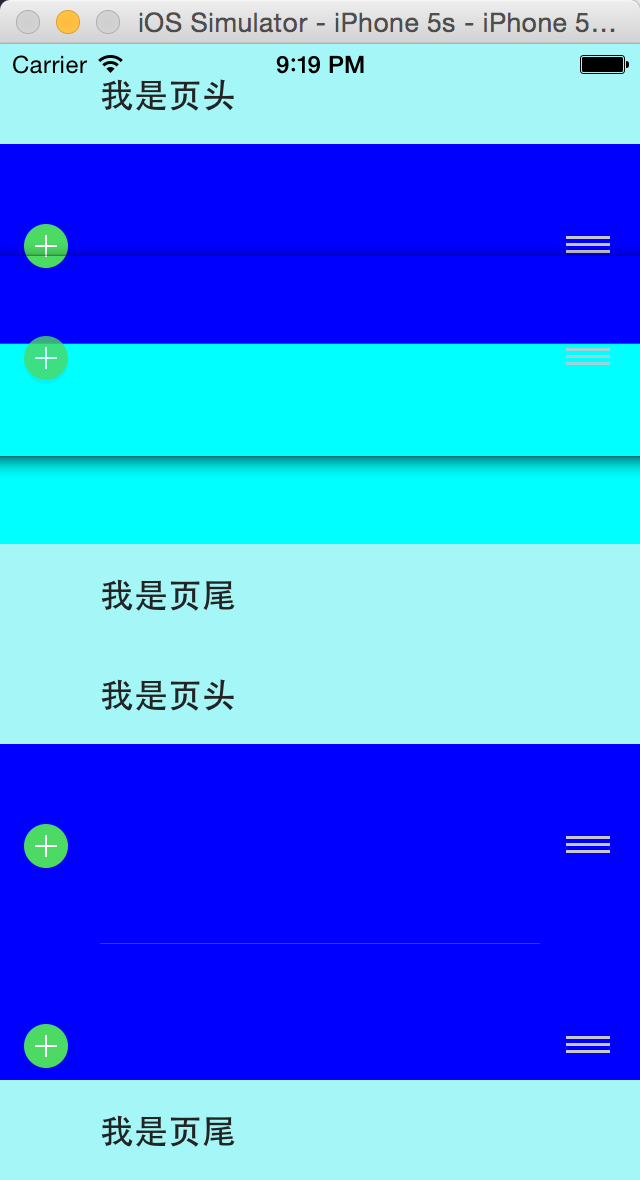
func tableView(tableView: UITableView, didSelectRowAtIndexPath indexPath: NSIndexPath) {
println("我被点击了")
}
// 8.该方法是用来设置 TableView 每一行 Cell 的编辑模式, 如果不设置, 默认都是删除
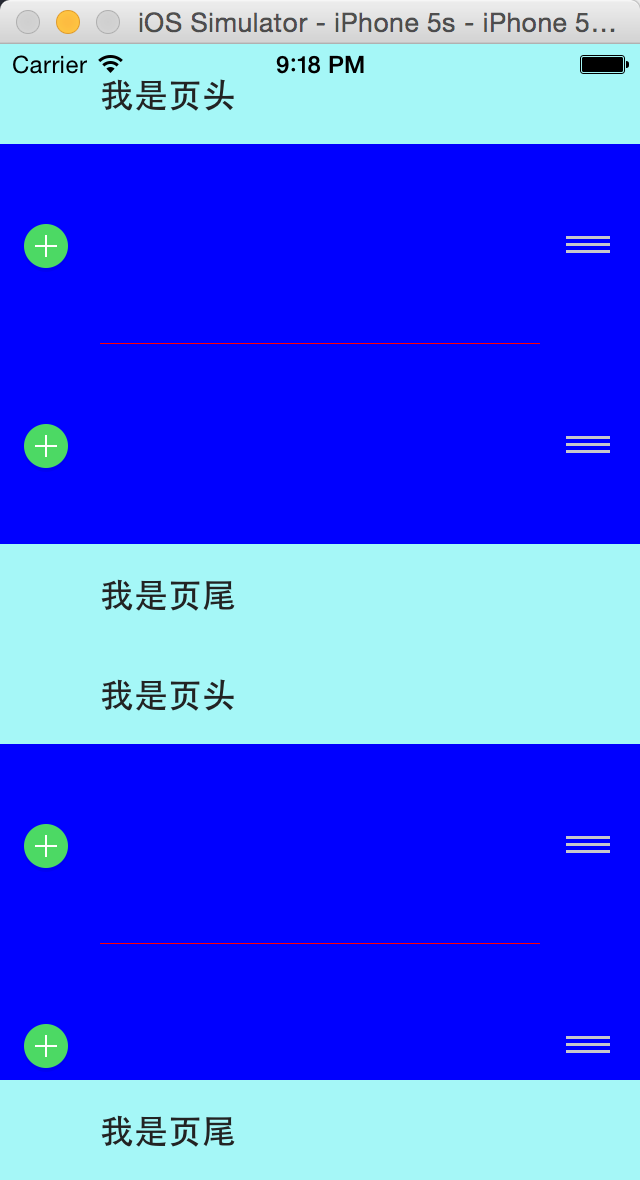
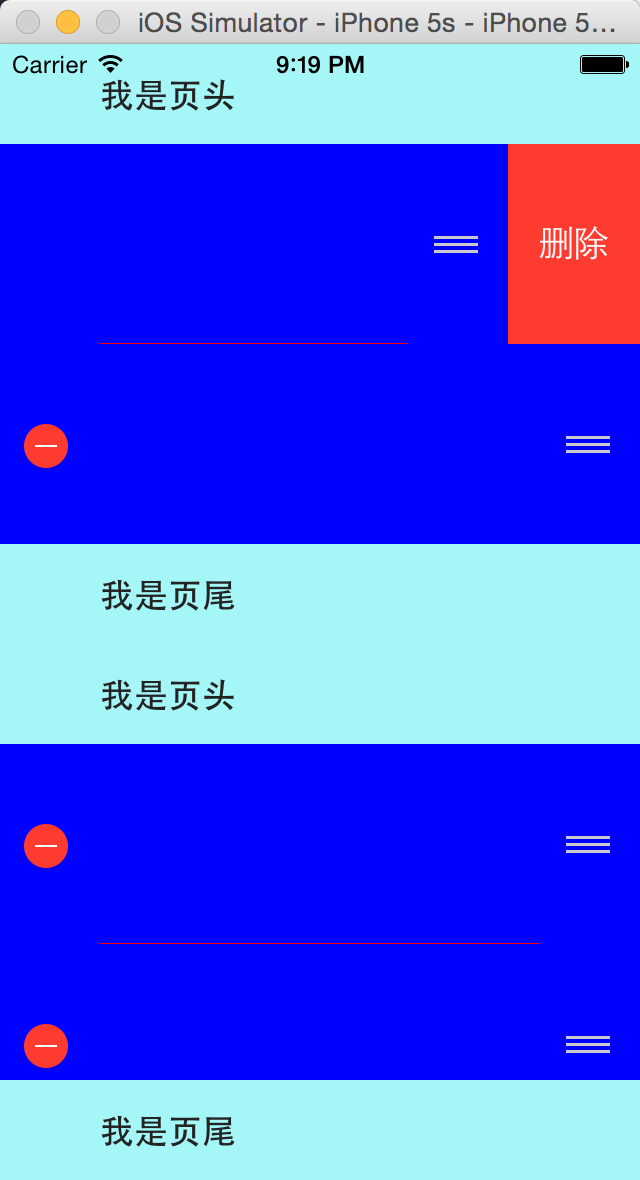
func tableView(tableView: UITableView, editingStyleForRowAtIndexPath indexPath: NSIndexPath) -> UITableViewCellEditingStyle {
return UITableViewCellEditingStyle.Insert
}
// 9.该方法是用来设置 Tabelview 的左滑快捷按钮, 只要写了该方法, 默认打开
func tableView(tableView: UITableView, commitEditingStyle editingStyle: UITableViewCellEditingStyle, forRowAtIndexPath indexPath: NSIndexPath) {
}
// 10.该方法是用来设置 TabelView 左滑快捷按钮的详细内容以及操作
func tableView(tableView: UITableView, titleForDeleteConfirmationButtonForRowAtIndexPath indexPath: NSIndexPath) -> String! {
return "删除"
}
// 11.该方法是用来设置 TableView 是否可以拖拽到其他行数, 只要写了该方法, 默认打开
func tableView(tableView: UITableView, moveRowAtIndexPath sourceIndexPath: NSIndexPath, toIndexPath destinationIndexPath: NSIndexPath) {
}4.最终的效果
PS: UITableView 是继承与 UIScrollView 的, 所以 UIScrollView 里的所有方法/属性 UITableView 都是可以使用的.
好了, 这次我们就讲到这里, 下次我们继续~~


 1839
1839


 被折叠的 条评论
为什么被折叠?
被折叠的 条评论
为什么被折叠?
 到【灌水乐园】发言


