


1,下面的样例是给表格UITableView添加编辑功能:
(1)给表格添加长按功能,长按后表格进入编辑状态
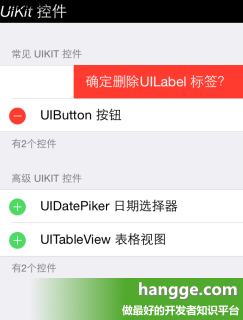
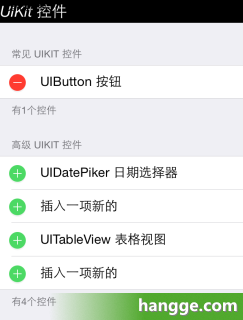
(2)在编辑状态下,第一个分组处于删除状态,第二个分组处于插入状态
(3)点击删除图标,删除对应条目
(4)点击添加图标,插入一条新数据
2,效果图

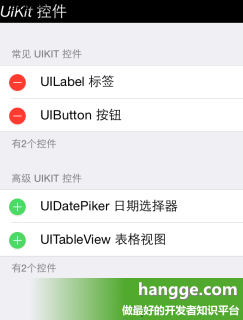
3,代码如下
|
1
2
3
4
5
6
7
8
9
10
11
12
13
14
15
16
17
18
19
20
21
22
23
24
25
26
27
28
29
30
31
32
33
34
35
36
37
38
39
40
41
42
43
44
45
46
47
48
49
50
51
52
53
54
55
56
57
58
59
60
61
62
63
64
65
66
67
68
69
70
71
72
73
74
75
76
77
78
79
80
81
82
83
84
85
86
87
88
89
90
91
92
93
94
95
96
97
98
99
100
101
102
103
104
105
106
107
108
109
110
111
112
113
114
115
116
117
118
119
120
121
122
123
124
125
126
127
128
129
130
131
132
133
134
135
136
137
138
139
140
141
142
143
144
145
146
147
148
149
150
151
152
153
154
155
156
157
158
159
160
161
162
163
164
165
166
167
168
169
170
171
172
173
174
175
176
177
178
179
180
181
182
183
184
185
186
187
188
189
190
191
192
193
|
import
UIKit
class
ViewController
:
UIViewController
,
UITableViewDelegate
,
UITableViewDataSource
,
UIGestureRecognizerDelegate
{
var
tableView:
UITableView
?
var
allnames:
Dictionary
<
Int
, [
String
]>?
var
adHeaders:[
String
]?
override
func
loadView() {
super
.loadView()
}
override
func
viewDidLoad() {
super
.viewDidLoad()
//初始化数据,这一次数据,我们放在属性列表文件里
self
.allnames = [
0:[
String
]([
"UILabel 标签"
,
"UIButton 按钮"
]),
1:[
String
]([
"UIDatePiker 日期选择器"
,
"UITableView 表格视图"
])
];
println
(
self
.allnames)
self
.adHeaders = [
"常见 UIKit 控件"
,
"高级 UIKit 控件"
]
//创建表视图
self
.tableView =
UITableView
(frame:
self
.view.frame, style:
UITableViewStyle
.
Grouped
)
self
.tableView!.delegate =
self
self
.tableView!.dataSource =
self
//创建一个重用的单元格
self
.tableView!.registerClass(
UITableViewCell
.
self
, forCellReuseIdentifier:
"SwiftCell"
)
self
.view.addSubview(
self
.tableView!)
//创建表头标签
var
headerLabel =
UILabel
(frame:
CGRectMake
(0, 0,
self
.view.bounds.size.width, 30))
headerLabel.backgroundColor =
UIColor
.blackColor()
headerLabel.textColor =
UIColor
.whiteColor()
headerLabel.numberOfLines = 0
headerLabel.lineBreakMode =
NSLineBreakMode
.
ByWordWrapping
headerLabel.text =
"UIKit 控件"
headerLabel.font =
UIFont
.italicSystemFontOfSize(20)
self
.tableView!.tableHeaderView = headerLabel
//绑定对长按的响应
var
longPress =
UILongPressGestureRecognizer
(target:
self
,
action:
Selector
(
"tableviewCellLongPressed:"
))
//代理
longPress.delegate =
self
longPress.minimumPressDuration = 1.0
//将长按手势添加到需要实现长按操作的视图里
self
.tableView!.addGestureRecognizer(longPress)
}
func
tableviewCellLongPressed(gestureRecognizer:
UILongPressGestureRecognizer
)
{
if
(gestureRecognizer.state ==
UIGestureRecognizerState
.
Began
)
{
println
(
"UIGestureRecognizerStateBegan"
);
}
if
(gestureRecognizer.state ==
UIGestureRecognizerState
.
Changed
)
{
println
(
"UIGestureRecognizerStateChanged"
);
}
if
(gestureRecognizer.state ==
UIGestureRecognizerState
.
Ended
)
{
println
(
"UIGestureRecognizerStateEnded"
);
//在正常状态和编辑状态之间切换
if
(
self
.tableView!.editing ==
false
)
{
self
.tableView!.setEditing(
true
, animated:
true
)
}
else
{
self
.tableView!.setEditing(
false
, animated:
true
)
}
}
}
//在本例中,有2个分区
func
numberOfSectionsInTableView(tableView:
UITableView
!) ->
Int
{
return
2
}
//返回表格行数(也就是返回控件数)
func
tableView(tableView:
UITableView
, numberOfRowsInSection section:
Int
) ->
Int
{
var
data =
self
.allnames?[section]
return
data!.count
}
// UITableViewDataSource协议中的方法,该方法的返回值决定指定分区的头部
func
tableView(tableView:
UITableView
, titleForHeaderInSection
section:
Int
)->
String
{
var
headers =
self
.adHeaders!;
return
headers[section];
}
// UITableViewDataSource协议中的方法,该方法的返回值决定指定分区的尾部
func
tableView(tableView:
UITableView
, titleForFooterInSection
section:
Int
)->
String
{
var
data =
self
.allnames?[section]
return
"有\(data!.count)个控件"
}
//创建各单元显示内容(创建参数indexPath指定的单元)
func
tableView(tableView:
UITableView
, cellForRowAtIndexPath indexPath:
NSIndexPath
)
->
UITableViewCell
{
//为了提供表格显示性能,已创建完成的单元需重复使用
let
identify:
String
=
"SwiftCell"
//同一形式的单元格重复使用,在声明时已注册
let
cell = tableView.dequeueReusableCellWithIdentifier(identify, forIndexPath: indexPath)
as
UITableViewCell
cell.accessoryType =
UITableViewCellAccessoryType
.
DisclosureIndicator
var
secno = indexPath.section
var
data =
self
.allnames?[secno]
cell.textLabel?.text = data![indexPath.row]
return
cell
}
// UITableViewDelegate 方法,处理列表项的选中事件
func
tableView(tableView:
UITableView
!, didSelectRowAtIndexPath indexPath:
NSIndexPath
!)
{
self
.tableView!.deselectRowAtIndexPath(indexPath, animated:
true
)
var
itemString =
self
.allnames![indexPath.section]![indexPath.row]
var
alertview =
UIAlertView
();
alertview.title =
"提示!"
alertview.message =
"你选中了【\(itemString)】"
;
alertview.addButtonWithTitle(
"确定"
)
alertview.show();
}
func
tableView(tableView:
UITableView
!, editingStyleForRowAtIndexPath indexPath:
NSIndexPath
!)
->
UITableViewCellEditingStyle
{
if
(indexPath.section == 1)
{
return
UITableViewCellEditingStyle
.
Insert
}
return
UITableViewCellEditingStyle
.
Delete
}
func
tableView(tableView:
UITableView
!,
titleForDeleteConfirmationButtonForRowAtIndexPath indexPath:
NSIndexPath
!) ->
String
!
{
var
data =
self
.allnames?[indexPath.section]!
var
itemString = data![indexPath.row]
as
String
return
"确定删除\(itemString)?"
}
func
tableView(tableView:
UITableView
!, commitEditingStyle editingStyle:
UITableViewCellEditingStyle
,
forRowAtIndexPath indexPath:
NSIndexPath
!)
{
if
(editingStyle ==
UITableViewCellEditingStyle
.
Delete
)
{
self
.allnames?[indexPath.section]?.removeAtIndex(indexPath.row)
self
.tableView!.reloadData()
self
.tableView!.setEditing(
true
, animated:
true
)
println
(
"你确认了删除按钮"
)
// Array
}
else
if
(editingStyle ==
UITableViewCellEditingStyle
.
Insert
)
{
self
.allnames?[indexPath.section]?.insert(
"插入一项新的"
, atIndex: indexPath.row+1)
println
(
"你按下了插入按钮"
)
self
.tableView!.reloadData()
}
}
override
func
didReceiveMemoryWarning() {
super
.didReceiveMemoryWarning()
// Dispose of any resources that can be recreated.
}
}
|


 2433
2433

 被折叠的 条评论
为什么被折叠?
被折叠的 条评论
为什么被折叠?
 到【灌水乐园】发言


