


引子
今天闲来做了一个类似iphone的圆角列表,先看效果。
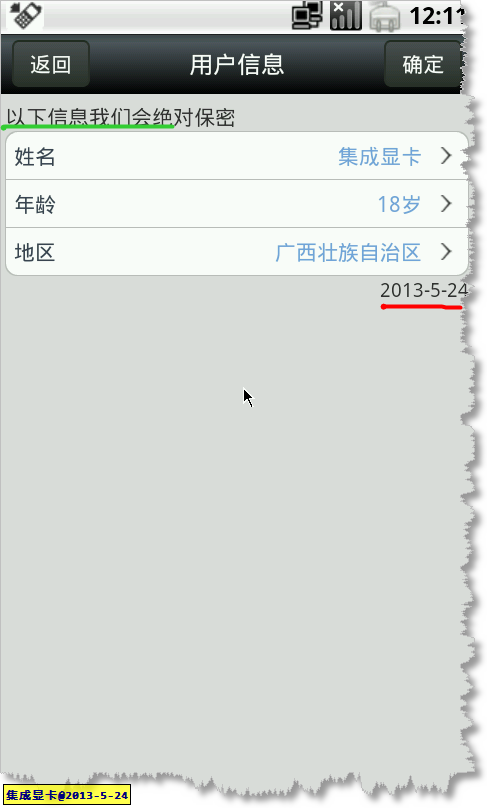
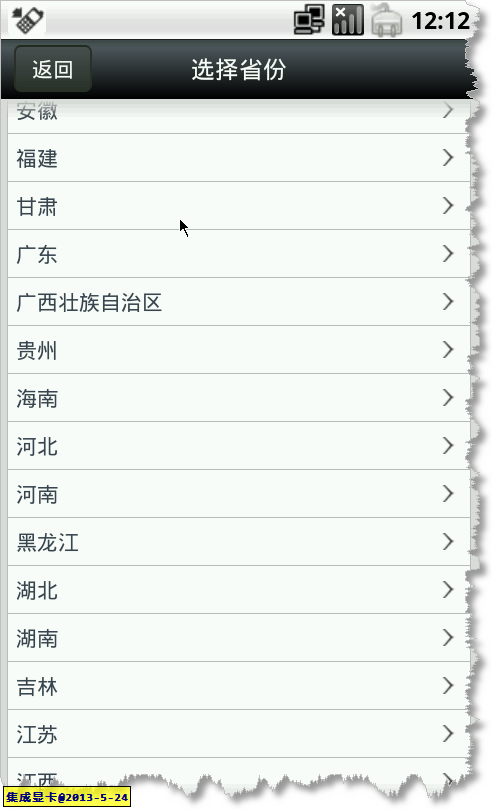
图片中绿色线条的是列表头文字,红色的是列表落款文字。此两处都可以显示/隐藏及动态改变值。对于列表头还可以设置文字的位置(靠左,靠右,居中)。点击图片中的地区一行,转到下面省份选择:
关于列表行
列表中的一行默认的定义为:
左边的标题(title)
右边的内容(value)
还有靠右的箭头
其中标题是一定会显示的,而“内容”如果为null,则不会显示,箭头是一个显示与否的boolean。则 CornerCell定义如下:
public class CornerCell {

	private String title;
	private String value;
	private boolean isArrow;
	private View view;

	public CornerCell(String title){
		this(title, null, false);
	}

	public CornerCell(String title, boolean isArrow){
		this(title, null, isArrow);
	}

	public CornerCell(String title, String value, boolean isArrow){
		this.title = title;
		this.value = value;
		this.isArrow = isArrow;
	}

	//getter and setter

	@Override
	public String toString() {
		return String.format(
				"[CornerCell: title=%1$s, value=%2$s, isArrow=%3$s]",
				title,
				value,
				isArrow
				);
	}
}
圆角列表容器
CornerRowLayout 继承于 LinearLayout,并实现了OnClickListener接口。
其构造方法如下:
 1 public CornerRowLayout(Context context, AttributeSet attrs) {
 2     super(context, attrs);
 3
 4     this.isShowValue = true;
 5
 6     contentLy = new LinearLayout(context, attrs);
 7     contentLy.setBackgroundResource(R.drawable.shape_corner_list_background);
 8     contentLy.setOrientation(LinearLayout.VERTICAL);
 9
10     LayoutParams lp = new LayoutParams(LayoutParams.FILL_PARENT, LayoutParams.WRAP_CONTENT);
11     headerTX = new TextView(getContext());
12     headerTX.setLayoutParams(lp);
13
14     footerTX = new TextView(getContext());
15     footerTX.setLayoutParams(lp);
16     footerTX.setGravity(Gravity.RIGHT);
17     footerTX.setTextSize(13);
18
19     //设置为垂直布局
20     this.setOrientation(LinearLayout.VERTICAL);
21     this.addView(headerTX);
22     this.addView(contentLy);
23     this.addView(footerTX);
24 }
设置列表内容
 1 /**
 2  * 设置这个表格的数据,会直接重新渲染整个表格
 3  *    @param cells
 4  */
 5 public void setCellList(List<CornerCell> cells){
 6     contentLy.removeAllViews();
 7
 8     for(int i=0;i<cells.size();i++){
 9         CornerCell cell = cells.get(i);
10
11         //如果 CornerCell 已经有自定义的视图,就用自定义的视图
12         View cellView = cell.getView() == null ?
13                 View.inflate(getContext(), R.layout.nerve_corner_cell, null)
14                 :
15                 cell.getView();
16
17         if(cellView == null)
18             continue;
19
20         System.out.println(cell);
21
22         /*
23          * 对头,中,尾进行分组
24          */
25         if(i == 0)
26             cellView.setBackgroundResource(R.drawable.shape_corner_list_top);
27         else{
28             //设置顶部的margin为1,就会出现一条细线
29             LayoutParams lp = new LayoutParams(LayoutParams.FILL_PARENT, LayoutParams.WRAP_CONTENT);
30             lp.setMargins(0, 1, 0, 0);
31             cellView.setLayoutParams(lp);
32
33             if(i == cells.size() - 1)
34                 cellView.setBackgroundResource(R.drawable.shape_corner_list_bottom);
35             else
36                 cellView.setBackgroundResource(R.drawable.shape_corner_list_middle);
37         }
38
39
40         //设置可以点击,不然按住时不会有效果
41         //cellView.setClickable(true);
42         //cellView.setPadding(5, 8, 5, 8);
43
44         ((TextView)cellView.findViewById(R.id.cell_title)).setText(cell.getTitle());
45         if(isShowValue)
46             ((TextView)cellView.findViewById(R.id.cell_value)).setText(cell.getValue());
47
48         cellView.findViewById(R.id.cell_arrow)
49             .setVisibility(cell.isArrow() ? View.VISIBLE : View.GONE);
50
51         cellView.setOnClickListener(this);
52         cellView.setTag(i);
53         //将这个view添加到本地容器
54         contentLy.addView(cellView);
55     }
56
57     resetAll();
58 }
如何使用
1.先将相关的java类导入项目,还有相关的layout,drawable,style文件
2.在想加入圆角列表的页面加入以下内容:
<org.nerve.ui.corner.CornerRowLayout
    xmlns:android="http://schemas.android.com/apk/res/android"
   	    android:id="@+id/myCornerLayout"
   	    android:layout_width="fill_parent"
		android:layout_height="fill_parent"
		android:padding="5dp"
		android:background="#DCDDDB"
		>
</org.nerve.ui.corner.CornerRowLayout>
这个根据实际情况而定,如果列表内容太多,需要嵌套在一个SrollView内。
3.在Activity中:
cornerL = (CornerRowLayout)findViewById(R.id.myCornerLayout);

List<CornerCell> cells = new ArrayList<CornerCell>();
cells.add(new CornerCell("姓名", "集成显卡", true));
cells.add(new CornerCell("年龄", "18岁", true));
cells.add(new CornerCell("地区", "广西壮族自治区", true));

cornerL.setCellList(cells);
cornerL.setOnRowClickListener(this);

cornerL.setHeader("以下信息我们会绝对保密");
cornerL.setFooter("2013-5-24");
效果就出来了。
4.Activity实现OnRowClickListenrr接口:
@Override
public void onRowClick(View v, int index) {
	if(index == 2){
		Intent intent = new Intent(ConrnerActivity.this, SelectProvinceActitivy.class);
		startActivityForResult(intent, PROVINCE);
	}
}
源代码下载:http://download.csdn.net/detail/ssrc0604hx/5442505
感谢阅读


 4258
4258

 被折叠的 条评论
为什么被折叠?
被折叠的 条评论
为什么被折叠?
 到【灌水乐园】发言


