


概述:
最近要学习写网络爬虫,所以把图的深度和广度搜索都再温习一下。
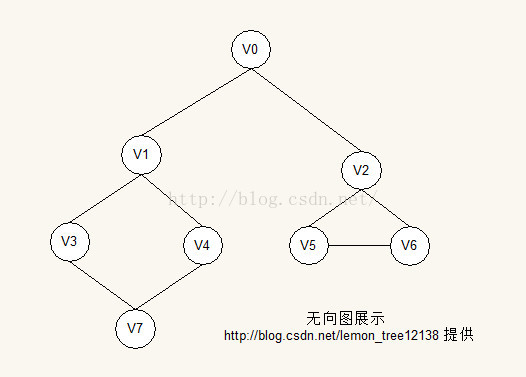
图结构展示:
实现过程:
首先,我们来看看图结构在代码中的实现。有三块逻辑:1.图中的节点:
public class GraphNode {

	public List<GraphEdge> edgeList = null;

	private String label = "";

	public GraphNode(String label) {
		this.label = label;
		if (edgeList == null) {
			edgeList = new ArrayList<GraphEdge>();
		}
	}

	/**
	 * 给当前节点添加一条边
	 * GraphNode
	 * @param edge
	 * 			添加的边
	 */
	public void addEdgeList(GraphEdge edge) {
		edgeList.add(edge);
	}

	public String getLabel() {
		return label;
	}
}
2.图中的边:
public class GraphEdge {

	private GraphNode nodeLeft;

	private GraphNode nodeRight;

	/**
	 * @param nodeLeft
	 * 			边的左端
	 * @param nodeRight
	 * 			边的右端
	 */
	public GraphEdge(GraphNode nodeLeft, GraphNode nodeRight) {
		this.nodeLeft = nodeLeft;
		this.nodeRight = nodeRight;
	}

	public GraphNode getNodeLeft() {
		return nodeLeft;
	}

	public GraphNode getNodeRight() {
		return nodeRight;
	}

}
3.把节点和边组合成一个图结构:
public class MyGraph {

	private List<GraphNode> nodes = null;

	public void initGraph(int n) {
		if (nodes == null) {
			nodes = new ArrayList<GraphNode>();
		}

		GraphNode node = null;
		for (int i = 0; i < n; i++) {
			node = new GraphNode(String.valueOf(i));
			nodes.add(node);
		}
	}

	public void initGraph(int n, boolean b) {
		initGraph(n);
		GraphEdge edge01 = new GraphEdge(nodes.get(0), nodes.get(1));
		GraphEdge edge02 = new GraphEdge(nodes.get(0), nodes.get(2));
		GraphEdge edge13 = new GraphEdge(nodes.get(1), nodes.get(3));
		GraphEdge edge14 = new GraphEdge(nodes.get(1), nodes.get(4));
		GraphEdge edge25 = new GraphEdge(nodes.get(2), nodes.get(5));
		GraphEdge edge26 = new GraphEdge(nodes.get(2), nodes.get(6));
		GraphEdge edge37 = new GraphEdge(nodes.get(3), nodes.get(7));
		GraphEdge edge47 = new GraphEdge(nodes.get(4), nodes.get(7));
		GraphEdge edge56 = new GraphEdge(nodes.get(5), nodes.get(6));


		nodes.get(0).addEdgeList(edge01);
		nodes.get(0).addEdgeList(edge02);
		nodes.get(1).addEdgeList(edge13);
		nodes.get(1).addEdgeList(edge14);
		nodes.get(2).addEdgeList(edge25);
		nodes.get(2).addEdgeList(edge26);
		nodes.get(3).addEdgeList(edge37);
		nodes.get(4).addEdgeList(edge47);
		nodes.get(5).addEdgeList(edge56);
	}

	public void initGraph() {
		initGraph(8, false);
	}

	public List<GraphNode> getGraphNodes() {
		return nodes;
	}
}
有了图的结构,我们就可以进行一些实际的操作了。
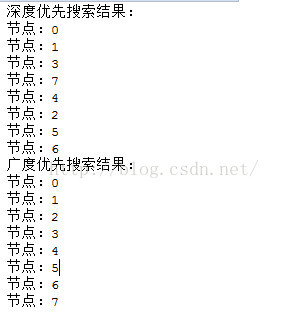
深度优先搜索:
public class DFSearch {

	/**
	 * 深度遍历
	 * DFSearch
	 * @param node
	 * 			当前节点
	 * @param visited
	 * 			被访问过的节点列表
	 */
	public void searchTraversing(GraphNode node, List<GraphNode> visited) {
		// 判断是否遍历过
		if (visited.contains(node)) {
			return;
		}

		visited.add(node);
		System.out.println("节点:" + node.getLabel());
		for (int i = 0; i < node.edgeList.size(); i++) {
			searchTraversing(node.edgeList.get(i).getNodeRight(), visited);
		}
	}
}
广度优先搜索:
public class BFSearch {

	/**
	 * 广度优先搜索
	 * BFSearch
	 * @param node
	 * 			搜索的入口节点
	 */
	public void searchTraversing(GraphNode node) {
		List<GraphNode> visited = new ArrayList<GraphNode>(); // 已经被访问过的元素
		Queue<GraphNode> q = new LinkedList<GraphNode>(); // 用队列存放依次要遍历的元素
		q.offer(node);

		while (!q.isEmpty()) {
			GraphNode currNode = q.poll();
			if (!visited.contains(currNode)) {
				visited.add(currNode);
				System.out.println("节点:" + currNode.getLabel());
				for (int i = 0; i < currNode.edgeList.size(); i++) {
					q.offer(currNode.edgeList.get(i).getNodeRight());
				}
			}
		}
	}
}


 226
226


 被折叠的 条评论
为什么被折叠?
被折叠的 条评论
为什么被折叠?
 到【灌水乐园】发言


