


mysql_config_editor set --login-path=client --host=localhost --user=localuser --password
这样我们就配置了一个为本地的数据源信息:
login-path :指定通过mysql客户端登录时的标识
host:我们要连接的数据库
user: 通过本地连接数据库时,使用的账号
password:指定通过本地连接时,使用的数据库密码(这里假设输入的密码为password1)
当然,如果通过远程连接,我们可能还要加上特定的端口信息。这样,当我们登录数据库时,只需要如下命令就可以连接到该数据库了:
mysql —login-path=client
这样我们就连接到本地数据库了。
下面我们来看看mysql_config_editor的细节部分:
由于该工具包含set/remove/print/reset/help,所以我们仅分析set功能的实现:
set功能是通过set_command函数实现的,该函数主要用于配置账号密码等数据源信息,并将该信息存储到二进制文件:
点击(此处)折叠或打开
static int set_command(void)
{
DBUG_ENTER("set_command");
DYNAMIC_STRING file_buf, path_buf;
init_dynamic_string(&path_buf, "", MY_LINE_MAX, MY_LINE_MAX);
init_dynamic_string(&file_buf, "", file_size, 3 * MY_LINE_MAX);
if (tty_password)
opt_password= get_tty_password(NullS);
if (file_size)
{
if (read_and_decrypt_file(&file_buf) == -1) //如果文件存在,就读取文件,并将文件的密文解密后存放到file_buf中.
goto error;
}
dynstr_append(&path_buf, "["); /* --login=path */
if (opt_login_path)
dynstr_append(&path_buf, opt_login_path);
else
dynstr_append(&path_buf, "client");
dynstr_append(&path_buf, "]");
if (opt_user) /* --user */
{
dynstr_append(&path_buf, "\nuser = ");
dynstr_append(&path_buf, opt_user);
}
if (opt_password) /* --password */
{
dynstr_append(&path_buf, "\npassword = ");
dynstr_append(&path_buf, opt_password);
}
if (opt_host) /* --host */
{
dynstr_append(&path_buf, "\nhost = ");
dynstr_append(&path_buf, opt_host);
}
if (opt_socket)
{
dynstr_append(&path_buf, "\nsocket = ");
dynstr_append(&path_buf, opt_socket);
}
if (opt_port)
{
dynstr_append(&path_buf, "\nport = ");
dynstr_append(&path_buf, opt_port);
}
dynstr_append(&path_buf, "\n");
/* Warn if login path already exists */
if (opt_warn && ((locate_login_path (&file_buf, opt_login_path)) //判断该login-path是否已经存在
!= NULL))
{
int choice;
printf ("WARNING : \'%s\' path already exists and will be "
"overwritten. \n Continue? (Press y|Y for Yes, any "
"other key for No) : ",
opt_login_path);
choice= getchar();
if (choice != (int) 'y' && choice != (int) 'Y’) //如果login-path存在是否选择覆盖
goto done; /* skip */
}
/* Remove the login path. */
remove_login_path(&file_buf, opt_login_path); //从原来文件中读取的内容中,删掉该login-path信息
/* Append the new login path to the file buffer. */
dynstr_append(&file_buf, path_buf.str); //将该login-path的信息加到file_buf的末尾
if (encrypt_and_write_file(&file_buf) == -1) //将包含新的log-path的所有信息和原来的信息加密写入文件
goto error;
done:
dynstr_free(&file_buf);
dynstr_free(&path_buf);
DBUG_RETURN(0);
error:
dynstr_free(&file_buf);
dynstr_free(&path_buf);
DBUG_RETURN(-1);
}
代码的具体逻辑如下:
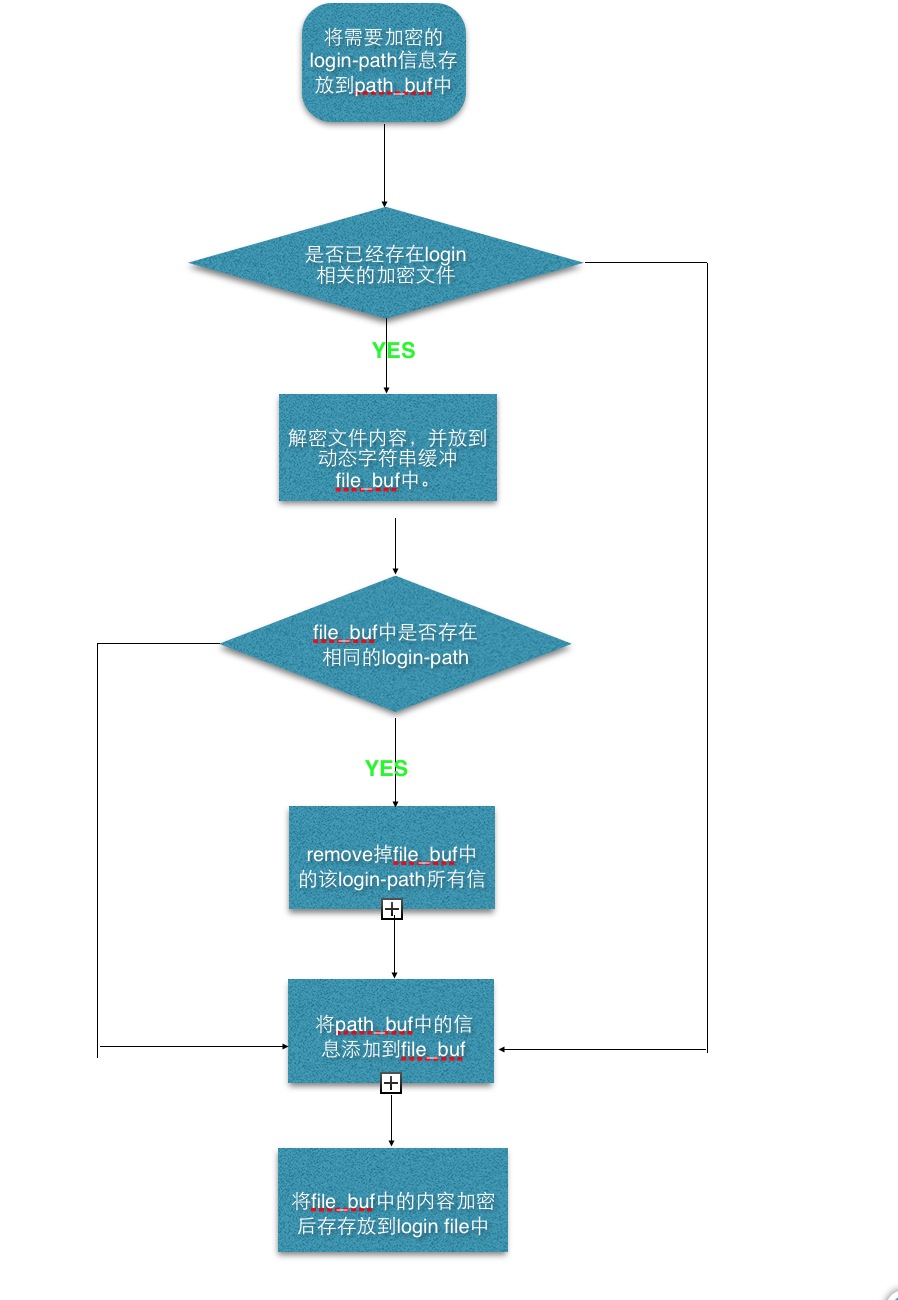
在这里我们重点看看其中涉及的几个重要的函数:
read_and_decrypt_file (读取文件内容,并解密后放到动态字符缓冲中)
locate_login_path(判断该login-path是否已经存在)
remove_login_path(如果login-path存在,则删除该login-path)
dynstr_append(&file_buf, path_buf.str); 将新的login-path添加到file_buf 末尾
encrypt_and_write_file(&file_buf) 将file_buf中的信息解码后写入到文件中
首先我们来看看加密后的文件格式如下:
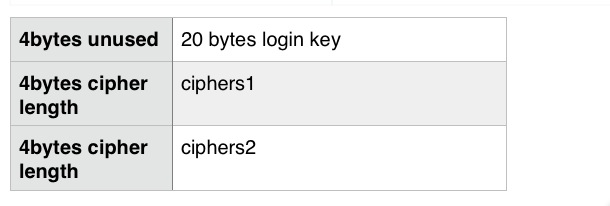
这里我们假设之前已经存在加密的文件了.
由于加密文件的前4个byte为’\0’,是未使用的,所以跳过解密环节。之后,紧接着的20个bytes是存放的对称加密算法的秘钥,而这部分内容在read_and_decrypt_file(read_login_key获取)调用之前已经读取取到,所以也要跳过。
因此read_and_decrypt_file的过程如下:
点击(此处)折叠或打开
/*
Header length for the login file.
4-byte (unused) + LOGIN_KEY_LEN
*/
#define MY_LOGIN_HEADER_LEN (4 + LOGIN_KEY_LEN)
static int read_and_decrypt_file(DYNAMIC_STRING *file_buf)
{
DBUG_ENTER("read_and_decrypt_file");
char cipher[MY_LINE_MAX], plain[MY_LINE_MAX];
uchar len_buf[MAX_CIPHER_STORE_LEN];
int cipher_len= 0, dec_len= 0;
/* Move past key first. */
if (my_seek(g_fd, MY_LOGIN_HEADER_LEN, SEEK_SET, MYF(MY_WME)) //跳过之前的unused bytes和login key部分
!= (MY_LOGIN_HEADER_LEN))
goto error; /* Error while seeking. */
/* First read the length of the cipher. */
while (my_read(g_fd, len_buf, MAX_CIPHER_STORE_LEN, //获取密文的长度
MYF(MY_WME)) == MAX_CIPHER_STORE_LEN)
{
cipher_len= sint4korr(len_buf); //将密文的长度转换成整形
if (cipher_len > MY_LINE_MAX)
goto error;
/* Now read 'cipher_len' bytes from the file. */
if ((int) my_read(g_fd, (uchar *) cipher, cipher_len, MYF(MY_WME)) == cipher_len) //读取相应密文长度的密文
{
if ((dec_len= decrypt_buffer(cipher, cipher_len, plain)) < 0) //解密该密文
goto error;
plain[dec_len]= 0;
dynstr_append(file_buf, plain); //将解密后的密文追加到file_buf中
}
}
verbose_msg("Successfully decrypted the login file.\n");
DBUG_RETURN(0);
error:
my_perror("couldn't decrypt the file");
DBUG_RETURN(-1);
}
所以该函数的过程,就变为下面四个步骤的重复,只到文件中所有的密文都解密。这样,file_buf中就包含了所有的文件的明文信息:
1.获取密文的长度
2.根据获取的长度,读取文件中的密文
3.根据读取到的密文,进行解密
4.将解密后的内容,追加到file_buf缓冲区中。
在函数中,我们看到会将获取到的密文的长度,通过sint4korr转换,那是为什么呢 ?
从上面我们可以知道,一个cipher其实有一个 4bytes的长度+cipher的字符串
所以,通过int4store 将cipher的长度存储在cipher字符串的前4个bytes中,通过sint4korr将cipher前4个bytes中的
值转化为实际的cipher长度:
点击(此处)折叠或打开
#define int4store(T,A) do { *((char *)(T))=(char) ((A));\
*(((char *)(T))+1)=(char) (((A) >> 8));\
*(((char *)(T))+2)=(char) (((A) >> 16));\
*(((char *)(T))+3)=(char) (((A) >> 24));\
} while(0)
#define sint4korr(A) (int32) (((int32) ((uchar) (A)[0])) +\
(((int32) ((uchar) (A)[1]) << 8)) +\
(((int32) ((uchar) (A)[2]) << 16)) +\
(((int32) ((int16) (A)[3]) << 24)))
接下来再看看locate_login_path函数的实现:
点击(此处)折叠或打开
static char* locate_login_path(DYNAMIC_STRING *file_buf, const char *path_name)
{
DBUG_ENTER("locate_login_path");
char *addr= NULL;
DYNAMIC_STRING dy_path_name;
init_dynamic_string(&dy_path_name, "", 512, 512); // 初始化dy_path_name动态字符串
//将dy_path_name 设置为[path_name]
dynstr_append(&dy_path_name, "\n[“);
dynstr_append(&dy_path_name, path_name);
dynstr_append(&dy_path_name, "]");
//检查第一个login-path是否就是要寻找的login-path
/* First check if it is the very first login path. */
if (file_buf->str == strstr(file_buf->str, dy_path_name.str + 1))
addr= file_buf->str;
/* If not, scan through the file. */
else
{
addr= strstr(file_buf->str, dy_path_name.str);
if (addr)
addr ++; /* Move past '\n' */
}
dynstr_free(&dy_path_name);
DBUG_RETURN(addr); //返回找到的login-path在file_buf的首地址
}
该函数主要是寻找login-path是否能已经存在,如果已经存在,返回该login-path在file_buf中的首地址。
如果该login-path已经存在,那么我们可能会选择remove该login-path,然后在添加该login-path。
接下来我们看看remove login-path的实现:
点击(此处)折叠或打开
static void remove_login_path(DYNAMIC_STRING *file_buf, const char *path_name)
{
DBUG_ENTER("remove_login_path");
char *start=NULL, *end= NULL;
int to_move, len, diff;
if((start= locate_login_path(file_buf, path_name)) == NULL) //如果该login-path不存在,直接结束
/* login path was not found, skip.. */
goto done;
end= strstr(start, "\n[“); // end为从start开始寻找,下一个login-path的起始位置
if (end) //如果该login-path是file_buf中间的某一个login-path
{
end ++; /* Move past '\n' */
len= ((diff= (start - end)) > 0) ? diff : - diff;
to_move= file_buf->length - (end - file_buf->str);
}
else //如果该login-path是该file_buf中最后一个log-path
{
*start= '\0';
file_buf->length= ((diff= (file_buf->str - start)) > 0) ? diff : - diff;
goto done;
}
while(to_move —) //将该login-path之后的login-path整体前移,覆盖move掉的login-path
*(start ++)= *(end ++);
*start= '\0';
file_buf->length -= len;
done:
DBUG_VOID_RETURN;
}
该函数主要是覆盖已经存在的login-path相关的字符串。
函数:dynstr_append(&file_buf, path_buf.str) ,将新添加的login-path内容,添加到file_buf的末尾。
最后来看看最重要,也是最核心的加密函数encrypt_and_write_file的实现:
点击(此处)折叠或打开
static int encrypt_and_write_file(DYNAMIC_STRING *file_buf)
{
DBUG_ENTER("encrypt_and_write_file");
my_bool done= FALSE;
char cipher[MY_LINE_MAX], *tmp= NULL;
uint bytes_read=0, len= 0;
int enc_len= 0; // Can be negative.
if (reset_login_file(0) == -1) //清空文件,并重新生成随机加密秘钥,并将对称加密秘钥写入文件头部
goto error;
/* Move past key first. */
if (my_seek(g_fd, MY_LOGIN_HEADER_LEN, SEEK_SET, MYF(MY_WME))
!= (MY_LOGIN_HEADER_LEN))
goto error; /* Error while seeking. */
tmp= &file_buf->str[bytes_read];
while(! done)
{
len= 0;
while(*tmp++ != '\n’) //读取file_buf中的每一行内容
if (len < (file_buf->length - bytes_read))
len ++;
else
{
done= TRUE;
break;
}
if (done)
break;
if ((enc_len= encrypt_buffer(&file_buf->str[bytes_read],++len,cipher+MAX_CIPHER_STORE_LEN))<0) //对读到的这一行内容进行加密,并将密文存放到cipher + MAX_CIPHER_STORE_LEN的地址处
goto error;
bytes_read += len;
if (enc_len > MY_LINE_MAX)
goto error;
/* Store cipher length first. */
int4store(cipher, enc_len); //将密文的长度存放到cipher的头部
if ((my_write(g_fd, (const uchar *)cipher, enc_len + MAX_CIPHER_STORE_LEN,
MYF(MY_WME))) != (enc_len + MAX_CIPHER_STORE_LEN)) //将该行加密过的密文写到文件
goto error;
}
verbose_msg("Successfully written encrypted data to the login file.\n");
/* Update file_size */
file_size= bytes_read; //更新文件大小
DBUG_RETURN(0);
error:
my_perror("couldn't encrypt the file");
DBUG_RETURN(-1);
}
该函数主要功能如下:
读取file_buf中一行
对读取到的行,根据产生的KEY进行加密,将加密后的内容存放到cipher+MAX_CIPHER_STORE_LEN地址处
将密文的长度存放到cipher和cipher+MAX_CIPHER_STORE_LEN之间的地址
将cipher写入文件
更新文件大小
上述1~5一直循环至file_buf中的内容全部加密,并全部写入到文件中为止!
下一节会讲到具体采用的加密算法,并会通过相关的解密算法,编写程序对该文件进行解密操作!!


 2137
2137


 被折叠的 条评论
为什么被折叠?
被折叠的 条评论
为什么被折叠?
 到【灌水乐园】发言


