


4 安装 PHP5
我们需要安装 PHP5 和 Apache PHP5 模块,运行命令:
yum install php
重启 Apache :
systemctl restart httpd.service
5 测试PHP5/获取关于PHP5安装详细信息
在默认根目录下创建一个探针文件:
vi /var/www/html/info.php
phpinfo();
?>
打开浏览器访问探针文件 (例如 http://192.168.0.100/info.php):
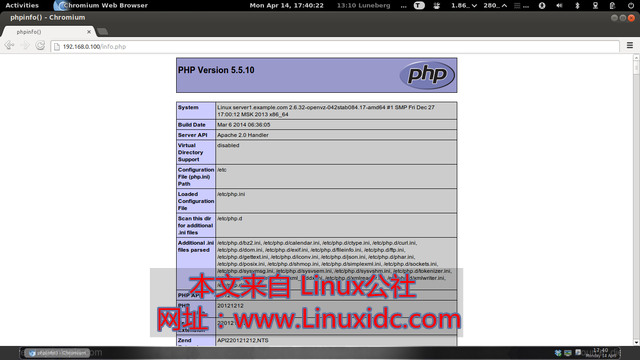
正如你看到的,PHP5正在运行,再向下滚动,你会看到PHP5中已经启用了所有模块。 MySQL是没有被列入其中,这意味着现在还不支持MySQL。
6 让PHP5支持MySQL
我们需要安装一个模块使得php5支持mysql,先查询一下安装包
yum search php
使用下面的命令进行安装:
yum install php-mysqlnd php-mssql php-opcache
在重启Apache2:
systemctl restart httpd.service
现在刷新 http://192.168.0.100/info.php模块是否安装成功,看PHP5是否已经支持Mysql。

7 安装phpMyAdmin来管理Mysql
phpmyadmin是一款基于php语言编写的管理 MySQL数据库的图形化软件。
使用下面的命令安装phpMyAdmin:
yum install phpmyadmin
现在配置 phpMyAdmin。我们需要改变 Apache 配置来让 phpMyAdmin 支持 localhost 连接(去掉/usr/share/phpMyAdmin/前面的注释,这样就准许访问)
vi /etc/httpd/conf.d/phpMyAdmin.conf
# phpMyAdmin - Web based MySQL browser written in php
#
# Allows only localhost by default
#
# But allowing phpMyAdmin to anyone other than localhost should be considered
# dangerous unless properly secured by SSL
Alias /phpMyAdmin /usr/share/phpMyAdmin
Alias /phpmyadmin /usr/share/phpMyAdmin
#
# # Apache 2.4
#
# Require ip 127.0.0.1
# Require ip ::1
#
#
#
# # Apache 2.2
# Order Deny,Allow
# Deny from All
# Allow from 127.0.0.1
# Allow from ::1
#
Require all granted
# Apache 2.4
Require ip 127.0.0.1
Require ip ::1
# Apache 2.2
Order Deny,Allow
Deny from All
Allow from 127.0.0.1
Allow from ::1
# These directories do not require access over HTTP - taken from the original
# phpMyAdmin upstream tarball
#
Order Deny,Allow
Deny from All
Allow from None
Order Deny,Allow
Deny from All
Allow from None
Order Deny,Allow
Deny from All
Allow from None
# This configuration prevents mod_security at phpMyAdmin directories from
# filtering SQL etc. This may break your mod_security implementation.
#
#
#
# SecRuleInheritance Off
#
#
重启Apache:
systemctl restart httpd.service
访问phpMyAdmin输入地址 http://192.168.0.100/phpmyadmin/:


 98
98


 被折叠的 条评论
为什么被折叠?
被折叠的 条评论
为什么被折叠?
 到【灌水乐园】发言


