


kinetic
kinetic: Documentation generated on June 10, 2019 at 10:58 PM
Package Summary
Released
Continuous Integration
Documented
Simple velocity controlled arm. Teleoperation software and firmware.
Maintainer status: maintained
Maintainer: Daniel Snider
Author: Daniel Snider , Matthew Mirvish
License: Unlicense
Overview
A simple arm system. Features include:velocity control of arm joint motors
fast and slow motor speed modifier buttons
open and close a gripper (single speed)
control of a camera servo (up and down only)
simple Arduino firmware to talk to PWM motors and a servo
This package does not do the following:no tf publishing
no URDF
no PID control loop
no integration with ros_control or MoveIt!
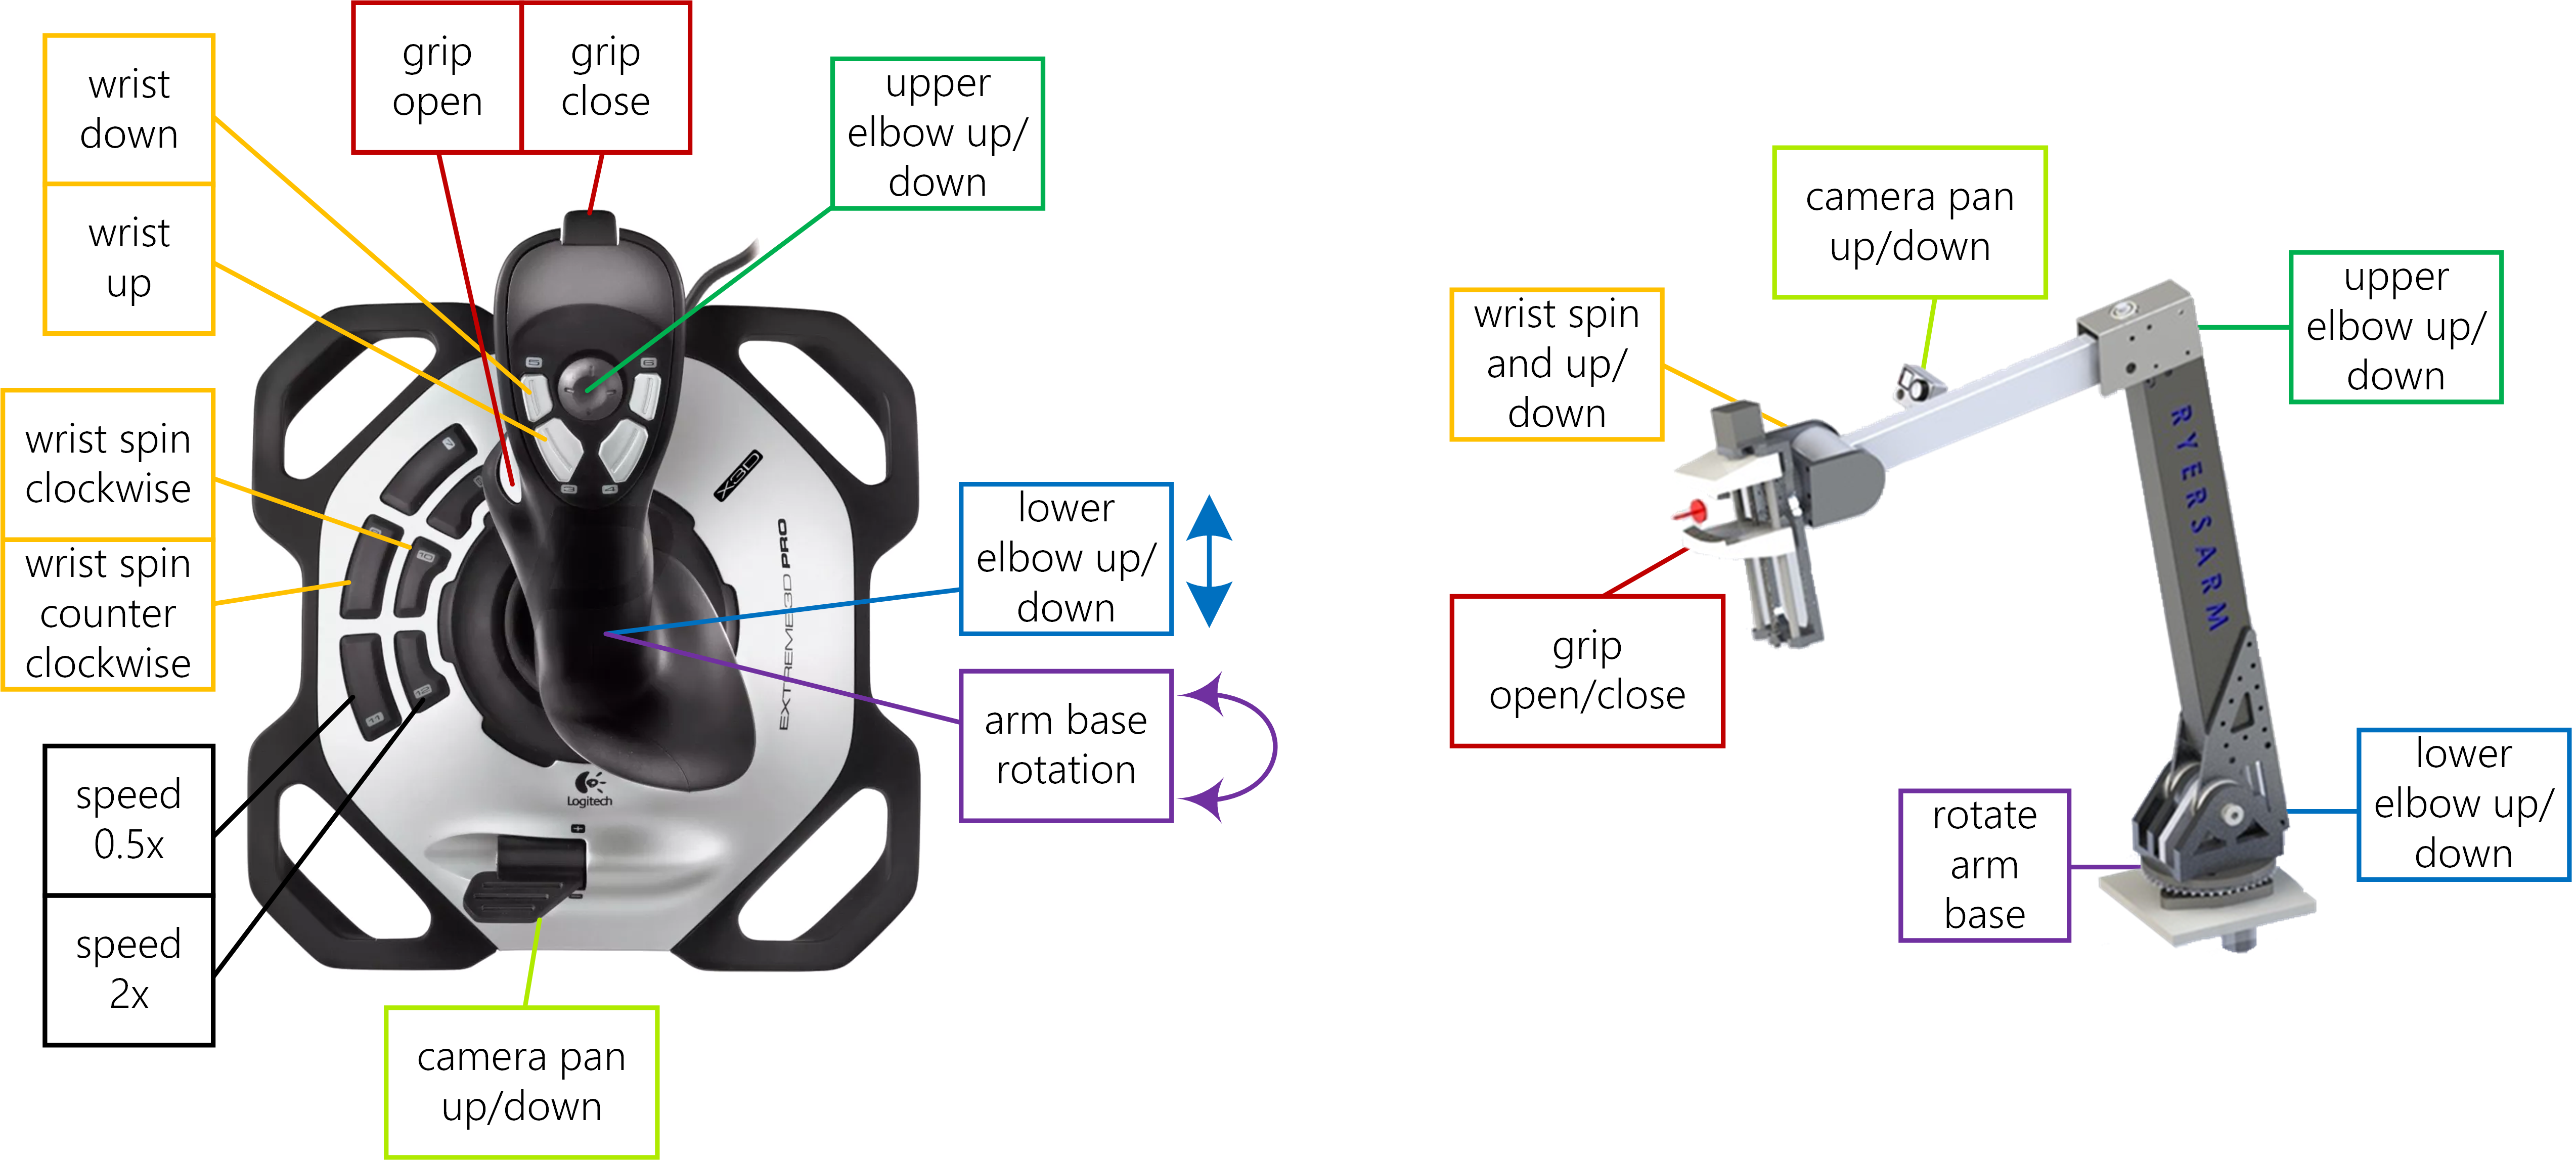
This diagram is also available in Visio format.
Package created by Ryerson University students for the University Rover Competition, summer 2017.
Quick Start
1. Install:
$ sudo apt-get install ros-kinetic-simple-arm
2. Launch:$ roslaunch simple_arm simple_arm.launch joystick_serial_dev:=/dev/input/js0 microcontroller_serial_dev:=/dev/ttyACM0
3. Install the arm_firmware onto a microcontroller connected to the arm joint motors by PWM. The microcontroller must also be connected to the computer running the simple_arm ROS node by a serial connection (ex. USB).
4. Move your robot arm.
Nodes
simple_arm
This node converts sensor_msgs/Joy messages from the joy node into a variety of commands that are sent over serial to a microcontroller to drive the robot arm.
The button mapping was tested on a Logitech Extreme 3D Pro joystick and should only need small modifications for similar controllers.
Subscribed Topics
joy_arm (sensor_msgs/Joy) Joystick state is received on this topic. See joy node for more info.
Parameters
~microcontroller_serial_device (string, default: /dev/ttyACM0) The microcontroller, often an Arduino, as seen in linux, that this node will send motor commands to.~baudrate (int, default: 9600) The serial device data transmission rate in bits per second (baud).
Serial Protocol
This node communicates with the arm_firmware using a simple serial protocol. Each serial motion command is a list of floats, one for each joint.
Serial data packet:(FLOAT) GRIP,
(FLOAT) WRIST_ROLL,
(FLOAT) WRIST_PITCH,
(FLOAT) UPPER_ELBOW,
(FLOAT) LOWER_ELBOW,
(FLOAT) BASE_YAW,
(FLOAT) CAMERA
arm_firmware
The arm_firmware microcontroller code does the minimum amount of work possible to receive motor commands from a USB serial connection and output voltages to digital PWM output to be received by motor controllers.
We connected an Arduino by USB serial to our main robot computer. We tested on a Arduino Mega 2560, however many other boards should work with the same code and setup steps thanks to PlatformIO. You may need to change to change the pin numbers.
 Caution! This software does not stop moving the robot if no messages are received for certain period of time. A pull request for this is very welcome.
PlatformIO
We deploy the arm_firmware to an Arduino microcontroller using PlatformIO.
 We like PlatformIO: "Single source code. Multiple platforms." PlatformIO supports approximately 200Embedded Boards and all majorDevelopment Platforms. Learn more onplatformio.org.
Install and configure arm_firmware
This steps were tested on Ubuntu 16.04.
1. Install PlatformIO
$ sudo python -c "$(curl -fsSL https://raw.githubusercontent.com/platformio/platformio/master/scripts/get-platformio.py)"
# Enable Access to Serial Ports (USB/UART)
$ sudo usermod -a -G dialout
$ curl https://raw.githubusercontent.com/platformio/platformio/develop/scripts/99-platformio-udev.rules > /etc/udev/rules.d/99-platformio-udev.rules
# After this file is installed, physically unplug and reconnect your board.
$ sudo service udev restart
2. Create a PlatformIO project
$ roscd simple_arm
$ cd ./arm_firmware/
# Find the microcontroller that you have in the list of PlatformIO boards
$ pio boards | grep -i mega2560
# Use the name of your board to initialize your project
$ pio init --board megaatmega2560
3. Modify wiring if necessary
$ vim src/main.cpp +9
Depending on how you want to wire your microcontroller this wiring can be changed:
struct JOINTPINS{
int wrist_roll = 9; // wrist roll pin
int wrist_pitch = 10; // wrist pitch pin
int upper_elbow = 11; // upper elbow pin
int lower_elbow = 12; // lower elbow pin
int base_yaw = 13; // base yaw pin
int grip_enable = A4; // gripper enable pin
int grip_open = A5; // gripper open pin
int grip_close = A6; // gripper close pin
int cam_tilt = 7; // camera servo pin
}pins;
4. Modify PWM Settings
$ vim src/main.cpp +4
Edit the following section to match your motor controller PWM specs:
// PWM specs of the Victor SP motor controller.
// https://www.vexrobotics.com/217-9090.html
#define sparkMax 650// Full-reverse input pulse
#define sparkMin 2350// Full-forward input pulse
5. Deploy Code to Arduino
$ pio run --target upload
6. Move your robot arm!

Have fun!
Feedback
Feature requests, bug reports, and contributions are welcome at https://github.com/danielsnider/simple_arm.
Special thanks to anyone who sends a picture of this package in action on their robot!


 200
200


 被折叠的 条评论
为什么被折叠?
被折叠的 条评论
为什么被折叠?
 到【灌水乐园】发言


