


一般情况下,我们会在web.xml下配置好Spring和SpringMVC,并指定好它们的配置文件
是最常用的也是最方便的方法
例如:
web.xml
contextConfigLocation
/WEB-INF/spring/root-context.xml
org.springframework.web.context.ContextLoaderListener
appServlet
org.springframework.web.servlet.DispatcherServlet
contextConfigLocation
/WEB-INF/spring/appServlet/servlet-context.xml
1
appServlet
/
今天介绍的是纯java配置,不基于xml,
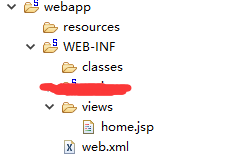
web.xml中一句代码都不用写。
文件目录:
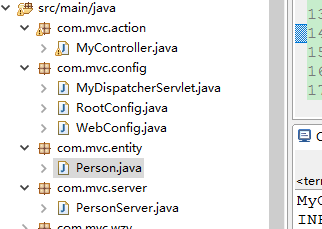
1.Spring容器的配置文件
package com.mvc.config;
import org.springframework.context.annotation.ComponentScan;
import org.springframework.context.annotation.Configuration;
@Configuration//标识是配置文件
@ComponentScan("com.mvc.server") //指定自动扫描的包
public classRootConfig {//在这里可以配置任何的bean,是基于Spring容器的
}
2.SpringMVC容器的配置文件
package com.mvc.config;
import org.springframework.context.annotation.Bean;
import org.springframework.context.annotation.ComponentScan;
import org.springframework.context.annotation.Configuration;
import org.springframework.web.servlet.ViewResolver;
import org.springframework.web.servlet.config.annotation.DefaultServletHandlerConfigurer;
import org.springframework.web.servlet.config.annotation.EnableWebMvc;
import org.springframework.web.servlet.config.annotation.WebMvcConfigurerAdapter;
import org.springframework.web.servlet.view.InternalResourceViewResolver;
@Configuration
@EnableWebMvc //表示这个类是SpringMVC的配置文件
@ComponentScan("com.mvc.action")//注意扫描的包public classWebConfig extends WebMvcConfigurerAdapter{
@BeanpublicViewResolver viewResolver(){
//配置视图解析器
InternalResourceViewResolver resolver= newInternalResourceViewResolver();
resolver.setPrefix("/WEB-INF/views/");
resolver.setSuffix(".jsp");
resolver.setExposeContextBeansAsAttributes(true);returnresolver;
}
@Overridepublic voidconfigureDefaultServletHandling(
DefaultServletHandlerConfigurer configurer){
//配置静态资源的处理
configurer.enable();
}
}
3.配置自定义的DispatcherServlet,在tomcat启动的时候,会找到这个类,并自动加载它,所以web.xml中不用再写任何有关Spring配置的代码
package com.mvc.config;
import org.springframework.web.servlet.support.AbstractAnnotationConfigDispatcherServletInitializer;public classMyDispatcherServlet
extends AbstractAnnotationConfigDispatcherServletInitializer{
@Overrideprotected Class>[] getRootConfigClasses() {return new Class>[]{RootConfig.class};//加载Spring的配置类
}
@Overrideprotected Class>[] getServletConfigClasses() {return new Class>[]{WebConfig.class};加载SpringMVC的配置类
}
@OverrideprotectedString[] getServletMappings() {return new String[]{"/"}; //映射路径
}
}
以上,Spring和SpringMVC的配置文件就写好了
4.下面编写控制器,这里的代码就是平时写的类型
package com.mvc.action;
import java.util.Map;
import org.springframework.beans.factory.annotation.Autowired;
import org.springframework.stereotype.Controller;
import org.springframework.web.bind.annotation.RequestMapping;
import com.mvc.server.PersonServer;
@Controllerpublic classMyController {
@AutowiredprivatePersonServer p;publicMyController(){
System.out.println("MyController...");
}
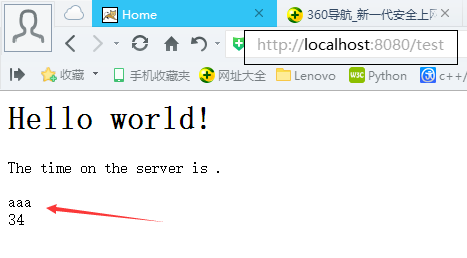
@RequestMapping("test")publicString test(Map map){
map.put("p", p.getPerson());
System.out.println("test...");return "home";
}
}
5.编写服务层
package com.mvc.server;
import org.springframework.stereotype.Service;
import com.mvc.entity.Person;
@Servicepublic classPersonServer {publicPersonServer(){
System.out.println("PersonServer..");
}publicPerson getPerson(){return new Person("aaa",34);
}
}
6.实体类
package com.mvc.entity;public classPerson {publicPerson(){}publicPerson(String name, Integer age) {this.name =name;this.age =age;
}privateString name;privateInteger age;publicString getName() {returnname;
}public voidsetName(String name) {this.name =name;
}publicInteger getAge() {returnage;
}public voidsetAge(Integer age) {this.age =age;
}
@OverridepublicString toString() {return "Person [name=" + name + ", age=" + age + "]";
}
}
配置好后,启动tomcat,就可以正常访问了。
需要注意的是WebConfig.java、RootConfig.java、MyDispatcherServlet.java这三个配置类,其他的没什么区别


 1912
1912


 被折叠的 条评论
为什么被折叠?
被折叠的 条评论
为什么被折叠?
 到【灌水乐园】发言


