豆子经常写些Powershell的小脚本用来管理Windows服务器。有的时候我希望能够把这些小工具分享给同事,不过有些同事对于Powershell一窍不通,对于脚本控制台界面更是深恶痛绝,如果有些傻瓜化的图像界面便于操作就好了。豆子在网上做了些小研究,写了个简单的测试界面,下面分享一下心得。
网上有一些第三方的付费工具可以直接进行GUI的开发,穷人舍不得花钱,豆子用的是微软的Visual Studio 2015的社区版。这个是版本是免费下载的,下载安装很费时间,大概花了2个小时。这个是下载链接 https://www.visualstudio.com/en-us/downloads/download-visual-studio-vs.aspx
简单的说,我需要在visual studio 上设计图形界面,生成对应的XAMl文件。XAML是基于XML的语言,一般用来定义Windows的图像界面。如果能想办法在Powershell里面识别出XAML文件的元素,Powershell就可以直接生成对应的图像界面。每一个元素对象都有自己的属性和方法,因此我可以直接对他们进行操作。
这篇博文微软官方提供了一个很好的脚本对XAML文件进行翻译,并进行了详细解释
下面这个博文提供了一个模板,他基于上一篇的脚本进行了加工,操作变得更简单。我们需要的就是生成XAMI文件,然后拷贝到其对应的字符串里,对于这个字符串的解析就不用自己操心了。
下面来个实际的例子
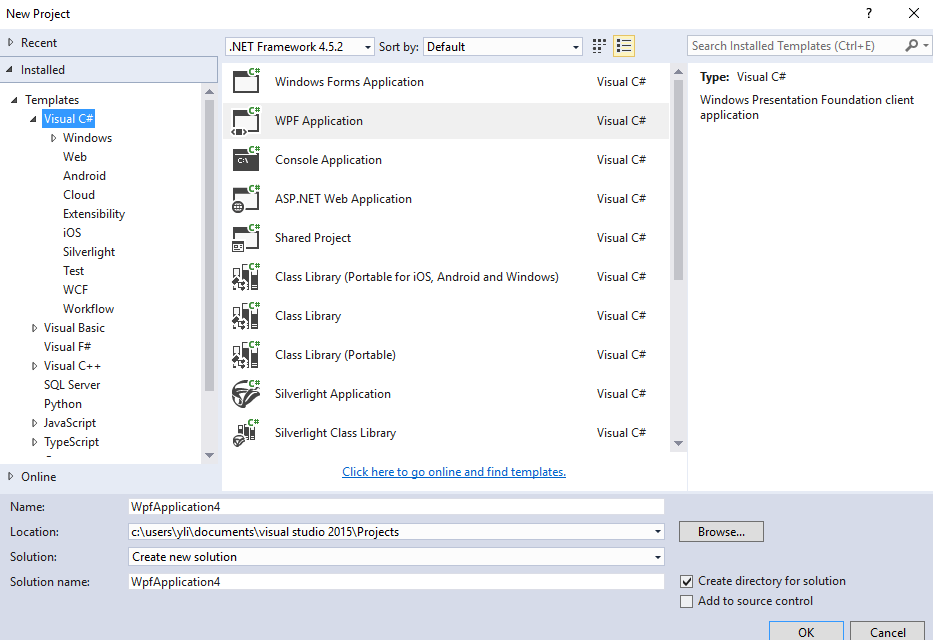
打开visual studio,然后新建一个项目,选择WPF
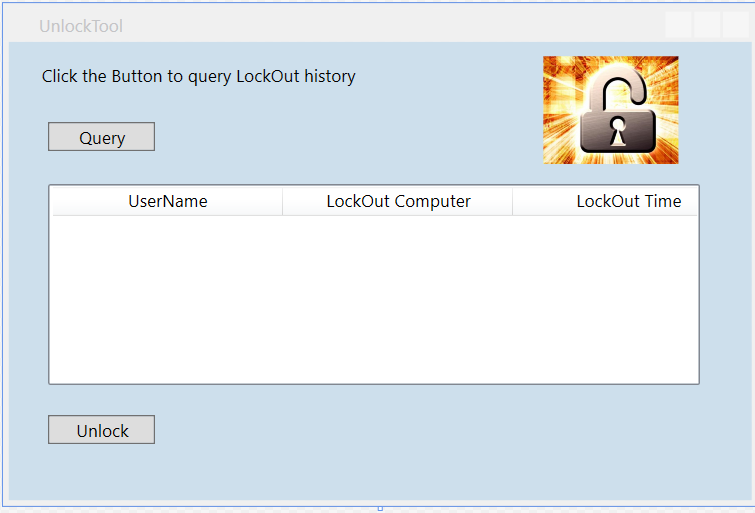
然后根据自己的需求,打开工具栏,拖曳成自己想要的界面。
比如说,下面是豆子的练习之作,我希望查询近期AD账户被锁的记录,同时可以一键解锁所有被锁账户。下面用到的几个工具是label, button, image 和listViewer,如果用过任何开发工具的人应该都很熟悉这些。
注意当我在主界面上拿鼠标拖曳这些图像控件的时候,他会自动生成对应的XAML文件
复制这些内容,然后粘贴到下面的Powershell 模板文件的@@符号之间里面。 如下所示
#ERASE ALL THIS AND PUT XAML BELOW between the @" "@
$inputXML = @"
<Window x:Class="WpfApplication3.MainWindow"
        xmlns="http://schemas.microsoft.com/winfx/2006/xaml/presentation"
        xmlns:x="http://schemas.microsoft.com/winfx/2006/xaml"
        xmlns:d="http://schemas.microsoft.com/expression/blend/2008"
        xmlns:mc="http://schemas.openxmlformats.org/markup-compatibility/2006"
        xmlns:local="clr-namespace:WpfApplication3"
        mc:Ignorable="d"
        Title="UnlockTool" Height="350" Width="525" Background="#FFCDDFEC">
    <Grid>
        <Label x:Name="label" Content="Click the Button to query LockOut history" HorizontalAlignment="Left" Margin="18,10,0,0" VerticalAlignment="Top" Width="292"/>
        <Button x:Name="button" Content="Query" HorizontalAlignment="Left" Margin="27,56,0,0" VerticalAlignment="Top" Width="75"/>
        <Button x:Name="button1" Content="Unlock" HorizontalAlignment="Left" Margin="27,260,0,0" VerticalAlignment="Top" Width="75"/>
        <ListView x:Name="listView" HorizontalAlignment="Left" Height="140" Margin="27,99,0,0" VerticalAlignment="Top" Width="454">
            <ListView.View>
                <GridView>
                    <GridViewColumn Header="UserName" DisplayMemberBinding ="{Binding 'username'}" Width="160"/>
                    <GridViewColumn Header="LockOut Computer" DisplayMemberBinding ="{Binding 'computer'}" Width="160"/>
                    <GridViewColumn Header="LockOut Time" DisplayMemberBinding ="{Binding 'time'}" Width="160"/>
                </GridView>
            </ListView.View>
        </ListView>
        <Image x:Name="image" HorizontalAlignment="Left" Height="75" Margin="372,10,0,0" VerticalAlignment="Top" Width="95" Source="c:\temp\unlock.png"/>
    </Grid>
</Window>
"@
$inputXML = $inputXML -replace 'mc:Ignorable="d"','' -replace "x:N",'N'  -replace '^<Win.*', '<Window'
[void][System.Reflection.Assembly]::LoadWithPartialName('presentationframework')
[xml]$XAML = $inputXML
#Read XAML
    $reader=(New-Object System.Xml.XmlNodeReader $xaml)
  try{$Form=[Windows.Markup.XamlReader]::Load( $reader )}
catch{Write-Host "Unable to load Windows.Markup.XamlReader. Double-check syntax and ensure .net is installed."}
#===========================================================================
# Store Form Objects In PowerShell
#===========================================================================
$xaml.SelectNodes("//*[@Name]") | %{Set-Variable -Name "WPF$($_.Name)" -Value $Form.FindName($_.Name)}
Function Get-FormVariables{
if ($global:ReadmeDisplay -ne $true){Write-host "If you need to reference this display again, run Get-FormVariables" -ForegroundColor Yellow;$global:ReadmeDisplay=$true}
write-host "Found the following interactable elements from our form" -ForegroundColor Cyan
get-variable WPF*
}
Get-FormVariables
#===========================================================================
# Actually make the objects work
#===========================================================================

#===========================================================================
# Shows the form
#===========================================================================
write-host "To show the form, run the following" -ForegroundColor Cyan
function Show-Form{
$Form.ShowDialog() | out-null
}
Show-Form
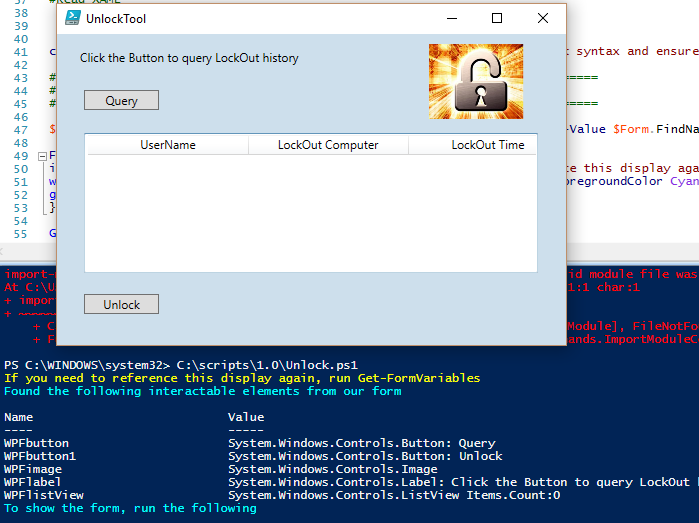
如果直接执行上面的代码的话,Powershell ISE 会生成对应的图像界面,并且在控制台输出当前的元素对象,这些解析出来的元素对象是可以直接在powershell里面操作的。
界面有了,接下来我需要添加真正的操作代码。
首先自己写一个方法从PDC上获取4740日志,这个需要事先在GPO上打开审计功能。对其XML的内容格式进行分析之后,进行输出,获取自己需要的内容。这里我需要知道用户名,从哪里锁住的,以及锁住的时间。
关于Windows 日志处理,可以参考我的另外一篇博文
http://beanxyz.blog.51cto.com/5570417/1695288
function get-lockout{
$eventcritea = @{logname='security';id=4740}
$Events =get-winevent -ComputerName (Get-ADDomain).pdcemulator -FilterHashtable $eventcritea
#$Events = Get-WinEvent -ComputerName syddc01 -Filterxml $xmlfilter

# Parse out the event message data
ForEach ($Event in $Events) {

    # Convert the event to XML
    $eventXML = [xml]$Event.ToXml()

    # Iterate through each one of the XML message properties
    For ($i=0; $i -lt $eventXML.Event.EventData.Data.Count; $i++) {


        # Append these as object properties
        Add-Member -InputObject $Event -MemberType NoteProperty -Force -Name  $eventXML.Event.EventData.Data[$i].name -Value $eventXML.Event.EventData.Data[$i].'#text'
    }
}
$events | select  @{n='UserName';e={$_.targetusername}},@{n='Computer';e={$_.targetdomainname}},@{n='time';e={$_.timecreated}}
}
接下来写事件的函数,比如单击第一个按钮,自动调用get-lockout方法,通过管道进行输出;第二个按钮直接解锁所有的用户。
$WPFbutton.add_click({
get-lockout | %{$WPFlistView.AddChild($_)}
}
  )

$WPFbutton1.add_click(
{
Search-ADAccount -LockedOut | ForEach-Object {Unlock-ADAccount -Identity $_.distinguishedname -PassThru }
})
注意第一个按钮的事件,我这里试图一行一行的在GridView里面添加数据,默认情况下他并不知道哪里数据需要添加,而是会把所有的数据都加在每一格子的数据里面,因此我们需要在前面的Grid定义里面手动绑定一下,注意DisplayMemberBinding 里面绑定的是我自定义的输出字段的名字
<ListView.View>
                <GridView>
                    <GridViewColumn Header="UserName" DisplayMemberBinding ="{Binding 'username'}" Width="160"/>
                    <GridViewColumn Header="LockOut Computer" DisplayMemberBinding ="{Binding 'computer'}" Width="160"/>
                    <GridViewColumn Header="LockOut Time" DisplayMemberBinding ="{Binding 'time'}" Width="160"/>
                </GridView>
            </ListView.View>
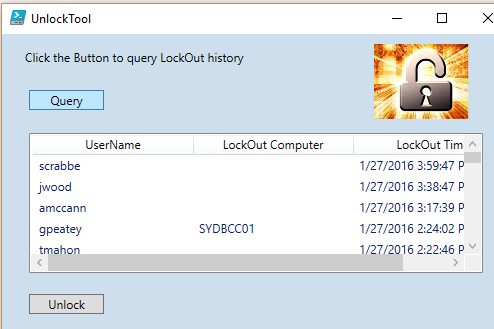
运行结果如下所示
下面是完整的脚本:
#ERASE ALL THIS AND PUT XAML BELOW between the @" "@
$inputXML = @"
<Window x:Class="WpfApplication3.MainWindow"
        xmlns="http://schemas.microsoft.com/winfx/2006/xaml/presentation"
        xmlns:x="http://schemas.microsoft.com/winfx/2006/xaml"
        xmlns:d="http://schemas.microsoft.com/expression/blend/2008"
        xmlns:mc="http://schemas.openxmlformats.org/markup-compatibility/2006"
        xmlns:local="clr-namespace:WpfApplication3"
        mc:Ignorable="d"
        Title="UnlockTool" Height="350" Width="525" Background="#FFCDDFEC">
    <Grid>
        <Label x:Name="label" Content="Click the Button to query LockOut history" HorizontalAlignment="Left" Margin="18,10,0,0" VerticalAlignment="Top" Width="292"/>
        <Button x:Name="button" Content="Query" HorizontalAlignment="Left" Margin="27,56,0,0" VerticalAlignment="Top" Width="75"/>
        <Button x:Name="button1" Content="Unlock" HorizontalAlignment="Left" Margin="27,260,0,0" VerticalAlignment="Top" Width="75"/>
        <ListView x:Name="listView" HorizontalAlignment="Left" Height="140" Margin="27,99,0,0" VerticalAlignment="Top" Width="454">
            <ListView.View>
                <GridView>
                    <GridViewColumn Header="UserName" DisplayMemberBinding ="{Binding 'username'}" Width="160"/>
                    <GridViewColumn Header="LockOut Computer" DisplayMemberBinding ="{Binding 'computer'}" Width="160"/>
                    <GridViewColumn Header="LockOut Time" DisplayMemberBinding ="{Binding 'time'}" Width="160"/>
                </GridView>
            </ListView.View>
        </ListView>
        <Image x:Name="image" HorizontalAlignment="Left" Height="75" Margin="372,10,0,0" VerticalAlignment="Top" Width="95" Source="c:\temp\unlock.png"/>
    </Grid>
</Window>
"@
$inputXML = $inputXML -replace 'mc:Ignorable="d"','' -replace "x:N",'N'  -replace '^<Win.*', '<Window'
[void][System.Reflection.Assembly]::LoadWithPartialName('presentationframework')
[xml]$XAML = $inputXML
#Read XAML
    $reader=(New-Object System.Xml.XmlNodeReader $xaml)
  try{$Form=[Windows.Markup.XamlReader]::Load( $reader )}
catch{Write-Host "Unable to load Windows.Markup.XamlReader. Double-check syntax and ensure .net is installed."}
#===========================================================================
# Store Form Objects In PowerShell
#===========================================================================
$xaml.SelectNodes("//*[@Name]") | %{Set-Variable -Name "WPF$($_.Name)" -Value $Form.FindName($_.Name)}
Function Get-FormVariables{
if ($global:ReadmeDisplay -ne $true){Write-host "If you need to reference this display again, run Get-FormVariables" -ForegroundColor Yellow;$global:ReadmeDisplay=$true}
write-host "Found the following interactable elements from our form" -ForegroundColor Cyan
get-variable WPF*
}
Get-FormVariables
#===========================================================================
# Actually make the objects work
#===========================================================================
function get-lockout{
$eventcritea = @{logname='security';id=4740}
$Events =get-winevent -ComputerName (Get-ADDomain).pdcemulator -FilterHashtable $eventcritea
#$Events = Get-WinEvent -ComputerName syddc01 -Filterxml $xmlfilter

# Parse out the event message data
ForEach ($Event in $Events) {

    # Convert the event to XML
    $eventXML = [xml]$Event.ToXml()

    # Iterate through each one of the XML message properties
    For ($i=0; $i -lt $eventXML.Event.EventData.Data.Count; $i++) {


        # Append these as object properties
        Add-Member -InputObject $Event -MemberType NoteProperty -Force -Name  $eventXML.Event.EventData.Data[$i].name -Value $eventXML.Event.EventData.Data[$i].'#text'
    }
}
$events | select  @{n='UserName';e={$_.targetusername}},@{n='Computer';e={$_.targetdomainname}},@{n='time';e={$_.timecreated}}
}
$WPFbutton.add_click({
get-lockout | %{$WPFlistView.AddChild($_)}
}
  )

$WPFbutton1.add_click(
{
Search-ADAccount -LockedOut | ForEach-Object {Unlock-ADAccount -Identity $_.distinguishedname -PassThru }
})
#Reference Sample entry of how to add data to a field
    #$vmpicklistView.items.Add([pscustomobject]@{'VMName'=($_).Name;Status=$_.Status;Other="Yes"})
    #$WPFtextBox.Text = $env:COMPUTERNAME
    #$WPFbutton.Add_Click({$WPFlistView.Items.Clear();start-sleep -Milliseconds 840;Get-DiskInfo -computername $WPFtextBox.Text | % {$WPFlistView.AddChild($_)}  })
#===========================================================================
# Shows the form
#===========================================================================
write-host "To show the form, run the following" -ForegroundColor Cyan
function Show-Form{
$Form.ShowDialog() | out-null
}
Show-Form
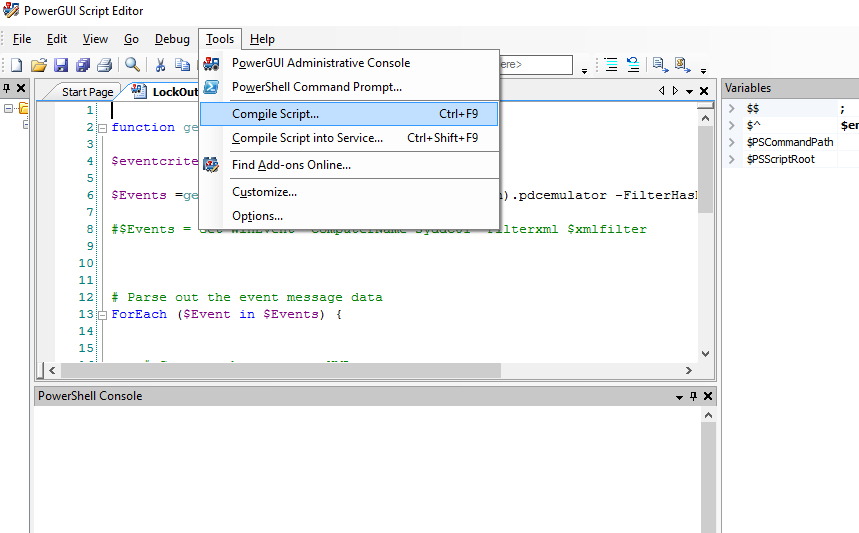
最后,豆子不希望别个看见源代码的话,可以考虑转换成EXE文件。从本质上说,powershell没法编译成可执行文件,但是可以“包装”在一个exe文件里面。一个免费的工具是PowerGUI,可以从Dell的网站上下载。
每次执行EXE其实仍然会执行一个解压的操作,然后自动加载PowerShell,这样的等待时间会稍长,因此豆子更宁愿直接运行ps1文件。





 5090
5090


 被折叠的 条评论
为什么被折叠?


