


1. 使用Preference来保存首选项数据
在res/xml下建preference的xml文件
<? xml version = "1.0"  encoding = "utf-8" ?>
<PreferenceScreen   xmlns:android = "http://schemas.android.com/apk/res/android" >
  <PreferenceCategory   android:title = "Category One" >
  <CheckBoxPreference
  android:defaultValue = "false"
  android:key = "checkboxpref"
  android:summary = "True or False"
  android:title = "CheckBox"   />
  </PreferenceCategory>
  <PreferenceCategory   android:title = "Category Two" >
  <EditTextPreference
  android:defaultValue = "[Enter a string here]"
  android:key = "editTextPref"
  android:summary = "Enter a string"
  android:title = "Edit Text"   />
  <RingtonePreference
  android:key = "ringtonepref"
  android:summary = "select a ringtone"
  android:title = "Ringtones"   />
  <PreferenceScreen
  android:key = "SecondPrefScreen"
  android:summary = "Click here to go to the second preference screen"
  android:title = "Second prefernce Screen" >
  <EditTextPreference
  android:key = "secondedittext"
  android:summary = "Enter a key"
  android:title = "Edit Text(Second Screen)"   />

  </PreferenceScreen>
  </PreferenceCategory>
</PreferenceScreen>
用到的xml的tag:
PreferenceScreen
PreferenceCategory
CheckBoxPreference
EditTextPreference
RingtonePreference
其中
PreferenceScreen
中的内容显示在同一个界面里,
PreferenceScreen
嵌入
PreferenceScreen
可以放置一个入口进入另一个界面;
PreferenceCategory
对首选项内容进行分类(视觉上的,实际调用感觉没区别);
每个首选项都有一个键值
android:key
跟View的id类似的识别作用;
public   class   MyPrefAty   extends   PreferenceActivity   {

  @Override
  protected   void  onCreate ( Bundle  savedInstanceState )   {
  super . onCreate ( savedInstanceState );

  PreferenceManager  preferenceManager  =  getPreferenceManager ();
 preferenceManager . setSharedPreferencesName ( "MySelfdefinePrefName" );

 addPreferencesFromResource ( R . xml . myapppreferences );
  }
}
继承自
PreferenceActivity
,从xml文件加载首选项界面,并且重命名该首选项的名称
用到的类:
PreferenceManager
用到的方法:
getPreferenceManager
()
setSharedPreferencesName
(
"MySelfdefinePrefName"
)
addPreferencesFromResource
(
R
.
xml
.
myapppreferences
)
public   void  onClickDisplay ( View  view )   {
  // SharedPreferences sharedPreferences = getSharedPreferences("com.example.administrator.mypreference_preferences", MODE_PRIVATE);
  SharedPreferences  sharedPreferences  =  getSharedPreferences ( "MySelfdefinePrefName" ,  MODE_PRIVATE );
  Toast . makeText ( getBaseContext (),  sharedPreferences . getString ( "editTextPref" ,   "" ),   Toast . LENGTH_SHORT ). show ();
  }

  public   void  onClickModify ( View  view )   {
  //SharedPreferences sharedPreferences = getSharedPreferences("com.example.administrator.mypreference_preferences", MODE_PRIVATE);
  SharedPreferences  sharedPreferences  =  getSharedPreferences ( "MySelfdefinePrefName" ,  MODE_PRIVATE );
  SharedPreferences . Editor  editor  =  sharedPreferences . edit ();
 editor . putString ( "editTextPref" ,   (( EditText )  findViewById ( R . id . txtString )). getText (). toString ());
 editor . commit ();
  }
用到的类:
SharedPreferences
SharedPreferences
.
Editor
用到的方法:
getSharedPreferences
(
"MySelfdefinePrefName"
,
MODE_PRIVATE
)
edit
()
putString()
commit
()
关键:
getSharedPreferences()
的第一个参数是对应首选项的xml的名称,默认是 “包名+_preferencens”,由此获得相应的首选项。修改首选项中的值 需要用到
SharedPreferences
.
Editor
2. 数据保存到内部存储
public class FileSave extends Activity {
     EditText editText;
     static final int READ_BLOCK_SIZE = 100;
     @Override
     protected void onCreate(Bundle savedInstanceState) {
     super.onCreate(savedInstanceState);
     setContentView(R.layout.myfilesavelayout);
     editText = (EditText) findViewById(R.id.edittextFile);
     }
     public void onClickLoad(View v) {
     try {
     FileInputStream fileInputStream = openFileInput("textfile.txt");
     InputStreamReader inputStreamReader = new InputStreamReader(fileInputStream);
     char[] inputBuffer = new char[READ_BLOCK_SIZE];
     String s = "";
     int charRead;
     while ((charRead = inputStreamReader.read(inputBuffer)) > 0) {
     String readString = String.copyValueOf(inputBuffer, 0, charRead);
     s += readString;
     }
     editText.setText(s);
     Toast.makeText(getBaseContext(), "File Load Successfully.", Toast.LENGTH_SHORT).show();
     } catch (FileNotFoundException e) {
     e.printStackTrace();
     } catch (IOException e) {
     e.printStackTrace();
     }
     }
     public void onClickSave(View view) {
     String string = editText.getText().toString();
     try {
     FileOutputStream fileOutputStream = openFileOutput("textfile.txt", MODE_WORLD_READABLE);
     OutputStreamWriter outputStreamWriter = new OutputStreamWriter(fileOutputStream);
     outputStreamWriter.write(string);
     outputStreamWriter.flush();
     outputStreamWriter.close();
     Toast.makeText(getBaseContext(), "File Save Successfully", Toast.LENGTH_SHORT).show();
     editText.setText("");
     } catch (IOException e) {
     e.printStackTrace();
     }
     }
    }
用到的类:
FileInputStream
InputStreamReader
FileOutputStream
OutputStreamWriter
用到的方法:
openFileInput
(
"textfile.txt"
)
read
(
inputBuffer
)
copyValueOf
(
inputBuffer
,
0
,
charRead
)
openFileOutput
(
"textfile.txt"
,
MODE_WORLD_READABLE
)
write
(
string
)
flush
()
close
()
关键点:
openFileOutput
(
"textfile.txt"
,
MODE_WORLD_READABLE
)
和
openFileInput
(
"textfile.txt"
)
都是使用相对路径,即内部存储的路径,只需要自定义文件名。
3. 保存数据到SD卡(外部存储)
public class SdSave extends Activity {
     EditText editText;
     @Override
     protected void onCreate(Bundle savedInstanceState) {
     super.onCreate(savedInstanceState);
     setContentView(R.layout.mysdlayout);
     editText = (EditText) findViewById(R.id.SDedittextFile);
     }
     public void onClickSaveSD(View view) {
     String string = editText.getText().toString();
     try {
     File sdCard = Environment.getExternalStorageDirectory();
     File directory = new File(sdCard.getAbsolutePath() + "/MyFiles");
     directory.mkdir();
     File file = new File(directory, "textfile.txt");
     FileOutputStream fileOutputStream = new FileOutputStream(file);
     OutputStreamWriter outputStreamWriter = new OutputStreamWriter(fileOutputStream);
     outputStreamWriter.write(string);
     outputStreamWriter.flush();
     outputStreamWriter.close();
     } catch (IOException e) {
     e.printStackTrace();
     }
     Toast.makeText(getBaseContext(), "Save In SD successfully!", Toast.LENGTH_SHORT).show();
     editText.setText("");
     }
     public void onClickLoadSD(View view) {
     try {
     File sdCard = Environment.getExternalStorageDirectory();
     File directory = new File(sdCard.getAbsolutePath() + "/MyFiles");
     File file = new File(directory, "textfile.txt");
     FileInputStream fileInputStream = new FileInputStream(file);
     InputStreamReader inputStreamReader = new InputStreamReader(fileInputStream);
     char[] inputBuffer = new char[100];
     String s = "";
     int charRead;
     while ((charRead = inputStreamReader.read(inputBuffer)) > 0) {
     String readString = String.copyValueOf(inputBuffer, 0, charRead);
     s += readString;
     inputBuffer = new char[100];
     }
     editText.setText(s);
     } catch (FileNotFoundException e) {
     e.printStackTrace();
     } catch (IOException e) {
     e.printStackTrace();
     }
     }
    }
用到的类:
File
Environment
FileOutputStream
OutputStreamWriter
FileInputStream
InputStreamReader
用到的方法:
getExternalStorageDirectory
()
getAbsolutePath
()
mkdir
()
write
(
string
)
flush
()
close
()
read
(
inputBuffer
)
copyValueOf
(
inputBuffer
,
0
,
charRead
)
关键在于用
getExternalStorageDirectory
()
和
getAbsolutePath
()
获得SD卡完整的路径(还需加上自定义的文件夹名和文件名)
4.使用数据库
public class DBAdapter {
 static final String KEY_ROWID = "_id";
 static final String KEY_NAME = "name";
 static final String KEY_EMAIL = "email";
 static final String TAG = "DBAdapter";

 static final String DATABASE_NAME = "MyDB3";
 static final String DATABASE_TABLE = "contacts";
 static final int DATABASE_VERSON = 1;

 static final String DATABASE_CREATE = "create table contacts (_id integer primary key autoincrement,name text not null,email text not null);";

 final Context context;

 DatabaseHelper DBHelper;

 SQLiteDatabase db;

 public DBAdapter(Context context){
 this.context = context;
 DBHelper = new DatabaseHelper(context);
 }

 private static class DatabaseHelper extends SQLiteOpenHelper{

 DatabaseHelper(Context context){
 super(context, DATABASE_NAME, null, DATABASE_VERSON);
 }

 @Override
 public void onCreate(SQLiteDatabase db) {
 db.execSQL(DATABASE_CREATE);
 }

 @Override
 public void onUpgrade(SQLiteDatabase db, int oldVersion, int newVersion) {
 Log.w(TAG,"Upgrading database from version "+oldVersion+" to "+ newVersion + ",which will destroy all old data");
 db.execSQL("DROP TABLE IF EXISTS contacts");
 onCreate(db);
 }


 }


 public DBAdapter open() throws SQLException{
 db = DBHelper.getWritableDatabase();
 //db = DBHelper.getReadableDatabase();
 return this;
 }

 public void close(){
 DBHelper.close();
 }

 public long inserContacts(String name,String email){
 ContentValues initialValues = new ContentValues();
 initialValues.put(KEY_NAME,name);
 initialValues.put(KEY_EMAIL, email);
 return db.insert(DATABASE_TABLE,null,initialValues);
 }

 public boolean deleteContact(long rowId){
 return db.delete(DATABASE_TABLE,KEY_ROWID+"="+rowId,null)>0;
 }

 public Cursor getAllContacts(){
 return db.query(DATABASE_TABLE,new String[]{KEY_ROWID,KEY_NAME,KEY_EMAIL},null,null,null,null,null);
 }

 public Cursor getContact(long rowId) throws SQLException{
 Cursor cursor = db.query(true,DATABASE_TABLE,new String[]{KEY_ROWID,KEY_NAME,KEY_EMAIL},KEY_ROWID +"="+rowId,null,null,null,null,null);
 if (cursor!=null)
 cursor.moveToFirst();
 return cursor;
 }

 public boolean updateContact(long rowId,String name,String email){
 ContentValues args = new ContentValues();
 args.put(KEY_NAME,name);
 args.put(KEY_EMAIL,email);
 return db.update(DATABASE_TABLE,args,KEY_ROWID+"="+rowId,null)>0;
 }
}
概述:创建一个辅助类来封装访问数据的复杂性(即方法)
用到的类:
SQLiteDatabase
SQLiteOpenHelper
ContentValues
Cursor
用到的方法:
onUpgrade
(
SQLiteDatabase
db
,
int
oldVersion
,
int
newVersion
)
getWritableDatabase
()
close
()
put
(
KEY_NAME
,
name
)
insert
(
DATABASE_TABLE
,
null
,
initialValues
)
delete
(
DATABASE_TABLE
,
KEY_ROWID
+
"="
+
rowId
,
null
)
query
(
DATABASE_TABLE
,
new
String
[]{
KEY_ROWID
,
KEY_NAME
,
KEY_EMAIL
},
null
,
null
,
null
,
null
,
null
)
update
(
DATABASE_TABLE
,
args
,
KEY_ROWID
+
"="
+
rowId
,
null
)
核心:
SQLiteOpenHelper
是个安卓SQL的辅助类,用来处理数据库的创建和版本管理
,需要重写它的onCreate()和onUpgrade()方法。
onCreate()在所需数据库不存在的时候被调用来创建一个新的数据库,
onUpgrade()在数据库需要升级的时候被调用,取决于数据库的版本号码变化。(e.g. 将上面代码中的
DATABASE_VERSON从1改到2 ,再次运行程序的时候onUpgrade()就会被调用
)
编程方式使用数据库——
public class MainActivity extends Activity {
 DBAdapter dbAdapter;
 TextView textView;

 @Override
 protected void onCreate(Bundle savedInstanceState) {
 super.onCreate(savedInstanceState);
 setContentView(R.layout.activity_main);

 textView = (TextView) findViewById(R.id.showInfo);
 dbAdapter = new DBAdapter(this);

 try {
 dbAdapter.open();
 } catch (SQLException e) {
 e.printStackTrace();
 }
 long id = dbAdapter.inserContacts("Li XiaoMing","997654321@qq.com");
 id = dbAdapter.inserContacts("Bruce","lixiaoming@gmail.com");
 dbAdapter.close();

 }

 public void ShowAllcontacts(View view) {
 try {
 dbAdapter.open();
 Cursor cursor = dbAdapter.getAllContacts();
 String s = "";

 if (cursor.moveToFirst()) {
 do {
 s += "id: " + cursor.getString(0) + " Name: " + cursor.getString(1) + " Email: " + cursor.getString(2) + "\n";
 } while (cursor.moveToNext());

 textView.setText(s);
 }
 dbAdapter.close();
 } catch (SQLException e) {
 e.printStackTrace();
 }
 }

 public void ShowOneContact(View view) {

 EditText editText = (EditText) findViewById(R.id.edittext_id);
 int id = Integer.parseInt(editText.getText().toString());
 //   Toast.makeText(getBaseContext(),Integer.toString(id),Toast.LENGTH_SHORT).show();

 try {
 dbAdapter.open();
 Cursor cursor = dbAdapter.getContact(id);
 if (cursor.moveToFirst())
 textView.setText("id: " + cursor.getString(0) + " Name: " + cursor.getString(1) + " Email: " + cursor.getString(2) + "\n");
 else
 Toast.makeText(getBaseContext(), "Contact Not Found", Toast.LENGTH_SHORT).show();
 } catch (SQLException e) {
 e.printStackTrace();
 }
 dbAdapter.close();

 }

 public void UpdateContact(View view) {
 EditText editText = (EditText) findViewById(R.id.edittext_id);
 int id = Integer.parseInt(editText.getText().toString());

 try {
 dbAdapter.open();
 } catch (SQLException e) {
 e.printStackTrace();
 }
 if (dbAdapter.updateContact(id, "Charley", "12332@outook.com"))
 Toast.makeText(getBaseContext(), "update Success", Toast.LENGTH_SHORT).show();
 else
 Toast.makeText(getBaseContext(), "update failure", Toast.LENGTH_SHORT).show();
 dbAdapter.close();

 }

 public void DeleteContact(View view) {
 EditText editText = (EditText) findViewById(R.id.edittext_id);
 int id = Integer.parseInt(editText.getText().toString());

 try {
 dbAdapter.open();
 } catch (SQLException e) {
 e.printStackTrace();
 }

 if (dbAdapter.deleteContact(id))
 Toast.makeText(getBaseContext(), "Delete Success", Toast.LENGTH_SHORT).show();
 else
 Toast.makeText(getBaseContext(), "Delete failure", Toast.LENGTH_SHORT).show();

 dbAdapter.close();
 }
}
用到的类:
Cursor
DBAdapter(自定义的类)
用到的方法:
moveToFirst
()
moveToNext
()
getString
(
)
分析:使用时主要使用自定义的
DBAdapter
类进行处理数据,其中
Cursor
作为检索返回的数据的类型(类似一个数组集合)
以上的方法的数据库是在运行的时候被创建的,但有时程序可能需要使用现有的数据库或者导入预创建好的数据库。
那么,如何使用于创建好的数据库——
首先,介绍一个可以用来查看和编辑SQLite数据库的软件——sqlitebrowser——
http://https://github.com/sqlitebrowser/sqlitebrowser。
接着,简单介绍一下安卓使用的
SQLite
数据库的特殊之处:
如果在程序中创建一个DB,导出后使用进行sqlitebrowser查看——发现,有2个额外的表 android_metadata和sqlite_squence
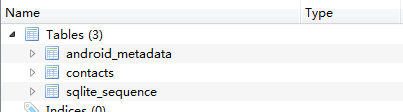
其中android_metadata用来定义使用的语言,可以删除(虽然有的博客说不行,但我亲测是可以的)

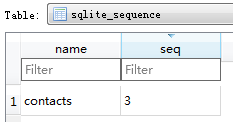
sqlite_squence似乎是来记录主要表的信息(项的数量),并且无法删除

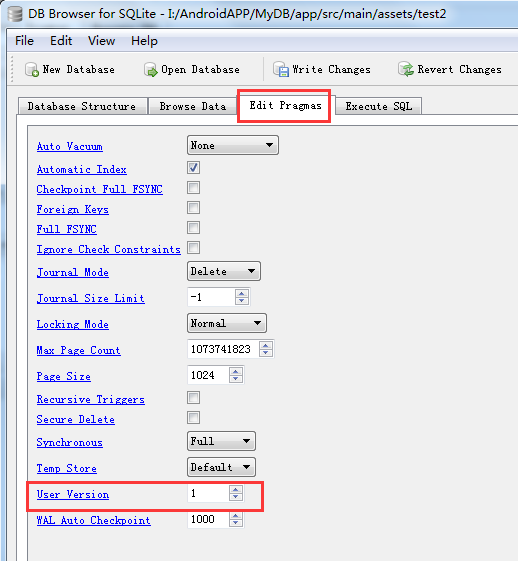
易出Bug的地方:
由
sqlitebrowser新建一个DB,会将版本默认为是0,在上面的代码中
DATABASE_VERSON
设置为1,因此如果直接导入新建的这个DB,会出现错误(程序崩溃...查了好久的bug...)
在以下的地方进行修改版本号
将DB文件放入\app\src\main\assets文件夹
代码:
protected void onCreate(Bundle savedInstanceState) {
 super.onCreate(savedInstanceState);
 setContentView(R.layout.activity_main);

 textView = (TextView) findViewById(R.id.showInfo);
 dbAdapter = new DBAdapter(this);

 try {
 String destPath = "/data/data/" + getPackageName() + "/databases";
 Toast.makeText(getBaseContext(), destPath, Toast.LENGTH_SHORT).show();
 File file = new File(destPath);
 if (!file.exists()) {
 file.mkdirs();
 file.createNewFile();
 CopyDB(getBaseContext().getAssets().open("test2"), new FileOutputStream(destPath + "/MyDB3"));
 }

 } catch (IOException e) {
 e.printStackTrace();
 }

 }


 public void CopyDB(InputStream inputStream, OutputStream outputStream) throws IOException {
 byte[] buffer = new byte[1024];
 int length;
 while ((length = inputStream.read(buffer)) > 0) {
 outputStream.write(buffer, 0, length);
 }
 Toast.makeText(getBaseContext(), "Copy Success", Toast.LENGTH_SHORT).show();
 inputStream.close();
 outputStream.close();
 }
用到的类:
File
FileOutputStream
InputStream
用到的方法:
getPackageName
()
mkdirs
()
createNewFile
()
write
(
buffer
,
0
,
length
)
分析: 将assets里的DB文件拷贝到内部存储的databases文件夹里;DB文件至多只会被拷贝一次,因为是在判断databases文件夹是否存在之后才进行拷贝,避免重复覆盖DB数据。


 1万+
1万+

 被折叠的 条评论
为什么被折叠?
被折叠的 条评论
为什么被折叠?
 到【灌水乐园】发言


